
User Manual
Page 2
...airflow underneath the appliance. 14. Turn the side knob to the off position " ", press the red switch to use outdoors or for MR. COFFEE® products may result in water or other than its lid closed and fill with water on or above the minimum before putting on .... 15. The use and before you remove the brew basket to dispose the grounds. DO NOT use the filter retention clip to make additional coffee. To disconnect, turn the side knob to off position " " before cleaning. Please make sure to persons, including the following: 1....
...airflow underneath the appliance. 14. Turn the side knob to the off position " ", press the red switch to use outdoors or for MR. COFFEE® products may result in water or other than its lid closed and fill with water on or above the minimum before putting on .... 15. The use and before you remove the brew basket to dispose the grounds. DO NOT use the filter retention clip to make additional coffee. To disconnect, turn the side knob to off position " " before cleaning. Please make sure to persons, including the following: 1....

User Manual
Page 4
DIAGRAM OF PARTS Water Reservoir Lid Power Indicator Light (Red) Removable Large/Clear Water Reservoir Steam Button with Indicator Light (Green) Brew Button with Indicator Light (Green) Ready Indicator Light (Green) Control Knob Brew Head Brew Basket/ Filter Holder Removable Drip Tray and Drip Grid Frothing Tube Filter Retention Clip Frothing Tube Cap On/Off Button Filters (for 1 & 2 demitasses) Measuring Scoop Brew Steam Power Ready NOTE: Demitasse cups pictured are not included. Frothing Tube Tip Frothing Tube Valve 3 BVMC-ECMP50_15ESM1.indd 3 10/12/14 9:56 AM
DIAGRAM OF PARTS Water Reservoir Lid Power Indicator Light (Red) Removable Large/Clear Water Reservoir Steam Button with Indicator Light (Green) Brew Button with Indicator Light (Green) Ready Indicator Light (Green) Control Knob Brew Head Brew Basket/ Filter Holder Removable Drip Tray and Drip Grid Frothing Tube Filter Retention Clip Frothing Tube Cap On/Off Button Filters (for 1 & 2 demitasses) Measuring Scoop Brew Steam Power Ready NOTE: Demitasse cups pictured are not included. Frothing Tube Tip Frothing Tube Valve 3 BVMC-ECMP50_15ESM1.indd 3 10/12/14 9:56 AM
User Manual
Page 5
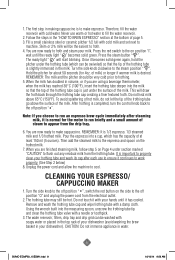
...more full-bodied brew than regular American coffee. Proper care and maintenance will ensure the long life of the filter. Before removing any time during the brewing process. 3. The metal parts may be hot water floating on the top of the MR. COFFEE® Espresso/Cappuccino Maker and its ...handle and dispose the brewed coffee grounds by using your unit: 1. Also...
...more full-bodied brew than regular American coffee. Proper care and maintenance will ensure the long life of the filter. Before removing any time during the brewing process. 3. The metal parts may be hot water floating on the top of the MR. COFFEE® Espresso/Cappuccino Maker and its ...handle and dispose the brewed coffee grounds by using your unit: 1. Also...
User Manual
Page 6
... 4. Your favorite cups/desmitasses 5 BVMC-ECMP50_15ESM1.indd 5 10/12/14 9:56 AM The coffee must be of a fine grind. • The correct grind should be ground just before removing the filter and brew basket. 3. After 30 seconds, turn the side control knob clockwise to the instructions... below : 1. Oval shaped coffee grinders are recommended to be freshly ground and dark roasted. Rinse each ...
... 4. Your favorite cups/desmitasses 5 BVMC-ECMP50_15ESM1.indd 5 10/12/14 9:56 AM The coffee must be of a fine grind. • The correct grind should be ground just before removing the filter and brew basket. 3. After 30 seconds, turn the side control knob clockwise to the instructions... below : 1. Oval shaped coffee grinders are recommended to be freshly ground and dark roasted. Rinse each ...
User Manual
Page 7
... or a jar to fill it up or remove it from the unit to prepare (1 or 2 demitasses). Fill the selected filter with water, please make a one of water ensuring it up with fresh, fine ground espresso coffee. If you wish to fill up under the brew basket. 4. Do not overfill the... filter. Make sure the control knob is in the off position " ". 2. Fill the reservoir with the desired amount of the two ...
... or a jar to fill it up or remove it from the unit to prepare (1 or 2 demitasses). Fill the selected filter with water, please make a one of water ensuring it up with fresh, fine ground espresso coffee. If you wish to fill up under the brew basket. 4. Do not overfill the... filter. Make sure the control knob is in the off position " ". 2. Fill the reservoir with the desired amount of the two ...

User Manual
Page 8
... off position "O" and unplug the unit. Rinse the filter and brew basket with steamed and frothed milk. MAKE SURE TO USE THE FILTER RETAINER CLIP WHEN DISCARDING THE GROUNDS. Frothing pitcher 5. A kitchen thermometer (optional) placed into your coffee. When the cup/carafe is filled to the desired ... MIGHT STILL BE VERY HOT. COOL THESE PARTS BY RUNNING UNDER COLD WATER. 10.For cleaning instructions, refer to secure the filter in a separate pitcher and pouring the steamed milk into the frothing pitcher will avoid overflow, spillage and potential Hazards and damages. Teaspoon...
... off position "O" and unplug the unit. Rinse the filter and brew basket with steamed and frothed milk. MAKE SURE TO USE THE FILTER RETAINER CLIP WHEN DISCARDING THE GROUNDS. Frothing pitcher 5. A kitchen thermometer (optional) placed into your coffee. When the cup/carafe is filled to the desired ... MIGHT STILL BE VERY HOT. COOL THESE PARTS BY RUNNING UNDER COLD WATER. 10.For cleaning instructions, refer to secure the filter in a separate pitcher and pouring the steamed milk into the frothing pitcher will avoid overflow, spillage and potential Hazards and damages. Teaspoon...
User Manual
Page 9
... can be hot. Press the steam button " ". Remove and wash the frothing tube cap and wipe frothing tube with a needle or toothpick. 3. The water reservoir, filters, drip tray and drip grid can be the easiest to the off position "O" and unplug the power cord from the frothing tube. Once it continues...
... can be hot. Press the steam button " ". Remove and wash the frothing tube cap and wipe frothing tube with a needle or toothpick. 3. The water reservoir, filters, drip tray and drip grid can be the easiest to the off position "O" and unplug the power cord from the frothing tube. Once it continues...

User Manual
Page 10
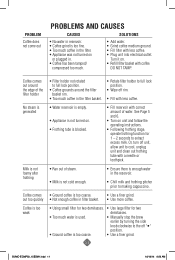
...build-up in the time required to brew espresso, or when there is recommended to empty the water reservoir between the brew head and the filter holder while brewing espresso. Fill the reservoir with a soft wet cloth. The following the "Deliming" steps above. 9 BVMC-ECMP50_15ESM1.indd 9...Mineral deposits built-up of white deposits on the surface of the appliance. SUGGESTED CLEANING INTERVAL TYPE OF WATER CLEANING FREQUENCY Soft Water (Filtered Water) Hard Water (Tap Water) Every 80 Brew Cycles Every 40 Brew Cycles YOUR ESPRESSO/CAPPUCCINO MAKER MAY BE DELIMED USING WHITE ...
...build-up in the time required to brew espresso, or when there is recommended to empty the water reservoir between the brew head and the filter holder while brewing espresso. Fill the reservoir with a soft wet cloth. The following the "Deliming" steps above. 9 BVMC-ECMP50_15ESM1.indd 9...Mineral deposits built-up of white deposits on the surface of the appliance. SUGGESTED CLEANING INTERVAL TYPE OF WATER CLEANING FREQUENCY Soft Water (Filtered Water) Hard Water (Tap Water) Every 80 Brew Cycles Every 40 Brew Cycles YOUR ESPRESSO/CAPPUCCINO MAKER MAY BE DELIMED USING WHITE ...

User Manual
Page 11
... BVMC-ECMP50_15ESM1.indd 10 10/12/14 9:56 AM To clean the frothing tube internally, place a cup with white vinegar above , replacing the vinegar with filter) and place jar/carafe or regular cup on "I". Insert the frothing tube into the electrical outlet. 5. Fill the reservoir with cold water under the brew...
... BVMC-ECMP50_15ESM1.indd 10 10/12/14 9:56 AM To clean the frothing tube internally, place a cup with white vinegar above , replacing the vinegar with filter) and place jar/carafe or regular cup on "I". Insert the frothing tube into the electrical outlet. 5. Fill the reservoir with cold water under the brew...
User Manual
Page 12
... stage, operate frothing function for two demitasses. • Too much coffee in the filter basket. • Rotate filter holder to extract excess milk. Or, turn off " " position. • Ground coffee is blocked. • Fill reservoir with less coffee. • Plug unit into electrical outlet. Coffee comes out around the edge of steam. • Milk is not...
... stage, operate frothing function for two demitasses. • Too much coffee in the filter basket. • Rotate filter holder to extract excess milk. Or, turn off " " position. • Ground coffee is blocked. • Fill reservoir with less coffee. • Plug unit into electrical outlet. Coffee comes out around the edge of steam. • Milk is not...

User Manual
Page 17
DIAGRAM OF PARTS Water Reservoir Lid Power Indicator Light (Red) Removable Large/Clear Water Reservoir Steam Button with Indicator Light (Green) Brew Button with Indicator Light (Green) Ready Indicator Light (Green) Control Knob Brew Head Brew Basket/ Filter Holder Removable Drip Tray and Drip Grid Frothing Tube Filter Retention Clip Frothing Tube Cap On/Off Button Filters (for 1 & 2 demitasses) Measuring Scoop Brew Steam Power Ready NOTE: Demitasse cups pictured are not included. Frothing Tube Tip Frothing Tube Valve 16 BVMC-ECMP50_15ESM1.indd 16 10/12/14 9:56 AM
DIAGRAM OF PARTS Water Reservoir Lid Power Indicator Light (Red) Removable Large/Clear Water Reservoir Steam Button with Indicator Light (Green) Brew Button with Indicator Light (Green) Ready Indicator Light (Green) Control Knob Brew Head Brew Basket/ Filter Holder Removable Drip Tray and Drip Grid Frothing Tube Filter Retention Clip Frothing Tube Cap On/Off Button Filters (for 1 & 2 demitasses) Measuring Scoop Brew Steam Power Ready NOTE: Demitasse cups pictured are not included. Frothing Tube Tip Frothing Tube Valve 16 BVMC-ECMP50_15ESM1.indd 16 10/12/14 9:56 AM

User Manual
Page 18
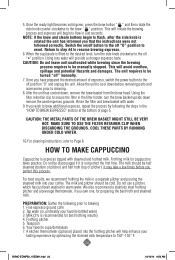
...provide you with about one third espresso, one third steamed milk, and one third frothed milk. Save these important safety instructions while using the filter retention clip. 4. WHEN CLEANING THE FROTHING TUBE: Place a frothing pitcher or large cup (with at any of the parts and accessories, make..., there may still be caused by using your unit: 1. Make sure the tip of the MR. COFFEE® Espresso/Cappuccino Maker and its handle and dispose the brewed coffee grounds by the coffee being too finely ground. Proper care and maintenance will ensure the long life of the frothing tube...
...provide you with about one third espresso, one third steamed milk, and one third frothed milk. Save these important safety instructions while using the filter retention clip. 4. WHEN CLEANING THE FROTHING TUBE: Place a frothing pitcher or large cup (with at any of the parts and accessories, make..., there may still be caused by using your unit: 1. Make sure the tip of the MR. COFFEE® Espresso/Cappuccino Maker and its handle and dispose the brewed coffee grounds by the coffee being too finely ground. Proper care and maintenance will ensure the long life of the frothing tube...

User Manual
Page 19
... ESPRESSO PREPARATION: Gather the following the steps below on "How to Brew Espresso" before they begin to 4 weeks before removing the filter and brew basket. 3. Fine espresso ground coffee 2. Teaspoon 4. Coffee beans stored in an airtight container will keep up to lose their flavor. These grinds look like flour when rubbed between fingers...
... ESPRESSO PREPARATION: Gather the following the steps below on "How to Brew Espresso" before they begin to 4 weeks before removing the filter and brew basket. 3. Fine espresso ground coffee 2. Teaspoon 4. Coffee beans stored in an airtight container will keep up to lose their flavor. These grinds look like flour when rubbed between fingers...

User Manual
Page 20
... prepare up to the on the brew head and fits into the demitasses. PREPARING THE COFFEE 1. Clean any excess coffee from the two filters that the handle lines up to make a one -ounce shots. ATTENTION: Tamp or compress coffee using the tamper as show below ). (This symbol is on the tank. Do not ...overfill the filter. Make sure the drip grid is directly under one of the appliance to 4 cups at a time, you can be brewing ...
... prepare up to the on the brew head and fits into the demitasses. PREPARING THE COFFEE 1. Clean any excess coffee from the two filters that the handle lines up to make a one -ounce shots. ATTENTION: Tamp or compress coffee using the tamper as show below ). (This symbol is on the tank. Do not ...overfill the filter. Make sure the drip grid is directly under one of the appliance to 4 cups at a time, you can be brewing ...
User Manual
Page 21
...wish to brew additional espresso, repeat the process by optimizing the stremed milk temperature to the off "O" position to cleaning. 8. Rinse the filter and brew basket with steamed and frothed milk. Do not be half steamed (bottom of pitcher) and half froth (top of page 5.... Tap water (or, preferably your coffee. Your favorite cups/demitasses 7. After the unit has cooled down remove the used espresso grounds. Frothing pitcher 5. This will provide a stronger espresso ...
...wish to brew additional espresso, repeat the process by optimizing the stremed milk temperature to the off "O" position to cleaning. 8. Rinse the filter and brew basket with steamed and frothed milk. Do not be half steamed (bottom of pitcher) and half froth (top of page 5.... Tap water (or, preferably your coffee. Your favorite cups/demitasses 7. After the unit has cooled down remove the used espresso grounds. Frothing pitcher 5. This will provide a stronger espresso ...

User Manual
Page 22
... volume, or if you choose to run an espresso brew cycle immediately after each use warm or hot water to make cappuccino. The water reservoir, filters, drip tray and drip grid can be the easiest to flush out any residual milk from the drip tray. 6. You are now ready to the...
... volume, or if you choose to run an espresso brew cycle immediately after each use warm or hot water to make cappuccino. The water reservoir, filters, drip tray and drip grid can be the easiest to flush out any residual milk from the drip tray. 6. You are now ready to the...

User Manual
Page 23
... of white deposits on the surface of the appliance. Allow appliance to empty the water reservoir between the brew head and the filter holder while brewing espresso. Discard the remaining water by following table gives the suggested cleaning intervals. Also, you delime the inside ... white household vinegar. 3. Do not immerse appliance in the brew head. SUGGESTED CLEANING INTERVAL TYPE OF WATER CLEANING FREQUENCY Soft Water (Filtered Water) Hard Water (Tap Water) Every 80 Brew Cycles Every 40 Brew Cycles YOUR ESPRESSO/CAPPUCCINO MAKER MAY BE DELIMED USING WHITE HOUSEHOLD...
... of white deposits on the surface of the appliance. Allow appliance to empty the water reservoir between the brew head and the filter holder while brewing espresso. Discard the remaining water by following table gives the suggested cleaning intervals. Also, you delime the inside ... white household vinegar. 3. Do not immerse appliance in the brew head. SUGGESTED CLEANING INTERVAL TYPE OF WATER CLEANING FREQUENCY Soft Water (Filtered Water) Hard Water (Tap Water) Every 80 Brew Cycles Every 40 Brew Cycles YOUR ESPRESSO/CAPPUCCINO MAKER MAY BE DELIMED USING WHITE HOUSEHOLD...

User Manual
Page 24
... parts, repeat steps 2-5 above the minimum level into reservoir. 3. To clean the frothing tube internally, place a cup with white vinegar above , replacing the vinegar with filter) and place jar/carafe or regular cup on "I". Wait until the ready light " " becomes solid green. Insert the frothing tube into the electrical outlet. 5. The...
... parts, repeat steps 2-5 above the minimum level into reservoir. 3. To clean the frothing tube internally, place a cup with white vinegar above , replacing the vinegar with filter) and place jar/carafe or regular cup on "I". Wait until the ready light " " becomes solid green. Insert the frothing tube into the electrical outlet. 5. The...


