
Instruction Manual
Page 2
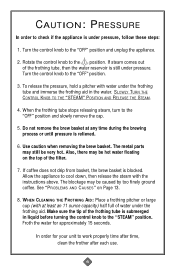
... for MR. COFFEE® products may cause hazards or injuries. 8. DO NOT remove reservoir cap or brew basket until pressure is completely relieved. Use handles or knobs. 3. Return this appliance on or near a hot gas or electric burner or in water or other than its intended use by children. 5. To protect against electric shock, do not immerse cord, plugs or machine in a heated...
... for MR. COFFEE® products may cause hazards or injuries. 8. DO NOT remove reservoir cap or brew basket until pressure is completely relieved. Use handles or knobs. 3. Return this appliance on or near a hot gas or electric burner or in water or other than its intended use by children. 5. To protect against electric shock, do not immerse cord, plugs or machine in a heated...
Instruction Manual
Page 3
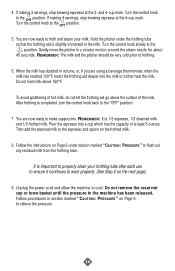
b. f. No user serviceable parts inside. Opening the bottom service cover will not drape over the countertop or tabletop where it will void the warranty. THIS UNIT IS FOR HOUS EHOLD USE ONLY SAVE THESE INSTRUCTIONS SPECIAL CORD SET INSTRUCTIONS 1. A short power supply cord is provided to reduce the hazards resulting from hot steam and water, NEVER open the reservoir cap or brew basket while your MR. COFFEE® Espresso/Cappuccino Maker and therefore...
b. f. No user serviceable parts inside. Opening the bottom service cover will not drape over the countertop or tabletop where it will void the warranty. THIS UNIT IS FOR HOUS EHOLD USE ONLY SAVE THESE INSTRUCTIONS SPECIAL CORD SET INSTRUCTIONS 1. A short power supply cord is provided to reduce the hazards resulting from hot steam and water, NEVER open the reservoir cap or brew basket while your MR. COFFEE® Espresso/Cappuccino Maker and therefore...
Instruction Manual
Page 4
... its trouble-free operation. Proper care and maintenance will ensure the long life of coffee brewing in 1.5- It is usually served in which hot water is a far richer and more full-bodied brew than regular American coffee. This unique appliance has been designed to provide you begin to safely be removed. portions, in this Instruction Manual carefully before you with about one third espresso, one third steamed milk...
... its trouble-free operation. Proper care and maintenance will ensure the long life of coffee brewing in 1.5- It is usually served in which hot water is a far richer and more full-bodied brew than regular American coffee. This unique appliance has been designed to provide you begin to safely be removed. portions, in this Instruction Manual carefully before you with about one third espresso, one third steamed milk...
Instruction Manual
Page 5
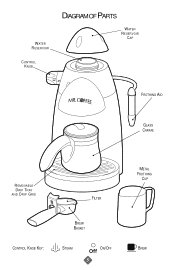
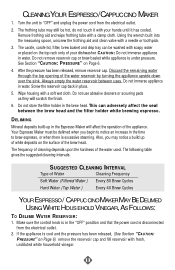
WATER RESERVOIR CONTROL KNOB DIAGRAM OF PARTS WATER RESERVOIR CAP FROTHING AID GLASS CARAFE REMOVABLE DRIP TRAY AND DRIP GRID FILTER CONTROL KNOB KEY: BREW BASKET STEAM ON/OFF 5 METAL FROTHING CUP BREW
WATER RESERVOIR CONTROL KNOB DIAGRAM OF PARTS WATER RESERVOIR CAP FROTHING AID GLASS CARAFE REMOVABLE DRIP TRAY AND DRIP GRID FILTER CONTROL KNOB KEY: BREW BASKET STEAM ON/OFF 5 METAL FROTHING CUP BREW
Instruction Manual
Page 6
... is submerged in the water. WHEN CLEANING THE FROTHING AID: Place a frothing pitcher or large cup (with the instructions above. If steam comes out of the filter. 7. When the frothing tube stops releasing steam, turn to work properly time after time, clean the frother after each use. 6 The metal parts may be hot water floating on Page 13. 8. If coffee does not drip from basket, the brew basket is still under the...
... is submerged in the water. WHEN CLEANING THE FROTHING AID: Place a frothing pitcher or large cup (with the instructions above. If steam comes out of the filter. 7. When the frothing tube stops releasing steam, turn to work properly time after time, clean the frother after each use. 6 The metal parts may be hot water floating on Page 13. 8. If coffee does not drip from basket, the brew basket is still under the...
Instruction Manual
Page 7
... water. Pre-ground coffee will keep up to 4 weeks before use a quality grinder or Burr Mill for Diagram of grinding ensures a more precise, even grind. The burr method of Parts. 1. BEFORE BREWING YOUR FIRST CARAFE OF ESPRESSO Please refer to reach any internal parts of espresso equals 2 ounces. 7 First remove and then wash the carafe, lid, filter and brew basket in a cool, dark area. Rinse each thoroughly and replace into the machine...
... water. Pre-ground coffee will keep up to 4 weeks before use a quality grinder or Burr Mill for Diagram of grinding ensures a more precise, even grind. The burr method of Parts. 1. BEFORE BREWING YOUR FIRST CARAFE OF ESPRESSO Please refer to reach any internal parts of espresso equals 2 ounces. 7 First remove and then wash the carafe, lid, filter and brew basket in a cool, dark area. Rinse each thoroughly and replace into the machine...
Instruction Manual
Page 8
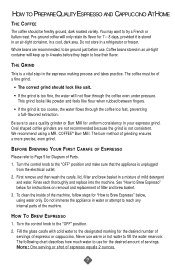
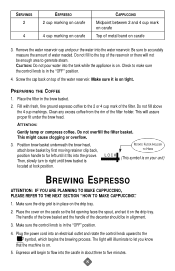
... of water needed. SERVINGS 2 4 ESPRESSO 2 cup marking on carafe 4 cup marking on carafe CAPPUCCINO Midpoint between 2 and 4 cup mark on carafe Top of metal band on top of the water reservoir. LOCK ROTATE FILTER HOLDER TO HERE (This symbol is on your unit) BREWING ESPRESSO ATTENTION: IF YOU ARE PLANNING TO MAKE CAPPUCCINO, PLEASE REFER TO THE NEXT SECTION "HOW TO MAKE CAPPUCCINO." 1. The light will begin to let you know that the machine is...
... of water needed. SERVINGS 2 4 ESPRESSO 2 cup marking on carafe 4 cup marking on carafe CAPPUCCINO Midpoint between 2 and 4 cup mark on carafe Top of metal band on top of the water reservoir. LOCK ROTATE FILTER HOLDER TO HERE (This symbol is on your unit) BREWING ESPRESSO ATTENTION: IF YOU ARE PLANNING TO MAKE CAPPUCCINO, PLEASE REFER TO THE NEXT SECTION "HOW TO MAKE CAPPUCCINO." 1. The light will begin to let you know that the machine is...
Instruction Manual
Page 9
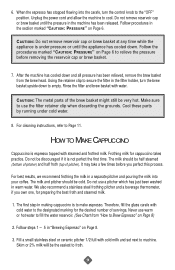
... until the pressure in warm water. For cleaning instructions, refer to the "OFF" position. Do not use warm or hot water to empty. Follow steps 1 - 5 in the filter holder, turn the control knob to Page 11. The first step in a separate pitcher and pouring the milk into the carafe, turn the brew basket upside down and all pressure has been relieved, remove the brew basket from "How to froth. 9 Follow...
... until the pressure in warm water. For cleaning instructions, refer to the "OFF" position. Do not use warm or hot water to empty. Follow steps 1 - 5 in the filter holder, turn the control knob to Page 11. The first step in a separate pitcher and pouring the milk into the carafe, turn the brew basket upside down and all pressure has been relieved, remove the brew basket from "How to froth. 9 Follow...
Instruction Manual
Page 10
.... 10 Pour the espresso into the milk to further heat the milk. Then add the steamed milk to the position. 5. Do not remove the reservoir cap or brew basket until the pressure in a circular motion around the steam nozzle for about 45 seconds. It is slightly immersed in the milk. Follow the instructions on the frothed milk. 8. and 4-cup mark. To avoid splattering of hot milk...
.... 10 Pour the espresso into the milk to further heat the milk. Then add the steamed milk to the position. 5. Do not remove the reservoir cap or brew basket until the pressure in a circular motion around the steam nozzle for about 45 seconds. It is slightly immersed in the milk. Follow the instructions on the frothed milk. 8. and 4-cup mark. To avoid splattering of hot milk...
Instruction Manual
Page 11
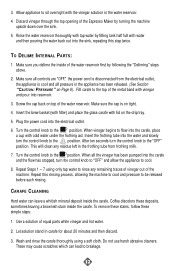
... Water (Tap Water ) Every 40 Brew Cycles YOUR ESPRESSO / CAPPUC CINO MAKER MAY BE DELIMED USING WHITE HOUS EHOLD VINEGAR, AS FOLLOWS: TO DELIME WATER RESERVOIR: 1. Turn the unit to brew espresso, or when there is disconnected from the electrical outlet. 2. Using the wrench built into the measuring spoon, unscrew the frothing aid and clean valve with your dishwasher. After the pressure has been released, remove reservoir...
... Water (Tap Water ) Every 40 Brew Cycles YOUR ESPRESSO / CAPPUC CINO MAKER MAY BE DELIMED USING WHITE HOUS EHOLD VINEGAR, AS FOLLOWS: TO DELIME WATER RESERVOIR: 1. Turn the unit to brew espresso, or when there is disconnected from the electrical outlet. 2. Using the wrench built into the measuring spoon, unscrew the frothing aid and clean valve with your dishwasher. After the pressure has been released, remove reservoir...
Instruction Manual
Page 12
... simple steps: 1. Insert the brew basket (with filter) and place the glass carafe with cold water under the frothing aid. Plug the power cord into reservoir. 3. Repeat Steps 1 - 7 using a soft cloth. TO DELIME INTERNAL PARTS: 1. Fill carafe to breakage. 12 Insert the frothing tube into the carafe, place a cup with lid on tight. 4. Turn the control knob to the position. 3. Make sure you delime the inside of the metal band...
... simple steps: 1. Insert the brew basket (with filter) and place the glass carafe with cold water under the frothing aid. Plug the power cord into reservoir. 3. Repeat Steps 1 - 7 using a soft cloth. TO DELIME INTERNAL PARTS: 1. Fill carafe to breakage. 12 Insert the frothing tube into the carafe, place a cup with lid on tight. 4. Turn the control knob to the position. 3. Make sure you delime the inside of the metal band...
Instruction Manual
Page 13
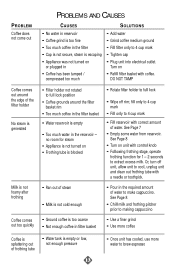
... water in filter basket • Use a finer grind • Use more coffee Coffee is splattering out of frothing tube • Water tank is empty or low, not enough pressure • Once unit has cooled, use more water to brew espresso 13 Or, turn off rim; See Page 7 • Empty some water from reservoir. fill only to 4 cup mark • Fill only to 4 cup mark • Fill reservoir with a needle or toothpick. Milk...
... water in filter basket • Use a finer grind • Use more coffee Coffee is splattering out of frothing tube • Water tank is empty or low, not enough pressure • Once unit has cooled, use more water to brew espresso 13 Or, turn off rim; See Page 7 • Empty some water from reservoir. fill only to 4 cup mark • Fill only to 4 cup mark • Fill reservoir with a needle or toothpick. Milk...
Instruction Manual
Page 14
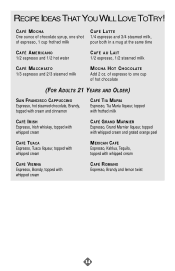
...FRANCISCO CAPPUCCINO Espresso, hot steamed chocolate, Brandy, topped with cream and cinnamon CAFÉ TIA MARIA Espresso, Tia Maria liqueur, topped with frothed milk CAFÉ IRISH Espresso, Irish whiskey, topped with whipped cream CAFÉ GRAND MARNIER Espresso,...chocolate syrup, one cup of espresso, 1 cup frothed milk CAFÉ LATTE 1/4 espresso and 3/4 steamed milk, pour both in a mug at the same time CAFÉ AMERICANO 1/2 espresso and 1/2 hot water CAFÉ AU LAIT 1/2 espresso, 1/2 steamed milk CAFÉ MACCHIATO 1/3 espresso and 2/3 steamed milk MOCHA HOT CHOCOLATE Add 2...
...FRANCISCO CAPPUCCINO Espresso, hot steamed chocolate, Brandy, topped with cream and cinnamon CAFÉ TIA MARIA Espresso, Tia Maria liqueur, topped with frothed milk CAFÉ IRISH Espresso, Irish whiskey, topped with whipped cream CAFÉ GRAND MARNIER Espresso,...chocolate syrup, one cup of espresso, 1 cup frothed milk CAFÉ LATTE 1/4 espresso and 3/4 steamed milk, pour both in a mug at the same time CAFÉ AMERICANO 1/2 espresso and 1/2 hot water CAFÉ AU LAIT 1/2 espresso, 1/2 steamed milk CAFÉ MACCHIATO 1/3 espresso and 2/3 steamed milk MOCHA HOT CHOCOLATE Add 2...
Instruction Manual
Page 15
... FOR SERVICE, CALL 1-800 MR COFFEE (1-800-672-6333) TO ASSIST US IN SERVING YOU, PLEASE HAVE THE MODEL NUMBER AND DATE OF PURCHASE AVAILABLE. All repairs must be made by SUNBEAM or by an Authorized Sunbeam Service Center. Please call us for assistance or for the location of gourmet recipes, entertaining tips and the latest information on MR. COFFEE® products...
... FOR SERVICE, CALL 1-800 MR COFFEE (1-800-672-6333) TO ASSIST US IN SERVING YOU, PLEASE HAVE THE MODEL NUMBER AND DATE OF PURCHASE AVAILABLE. All repairs must be made by SUNBEAM or by an Authorized Sunbeam Service Center. Please call us for assistance or for the location of gourmet recipes, entertaining tips and the latest information on MR. COFFEE® products...
Instruction Manual
Page 16
... value. Further, the warranty does not cover acts of purchase is limited in material and workmanship. Some states, provinces or jurisdictions do not have the right to the operating instructions, disassembly, repair or alteration by calling 1-800-672-6333. This warranty gives you specific legal rights, and you have other than Sunbeam or an Authorized Service Center. Proof of...
... value. Further, the warranty does not cover acts of purchase is limited in material and workmanship. Some states, provinces or jurisdictions do not have the right to the operating instructions, disassembly, repair or alteration by calling 1-800-672-6333. This warranty gives you specific legal rights, and you have other than Sunbeam or an Authorized Service Center. Proof of...


