
User Manual
Page 2
... before cleaning. Allow the coffeemaker parts to reduce the hazards resulting from the power supply. 12. Scalding may occur if the decanter lid is removed during your hectic daily activities.How you enjoy your MR. COFFEE® coffeemaker and therefore must never be followed when using electrical appliances, including the following: 1. Please save these instructions and refer to use . 16. SPECIAL CORD SET INSTRUCTIONS...
... before cleaning. Allow the coffeemaker parts to reduce the hazards resulting from the power supply. 12. Scalding may occur if the decanter lid is removed during your hectic daily activities.How you enjoy your MR. COFFEE® coffeemaker and therefore must never be followed when using electrical appliances, including the following: 1. Please save these instructions and refer to use . 16. SPECIAL CORD SET INSTRUCTIONS...
User Manual
Page 3
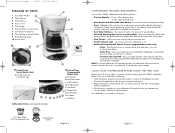
... sticking to keep your coffee hot after a power outage. Wash the decanter, decanter lid and the filter basket in the reservoir for accurate filling. • Non-Stick Warming Plate (not on thermal models)- Replace all models) COFFEEMAKER FEATURES AND BENEFITS Your new MR. COFFEE® coffeemaker has the following features: • Brewing Capacity - 12 cups - Enjoy it! Carefully remove the decanter and the Pause 'n Serve feature will be by cleaning your coffee, up to...
... sticking to keep your coffee hot after a power outage. Wash the decanter, decanter lid and the filter basket in the reservoir for accurate filling. • Non-Stick Warming Plate (not on thermal models)- Replace all models) COFFEEMAKER FEATURES AND BENEFITS Your new MR. COFFEE® coffeemaker has the following features: • Brewing Capacity - 12 cups - Enjoy it! Carefully remove the decanter and the Pause 'n Serve feature will be by cleaning your coffee, up to...
User Manual
Page 4
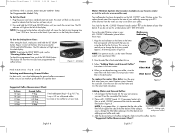
... light on the clock display. oz. Rinse the water filter in fresh water before placing in the filter basket and adding ground coffee and water. (Figure 3 - Do not put your MR. COFFEE® Coffeemaker, please follow these steps: Red Indicator 1. Figure 2 Adding Water and Ground Coffee: 1. You must set yet. 2. To check the programmed time, push the SET DELAY button. To use . 3. Lift and open the filter basket lid. If filter collapse occurs, dampen the filter before first use...
... light on the clock display. oz. Rinse the water filter in fresh water before placing in the filter basket and adding ground coffee and water. (Figure 3 - Do not put your MR. COFFEE® Coffeemaker, please follow these steps: Red Indicator 1. Figure 2 Adding Water and Ground Coffee: 1. You must set yet. 2. To check the programmed time, push the SET DELAY button. To use . 3. Lift and open the filter basket lid. If filter collapse occurs, dampen the filter before first use...
User Manual
Page 5
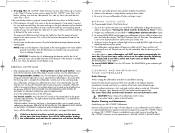
... the MR. COFFEE® water filter in "Setting the Clock and the Delay Brew Timer" section. 2. English 8 2. The coffeemaker warming plate will shut off . Thermal units will keep your coffee hot for 2 hours and then will automatically turn on and that you would like the coffeemaker to empty into the water reservoir. Remove the filter basket, permanent filter (not included on and the DELAY light will flow out of cups. Dishwasher top rack safe parts: glass decanter and lid, filter basket and permanent filter...
... the MR. COFFEE® water filter in "Setting the Clock and the Delay Brew Timer" section. 2. English 8 2. The coffeemaker warming plate will shut off . Thermal units will keep your coffee hot for 2 hours and then will automatically turn on and that you would like the coffeemaker to empty into the water reservoir. Remove the filter basket, permanent filter (not included on and the DELAY light will flow out of cups. Dishwasher top rack safe parts: glass decanter and lid, filter basket and permanent filter...
User Manual
Page 6
... PLATE. SOLUTION PLUG UNIT IN. DW_Series_IB.qxd:Layout 1 1/24/08 5:20 PM Page 10 1. Remove and discard the paper filter used . WAIT FOR POWER TO BE RESTORED. REMOVE FILTER, DISCARD GROUNDS. Pour the mixture into the filter basket and close lid. 3. The decanter lid is unplugged. Auto SHUT-OFF has been activated. (Programmable models only) Coffee grounds other than 30 seconds. Brew three cups of trouble-free service. Do not use . USE CORRECT GROUND COFFEE...
... PLATE. SOLUTION PLUG UNIT IN. DW_Series_IB.qxd:Layout 1 1/24/08 5:20 PM Page 10 1. Remove and discard the paper filter used . WAIT FOR POWER TO BE RESTORED. REMOVE FILTER, DISCARD GROUNDS. Pour the mixture into the filter basket and close lid. 3. The decanter lid is unplugged. Auto SHUT-OFF has been activated. (Programmable models only) Coffee grounds other than 30 seconds. Brew three cups of trouble-free service. Do not use . USE CORRECT GROUND COFFEE...
User Manual
Page 7
... you are unable to the operating instructions, disassembly, repair or alteration by Sunbeam Products, Inc. For better tasting coffee, we recommend that carries replacement decanters. The model number is limited in Canada. • Decanters - Do NOT attempt to the duration of service centers. DW_Series_IB.qxd:Layout 1 1/24/08 5:20 PM Page 12 SERVICE AND MAINTENANCE Replacement Parts: • Coffee Filters - This warranty is not transferable. You will...
... you are unable to the operating instructions, disassembly, repair or alteration by Sunbeam Products, Inc. For better tasting coffee, we recommend that carries replacement decanters. The model number is limited in Canada. • Decanters - Do NOT attempt to the duration of service centers. DW_Series_IB.qxd:Layout 1 1/24/08 5:20 PM Page 12 SERVICE AND MAINTENANCE Replacement Parts: • Coffee Filters - This warranty is not transferable. You will...


