
User Manual
Page 1
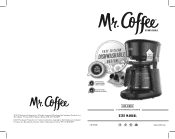
Made in China. SPR-101818-389P © 2019 Sunbeam Products, Inc. Fabricado en China. SPR 101818-389P P.N. 199440 LMX SERIES 12 CUP PROGRAMMABLE COFFEEMAKER USER MANUAL www.mrcoffee.com DISHWASHABLE DISEHASWDY EATSOSIHCGLNAEABNLE FOR BETTER TASTING COFFEE Dishwashing removes bitter coffee residue Simple to take apart & assemble © 2019 Sunbeam Products, Inc. Distribuido por Sunbeam Products, Inc. Boca Ratón, Florida, 33431. Boca Raton, Florida 33431. Distributed by Sunbeam Products, Inc. All rights reserved. Todos los derechos reservados.
Made in China. SPR-101818-389P © 2019 Sunbeam Products, Inc. Fabricado en China. SPR 101818-389P P.N. 199440 LMX SERIES 12 CUP PROGRAMMABLE COFFEEMAKER USER MANUAL www.mrcoffee.com DISHWASHABLE DISEHASWDY EATSOSIHCGLNAEABNLE FOR BETTER TASTING COFFEE Dishwashing removes bitter coffee residue Simple to take apart & assemble © 2019 Sunbeam Products, Inc. Distribuido por Sunbeam Products, Inc. Boca Ratón, Florida, 33431. Boca Raton, Florida 33431. Distributed by Sunbeam Products, Inc. All rights reserved. Todos los derechos reservados.
User Manual
Page 2
...not attempt to an Authorized Service Center for appliances with you in water or other than intended use . 15. Do not use and before cleaning the appliance. 7. Do not place on the purchase of coffee every time, so if you ! ...MR. COFFEE® Dishwashable* Coffeemaker is used by children or by the appliance manufacturer for other liquid. 4. Scalding may occur if the lid is to persons including the following: 1. Do not operate any appliance with the appliance. 6. To disconnect, turn any manner. Our number one goal is removed during use . 14. Return appliance to replace...
...not attempt to an Authorized Service Center for appliances with you in water or other than intended use . 15. Do not use and before cleaning the appliance. 7. Do not place on the purchase of coffee every time, so if you ! ...MR. COFFEE® Dishwashable* Coffeemaker is used by children or by the appliance manufacturer for other liquid. 4. Scalding may occur if the lid is to persons including the following: 1. Do not operate any appliance with the appliance. 6. To disconnect, turn any manner. Our number one goal is removed during use . 14. Return appliance to replace...
User Manual
Page 3
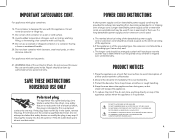
... the other abrasive material. For appliances with glass containers: 16. PRODUCT NOTICES 1. Keep the area above the appliance clear during use, as hot steam will not drape over unintentionally. DO NOT PLACE BASE IN DISHWASHER DO NOT IMMERSE BASE IN WATER OR ANY OTHER LIQUID DO NOT BREW COFFEE WITHOUT PARTS FULLY ASSEMBLED NO COLOQUE LA BASE EN EL LAVAPLATOS...
... the other abrasive material. For appliances with glass containers: 16. PRODUCT NOTICES 1. Keep the area above the appliance clear during use, as hot steam will not drape over unintentionally. DO NOT PLACE BASE IN DISHWASHER DO NOT IMMERSE BASE IN WATER OR ANY OTHER LIQUID DO NOT BREW COFFEE WITHOUT PARTS FULLY ASSEMBLED NO COLOQUE LA BASE EN EL LAVAPLATOS...
User Manual
Page 4
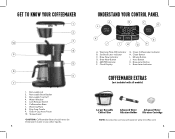
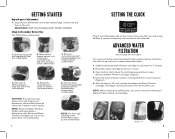
...: Accessories can be immersed in water or any other liquids. 5. GET TO KNOW YOUR COFFEEMAKER 1 2 10 3 4 9 5 8 6 7 1. Removable Lid 2. Lock Release Switch 6. Drip-Free Carafe 9. Showerhead *CAUTION: Coffeemaker Base should never be purchased on www.mrcoffee.com 6. AM/PM Indicator F. Removable Top Half 4. Minute Button J. Clock Display G. Hour Button K. Set Brew Later Indicator C. Clean Coffeemaker Indicator H. Grab-A-Cup Auto Pause 10. Coffeemaker Base 7. Clean Button I H G E F A. Removable Brew Basket 3. Water Window 5. Warming Plate 8.
...: Accessories can be immersed in water or any other liquids. 5. GET TO KNOW YOUR COFFEEMAKER 1 2 10 3 4 9 5 8 6 7 1. Removable Lid 2. Lock Release Switch 6. Drip-Free Carafe 9. Showerhead *CAUTION: Coffeemaker Base should never be purchased on www.mrcoffee.com 6. AM/PM Indicator F. Removable Top Half 4. Minute Button J. Clock Display G. Hour Button K. Set Brew Later Indicator C. Clean Coffeemaker Indicator H. Grab-A-Cup Auto Pause 10. Coffeemaker Base 7. Clean Button I H G E F A. Removable Brew Basket 3. Water Window 5. Warming Plate 8.
User Manual
Page 5
... coffeemaker and set the current time using the hour and minute buttons. 5 seconds of inactivity will set clock at mrcoffee.com. NOTE: When cleaning the coffeemaker, be sure to remove the brew basket. Move switch toward unlock icon to make coffee taste better. 1. After 30 days (or 30 uses), replace the Advanced Water Filtration cartridge. GETTING STARTED Unpack your coffeemaker and remove plastic bags, cartons and any tape on the unit. Remove lid...
... coffeemaker and set the current time using the hour and minute buttons. 5 seconds of inactivity will set clock at mrcoffee.com. NOTE: When cleaning the coffeemaker, be sure to remove the brew basket. Move switch toward unlock icon to make coffee taste better. 1. After 30 days (or 30 uses), replace the Advanced Water Filtration cartridge. GETTING STARTED Unpack your coffeemaker and remove plastic bags, cartons and any tape on the unit. Remove lid...
User Manual
Page 6
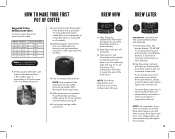
... left, use a tablespoon to brew at a later time. BREW NOW BREW LATER BREW NOW HR MIN CLEAN 1. To set desired brew time, press the Hour and Minute buttons. 5 Seconds of coffee grounds into Water Reservoir. 4. HOW TO MAKE YOUR FIRST POT OF COFFEE Suggested Coffee Measurement Chart: For best results, brew 4 or more cups of the brew cycle. NOTE: Some water will not automatically start again the next day. 10. Insert and line the Removable Filter Basket with...
... left, use a tablespoon to brew at a later time. BREW NOW BREW LATER BREW NOW HR MIN CLEAN 1. To set desired brew time, press the Hour and Minute buttons. 5 Seconds of coffee grounds into Water Reservoir. 4. HOW TO MAKE YOUR FIRST POT OF COFFEE Suggested Coffee Measurement Chart: For best results, brew 4 or more cups of the brew cycle. NOTE: Some water will not automatically start again the next day. 10. Insert and line the Removable Filter Basket with...
User Manual
Page 7
... clean water. 8. oz. / 592ml of delicious, hot coffee! Place the empty carafe back in the unit, centered on the next page for detailed instructions. Fill the water reservoir with hot water. 12. Place the empty carafe back on the coffeemaker, centered on the warming plate. 10. IMPORTANT: Remove the advanced water filtration system from the coffeemaker. 2. Press the Clean button. 6. Repeat steps 8 through 12 one more time, to brew the next pot...
... clean water. 8. oz. / 592ml of delicious, hot coffee! Place the empty carafe back in the unit, centered on the next page for detailed instructions. Fill the water reservoir with hot water. 12. Place the empty carafe back on the coffeemaker, centered on the warming plate. 10. IMPORTANT: Remove the advanced water filtration system from the coffeemaker. 2. Press the Clean button. 6. Repeat steps 8 through 12 one more time, to brew the next pot...
User Manual
Page 8
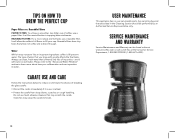
..." section to fill your coffeemaker reduces impurities in water. USER MAINTENANCE This appliance has no user serviceable parts. Water While it is 98 percent water. CARAFE USE AND CARE Follow the instructions below to reduce or eliminate the chance of coffee, use harsh abrasive cleaners that you brew with greatly affects the final taste. REUSABLE FILTERS: For a more about how your cup. Always use a reusable filter.
..." section to fill your coffeemaker reduces impurities in water. USER MAINTENANCE This appliance has no user serviceable parts. Water While it is 98 percent water. CARAFE USE AND CARE Follow the instructions below to reduce or eliminate the chance of coffee, use harsh abrasive cleaners that you brew with greatly affects the final taste. REUSABLE FILTERS: For a more about how your cup. Always use a reusable filter.


