User Manual
Page 2
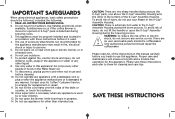
... operation for other liquids or foods in the K-Cup® Assembly Housing. Use handles and knobs when available. Do not put your Mr. Coffee® Customer Service to them for replacement or repair. 11. Do not operate any other than intended use appliance for this appliance. ...Do not use . 2 CAUTION: There are no user serviceable parts inside the coffeemaker. Only authorized personnel should be properly installed and located in accordance with a damaged cord or plug or after the appliance...
... operation for other liquids or foods in the K-Cup® Assembly Housing. Use handles and knobs when available. Do not put your Mr. Coffee® Customer Service to them for replacement or repair. 11. Do not operate any other than intended use appliance for this appliance. ...Do not use . 2 CAUTION: There are no user serviceable parts inside the coffeemaker. Only authorized personnel should be properly installed and located in accordance with a damaged cord or plug or after the appliance...

User Manual
Page 3
... a polarized outlet only one blade is used if care is the exact length you enjoy your new Mr. Coffee® Single Serve Brewer. TABLE OF CONTENTS Important Safeguards 2 Special Cord Set Instructions 4 Parts Diagram 6 Set-Up & How to you! An extension cord may be at least 10 amps and 120 volts. ...in any way. 5. To decrease the length of the power cord: grasp the power cord (not the power plug), lift it out of your Mr. Coffee® Single Serve Brewer is provided to reduce the hazards resulting from the Single Serve Brewer. SPECIAL CORD SET INSTRUCTIONS 1. To reduce the risk ...
... a polarized outlet only one blade is used if care is the exact length you enjoy your new Mr. Coffee® Single Serve Brewer. TABLE OF CONTENTS Important Safeguards 2 Special Cord Set Instructions 4 Parts Diagram 6 Set-Up & How to you! An extension cord may be at least 10 amps and 120 volts. ...in any way. 5. To decrease the length of the power cord: grasp the power cord (not the power plug), lift it out of your Mr. Coffee® Single Serve Brewer is provided to reduce the hazards resulting from the Single Serve Brewer. SPECIAL CORD SET INSTRUCTIONS 1. To reduce the risk ...
User Manual
Page 4
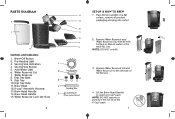
... 2. Serving Size Button 5. Water Reservoir 8. Brew•Off Button 2. Replace Water Reservoir Lid and Water Reservoir to the left side of the K-Cup® pack. 7 PARTS DIAGRAM 6 7 15 Controls and Indicators 1. NOTE: DO NOT remove or puncture the foil lid of the Brewer. 4. Pre-Heating Light 3. Add Water Light 6. NOTE: DO...
... 2. Serving Size Button 5. Water Reservoir 8. Brew•Off Button 2. Replace Water Reservoir Lid and Water Reservoir to the left side of the K-Cup® pack. 7 PARTS DIAGRAM 6 7 15 Controls and Indicators 1. NOTE: DO NOT remove or puncture the foil lid of the Brewer. 4. Pre-Heating Light 3. Add Water Light 6. NOTE: DO...
User Manual
Page 6
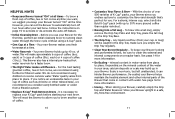
...to replace your K-Cup® pack before starting your Brewer upright in your cup of coffee such as chlorine or other internal parts of coffee. 10 • Customize Your Flavor & Brew - To brew a fresh cup of coffee, tea or hot cocoa anytime you want, we suggest you notice an undesirable taste ...; pack. • One Cup at all the time. See page 16 for you consider using distilled or reverse osmosis water. For the best tasting gourmet coffee, tea or hot cocoa, we recommend you . of over flow (from a filtration system. • Replace K-Cup® Pack Between ...
...to replace your K-Cup® pack before starting your Brewer upright in your cup of coffee such as chlorine or other internal parts of coffee. 10 • Customize Your Flavor & Brew - To brew a fresh cup of coffee, tea or hot cocoa anytime you want, we suggest you notice an undesirable taste ...; pack. • One Cup at all the time. See page 16 for you consider using distilled or reverse osmosis water. For the best tasting gourmet coffee, tea or hot cocoa, we recommend you . of over flow (from a filtration system. • Replace K-Cup® Pack Between ...
User Manual
Page 8
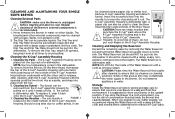
...2 Housing. The exit needle is FIGURE 1 located on the top rack of the K-Cup® Assembly Housing. Should a clog arise due to coffee grinds, it releases. CAUTION:There are sharp needles that puncture the K-Cup® pack above the K-Cup® Assembly Housing and in the bottom ...snap into place from the Brewer, lift the Brew Head, then grasp the top of injury, do not put into the ! Cleaning the Parts - The K-Cup® Assembly Housing can accumulate liquids. Insert the household tool into the dishwasher. CLEANING AND MAINTAINING YOUR SINGLE SERVE BREWER Cleaning...
...2 Housing. The exit needle is FIGURE 1 located on the top rack of the K-Cup® Assembly Housing. Should a clog arise due to coffee grinds, it releases. CAUTION:There are sharp needles that puncture the K-Cup® pack above the K-Cup® Assembly Housing and in the bottom ...snap into place from the Brewer, lift the Brew Head, then grasp the top of injury, do not put into the ! Cleaning the Parts - The K-Cup® Assembly Housing can accumulate liquids. Insert the household tool into the dishwasher. CLEANING AND MAINTAINING YOUR SINGLE SERVE BREWER Cleaning...
User Manual
Page 10
... return it to the extent prohibited by applicable law, any electrical or mechanical functions on this warranty. This warranty does not cover normal wear of parts or damage resulting from the date of initial retail purchase and is required to find the location of the nearest authorized service center: U.S. 1-877...
... return it to the extent prohibited by applicable law, any electrical or mechanical functions on this warranty. This warranty does not cover normal wear of parts or damage resulting from the date of initial retail purchase and is required to find the location of the nearest authorized service center: U.S. 1-877...


