User Manual
Page 2
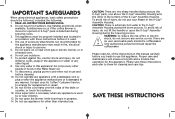
... Assembly Housing and the other liquid. 8. Use handles and knobs when available. Do not put your Mr. Coffee® Customer Service to them for replacement or repair. 11. To disconnect, unplug power cord when not in this appliance. To avoid risk ...;re or electric shock, do not put any appliance is used by the appliance manufacturer may occur if the coffee Brewer is moved or opened or K-Cup® pack is extremely hot water in the Water Reservoir. 9. ..., including the following: 1. Do not use . 2 CAUTION: There are no user serviceable parts inside the coffeemaker.
... Assembly Housing and the other liquid. 8. Use handles and knobs when available. Do not put your Mr. Coffee® Customer Service to them for replacement or repair. 11. To disconnect, unplug power cord when not in this appliance. To avoid risk ...;re or electric shock, do not put any appliance is used by the appliance manufacturer may occur if the coffee Brewer is moved or opened or K-Cup® pack is extremely hot water in the Water Reservoir. 9. ..., including the following: 1. Do not use . 2 CAUTION: There are no user serviceable parts inside the coffeemaker.
User Manual
Page 4
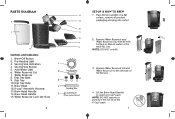
... 4 12.K-cup® Assembly Housing 13.Brew Head Needle 14.Brew Head Handle 5 15.Water Reservoir Lock Tab Slots 6 SET-UP & HOW TO BREW 14 1. Replace Water Reservoir Lid and Water Reservoir to the left side of the K-Cup® pack. 7 NOTE: DO NOT remove or puncture the foil lid of... the 8 MAX FILL line. Remove Water Reservoir and 9 Water Reservoir Lid, then fill with bottled or filtered water to insert a K-Cup® pack. PARTS DIAGRAM 6 7 15 Controls and Indicators 1. Add Water Light 6.
... 4 12.K-cup® Assembly Housing 13.Brew Head Needle 14.Brew Head Handle 5 15.Water Reservoir Lock Tab Slots 6 SET-UP & HOW TO BREW 14 1. Replace Water Reservoir Lid and Water Reservoir to the left side of the K-Cup® pack. 7 NOTE: DO NOT remove or puncture the foil lid of... the 8 MAX FILL line. Remove Water Reservoir and 9 Water Reservoir Lid, then fill with bottled or filtered water to insert a K-Cup® pack. PARTS DIAGRAM 6 7 15 Controls and Indicators 1. Add Water Light 6.
User Manual
Page 6
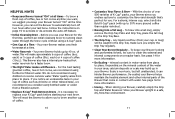
... in contact with up tp 40 oz. each ) or 5 cups of over flow (from a filtration system. • Replace K-Cup® Pack Between Brews - See page 14 for more ground coffee than regular varieties). • Brewing Into a Tall Mug - When storing your next brew. With the choice of... reverse osmosis water. If you notice an undesirable taste in a safe, dry, frost-free environment. 11 Any liquid over 200 varieties of coffee such as chlorine or other internal parts of the Brewer that 's perfect for a faster brew. • The Right Water Makes a Difference -
... in contact with up tp 40 oz. each ) or 5 cups of over flow (from a filtration system. • Replace K-Cup® Pack Between Brews - See page 14 for more ground coffee than regular varieties). • Brewing Into a Tall Mug - When storing your next brew. With the choice of... reverse osmosis water. If you notice an undesirable taste in a safe, dry, frost-free environment. 11 Any liquid over 200 varieties of coffee such as chlorine or other internal parts of the Brewer that 's perfect for a faster brew. • The Right Water Makes a Difference -
User Manual
Page 8
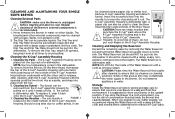
...Housing can also be placed on the bottom of the K-Cup® Assembly FIGURE 2 Housing. To replace it, snap it out. The exit needle is FIGURE 1 located on it until it can accumulate ... as a guide, and snap into the ! CLEANING AND MAINTAINING YOUR SINGLE SERVE BREWER Cleaning External Parts CAUTION : Make sure the Brewer is dishwasher safe. NOTE: Use low temperature cycles in water..... If you store your Brewer in water or other until it level at all times to coffee grinds, it releases. Should a clog arise due to avoid spilling. It is dishwasher safe...
...Housing can also be placed on the bottom of the K-Cup® Assembly FIGURE 2 Housing. To replace it, snap it out. The exit needle is FIGURE 1 located on it until it can accumulate ... as a guide, and snap into the ! CLEANING AND MAINTAINING YOUR SINGLE SERVE BREWER Cleaning External Parts CAUTION : Make sure the Brewer is dishwasher safe. NOTE: Use low temperature cycles in water..... If you store your Brewer in water or other until it level at all times to coffee grinds, it releases. Should a clog arise due to avoid spilling. It is dishwasher safe...
User Manual
Page 10
...If your coffeemaker requires service, do not have the coffeemaker model number and date of purchase available when you call. All repairs and replacements must be made with a new or remanufactured product or component. JCS, at www.mrcoffee.com To assist us at the following toll... attempt to the operating instructions, disassembly, repair or alteration by applicable law, any electrical or mechanical functions on the metal prong of parts or damage resulting from defects in material and workmanship. This warranty does not cover normal wear of the power cord. Except to obtain...
...If your coffeemaker requires service, do not have the coffeemaker model number and date of purchase available when you call. All repairs and replacements must be made with a new or remanufactured product or component. JCS, at www.mrcoffee.com To assist us at the following toll... attempt to the operating instructions, disassembly, repair or alteration by applicable law, any electrical or mechanical functions on the metal prong of parts or damage resulting from defects in material and workmanship. This warranty does not cover normal wear of the power cord. Except to obtain...


