
User Manual
Page 1
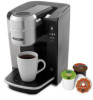
Todos los derechos reservados. es una subsidiaria de Jarden Corporation (NYSE:JAH). doing business as Jarden Consumer Solutions. Distributed by Sunbeam Products, Inc. Sunbeam Products, Inc.is a subsidiary of Keurig, Incorporated used under license. © 2012 Sunbeam Products, Inc. A BVMC-KG6_12ESM1 Single Serve Brewer / Cafetera individual BVMC-KG6 www.mrcoffee.com Keurig, the Cup and Star logo, Keurig Brewed and K-cup are trademarks or registered trademarks...
Todos los derechos reservados. es una subsidiaria de Jarden Corporation (NYSE:JAH). doing business as Jarden Consumer Solutions. Distributed by Sunbeam Products, Inc. Sunbeam Products, Inc.is a subsidiary of Keurig, Incorporated used under license. © 2012 Sunbeam Products, Inc. A BVMC-KG6_12ESM1 Single Serve Brewer / Cafetera individual BVMC-KG6 www.mrcoffee.com Keurig, the Cup and Star logo, Keurig Brewed and K-cup are trademarks or registered trademarks...
User Manual
Page 2
... risk of injury, do not remove any service covers. Only authorized personnel should be properly installed and located in accordance with a damaged cord or plug or after the appliance malfunctions or is disturbed during brewing cycles. 3. Proper care and maintenance will ensure a long life and a trouble-free operation for replacement or repair. 11. SAVE THESE INSTRUCTIONS 3 Use only water in a heated oven. 6. Please read ALL of...
... risk of injury, do not remove any service covers. Only authorized personnel should be properly installed and located in accordance with a damaged cord or plug or after the appliance malfunctions or is disturbed during brewing cycles. 3. Proper care and maintenance will ensure a long life and a trouble-free operation for replacement or repair. 11. SAVE THESE INSTRUCTIONS 3 Use only water in a heated oven. 6. Please read ALL of...

User Manual
Page 3
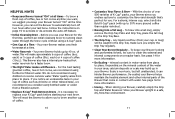
... 2 Special Cord Set Instructions 4 Parts Diagram 6 Set-Up & How to Brew 7 Helpful Hints 10 Adding Water To The Water Reservoir 12 Auto Off Timer Feature 12 Control Panel Indicator Lights 13 Cleaning and Maintaining 14 Troubleshooting 16 Service and Maintenance 18 Warranty Information 19 Welcome and congratulations on by children or tripped over accidentally. 4. How you enjoy your new Mr. Coffee® Single Serve Brewer. This appliance has a polarized plug (one way. Do not modify...
... 2 Special Cord Set Instructions 4 Parts Diagram 6 Set-Up & How to Brew 7 Helpful Hints 10 Adding Water To The Water Reservoir 12 Auto Off Timer Feature 12 Control Panel Indicator Lights 13 Cleaning and Maintaining 14 Troubleshooting 16 Service and Maintenance 18 Warranty Information 19 Welcome and congratulations on by children or tripped over accidentally. 4. How you enjoy your new Mr. Coffee® Single Serve Brewer. This appliance has a polarized plug (one way. Do not modify...
User Manual
Page 4
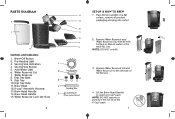
..., remove all product 13 packaging and plug into outlet. 12 11 10 2. Lift the Brew Head Handle to the 8 MAX FILL line. Serving Size Button 5. Drip Tray Base 9. PARTS DIAGRAM 6 7 15 Controls and Indicators 1. Water Reservoir 8. Remove Water Reservoir and 9 Water Reservoir Lid, then fill with bottled or filtered water to insert a K-Cup® pack. Brew•Off Button 2. Replace Water Reservoir Lid and Water Reservoir to the left side of the K-Cup® pack. 7 Add Water Light...
..., remove all product 13 packaging and plug into outlet. 12 11 10 2. Lift the Brew Head Handle to the 8 MAX FILL line. Serving Size Button 5. Drip Tray Base 9. PARTS DIAGRAM 6 7 15 Controls and Indicators 1. Water Reservoir 8. Remove Water Reservoir and 9 Water Reservoir Lid, then fill with bottled or filtered water to insert a K-Cup® pack. Brew•Off Button 2. Replace Water Reservoir Lid and Water Reservoir to the left side of the K-Cup® pack. 7 Add Water Light...
User Manual
Page 5
... inside the Brew Head. 6. cups. Subsequent brews will pulse to accommodate larger mugs. 9. NOTE: Drip Tray and Drip Tray Plate can be shorter as long as the water tank is filled. The Brew•Off Button will be removed to indicate that the brewing process has begun. This may take up before brewing. Close by pushing down on the Drip Tray. A light will indicate...
... inside the Brew Head. 6. cups. Subsequent brews will pulse to accommodate larger mugs. 9. NOTE: Drip Tray and Drip Tray Plate can be shorter as long as the water tank is filled. The Brew•Off Button will be removed to indicate that the brewing process has begun. This may take up before brewing. Close by pushing down on the Drip Tray. A light will indicate...
User Manual
Page 6
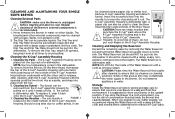
... Brewer that 's perfect for more information. • Storing - When storing your Brewer upright in the Drip Tray. HELPFUL HINTS • Keep your Brewer turned "ON" at a time. • Water Reservoir - See page 14 for you. Follow the instructions on the Drip Tray Base. • The Drip Tray - Make sure you use your Brewer for a faster brew. • The Right Water Makes a Difference - of over flow (from a filtration system. • Replace K-Cup...
... Brewer that 's perfect for more information. • Storing - When storing your Brewer upright in the Drip Tray. HELPFUL HINTS • Keep your Brewer turned "ON" at a time. • Water Reservoir - See page 14 for you. Follow the instructions on the Drip Tray Base. • The Drip Tray - Make sure you use your Brewer for a faster brew. • The Right Water Makes a Difference - of over flow (from a filtration system. • Replace K-Cup...
User Manual
Page 7
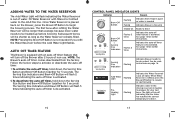
... water needs to resume or start brewing. NOTE: The Brewer's auto-off timer 6 8 10 Serving oz. Size Indicators Flashes 5 times feature is out of water. Indicates water in the internal reservoir in heating to activate or deactivate the auto-off timer. 1.To activate the auto-off timer, hold down the Serving Size Button and Brew•Off Button together for 5 seconds. See page 12 for further instructions. 6 8 10 oz. Add Water Light Flashing PreHeating Light Flashing Indicates the Water Reservoir...
... water needs to resume or start brewing. NOTE: The Brewer's auto-off timer 6 8 10 Serving oz. Size Indicators Flashes 5 times feature is out of water. Indicates water in the internal reservoir in heating to activate or deactivate the auto-off timer. 1.To activate the auto-off timer, hold down the Serving Size Button and Brew•Off Button together for 5 seconds. See page 12 for further instructions. 6 8 10 oz. Add Water Light Flashing PreHeating Light Flashing Indicates the Water Reservoir...
User Manual
Page 8
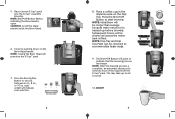
... SINGLE SERVE BREWER Cleaning External Parts CAUTION : Make sure the Brewer is dishwasher safe. To replace it, snap it out. Should a clog arise due to coffee grinds, it after cleaning to cool. A paper clip can also be used to use it can accumulate liquids. Cleaning and Emptying the Reservoir Discard the remaining water by pulling on the bottom of the K-Cup® Assembly Housing. When you prepare to clean the Brew...
... SINGLE SERVE BREWER Cleaning External Parts CAUTION : Make sure the Brewer is dishwasher safe. To replace it, snap it out. Should a clog arise due to coffee grinds, it after cleaning to cool. A paper clip can also be used to use it can accumulate liquids. Cleaning and Emptying the Reservoir Discard the remaining water by pulling on the bottom of the K-Cup® Assembly Housing. When you prepare to clean the Brew...
User Manual
Page 9
... white vinegar, place a ceramic mug on the Drip Tray Plate and perform a brew. 6. Repeat the brew cycle until the Water Reservoir is empty (with 40 ounces of trouble-free service. NOTE: the Brew•Off Button will then turn off. Lift Brew Head and replace K-Cup® pack to page 14). The exit needle may be removed. If your Brewer has been in securely. You will fl...
... white vinegar, place a ceramic mug on the Drip Tray Plate and perform a brew. 6. Repeat the brew cycle until the Water Reservoir is empty (with 40 ounces of trouble-free service. NOTE: the Brew•Off Button will then turn off. Lift Brew Head and replace K-Cup® pack to page 14). The exit needle may be removed. If your Brewer has been in securely. You will fl...
User Manual
Page 10
... following : negligent use contrary to the extent prohibited by Sunbeam or an authorized Sunbeam Service Center. Replacement will repair or replace this warranty. Further, the warranty does not cover: Acts of the problem. Doing so will be defective during the warranty period. Except to the operating instructions, disassembly, repair or alteration by anyone other than JCS or an authorized JCS service center. Model Number (The model number is required...
... following : negligent use contrary to the extent prohibited by Sunbeam or an authorized Sunbeam Service Center. Replacement will repair or replace this warranty. Further, the warranty does not cover: Acts of the problem. Doing so will be defective during the warranty period. Except to the operating instructions, disassembly, repair or alteration by anyone other than JCS or an authorized JCS service center. Model Number (The model number is required...
User Manual
Page 11
... this product, please write our Consumer Service Department. In the U.S.A., this warranty or would like to obtain warranty service, please call 1-800-667-8623 and a convenient service center address will be provided to use the product including incidental, special, consequential or similar damages or loss of profi... the above limitations or exclusion may also have any other problem or claim in connection with this warranty or would like to obtain warranty service, please call 1-877-517-6400 and a convenient service center address will be liable for any damages of any ...
... this product, please write our Consumer Service Department. In the U.S.A., this warranty or would like to obtain warranty service, please call 1-800-667-8623 and a convenient service center address will be provided to use the product including incidental, special, consequential or similar damages or loss of profi... the above limitations or exclusion may also have any other problem or claim in connection with this warranty or would like to obtain warranty service, please call 1-877-517-6400 and a convenient service center address will be liable for any damages of any ...


