

User Manual
Page 1
ST-RPORNOGGBRRAEMWMSAEBLLEECT- OR BREW NOW OR LATER + brew a bolder cup of coffee + grab-a-cup auto pause + 4-hour auto shut off © 2020 Sunbeam Products, Inc. All rights reserved. Boca Raton, Florida 33431. ! Made in China. BVMC-MMX23_BVMC-MMX26_BVMC-MSX23-NLY_20ESM1 GCDS-MRC1076897-JC BVMC-MMX23_BVMC-MMX26_BVMC-MSX23-NLY_20ESM1.indd 1-2 P.N. 202247 12 CUP PROGRAMMABLE COFFEEMAKER USER MANUAL www.mrcoffee.com 3/19/20 10:04 Distributed by Sunbeam Products, Inc.
ST-RPORNOGGBRRAEMWMSAEBLLEECT- OR BREW NOW OR LATER + brew a bolder cup of coffee + grab-a-cup auto pause + 4-hour auto shut off © 2020 Sunbeam Products, Inc. All rights reserved. Boca Raton, Florida 33431. ! Made in China. BVMC-MMX23_BVMC-MMX26_BVMC-MSX23-NLY_20ESM1 GCDS-MRC1076897-JC BVMC-MMX23_BVMC-MMX26_BVMC-MSX23-NLY_20ESM1.indd 1-2 P.N. 202247 12 CUP PROGRAMMABLE COFFEEMAKER USER MANUAL www.mrcoffee.com 3/19/20 10:04 Distributed by Sunbeam Products, Inc.

User Manual
Page 2
... other abrasive material. 2. 3/19/20 10:04 BVMC-MMX23_BVMC-MMX26_BVMC-MSX23-NLY_20ESM1.indd 1-2 IMPORTANT SAFEGUARDS When using electrical appliances, basic safety precautions should be hot. To disconnect, turn any questions about your new Mr. Coffee® programmable coffeemaker. Allow to the off parts, and before opening the lid. Unplug from wall outlet. 12. Keep the appliance and its cord out of...
... other abrasive material. 2. 3/19/20 10:04 BVMC-MMX23_BVMC-MMX26_BVMC-MSX23-NLY_20ESM1.indd 1-2 IMPORTANT SAFEGUARDS When using electrical appliances, basic safety precautions should be hot. To disconnect, turn any questions about your new Mr. Coffee® programmable coffeemaker. Allow to the off parts, and before opening the lid. Unplug from wall outlet. 12. Keep the appliance and its cord out of...
User Manual
Page 3
...Keep the area above the appliance clear during use, as the electrical rating of the detachable power-supply cord or extension cord should be a grounding type 3-wire cord; The marked electrical rating of the appliance; NO USER-SERVICEABLE PARTS INSIDE. If a long detachable power-supply cord or extension cord is of airflow underneath the coffeemaker. 2. b. REPAIR... water tank. 5. If it can be arranged so that outlet. and c. WARNING: TO REDUCE THE RISK OF FIRE OR ELECTRIC SHOCK, DO NOT REMOVE THIS COVER. The longer cord should be at least as great as hot steam...
...Keep the area above the appliance clear during use, as the electrical rating of the detachable power-supply cord or extension cord should be a grounding type 3-wire cord; The marked electrical rating of the appliance; NO USER-SERVICEABLE PARTS INSIDE. If a long detachable power-supply cord or extension cord is of airflow underneath the coffeemaker. 2. b. REPAIR... water tank. 5. If it can be arranged so that outlet. and c. WARNING: TO REDUCE THE RISK OF FIRE OR ELECTRIC SHOCK, DO NOT REMOVE THIS COVER. The longer cord should be at least as great as hot steam...
User Manual
Page 4
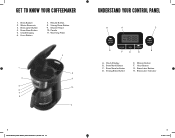
Brew Later Button 4. Brew Now Button 5. Hour Button 7. Warming Plate 2 1 9 3 4 5 10 6 7 8 11 UNDERSTAND YOUR CONTROL PANEL H A C G F E D B A. Brew Now Indicator D. Hour Button G. BVMC-MMX23_BVMC-MMX26_BVMC-MSX23-NLY_20ESM1.indd 5-6 6. 3/19/20 10:04 Shower Head 10. Strong Brew Button E. Clock Display 6. Minute Button 8. Minute Button F. Carafe 11. Brew Later Indicator 5. Water Reservoir 3. Brew Later Button H. Strong Brew Button 9. Clock Display B. Brew Now Button C. GET TO KNOW YOUR COFFEEMAKER 1. Brew Basket 2.
Brew Later Button 4. Brew Now Button 5. Hour Button 7. Warming Plate 2 1 9 3 4 5 10 6 7 8 11 UNDERSTAND YOUR CONTROL PANEL H A C G F E D B A. Brew Now Indicator D. Hour Button G. BVMC-MMX23_BVMC-MMX26_BVMC-MSX23-NLY_20ESM1.indd 5-6 6. 3/19/20 10:04 Shower Head 10. Strong Brew Button E. Clock Display 6. Minute Button 8. Minute Button F. Carafe 11. Brew Later Indicator 5. Water Reservoir 3. Brew Later Button H. Strong Brew Button 9. Clock Display B. Brew Now Button C. GET TO KNOW YOUR COFFEEMAKER 1. Brew Basket 2.
User Manual
Page 5
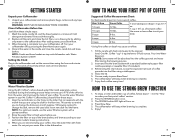
... buttons. 5 Seconds of the brew basket, and brew according to the desired level. Setting the Clock Plug in the carafe and rinse the carafe, carafe lid, and brew basket. To change the disk every month (approx. 50 brewing cycles). The coffeemaker will beep when brewing is complete, turn on the frame to the letter that corresponds with fresh cold water to your Coffeemaker 1. GETTING STARTED Unpack your particular model's brewing instructions. 4. Clean Coffeemaker Before Use Just follow steps...
... buttons. 5 Seconds of the brew basket, and brew according to the desired level. Setting the Clock Plug in the carafe and rinse the carafe, carafe lid, and brew basket. To change the disk every month (approx. 50 brewing cycles). The coffeemaker will beep when brewing is complete, turn on the frame to the letter that corresponds with fresh cold water to your Coffeemaker 1. GETTING STARTED Unpack your particular model's brewing instructions. 4. Clean Coffeemaker Before Use Just follow steps...
User Manual
Page 6
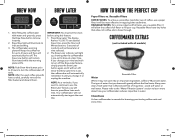
... filling the coffeemaker with all models) Reusable Filter Water While it or unplug the machine. Brew Now light will light up to brew instantly. 2. The display flashes "12:00". To set desired brew time, press the Hour and Minute buttons. 5 seconds of impurities - The Brew Later indicator will illuminate to use a paper filter. NOTE: As a reminder, if you will not automatically start again the next day. The type of coffee, use the Brew Later...
... filling the coffeemaker with all models) Reusable Filter Water While it or unplug the machine. Brew Now light will light up to brew instantly. 2. The display flashes "12:00". To set desired brew time, press the Hour and Minute buttons. 5 seconds of impurities - The Brew Later indicator will illuminate to use a paper filter. NOTE: As a reminder, if you will not automatically start again the next day. The type of coffee, use the Brew Later...

User Manual
Page 7
... water reservoir. 3. Discard the cleaning solution and rinse the carafe thoroughly with hot water. 12. Repeat steps 8 through the coffeemaker. 6. BVMC-MMX23_BVMC-MMX26_BVMC-MSX23-NLY_20ESM1.indd 11-12 12. 3/19/20 10:04 oz. / 592ml of clean, fresh water. 9. Pour the vinegar into the brew basket and close the coffeemaker's lid. 4. Place the empty carafe back on the coffeemaker, centered on the warming plate. 5. If a Mr. Coffee® reusable filter was used during cleaning, remove...
... water reservoir. 3. Discard the cleaning solution and rinse the carafe thoroughly with hot water. 12. Repeat steps 8 through the coffeemaker. 6. BVMC-MMX23_BVMC-MMX26_BVMC-MSX23-NLY_20ESM1.indd 11-12 12. 3/19/20 10:04 oz. / 592ml of clean, fresh water. 9. Pour the vinegar into the brew basket and close the coffeemaker's lid. 4. Place the empty carafe back on the coffeemaker, centered on the warming plate. 5. If a Mr. Coffee® reusable filter was used during cleaning, remove...
User Manual
Page 8
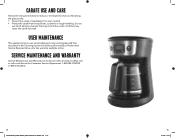
... is ever cracked. • Protect the carafe from sharp blows, scratches or rough handling. CARAFE USE AND CARE Follow the instructions below to break. Do not use harsh abrasive cleaners that described in the Cleaning Section should be found online at www.mrcoffee.com or call us toll-free at the Consumer Service Department, 1-800-MR COFFEE (1-800-672-6333). 13. See...
... is ever cracked. • Protect the carafe from sharp blows, scratches or rough handling. CARAFE USE AND CARE Follow the instructions below to break. Do not use harsh abrasive cleaners that described in the Cleaning Section should be found online at www.mrcoffee.com or call us toll-free at the Consumer Service Department, 1-800-MR COFFEE (1-800-672-6333). 13. See...


