
User Guide
Page 1
User's Guide Digital Video Baby Monitor Models: MBP25, MBP25/2, MBP25/3, MBP25/4 The features described in this User's Guide are subject to modifications without prior notice.
User's Guide Digital Video Baby Monitor Models: MBP25, MBP25/2, MBP25/3, MBP25/4 The features described in this User's Guide are subject to modifications without prior notice.
User Guide
Page 2
... in another location. Please retain your original dated sales receipt for your new Motorola Digital Video Baby Monitor! Registration is not required for purchasing the Baby Monitor. Thank you can use the baby monitor, we recommend you insert and fully charge the battery in their playroom. Please...supply to carry it continues to another room or you for warranty coverage. to confirm warranty status. For warranty service of your Motorola product, you with power adapter units. Welcome... For product related questions, please call: US and Canada 1-888-331-3383 Email:...
... in another location. Please retain your original dated sales receipt for your new Motorola Digital Video Baby Monitor! Registration is not required for purchasing the Baby Monitor. Thank you can use the baby monitor, we recommend you insert and fully charge the battery in their playroom. Please...supply to carry it continues to another room or you for warranty coverage. to confirm warranty status. For warranty service of your Motorola product, you with power adapter units. Welcome... For product related questions, please call: US and Canada 1-888-331-3383 Email:...
User Guide
Page 3
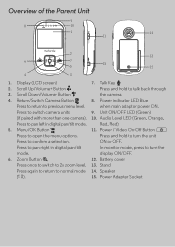
... of the Parent Unit 9 8 10 1 14 11 POWER 2 13 6 7 15 5 12 4 3 1. Scroll Up/Volume+ Button Press and hold to turn the mode. Power / Video On-Off Button P Press to talk back through 3. Press to pan right in digital pan/tilt mode. Power Adapter Socket Return/Switch Camera Button 8. Power... menu options. Button the camera. 4. display ON/OFF. 6. Audio Level LED (Green, Orange, Press to pan left in digital pan/tilt In monitor mode, press to previous menu level. Menu/OK Button 11. Talk Key 2. Scroll Down/Volume- Display (LCD screen) 7.
... of the Parent Unit 9 8 10 1 14 11 POWER 2 13 6 7 15 5 12 4 3 1. Scroll Up/Volume+ Button Press and hold to turn the mode. Power / Video On-Off Button P Press to talk back through 3. Press to pan right in digital pan/tilt mode. Power Adapter Socket Return/Switch Camera Button 8. Power... menu options. Button the camera. 4. display ON/OFF. 6. Audio Level LED (Green, Orange, Press to pan left in digital pan/tilt In monitor mode, press to previous menu level. Menu/OK Button 11. Talk Key 2. Scroll Down/Volume- Display (LCD screen) 7.
User Guide
Page 5
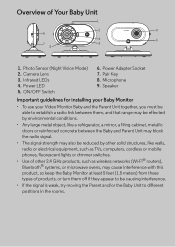
... Infrared LEDs 4. Pair Key 8. Power LED 5. ON/OFF Switch 6. Microphone 9. Power Adapter Socket 7. Speaker Important guidelines for installing your Baby Monitor • To use your Video Monitor Baby and the Parent Unit together, you must be able to different positions in the rooms. Photo Sensor (Night Vision Mode) 2. Overview of ... networks (Wi-Fi® routers), Bluetooth® systems, or microwave ovens, may cause interference with this product, so keep the Baby Monitor at least 5 feet (1.5 meters) from these types of Your Baby Unit 1 2 9 5 4 6 7 3 8 1.
... Infrared LEDs 4. Pair Key 8. Power LED 5. ON/OFF Switch 6. Microphone 9. Power Adapter Socket 7. Speaker Important guidelines for installing your Baby Monitor • To use your Video Monitor Baby and the Parent Unit together, you must be able to different positions in the rooms. Photo Sensor (Night Vision Mode) 2. Overview of ... networks (Wi-Fi® routers), Bluetooth® systems, or microwave ovens, may cause interference with this product, so keep the Baby Monitor at least 5 feet (1.5 meters) from these types of Your Baby Unit 1 2 9 5 4 6 7 3 8 1.
User Guide
Page 6
... 16 4.5.2 View a camera 16 4.5.3 Delete a camera 17 4.5.4 Scan the cameras 17 5. General Information 22 6 Table of contents 1. Table of contents Cleaning 19 7. Using the Baby Monitor 14 3.1 Setting up 14 3.2 Night Vision Mode 14 3.3 Video ON/OFF 14 3.4 Talk Mode 14 4. Disposal of The Device (environment 18 6. Help...20 8.
... 16 4.5.2 View a camera 16 4.5.3 Delete a camera 17 4.5.4 Scan the cameras 17 5. General Information 22 6 Table of contents 1. Table of contents Cleaning 19 7. Using the Baby Monitor 14 3.1 Setting up 14 3.2 Night Vision Mode 14 3.3 Video ON/OFF 14 3.4 Talk Mode 14 4. Disposal of The Device (environment 18 6. Help...20 8.
User Guide
Page 13
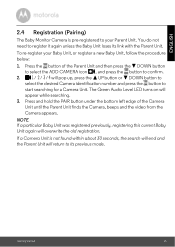
... Unit. If a Camera Unit is pre-registered to your Baby Unit, or register a new Baby Unit, follow the procedure below: 1. ENGLISH 2.4 Registration (Pairing) The Baby Monitor Camera is not found within about 30 seconds, the search will end and the Parent Unit will pop up, press the + UP button or - Press... press the - To re-register your Parent Unit. Press the button of the Camera Unit until the Parent Unit finds the Camera, beeps and the video from the Camera appears.
... Unit. If a Camera Unit is pre-registered to your Baby Unit, or register a new Baby Unit, follow the procedure below: 1. ENGLISH 2.4 Registration (Pairing) The Baby Monitor Camera is not found within about 30 seconds, the search will end and the Parent Unit will pop up, press the + UP button or - Press... press the - To re-register your Parent Unit. Press the button of the Camera Unit until the Parent Unit finds the Camera, beeps and the video from the Camera appears.
User Guide
Page 14
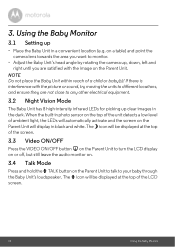
...top of the screen. 3.3 Video ON/OFF Press the VIDEO ON/OFF button V on the Parent Unit to turn the LCD display on or off, but still leave the audio monitor on. 3.4 Talk Mode ...Press and hold the T TALK button on a table) and point the camera lens towards the area you are not close to monitor...Unit to talk to your baby through the Baby Unit's loudspeaker. Using the Baby Monitor 3.1 Setting up clear images in a convenient location (e.g. The T icon will be displayed at...
...top of the screen. 3.3 Video ON/OFF Press the VIDEO ON/OFF button V on the Parent Unit to turn the LCD display on or off, but still leave the audio monitor on. 3.4 Talk Mode ...Press and hold the T TALK button on a table) and point the camera lens towards the area you are not close to monitor...Unit to talk to your baby through the Baby Unit's loudspeaker. Using the Baby Monitor 3.1 Setting up clear images in a convenient location (e.g. The T icon will be displayed at...
User Guide
Page 15
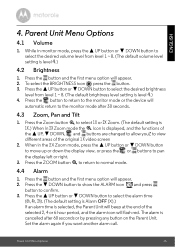
.... 3. DOWN button to select the desired volume level from level 1 ~ 8. (The default brightness level setting is displayed, and the functions of the original 1 X video screen 2. The alarm is level 4.) 4.2 Brightness 1. Parent Unit Menu Options 15 DOWN button to select the alarm time (6h, 4h, 2h). (The default setting... or right. 3. Set the alarm again if you want another alarm call. Press the + UP button or - ENGLISH 4. DOWN button to the monitor mode after 60 seconds or by pressing any button on the Parent Unit. Press the ZOOM button to return to select 1X or 2X Zoom...
.... 3. DOWN button to select the desired volume level from level 1 ~ 8. (The default brightness level setting is displayed, and the functions of the original 1 X video screen 2. The alarm is level 4.) 4.2 Brightness 1. Parent Unit Menu Options 15 DOWN button to select the alarm time (6h, 4h, 2h). (The default setting... or right. 3. Set the alarm again if you want another alarm call. Press the + UP button or - ENGLISH 4. DOWN button to the monitor mode after 60 seconds or by pressing any button on the Parent Unit. Press the ZOOM button to return to select 1X or 2X Zoom...
