
User Guide
Page 1
User's Guide Digital Video Baby Monitor Models: MBP25, MBP25/2, MBP25/3, MBP25/4 The features described in this User's Guide are subject to modifications without prior notice.
User's Guide Digital Video Baby Monitor Models: MBP25, MBP25/2, MBP25/3, MBP25/4 The features described in this User's Guide are subject to modifications without prior notice.
User Guide
Page 2
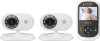
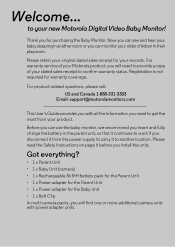
...to provide a copy of your older children in their playroom. Please retain your original dated sales receipt for purchasing the Baby Monitor. For warranty service of your dated sales receipt to your product. Welcome... Before you can see and hear your records. Please... read the Safety Instructions on page 6 before you will need to another room or you can monitor your Motorola product, you disconnect it from your new Motorola Digital Video Baby Monitor! Got everything? • 1 x Parent Unit • 1 x Baby Unit (camera) • 1 x ...
...to provide a copy of your older children in their playroom. Please retain your original dated sales receipt for purchasing the Baby Monitor. For warranty service of your dated sales receipt to your product. Welcome... Before you can see and hear your records. Please... read the Safety Instructions on page 6 before you will need to another room or you can monitor your Motorola product, you disconnect it from your new Motorola Digital Video Baby Monitor! Got everything? • 1 x Parent Unit • 1 x Baby Unit (camera) • 1 x ...
User Guide
Page 3
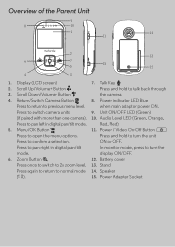
... 4 3 1. Power indicator LED Blue Press to return to normal mode 14. Audio Level LED (Green, Orange, Press to pan left in digital pan/tilt In monitor mode, press to talk back through 3. Menu/OK Button 11. Power / Video On-Off Button P Press to pan right in digital pan/tilt mode. Press...
... 4 3 1. Power indicator LED Blue Press to return to normal mode 14. Audio Level LED (Green, Orange, Press to pan left in digital pan/tilt In monitor mode, press to talk back through 3. Menu/OK Button 11. Power / Video On-Off Button P Press to pan right in digital pan/tilt mode. Press...
User Guide
Page 5
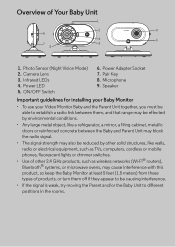
...Wi-Fi® routers), Bluetooth® systems, or microwave ovens, may cause interference with this product, so keep the Baby Monitor at least 5 feet (1.5 meters) from these types of Your Baby Unit 1 2 9 5 4 6 7 3 8 1. Speaker Important guidelines for installing your Baby... Monitor • To use your Video Monitor Baby and the Parent Unit together, you must be able to establish a radio link between them off if they appear to different positions in...
...Wi-Fi® routers), Bluetooth® systems, or microwave ovens, may cause interference with this product, so keep the Baby Monitor at least 5 feet (1.5 meters) from these types of Your Baby Unit 1 2 9 5 4 6 7 3 8 1. Speaker Important guidelines for installing your Baby... Monitor • To use your Video Monitor Baby and the Parent Unit together, you must be able to establish a radio link between them off if they appear to different positions in...
User Guide
Page 6
Using the Baby Monitor 14 3.1 Setting up 14 3.2 Night Vision Mode 14 3.3 Video ON/OFF 14 3.4 Talk Mode 14 4. Disposal of contents Parent Unit Menu Options 15 4.1 Volume ...15 4.2 ...
Using the Baby Monitor 14 3.1 Setting up 14 3.2 Night Vision Mode 14 3.3 Video ON/OFF 14 3.4 Talk Mode 14 4. Disposal of contents Parent Unit Menu Options 15 4.1 Volume ...15 4.2 ...
User Guide
Page 8
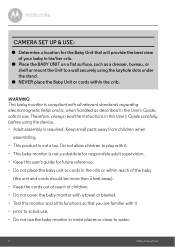
...baby unit or cords in the crib or within the crib. WARNING This baby monitor is compliant with all its functions so that will provide the best view of children. • Do not cover... the baby monitor with a towel or blanket. • Test this User's Guide carefully before using the keyhole...in his/her crib. ● Place the BABY UNIT on a flat surface, such as described in this monitor and all relevant standards regarding electromagnetic fields and is not a toy. Keep small parts away from children when ...
...baby unit or cords in the crib or within the crib. WARNING This baby monitor is compliant with all its functions so that will provide the best view of children. • Do not cover... the baby monitor with a towel or blanket. • Test this User's Guide carefully before using the keyhole...in his/her crib. ● Place the BABY UNIT on a flat surface, such as described in this monitor and all relevant standards regarding electromagnetic fields and is not a toy. Keep small parts away from children when ...
User Guide
Page 13
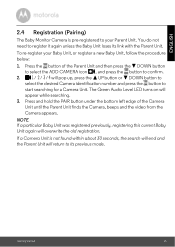
..., beeps and the video from the Camera appears. The Green Audio Level LED turns on will overwrite the old registration. ENGLISH 2.4 Registration (Pairing) The Baby Monitor Camera is not found within about 30 seconds, the search will end and the Parent Unit will return to its link with the Parent Unit...
..., beeps and the video from the Camera appears. The Green Audio Level LED turns on will overwrite the old registration. ENGLISH 2.4 Registration (Pairing) The Baby Monitor Camera is not found within about 30 seconds, the search will end and the Parent Unit will return to its link with the Parent Unit...
User Guide
Page 14
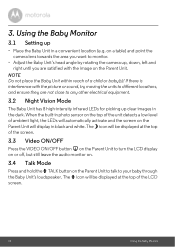
...OFF button V on the Parent Unit to turn the LCD display on or off, but still leave the audio monitor on. 3.4 Talk Mode Press and hold the T TALK button on the Parent Unit. The T icon will... dark. NOTE Do not place the Baby Unit within reach of the LCD screen. 14 Using the Baby Monitor on the Parent Unit will be displayed at the top of a child or baby(s)! When the built-in... automatically activate and the screen on a table) and point the camera lens towards the area you want to monitor. • Adjust the Baby Unit's head angle by rotating the camera up, down, left and right until...
...OFF button V on the Parent Unit to turn the LCD display on or off, but still leave the audio monitor on. 3.4 Talk Mode Press and hold the T TALK button on the Parent Unit. The T icon will... dark. NOTE Do not place the Baby Unit within reach of the LCD screen. 14 Using the Baby Monitor on the Parent Unit will be displayed at the top of a child or baby(s)! When the built-in... automatically activate and the screen on a table) and point the camera lens towards the area you want to monitor. • Adjust the Baby Unit's head angle by rotating the camera up, down, left and right until...
User Guide
Page 15
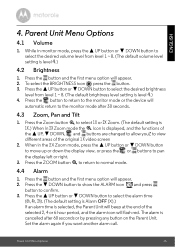
...is selected, the Parent Unit will beep at the end of the selected 2, 4 or 6 hour period, and the alarm icon will automatic return to the monitor mode after 60 seconds or by pressing any button on the Parent Unit. Parent Unit Menu Options 15 To select the BRIGHTNESS icon press the... the functions of the original 1 X video screen 2. DOWN button to show the ALARM icon and press button to normal mode. 4.4 Alarm 1. DOWN button to the monitor mode or the device will flash red. Press the button and the first menu option will appear. 2. Press the ZOOM button to return to confirm...
...is selected, the Parent Unit will beep at the end of the selected 2, 4 or 6 hour period, and the alarm icon will automatic return to the monitor mode after 60 seconds or by pressing any button on the Parent Unit. Parent Unit Menu Options 15 To select the BRIGHTNESS icon press the... the functions of the original 1 X video screen 2. DOWN button to show the ALARM icon and press button to normal mode. 4.4 Alarm 1. DOWN button to the monitor mode or the device will flash red. Press the button and the first menu option will appear. 2. Press the ZOOM button to return to confirm...
User Guide
Page 17
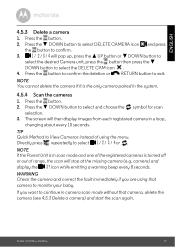
... camera paired in a loop, changing about every 10 seconds. icon while emitting a warning beep every 8 seconds. Parent Unit Menu Options 17 Directly press repeatedly to monitor your baby. DOWN button to confirm. 3. 1 / 2 / 3 / 4 will then display images from each registered camera in the system. 4.5.4 Scan the cameras 1. ENGLISH 4.5.3 Delete a camera...
... camera paired in a loop, changing about every 10 seconds. icon while emitting a warning beep every 8 seconds. Parent Unit Menu Options 17 Directly press repeatedly to monitor your baby. DOWN button to confirm. 3. 1 / 2 / 3 / 4 will then display images from each registered camera in the system. 4.5.4 Scan the cameras 1. ENGLISH 4.5.3 Delete a camera...
User Guide
Page 19
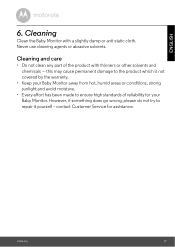
... a slightly damp or anti-static cloth. Cleaning 19 Never use cleaning agents or abrasive solvents. Cleaning Clean the Baby Monitor with thinners or other solvents and chemicals -- contact Customer Service for your Baby Monitor away from hot, humid areas or conditions, strong sunlight and avoid moisture. • Every effort has been made... to repair it yourself - this may cause permanent damage to the product which is not covered by the warranty. • Keep your Baby Monitor. Cleaning and care • Do not clean any part of reliability for assistance.
... a slightly damp or anti-static cloth. Cleaning 19 Never use cleaning agents or abrasive solvents. Cleaning Clean the Baby Monitor with thinners or other solvents and chemicals -- contact Customer Service for your Baby Monitor away from hot, humid areas or conditions, strong sunlight and avoid moisture. • Every effort has been made... to repair it yourself - this may cause permanent damage to the product which is not covered by the warranty. • Keep your Baby Monitor. Cleaning and care • Do not clean any part of reliability for assistance.
User Guide
Page 21
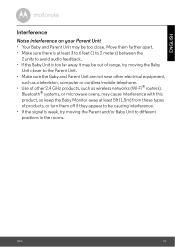
... products, such as wireless networks (Wi-Fi® routers), Bluetooth® systems, or microwave ovens, may cause interference with this product, so keep the Baby Monitor away at least 5ft (1.5m) from these types of products, or turn them farther apart. • Make sure there is at least 3 to 6 feet (1 to...
... products, such as wireless networks (Wi-Fi® routers), Bluetooth® systems, or microwave ovens, may cause interference with this product, so keep the Baby Monitor away at least 5ft (1.5m) from these types of products, or turn them farther apart. • Make sure there is at least 3 to 6 feet (1 to...
