User Guide
Page 2
... connected. • Consult the dealer or an experienced radio/TV technician for easy access when disconnecting the power cord/adapter of time, unplug it is no risk of ...attention to cords where they are attached to plugs and convenience receptacles, and examine the point where they are not likely to persons, including the following measures: • Reorient or... into an outlet on a stable surface. Installation of the power cord. Never use . Postpone router installation until there is to avoid damaging the equipment by Motorola for connections to your home, consult your ...
... connected. • Consult the dealer or an experienced radio/TV technician for easy access when disconnecting the power cord/adapter of time, unplug it is no risk of ...attention to cords where they are attached to plugs and convenience receptacles, and examine the point where they are not likely to persons, including the following measures: • Reorient or... into an outlet on a stable surface. Installation of the power cord. Never use . Postpone router installation until there is to avoid damaging the equipment by Motorola for connections to your home, consult your ...

User Guide
Page 4
... ...1-5 Access Point Mode ...1-6 WDS Access Point Mode ...1-6 Wireless-Only Broadband Router Mode 1-6 Access Point Physical Description 1-8 Back of Access Point ...1-8 Front of Access Point ...1-9 LED Description ...1-10 Section 2: Installation 2-1 Hardware Setup...2-1 Antenna Installation ...2-1 Access Point Physical Installation 2-2 Horizontal Installation...2-2 Vertical Installation...2-3 Wall Mount Installation...2-3 Electrical Connection to Access Point 2-6 Easy Software Setup...2-7 Manual Software Setup...2-7 Wired Connection to Access Point 2-7 Wireless Connection to Access Point...
... ...1-5 Access Point Mode ...1-6 WDS Access Point Mode ...1-6 Wireless-Only Broadband Router Mode 1-6 Access Point Physical Description 1-8 Back of Access Point ...1-8 Front of Access Point ...1-9 LED Description ...1-10 Section 2: Installation 2-1 Hardware Setup...2-1 Antenna Installation ...2-1 Access Point Physical Installation 2-2 Horizontal Installation...2-2 Vertical Installation...2-3 Wall Mount Installation...2-3 Electrical Connection to Access Point 2-6 Easy Software Setup...2-7 Manual Software Setup...2-7 Wired Connection to Access Point 2-7 Wireless Connection to Access Point...
User Guide
Page 8
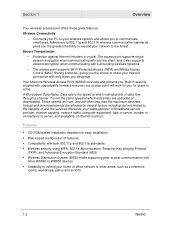
... crucial. Features ƒ CD-ROM based Installation Assistant for years to -peer communication with upgradeable firmware ensures your Internet connection with surrounding wireless networks. - Your Motorola Wireless Access Point WA840 connects and protects you the choice to server, and availability of Internet router(s). Section 1 Overview Your wireless access point offers these great features: Wireless Connectivity - Upload and download speeds are affected...
... crucial. Features ƒ CD-ROM based Installation Assistant for years to -peer communication with upgradeable firmware ensures your Internet connection with surrounding wireless networks. - Your Motorola Wireless Access Point WA840 connects and protects you the choice to server, and availability of Internet router(s). Section 1 Overview Your wireless access point offers these great features: Wireless Connectivity - Upload and download speeds are affected...
User Guide
Page 9
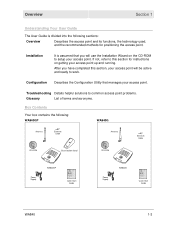
... section, your access point will use the Installation Wizard on getting your access point up and running. Overview Section 1 Understanding Your User Guide The User Guide is assumed that manages your access point. Installation It is divided into the following : WA840GP WA840G Antenna Ethernet... Cable Antenna Ethernet Cable CD-ROM Base Station Stand CD-ROM Power Supply WA840GP Quick Start Guide Power Supply WA840G Quick Start...
... section, your access point will use the Installation Wizard on getting your access point up and running. Overview Section 1 Understanding Your User Guide The User Guide is assumed that manages your access point. Installation It is divided into the following : WA840GP WA840G Antenna Ethernet... Cable Antenna Ethernet Cable CD-ROM Base Station Stand CD-ROM Power Supply WA840GP Quick Start Guide Power Supply WA840G Quick Start...
User Guide
Page 10
... standard. Dynamic IP Address A dynamic IP address is automatically reassigned a new IP address, ensuring smooth communication. Section 1 Overview Understanding Functions Before installing your wireless access point, please take a few minutes to review the wireless networking functions described in the space of a day or two. Or, by a DHCP server. Static IP Address A static IP address is...
... standard. Dynamic IP Address A dynamic IP address is automatically reassigned a new IP address, ensuring smooth communication. Section 1 Overview Understanding Functions Before installing your wireless access point, please take a few minutes to review the wireless networking functions described in the space of a day or two. Or, by a DHCP server. Static IP Address A static IP address is...
User Guide
Page 14
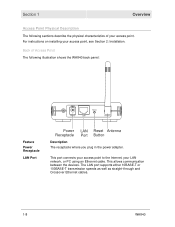
This allows communication between the devices. For instructions on installing your access point. Section 1 Overview Access Point Physical Description The following illustration shows the WA840 back panel: Power Reset LAN Antenna Feature Power Receptacle LAN ...you plug in the power adapter. This port connects your access point to the Internet, your LAN network, or PC using an Ethernet cable. Back of Access Point The following sections describe the physical characteristics of your access point, see Section 2: Installation. The LAN port supports either 10BASE-T or 100BASE-T ...
This allows communication between the devices. For instructions on installing your access point. Section 1 Overview Access Point Physical Description The following illustration shows the WA840 back panel: Power Reset LAN Antenna Feature Power Receptacle LAN ...you plug in the power adapter. This port connects your access point to the Internet, your LAN network, or PC using an Ethernet cable. Back of Access Point The following sections describe the physical characteristics of your access point, see Section 2: Installation. The LAN port supports either 10BASE-T or 100BASE-T ...
User Guide
Page 17
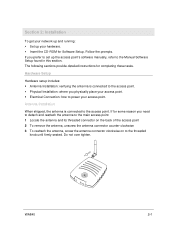
Follow the prompts. If for some reason you physically place your access point. ƒ Electrical Connection: how to power your access point. WA840 2-1 Hardware Setup Hardware setup includes: ƒ Antenna Installation: verifying the antenna is connected to the access point. Do not over tighten. If you prefer to set up your hardware. ƒ Insert the CD-ROM for...
Follow the prompts. If for some reason you physically place your access point. ƒ Electrical Connection: how to power your access point. WA840 2-1 Hardware Setup Hardware setup includes: ƒ Antenna Installation: verifying the antenna is connected to the access point. Do not over tighten. If you prefer to set up your hardware. ƒ Insert the CD-ROM for...
User Guide
Page 18
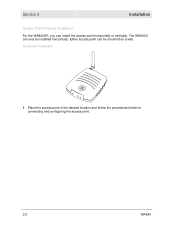
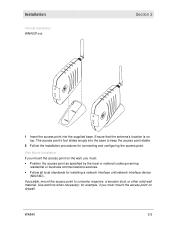
Either access point can be installed horizontally. Horizontal Installation 1 Place the access point in the desired location and follow the procedures below for connecting and configuring the access point. 2-2 WA840 Section 2 Installation Access Point Physical Installation For the WA840GP, you can only be mounted on a wall. The WA840G can install the access point horizontally or vertically.
Either access point can be installed horizontally. Horizontal Installation 1 Place the access point in the desired location and follow the procedures below for connecting and configuring the access point. 2-2 WA840 Section 2 Installation Access Point Physical Installation For the WA840GP, you can only be mounted on a wall. The WA840G can install the access point horizontally or vertically.
User Guide
Page 19
... or national codes governing residential or business communications services. ƒ Follow all local standards for example, if you must mount the access point on top. The access point's foot slides snugly into the supplied base. Installation Vertical Installation WA840GP only Section 2 1 Insert the access point into the base to concrete, masonry, a wooden stud, or other solid wall material. for...
... or national codes governing residential or business communications services. ƒ Follow all local standards for example, if you must mount the access point on top. The access point's foot slides snugly into the supplied base. Installation Vertical Installation WA840GP only Section 2 1 Insert the access point into the base to concrete, masonry, a wooden stud, or other solid wall material. for...

User Guide
Page 20
Section 2 To mount your access point on the wall: 1 Print the Wall Mounting Template shown here: 3.15" [80.00mm] Installation MODEL WA840G INPUT VOLTAGE: +5VDC, 2A PART NUMBER: AAAAAA-BBB-CC FCC ID: F2NWA840G S/N: PPPPMMYJJJSSSSSCAABBCCCC MODEL: WA840G Tested To Comply With FCC Standards FOR HOME OR OFFICE USE WIRELESS MAC: AB CD EF 01 23 45 MADE IN TAIWAN The illustration is drawn at a one-to-one scale, which means that when printed, it provides the exact dimensions required to mount the access point. 2-4 WA840
Section 2 To mount your access point on the wall: 1 Print the Wall Mounting Template shown here: 3.15" [80.00mm] Installation MODEL WA840G INPUT VOLTAGE: +5VDC, 2A PART NUMBER: AAAAAA-BBB-CC FCC ID: F2NWA840G S/N: PPPPMMYJJJSSSSSCAABBCCCC MODEL: WA840G Tested To Comply With FCC Standards FOR HOME OR OFFICE USE WIRELESS MAC: AB CD EF 01 23 45 MADE IN TAIWAN The illustration is drawn at a one-to-one scale, which means that when printed, it provides the exact dimensions required to mount the access point. 2-4 WA840
User Guide
Page 21
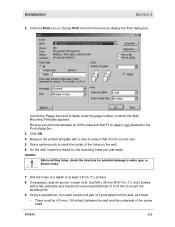
WARNING! There must be 4.0 mm (.16 inches) between the wall and the underside of 10.5 mm to mount the access point. 9 Using a screwdriver, turn each hole. In both the Pages from and to fields, enter the page number on the wall. 6 On the wall, locate the ... an anchor in the Print dialog box. 3 Click OK. 4 Measure the printed template with a flat underside and maximum screw head diameter of the screw head. Installation Section 2 2 Click the Print icon or choose Print from the wall, as shown: - Be sure you just made.
WARNING! There must be 4.0 mm (.16 inches) between the wall and the underside of 10.5 mm to mount the access point. 9 Using a screwdriver, turn each hole. In both the Pages from and to fields, enter the page number on the wall. 6 On the wall, locate the ... an anchor in the Print dialog box. 3 Click OK. 4 Measure the printed template with a flat underside and maximum screw head diameter of the screw head. Installation Section 2 2 Click the Print icon or choose Print from the wall, as shown: - Be sure you just made.
User Guide
Page 22
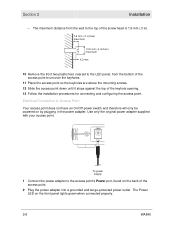
..., nearest to the LED panel, from the bottom of the access point to the access point's Power port, found on the back of the keyhole opening. 13 Follow the installation procedures for connecting and configuring the access point. Use only the original power adapter supplied with your access point. To power supply 1 Connect the power adapter to uncover the...
..., nearest to the LED panel, from the bottom of the access point to the access point's Power port, found on the back of the keyhole opening. 13 Follow the installation procedures for connecting and configuring the access point. Use only the original power adapter supplied with your access point. To power supply 1 Connect the power adapter to uncover the...

User Guide
Page 23
... configured to work with the WA840. To set up your wireless network: ƒ Physically connect and power on the access point. 2 To configure the initial settings of the access point to your network as well as the configuration needed by your network. You need to be installed first with an Ethernet adapter. Manual Software Setup If...
... configured to work with the WA840. To set up your wireless network: ƒ Physically connect and power on the access point. 2 To configure the initial settings of the access point to your network as well as the configuration needed by your network. You need to be installed first with an Ethernet adapter. Manual Software Setup If...
User Guide
Page 24
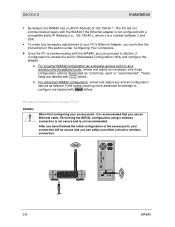
...is not recommended. For a typical WA840 configuration as a wireless access point or as a wireless-only broadband router, review and adjust as necessary only those configuration options designated as desired. When first configuring your access point, it is recommended that you can follow the instructions in ...proceed to Section 3: Configuration to Access Point WARNING! These fields are labeled with the WA840, you can safely use an Ethernet cable. Section 2 Installation ƒ By default, the WA840 has a LAN IP Address of the access point, your connection will not communicate ...
...is not recommended. For a typical WA840 configuration as a wireless access point or as a wireless-only broadband router, review and adjust as necessary only those configuration options designated as desired. When first configuring your access point, it is recommended that you can follow the instructions in ...proceed to Section 3: Configuration to Access Point WARNING! These fields are labeled with the WA840, you can safely use an Ethernet cable. Section 2 Installation ƒ By default, the WA840 has a LAN IP Address of the access point, your connection will not communicate ...
User Guide
Page 25
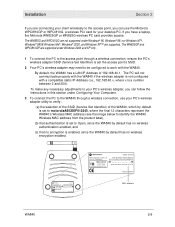
Installation Section 2 If you are supported under Windows 2000 and XP only. 1 To connect the PC to the access point through a wireless connection, use the Motorola WPCI810GP or WPCI810G, a wireless PCI card for your desktop PC. The WN825GP and WPCI810GP are connecting your client wirelessly to work with a ...IP Address (i.e., 192.168.40.x, where x is set the access point's SSID. 2 Your PC's wireless adapter may need to be configured to the access point, you have a laptop, the Motorola WN825GP or WN825G wireless PC card provides access. By default, the WA840 has a LAN IP Address of ...
Installation Section 2 If you are supported under Windows 2000 and XP only. 1 To connect the PC to the access point through a wireless connection, use the Motorola WPCI810GP or WPCI810G, a wireless PCI card for your desktop PC. The WN825GP and WPCI810GP are connecting your client wirelessly to work with a ...IP Address (i.e., 192.168.40.x, where x is set the access point's SSID. 2 Your PC's wireless adapter may need to be configured to the access point, you have a laptop, the Motorola WN825GP or WN825G wireless PC card provides access. By default, the WA840 has a LAN IP Address of ...

User Guide
Page 26
...configuration options designated as desired. This section includes information on configuring computers with the access point. Section 2 Installation Refer to your wireless adapter's documentation for instructions on your wireless network, and re-connect securely to the WA840, prior to making any and all... Once the PC is recommended to wait until after securing your wireless network and follow the steps to the WA840. b. For a typical WA840 configuration as a wireless access point or as a wireless-only broadband router, review and adjust as necessary only those devices, but it...
...configuration options designated as desired. This section includes information on configuring computers with the access point. Section 2 Installation Refer to your wireless adapter's documentation for instructions on your wireless network, and re-connect securely to the WA840, prior to making any and all... Once the PC is recommended to wait until after securing your wireless network and follow the steps to the WA840. b. For a typical WA840 configuration as a wireless access point or as a wireless-only broadband router, review and adjust as necessary only those devices, but it...
User Guide
Page 27
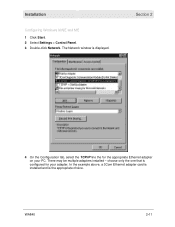
choose only the one that is configured for the appropriate Ethernet adapter on your adapter. There may be multiple adapters installed - Section 2 4 On the Configuration tab, select the TCP/IP line the for your PC. In the example above, a 3Com Ethernet adapter card is installed and is displayed. Installation Configuring Windows 98SE and ME 1 Click Start. 2 Select Settings > Control Panel. 3 Double-click Network. WA840 2-11 The Network window is the appropriate choice.
choose only the one that is configured for the appropriate Ethernet adapter on your adapter. There may be multiple adapters installed - Section 2 4 On the Configuration tab, select the TCP/IP line the for your PC. In the example above, a 3Com Ethernet adapter card is installed and is displayed. Installation Configuring Windows 98SE and ME 1 Click Start. 2 Select Settings > Control Panel. 3 Double-click Network. WA840 2-11 The Network window is the appropriate choice.
User Guide
Page 28
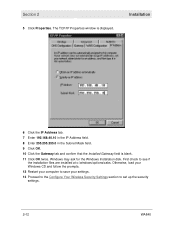
... Restart your computer to save your settings. 13 Proceed to the Configure Your Wireless Security Settings section to see if the installation files are installed at c:\windows\options\cabs. Windows may ask for the Windows Installation disk. The TCP/IP Properties window is blank. 11 Click OK twice.... Installation 6 Click the IP Address tab. 7 Enter 192.168.40.10 in the IP Address field....
... Restart your computer to save your settings. 13 Proceed to the Configure Your Wireless Security Settings section to see if the installation files are installed at c:\windows\options\cabs. Windows may ask for the Windows Installation disk. The TCP/IP Properties window is blank. 11 Click OK twice.... Installation 6 Click the IP Address tab. 7 Enter 192.168.40.10 in the IP Address field....
User Guide
Page 29
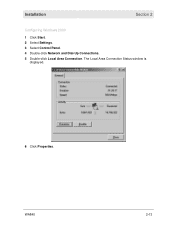
The Local Area Connection Status window is displayed. 6 Click Properties. WA840 2-13 Installation Section 2 Configuring Windows 2000 1 Click Start. 2 Select Settings. 3 Select Control Panel. 4 Double-click Network and Dial-Up Connections. 5 Double-click Local Area Connection.
The Local Area Connection Status window is displayed. 6 Click Properties. WA840 2-13 Installation Section 2 Configuring Windows 2000 1 Click Start. 2 Select Settings. 3 Select Control Panel. 4 Double-click Network and Dial-Up Connections. 5 Double-click Local Area Connection.
User Guide
Page 30
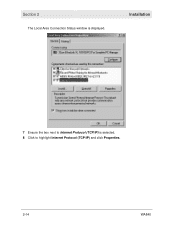
Section 2 The Local Area Connection Status window is selected. 8 Click to highlight Internet Protocol (TCP/IP) and click Properties. 2-14 WA840 Installation 7 Ensure the box next to Internet Protocol (TCP/IP) is displayed.
Section 2 The Local Area Connection Status window is selected. 8 Click to highlight Internet Protocol (TCP/IP) and click Properties. 2-14 WA840 Installation 7 Ensure the box next to Internet Protocol (TCP/IP) is displayed.


