
User Manual
Page 3
... Clip 14 Battery Information 15 Charging Your Battery 15 Wall Charger 16 Desktop Chargers 16 Rapid Charger 16 Slow Charger 17 Battery Charge Status 18 LED Indicator 18 Display 19 DTMF Keypad 20 Indicator Tones 21 Programmable Buttons 22 Menu Buttons 26 Menu Button 26 Menu Scroll Buttons 26 Navigate the Menu 26 Exit the Menu 26 Getting Started 27 Turn the Radio On or Off 27 Adjust the Volume 27...
... Clip 14 Battery Information 15 Charging Your Battery 15 Wall Charger 16 Desktop Chargers 16 Rapid Charger 16 Slow Charger 17 Battery Charge Status 18 LED Indicator 18 Display 19 DTMF Keypad 20 Indicator Tones 21 Programmable Buttons 22 Menu Buttons 26 Menu Button 26 Menu Scroll Buttons 26 Navigate the Menu 26 Exit the Menu 26 Getting Started 27 Turn the Radio On or Off 27 Adjust the Volume 27...

User Manual
Page 4
...English Repeater or Talkaround Mode 31 Revert Memory Channel (1 & 2 32 Store Memory Channel (1 & 2 32 Home Revert AutoKey (1 & 2 32 VOX Operation 32 Connecting a VOX Headset 32 Enable or Disable VOX 32 Enable/Disable Headset Sidetone 33 VOX Headset 33 Non-VOX Headset with In-Line PTT . . . .33 Keypad Lock/Unlock 34 Program PL/DPL Codes 34 Radio Calls... 42 Prioritize a Channel or Talkgroup in a Scan List 43 Phone 45 Access the Repeater 45 Receive a Phone Call 45 Disconnect a Phone Call 46 Make a Phone Call 46 Edit the Phone List 48 Add an Entry 48 Delete an Entry 49 Edit ...
...English Repeater or Talkaround Mode 31 Revert Memory Channel (1 & 2 32 Store Memory Channel (1 & 2 32 Home Revert AutoKey (1 & 2 32 VOX Operation 32 Connecting a VOX Headset 32 Enable or Disable VOX 32 Enable/Disable Headset Sidetone 33 VOX Headset 33 Non-VOX Headset with In-Line PTT . . . .33 Keypad Lock/Unlock 34 Program PL/DPL Codes 34 Radio Calls... 42 Prioritize a Channel or Talkgroup in a Scan List 43 Phone 45 Access the Repeater 45 Receive a Phone Call 45 Disconnect a Phone Call 46 Make a Phone Call 46 Edit the Phone List 48 Add an Entry 48 Delete an Entry 49 Edit ...

User Manual
Page 5
Tone Preferences 51 Tones On/Off 53 Keypad On/Off Tones 53 Call Tone Tagging (Conventional Operation Only 54 Escalert (Conventional Operation Only 54 User Settings 55 Set Squelch Level 57 Set Power Level 57 Option Board On/Off 58 Set the Lights 58 Display the Software Version 59 Warranty 61 Accessories 65 Antennas 65 Batteries 65 Carry Accessories 65 Chargers 66 Headsets 66 Surveillance Accessories 67 Ear Microphone Systems 68 Remote Speaker Microphones 68 Miscellaneous 68 3 English CONTENTS
Tone Preferences 51 Tones On/Off 53 Keypad On/Off Tones 53 Call Tone Tagging (Conventional Operation Only 54 Escalert (Conventional Operation Only 54 User Settings 55 Set Squelch Level 57 Set Power Level 57 Option Board On/Off 58 Set the Lights 58 Display the Software Version 59 Warranty 61 Accessories 65 Antennas 65 Batteries 65 Carry Accessories 65 Chargers 66 Headsets 66 Surveillance Accessories 67 Ear Microphone Systems 68 Remote Speaker Microphones 68 Miscellaneous 68 3 English CONTENTS
User Manual
Page 10
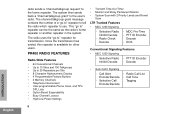
... Decode • Quik-Call II Signaling - Radio Call List - This "go to 20 Repeaters per Site • 8-Character Alphanumeric Display • 4 Programmable Feature Buttons • 2 Memory Channels • Telephone Interconnect • User-programmable Phone, Scan, and TPL/ DPL Lists • Option Board Expandability • Busy Channel Lockout • High/Low Power Settings • Transmit Time-Out Timer • Monitor...
... Decode • Quik-Call II Signaling - Radio Call List - This "go to 20 Repeaters per Site • 8-Character Alphanumeric Display • 4 Programmable Feature Buttons • 2 Memory Channels • Telephone Interconnect • User-programmable Phone, Scan, and TPL/ DPL Lists • Option Board Expandability • Busy Channel Lockout • High/Low Power Settings • Transmit Time-Out Timer • Monitor...
User Manual
Page 17
... mode you will see the LED indicator flash red. Note: Do not use to be at the same time when charging. 15 English RADIO OVERVIEW When the battery level is low and the radio is in failure of the PTT button, you will hear an alert tone. Charging a hot battery (above . BATTERY INFORMATION Charging Your Battery This radio is powered by the charger. The battery should be used with a Motorola charger. Upon release of the battery...
... mode you will see the LED indicator flash red. Note: Do not use to be at the same time when charging. 15 English RADIO OVERVIEW When the battery level is low and the radio is in failure of the PTT button, you will hear an alert tone. Charging a hot battery (above . BATTERY INFORMATION Charging Your Battery This radio is powered by the charger. The battery should be used with a Motorola charger. Upon release of the battery...

User Manual
Page 18
... expose the audio accessory connector. 3 Insert the charging adapter into the accessory connector. 4 Plug the charging adapter into an electrical outlet. LED color No LED Indication Single Green Flash Flashing Reda Steady Red Status Battery inserted incorrectly or battery not detected. Battery is not connected to 16 hours, do not charge the battery more than 10 hours. RADIO OVERVIEW English WALL CHARGER Note: Do not use the wall charger if using lithiumion (Li...
... expose the audio accessory connector. 3 Insert the charging adapter into the accessory connector. 4 Plug the charging adapter into an electrical outlet. LED color No LED Indication Single Green Flash Flashing Reda Steady Red Status Battery inserted incorrectly or battery not detected. Battery is not connected to 16 hours, do not charge the battery more than 10 hours. RADIO OVERVIEW English WALL CHARGER Note: Do not use the wall charger if using lithiumion (Li...

User Manual
Page 20
...Call Flashing Yellow Indicates receiving a Selective Call Yellow Indicates sending a Selective Call Monitor/Open Squelch Yellow While monitoring Low Battery Flashing Red Low battery level when transmitting Hold down the preprogrammed Battery Indicator button. Battery Level Full Good Fair Low Very Low Display 18 LED INDICATOR Indicates power-up, transmit, receive, scan monitor status, channel/talkgroup busy, Call Alert™ receive/transmit, Selective Call receive/ transmit, and battery status. RADIO OVERVIEW English BATTERY CHARGE STATUS You can check battery charge...
...Call Flashing Yellow Indicates receiving a Selective Call Yellow Indicates sending a Selective Call Monitor/Open Squelch Yellow While monitoring Low Battery Flashing Red Low battery level when transmitting Hold down the preprogrammed Battery Indicator button. Battery Level Full Good Fair Low Very Low Display 18 LED INDICATOR Indicates power-up, transmit, receive, scan monitor status, channel/talkgroup busy, Call Alert™ receive/transmit, Selective Call receive/ transmit, and battery status. RADIO OVERVIEW English BATTERY CHARGE STATUS You can check battery charge...
User Manual
Page 23
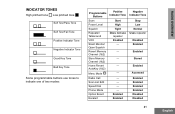
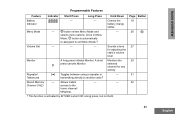
... Indicator Tone Good Key Tone Bad Key Tone Some programmable buttons use tones to indicate one of two modes: Programmable Buttons Scan Power Level Squelch Repeater/ Talkaround VOX Silent Monitor/ Open Squelch Revert Memory Channel (1&2) Store Memory Channel (1&2) Home Revert AutoKey (1&2) Menu Mode J Radio Call Scan List Edit Speed Dial Phone Mode Option Board Escalert Positive Indicator Tone Start High Tight Does not use repeater Enabled - - - - - - - - - Enabled Enabled Negative Indicator Tone Stop Low Normal Uses repeater Disabled...
... Indicator Tone Good Key Tone Bad Key Tone Some programmable buttons use tones to indicate one of two modes: Programmable Buttons Scan Power Level Squelch Repeater/ Talkaround VOX Silent Monitor/ Open Squelch Revert Memory Channel (1&2) Store Memory Channel (1&2) Home Revert AutoKey (1&2) Menu Mode J Radio Call Scan List Edit Speed Dial Phone Mode Option Board Escalert Positive Indicator Tone Start High Tight Does not use repeater Enabled - - - - - - - - - Enabled Enabled Negative Indicator Tone Stop Low Normal Uses repeater Disabled...
User Manual
Page 25
Sounds a tone for any activity. Programmable Features Feature Indicator Short Press Long Press Hold Down Battery Indicator Menu Mode - - selects menu options. Monitor A long press initiates Monitor. Repeater/ J Toggles between using a repeater or - Checks the battery charge status. - A short Monitors the C press cancels Monitor. Allows instant - - selected channel for adjusting the radio's volume level. Talkaround transmitting directly to the home channel/ talkgroup. † This...
Sounds a tone for any activity. Programmable Features Feature Indicator Short Press Long Press Hold Down Battery Indicator Menu Mode - - selects menu options. Monitor A long press initiates Monitor. Repeater/ J Toggles between using a repeater or - Checks the battery charge status. - A short Monitors the C press cancels Monitor. Allows instant - - selected channel for adjusting the radio's volume level. Talkaround transmitting directly to the home channel/ talkgroup. † This...
User Manual
Page 29
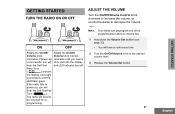
... and the LED flash green. Note: Your dealer can preprogram one of the programmable buttons to the desired volume level. 3 Release the Volume Set button. 27 English GETTING STARTED clockwise. Pass Tone ( ) and see page 23). • You will hear the Self Test Fail Tone ( ). The radio will click and both the display hear the Self-Test and LED indicator turn off. ADJUST THE VOLUME Turn the On/Off/Volume Control knob clockwise...
... and the LED flash green. Note: Your dealer can preprogram one of the programmable buttons to the desired volume level. 3 Release the Volume Set button. 27 English GETTING STARTED clockwise. Pass Tone ( ) and see page 23). • You will hear the Self Test Fail Tone ( ). The radio will click and both the display hear the Self-Test and LED indicator turn off. ADJUST THE VOLUME Turn the On/Off/Volume Control knob clockwise...
User Manual
Page 31
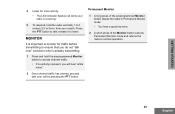
... mode. • You hear a good key tone. 2 A short press of the Monitor button cancels Permanent Monitor mode and returns the radio to talk; GETTING STARTED 4 Listen for traffic before transmitting to ensure that you do not "talk over" someone who is present, you will hear "white noise." 2 Once channel traffic has cleared, proceed with your mouth. Press the PTT button to normal operation. 29 English...
... mode. • You hear a good key tone. 2 A short press of the Monitor button cancels Permanent Monitor mode and returns the radio to talk; GETTING STARTED 4 Listen for traffic before transmitting to ensure that you do not "talk over" someone who is present, you will hear "white noise." 2 Once channel traffic has cleared, proceed with your mouth. Press the PTT button to normal operation. 29 English...

User Manual
Page 34
... at the touch of your radio and turn the radio on. Enable or Disable VOX To enable or disable VOX operation, press the preprogrammed VOX button (see page 23). Connecting a VOX Headset 1 Turn off your radio. 2 Connect the VOX accessory to store that is an LTR talkgroup, the Home Revert AutoKey feature automatically keys-up and transmits an MDC PTT...
... at the touch of your radio and turn the radio on. Enable or Disable VOX To enable or disable VOX operation, press the preprogrammed VOX button (see page 23). Connecting a VOX Headset 1 Turn off your radio. 2 Connect the VOX accessory to store that is an LTR talkgroup, the Home Revert AutoKey feature automatically keys-up and transmits an MDC PTT...
User Manual
Page 37
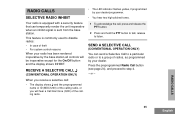
... the display shows INHIBIT. RECEIVE A SELECTIVE CALL F (CONVENTIONAL OPERATION ONLY) When you receive a selective call , press and release the PTT button. 2 Press and hold the PTT button to disable radios: • In case of the calling radio. • The LED indicator flashes yellow, if programmed by your radio has been rendered inoperative by your dealer. This feature is commonly used to talk;
... the display shows INHIBIT. RECEIVE A SELECTIVE CALL F (CONVENTIONAL OPERATION ONLY) When you receive a selective call , press and release the PTT button. 2 Press and hold the PTT button to disable radios: • In case of the calling radio. • The LED indicator flashes yellow, if programmed by your radio has been rendered inoperative by your dealer. This feature is commonly used to talk;

User Manual
Page 47
RECEIVE A PHONE CALL D When a phone call is available in one of tones, and see page 45). 45 English PHONE The phone feature is received, a ringing tone sounds, alerting you are in Phone mode. You will hear a series of three ways to enter your access/de-access code to the repeater. The de- or - 1 Select a channel/talkgroup that an access/deaccess code is sent automatically when you...
RECEIVE A PHONE CALL D When a phone call is available in one of tones, and see page 45). 45 English PHONE The phone feature is received, a ringing tone sounds, alerting you are in Phone mode. You will hear a series of three ways to enter your access/de-access code to the repeater. The de- or - 1 Select a channel/talkgroup that an access/deaccess code is sent automatically when you...

User Manual
Page 52
... setting. 10 Enter the number using the DTMF keypad. 11 J to select the entry. 12 you exit menu mode. or - or - PHONE English 11 J to confirm your selection. 12 Use the DTMF keypad to select 8 L or M until PHN LST PHN LST EDT CODE EDT CODE ACCESS - Edit Access/Deaccess Codes You can edit the access/de-access codes that are used to connect...
... setting. 10 Enter the number using the DTMF keypad. 11 J to select the entry. 12 you exit menu mode. or - or - PHONE English 11 J to confirm your selection. 12 Use the DTMF keypad to select 8 L or M until PHN LST PHN LST EDT CODE EDT CODE ACCESS - Edit Access/Deaccess Codes You can edit the access/de-access codes that are used to connect...

User Manual
Page 59
.../or background noise. until TIGHT 7 J to conserve the battery. In this feature to select UTILITY 4 L or M until NORMAL - Note: The R or S symbol appears on the display when High/Low Power Level is farther away. • Low power (R) to select the current setting. or - However, tightening squelch could cause calls from remote locations to be changed. • High power (S) allows you...
.../or background noise. until TIGHT 7 J to conserve the battery. In this feature to select UTILITY 4 L or M until NORMAL - Note: The R or S symbol appears on the display when High/Low Power Level is farther away. • Low power (R) to select the current setting. or - However, tightening squelch could cause calls from remote locations to be changed. • High power (S) allows you...

User Manual
Page 63
... between MOTOROLA and the original end user purchaser, MOTOROLA does not warrant the installation, maintenance or service of time from this warranty. 61 English WARRANTY Because each system which is extended by MOTOROLA which may use and service for a period of the Product. Unless made in material and workmanship under this warranty. Replaced parts or boards are warranted for range, coverage, or operation of MOTOROLA. All replaced parts of...
... between MOTOROLA and the original end user purchaser, MOTOROLA does not warrant the installation, maintenance or service of time from this warranty. 61 English WARRANTY Because each system which is extended by MOTOROLA which may use and service for a period of the Product. Unless made in material and workmanship under this warranty. Replaced parts or boards are warranted for range, coverage, or operation of MOTOROLA. All replaced parts of...

User Manual
Page 68
... Medium Weight Over the Head Dual Muff Headset Medium Weight Behind the Head Dual Muff Headset Medium Weight Single Speaker Headset Heavy Duty Dual Muff Headset with Noise Canceling Microphone Heavy Duty Dual Muff Racing Headset (requires RKN4090 Headset Adapter Cable) Adapter Cable for use with headset RMN4051 only 66 ACCESSORIES English RLN4815 RLN4570 1505596Z02 4280384F89 HLN9985 Universal Radio Pak Break-A-Way Chest Pack Replacement Strap for HLN6602 Universal...
... Medium Weight Over the Head Dual Muff Headset Medium Weight Behind the Head Dual Muff Headset Medium Weight Single Speaker Headset Heavy Duty Dual Muff Headset with Noise Canceling Microphone Heavy Duty Dual Muff Racing Headset (requires RKN4090 Headset Adapter Cable) Adapter Cable for use with headset RMN4051 only 66 ACCESSORIES English RLN4815 RLN4570 1505596Z02 4280384F89 HLN9985 Universal Radio Pak Break-A-Way Chest Pack Replacement Strap for HLN6602 Universal...

User Manual
Page 71
... the preprogrammed Nuisance Delete button until you hear a click and both the display and the LED indicators turn off. The LED indicator lights steady red while sending. 2. The LED indicator blinks green during scanning. 2. Adjust the Volume 1. OR - On/Off/Volume Knob Channel Selector Knob PTT Side Button 1 (Programmable) LED Indicator Microphone/ Speaker Display Side Button 2 (Programmable) Front Button P1 (Programmable) P2 P1 3 2 6 1 5 9 4 8 # 7 0 * Front Button P2 (Programmable) Menu Scroll Buttons DTMF Keypad Button Function Short Press...
... the preprogrammed Nuisance Delete button until you hear a click and both the display and the LED indicators turn off. The LED indicator lights steady red while sending. 2. The LED indicator blinks green during scanning. 2. Adjust the Volume 1. OR - On/Off/Volume Knob Channel Selector Knob PTT Side Button 1 (Programmable) LED Indicator Microphone/ Speaker Display Side Button 2 (Programmable) Front Button P1 (Programmable) P2 P1 3 2 6 1 5 9 4 8 # 7 0 * Front Button P2 (Programmable) Menu Scroll Buttons DTMF Keypad Button Function Short Press...

User Manual
Page 72
... call . 3. Phone Mode - The charge status is received, the radio displays F and the name or ID of the programmable buttons. Restore Channels/Talkgroups to listen. release to the Scan List Power off the radio then turn it on the display. Press and hold the PTT button to stop the scan. LED Indicators LED State/Color Indication Radio Call Red Transmitting Flashing Red Receiving Flashing Red Channel/Talkgroup Busy Scan Flashing Green...
... call . 3. Phone Mode - The charge status is received, the radio displays F and the name or ID of the programmable buttons. Restore Channels/Talkgroups to listen. release to the Scan List Power off the radio then turn it on the display. Press and hold the PTT button to stop the scan. LED Indicators LED State/Color Indication Radio Call Red Transmitting Flashing Red Receiving Flashing Red Channel/Talkgroup Busy Scan Flashing Green...


