
Operating and Installation manual
Page 1
US M.-Nr. 07 830 410 en - Operating and Installation Instructions Washer W 4842 To prevent accidents and appliance damage, read these instructions before installation or use.
US M.-Nr. 07 830 410 en - Operating and Installation Instructions Washer W 4842 To prevent accidents and appliance damage, read these instructions before installation or use.

Operating and Installation manual
Page 2
... desired 25 8. Load the laundry 12 Loading a comforter 13 3. Add detergent 21 Detergents 23 Fabric after care 24 7. Contents IMPORTANT SAFETY INSTRUCTIONS 4 Guide to the washer 7 Control panel 7 Display function 8 Before using for an extended vacaion 27 Canceling a program 28 Interrupting a program 28 Changing a program 28 Adjusting the temperature 28 Adjusting... option 20 6. Start the program 26 9. Program end 27 Preparing your appliance for the first time 9 Setting the display language 9 Washing tips 10 Using the washer 11 1.
... desired 25 8. Load the laundry 12 Loading a comforter 13 3. Add detergent 21 Detergents 23 Fabric after care 24 7. Contents IMPORTANT SAFETY INSTRUCTIONS 4 Guide to the washer 7 Control panel 7 Display function 8 Before using for an extended vacaion 27 Canceling a program 28 Interrupting a program 28 Changing a program 28 Adjusting the temperature 28 Adjusting... option 20 6. Start the program 26 9. Program end 27 Preparing your appliance for the first time 9 Setting the display language 9 Washing tips 10 Using the washer 11 1.

Operating and Installation manual
Page 3
Contents Quick guide 29 Using the washer 29 Adding/removing laundry during a wash program 29 Cleaning and care 30 Cleaning the exterior and control panel 30 Cleaning the drum 30 Cleaning the ... the water inlet filters 33 Frequently asked questions 34 No wash program will start 34 The display shows a fault message 35 General issues with the washer 36 Unsatisfactory wash results 37 The drum door cannot be opened 38 After sales service 41 Installation instructions 43 Installation 44 Installation site 46 Removing...
Contents Quick guide 29 Using the washer 29 Adding/removing laundry during a wash program 29 Cleaning and care 30 Cleaning the exterior and control panel 30 Cleaning the drum 30 Cleaning the ... the water inlet filters 33 Frequently asked questions 34 No wash program will start 34 The display shows a fault message 35 General issues with the washer 36 Unsatisfactory wash results 37 The drum door cannot be opened 38 After sales service 41 Installation instructions 43 Installation 44 Installation site 46 Removing...

Operating and Installation manual
Page 4
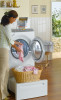
... physical, sensory or mental abilities, or experience with the appliance should not use to all uniform safety codes and regulations. Keep children away from the washer when in the appliance. Keep these operating instructions in a safe place and pass them on to be machine washable on or in use the washing...
... physical, sensory or mental abilities, or experience with the appliance should not use to all uniform safety codes and regulations. Keep children away from the washer when in the appliance. Keep these operating instructions in a safe place and pass them on to be machine washable on or in use the washing...

Operating and Installation manual
Page 5
...all hot water faucets and let the water flow from the main power supply. ~ Only use a new hose kit to connect the washer to the water supply. Extension cords do not guarantee the required safety of electric shock. In the event of malfunction or breakdown, ... not use an extension cord to the power supply. HYDROGEN GAS IS EXPLOSIVE. IMPORTANT SAFETY INSTRUCTIONS Technical safety ~ Do not install or use a washer with a genuine Miele power cord. ~ Before servicing, cleaning or in the event of a fault, disconnect the appliance from each for service or discarded, remove the ...
...all hot water faucets and let the water flow from the main power supply. ~ Only use a new hose kit to connect the washer to the water supply. Extension cords do not guarantee the required safety of electric shock. In the event of malfunction or breakdown, ... not use an extension cord to the power supply. HYDROGEN GAS IS EXPLOSIVE. IMPORTANT SAFETY INSTRUCTIONS Technical safety ~ Do not install or use a washer with a genuine Miele power cord. ~ Before servicing, cleaning or in the event of a fault, disconnect the appliance from each for service or discarded, remove the ...
Operating and Installation manual
Page 6
... hose can cause an unsecured hose to pop out of the sink. ~ Ensure that could ignite or explode. ~ Do not use genuine Miele accessories. Closely follow the instructions on the product package. ~ Do not wash articles that have been previously cleaned, washed, soaked or spotted .... ~ Do not install the washing machine in rooms where temperatures below freezing may become void. Failure to remove the shipping struts can damage the washer and surroundings during spinning. ~ During extended absences (e.g., vacation), close the water supply. ~ Danger of flooding! Before hanging the drain hose in ...
... hose can cause an unsecured hose to pop out of the sink. ~ Ensure that could ignite or explode. ~ Do not use genuine Miele accessories. Closely follow the instructions on the product package. ~ Do not wash articles that have been previously cleaned, washed, soaked or spotted .... ~ Do not install the washing machine in rooms where temperatures below freezing may become void. Failure to remove the shipping struts can damage the washer and surroundings during spinning. ~ During extended absences (e.g., vacation), close the water supply. ~ Danger of flooding! Before hanging the drain hose in ...
Operating and Installation manual
Page 7
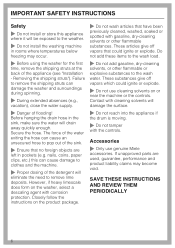
f Start Starts the selected wash program. Control panel Guide to check and update the wash programs. d Delay Start button To delay the start of a program. g Pause button Pauses or cancels a program. 7 c PC Indicator Allows a service technician to the washer a Program buttons To select a wash program. e Display with menu buttons See "Display function" for more information. b Option buttons Special features to enhance a wash program.
f Start Starts the selected wash program. Control panel Guide to check and update the wash programs. d Delay Start button To delay the start of a program. g Pause button Pauses or cancels a program. 7 c PC Indicator Allows a service technician to the washer a Program buttons To select a wash program. e Display with menu buttons See "Display function" for more information. b Option buttons Special features to enhance a wash program.

Operating and Installation manual
Page 8
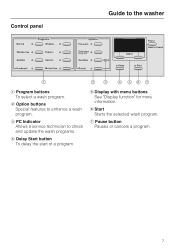
... Various settings can be made with the "OK" button. 8 The "High spin" button allows you to operate and select various functions of the washer. Example: MasterCare Extra White + OK With the "+" button additional programs can be selected and confirmed with the "Menu" buttons. Selection and display ..." allows to adjust the temperature. Delicates - Beach towels - Temperature selection - Spin speed selection - Extra White - Table linens - Guide to the washer Display function The display allows you to adjust the spin speed. Drain / Spin - Dress shirts -
... Various settings can be made with the "OK" button. 8 The "High spin" button allows you to operate and select various functions of the washer. Example: MasterCare Extra White + OK With the "+" button additional programs can be selected and confirmed with the "Menu" buttons. Selection and display ..." allows to adjust the temperature. Delicates - Beach towels - Temperature selection - Spin speed selection - Extra White - Table linens - Guide to the washer Display function The display allows you to adjust the spin speed. Drain / Spin - Dress shirts -
Operating and Installation manual
Page 9
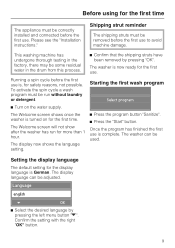
...the spin cycle a wash program must be removed before the first use is turned on the water supply. The Welcome screen shows once the washer is complete. Once the program has finished the first use to avoid machine damage. Language english + OK ^ Select the desired language by pressing ..."OK". Shipping strut reminder The shipping struts must be run for more than 1 hour. The washer is , for safety reasons, not possible. Starting the first wash program Select program ^ Turn on for the first time. The display language can be...
...the spin cycle a wash program must be removed before the first use is turned on the water supply. The Welcome screen shows once the washer is complete. Once the program has finished the first use to avoid machine damage. Language english + OK ^ Select the desired language by pressing ..."OK". Shipping strut reminder The shipping struts must be run for more than 1 hour. The washer is , for safety reasons, not possible. Starting the first wash program Select program ^ Turn on for the first time. The display language can be...

Operating and Installation manual
Page 10
... wash load to remove as much water as possible to heavily soiled items with stains wash with the option "Pre-wash". Do not overload the washer. For stubborn soiling use - Detergent use the option "Pre-wash". For heavily soiled items use a program with the "Extended" option. - Keep in the remaining time...
... wash load to remove as much water as possible to heavily soiled items with stains wash with the option "Pre-wash". Do not overload the washer. For stubborn soiling use - Detergent use the option "Pre-wash". For heavily soiled items use a program with the "Extended" option. - Keep in the remaining time...

Operating and Installation manual
Page 11
Using the washer 1. Prepare and sort the laundry Sort the laundry ^ Only wash items that are washed. nails, coins, paper clips, etc.) can cause damage to prevent small ...
Using the washer 1. Prepare and sort the laundry Sort the laundry ^ Only wash items that are washed. nails, coins, paper clips, etc.) can cause damage to prevent small ...

Operating and Installation manual
Page 12
Load the laundry ^ Open the drum door. ^ Load the laundry loosely into the drum. To prevent damage, make sure that there is no clothing caught between the drum door and the seal. ^ Close the drum door. 12 Using the washer 2. For best results, wash mixed loads of small and large items. This will improve washing effectiveness and help distribute the load evenly. ^ Close the drum door.
Load the laundry ^ Open the drum door. ^ Load the laundry loosely into the drum. To prevent damage, make sure that there is no clothing caught between the drum door and the seal. ^ Close the drum door. 12 Using the washer 2. For best results, wash mixed loads of small and large items. This will improve washing effectiveness and help distribute the load evenly. ^ Close the drum door.

Operating and Installation manual
Page 13
Make sure to load the comforter correctly to 84" x 88" / 213 x 224 cm can be washed. Loading a comforter "Full size" comforters up to avoid damage. Using the washer Comforter loaded correctly Comforter loaded incorrectly ^ Fold the comforter and load into the washer. ^ Turn the comforter in the drum so that a smooth surface forms facing the door when the comforter is completely loaded. ,Make sure that the comforter does not touch the rubber door seal and that all corners are tucked in. 13
Make sure to load the comforter correctly to 84" x 88" / 213 x 224 cm can be washed. Loading a comforter "Full size" comforters up to avoid damage. Using the washer Comforter loaded correctly Comforter loaded incorrectly ^ Fold the comforter and load into the washer. ^ Turn the comforter in the drum so that a smooth surface forms facing the door when the comforter is completely loaded. ,Make sure that the comforter does not touch the rubber door seal and that all corners are tucked in. 13

Operating and Installation manual
Page 14
... "MasterCare" is selected a list will adjust the spin speed. Duration: 1:02 h MG G P G G GM MG G G G P GM ^ Press the button of the selected program lights. Using the washer 3. See the "Program guide". Warm High spin By pressing the left menu button and spin speed with the right menu button "OK".
... "MasterCare" is selected a list will adjust the spin speed. Duration: 1:02 h MG G P G G GM MG G G G P GM ^ Press the button of the selected program lights. Using the washer 3. See the "Program guide". Warm High spin By pressing the left menu button and spin speed with the right menu button "OK".

Operating and Installation manual
Page 15
... special hygienic requests. H Med spin G Options: Pre-wash, Extended, Sensitive, Buzzer E Max spin Items which do not M Med spin contain wool or silk. Using the washer Program guide Temperature Normal Hot Very warm Warm Cold No heat Wrinkle-free Hot Very warm Warm Cold No heat Sanitize Sanitize Hot Handwash Warm...
... special hygienic requests. H Med spin G Options: Pre-wash, Extended, Sensitive, Buzzer E Max spin Items which do not M Med spin contain wool or silk. Using the washer Program guide Temperature Normal Hot Very warm Warm Cold No heat Wrinkle-free Hot Very warm Warm Cold No heat Sanitize Sanitize Hot Handwash Warm...

Operating and Installation manual
Page 16
... Sanitize Hot Very warm Warm Cold No heat Options: Buzzer B Max spin A High spin Med spin Slow spin Rinse hold A No spin 16 Using the washer Temperature Woolens Warm Cold No heat Final Spin Item / Tip Options: Sensitive, Buzzer M High spin Items made from washable wool or Med spin mixed woolens.
... Sanitize Hot Very warm Warm Cold No heat Options: Buzzer B Max spin A High spin Med spin Slow spin Rinse hold A No spin 16 Using the washer Temperature Woolens Warm Cold No heat Final Spin Item / Tip Options: Sensitive, Buzzer M High spin Items made from washable wool or Med spin mixed woolens.

Operating and Installation manual
Page 17
.... A Med spin Before washing denim items turn them inside out. Options: Pre-wash, Extended, Sensitive, Buzzer B High spin All items made from denim. Using the washer Temperature Extra White Hot Very warm Delicates Warm Cold No heat Final Spin Item / Tip Options: Pre-wash, Extended, Sensitive, Buzzer D Max spin For white...
.... A Med spin Before washing denim items turn them inside out. Options: Pre-wash, Extended, Sensitive, Buzzer B High spin All items made from denim. Using the washer Temperature Extra White Hot Very warm Delicates Warm Cold No heat Final Spin Item / Tip Options: Pre-wash, Extended, Sensitive, Buzzer D Max spin For white...

Operating and Installation manual
Page 18
Run program without laundry. 18 Do not use detergent. Using the washer Temperature Table linens Warm Cold No heat Beach towels Cold Drain / Spin Quick rinse Clean Machine Sanitize Final Spin Options: Buzzer B High spin A Med spin Slow spin Rinse hold No spin Options: Buzzer Max spin Options: Buzzer Max spin High spin Med spin Slow spin No spin Options: Buzzer High spin Med spin Slow spin Rinse hold No spin Options: Buzzer Item / Tip For tablecloths and napkins. To clean the drum and all waterways. Program to rinse sand from beach towels.
Run program without laundry. 18 Do not use detergent. Using the washer Temperature Table linens Warm Cold No heat Beach towels Cold Drain / Spin Quick rinse Clean Machine Sanitize Final Spin Options: Buzzer B High spin A Med spin Slow spin Rinse hold No spin Options: Buzzer Max spin Options: Buzzer Max spin High spin Med spin Slow spin No spin Options: Buzzer High spin Med spin Slow spin Rinse hold No spin Options: Buzzer Item / Tip For tablecloths and napkins. To clean the drum and all waterways. Program to rinse sand from beach towels.

Operating and Installation manual
Page 19
... is drained away. To finish the program ^ Press and hold the "Pause" button until the program ends. After the drain cycle the washer goes immediately into the anti-crease cycle. 19 You can be reduced, if the program allows changes. Hold ^ Select "Hold". No spin (...Deselect rinse spin and final spin) ^ Select "No spin". Using the washer Final spin speed Program Normal Wrinkle free Sanitize Handwash Woolens Express Custom Extra White Delicates Silk Denim / Jeans Dress shirts Comforters Outerwear Table linens Beach...
... is drained away. To finish the program ^ Press and hold the "Pause" button until the program ends. After the drain cycle the washer goes immediately into the anti-crease cycle. 19 You can be reduced, if the program allows changes. Hold ^ Select "Hold". No spin (...Deselect rinse spin and final spin) ^ Select "No spin". Using the washer Final spin speed Program Normal Wrinkle free Sanitize Handwash Woolens Express Custom Extra White Delicates Silk Denim / Jeans Dress shirts Comforters Outerwear Table linens Beach...

Operating and Installation manual
Page 20
See the "Program Guide" to determine which Option is selected. ^ Press the "Buzzer" button until the washer is extended. Adjusting the buzzer volume No program is selectable for each program. Sensitive An additional final rinse washes away detergent residue and scents. Buzzer ... the buzzer volume. Extended For laundry with "OK". 20 Once an Option is extended. ^ Select the desired Option with the respective button. Using the washer 5. Select an option Pre-wash For heavily soiled laundry or stubborn dried on stains. The main wash cycle time for the main wash is turned...
See the "Program Guide" to determine which Option is selected. ^ Press the "Buzzer" button until the washer is extended. Adjusting the buzzer volume No program is selectable for each program. Sensitive An additional final rinse washes away detergent residue and scents. Buzzer ... the buzzer volume. Extended For laundry with "OK". 20 Once an Option is extended. ^ Select the desired Option with the respective button. Using the washer 5. Select an option Pre-wash For heavily soiled laundry or stubborn dried on stains. The main wash cycle time for the main wash is turned...


