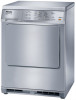
T8000 Tumble Dryers
Page 1
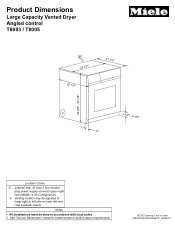
...-in space requirements NOTE: Drawing is not to lower right or left side or lower left rear (see separate sheet). Product Dimensions Large Capacity Vented Dryer Angled control T8003 / T8005 E 23 1/2" 22 1/2" 21 1/2" 33 3/8" - 34 1/8" V 3 3/4" - 4 1/2" 2" Location Codes E - 208/240 Volt, 30 Amp 5 foot molded plug power supply connects upper right rear...
...-in space requirements NOTE: Drawing is not to lower right or left side or lower left rear (see separate sheet). Product Dimensions Large Capacity Vented Dryer Angled control T8003 / T8005 E 23 1/2" 22 1/2" 21 1/2" 33 3/8" - 34 1/8" V 3 3/4" - 4 1/2" 2" Location Codes E - 208/240 Volt, 30 Amp 5 foot molded plug power supply connects upper right rear...
T8000 Tumble Dryers
Page 2
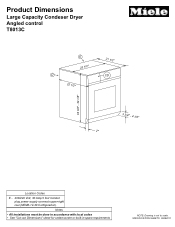
Product Dimensions Large Capacity Condeser Dryer Angled control T8013C E 23 1/2" D 22 1/2" 21 1/2" CD 33 3/8" - 34 1/8" 3 3/4" - 4 1/2" 2" Location Codes E - 208/240 Volt, 30 Amp 5 foot molded plug power supply connects upper right rear (NEMA 14-30 Configuration). SPECIFICATION SHEETS 08262011 Notes • All installations must be done in accordance with local codes • See "Cut-out Dimensions" sheet for undercounter or built-in space requirements NOTE: Drawing is not to scale.
Product Dimensions Large Capacity Condeser Dryer Angled control T8013C E 23 1/2" D 22 1/2" 21 1/2" CD 33 3/8" - 34 1/8" 3 3/4" - 4 1/2" 2" Location Codes E - 208/240 Volt, 30 Amp 5 foot molded plug power supply connects upper right rear (NEMA 14-30 Configuration). SPECIFICATION SHEETS 08262011 Notes • All installations must be done in accordance with local codes • See "Cut-out Dimensions" sheet for undercounter or built-in space requirements NOTE: Drawing is not to scale.
T8000 Tumble Dryers
Page 3
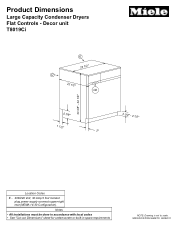
Notes • All installations must be done in accordance with local codes • See "Cut-out Dimensions" sheet for undercounter or built-in space requirements NOTE: Drawing is not to scale. Decor unit T8019Ci E 23 1/2" D 22 1/2" CD 5 7/8" 1 1/2" 2" 33 3/8" - 34 1/8" 3 3/4" - 4 1/2" Location Codes E - 208/240 Volt, 30 Amp 5 foot molded plug power supply connects upper right rear (NEMA 14-30 Configuration). SPECIFICATION SHEETS 08262011 Product Dimensions Large Capacity Condenser Dryers Flat Controls -
Notes • All installations must be done in accordance with local codes • See "Cut-out Dimensions" sheet for undercounter or built-in space requirements NOTE: Drawing is not to scale. Decor unit T8019Ci E 23 1/2" D 22 1/2" CD 5 7/8" 1 1/2" 2" 33 3/8" - 34 1/8" 3 3/4" - 4 1/2" Location Codes E - 208/240 Volt, 30 Amp 5 foot molded plug power supply connects upper right rear (NEMA 14-30 Configuration). SPECIFICATION SHEETS 08262011 Product Dimensions Large Capacity Condenser Dryers Flat Controls -

T8000 Tumble Dryers
Page 5
Product Dimensions Laundry Stand WTS410 - SPECIFICATION SHEETS 08262011 White Only 11" 22" 23 3/8" Notes • For use with both large and super capacity washers or tumble dryers. • All installations must be done in accordnace with local codes NOTE: Drawing is not to scale.
Product Dimensions Laundry Stand WTS410 - SPECIFICATION SHEETS 08262011 White Only 11" 22" 23 3/8" Notes • For use with both large and super capacity washers or tumble dryers. • All installations must be done in accordnace with local codes NOTE: Drawing is not to scale.
T8000 Tumble Dryers
Page 6
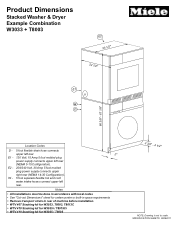
E2 - 208/240 Volt, 30 Amp 5 foot molded plug power supply connects upper right rear (NEMA 14-30 Configuration). Product Dimensions Stacked Washer & Dryer Example Combination W3033 + T8003 E2 23 1/2" 22 1/2" E1 V W D 66 3/8" - 67 1/8" Location Codes D - 5 foot flexible drain hose connects upper left rear. 2" E1 - 120 Volt, 15 Amp 5 ...
E2 - 208/240 Volt, 30 Amp 5 foot molded plug power supply connects upper right rear (NEMA 14-30 Configuration). Product Dimensions Stacked Washer & Dryer Example Combination W3033 + T8003 E2 23 1/2" 22 1/2" E1 V W D 66 3/8" - 67 1/8" Location Codes D - 5 foot flexible drain hose connects upper left rear. 2" E1 - 120 Volt, 15 Amp 5 ...
T8000 Tumble Dryers
Page 8
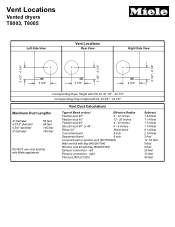
...bend 8 inch Segmented bend 8 inch Louvered wall or window vent (#03780400) Wall vent kit with flap (#00087184) Window vent kit with Miele appliances. right Flat duct (#01221330) Subtract 1 3/4 feet 1 1/4 feet 1 1/4 feet 1 1/4 feet 8 1/4 feet 2 3/4 ... 5 feet 20 feet 33 feet 59 feet Vent Locations Vented dryers T8003, T8005 Left Side View Vent Locations Rear View Right Side View 3 1/2" - 4 1/4" 3 1/2" - 4 1/4" 3 1/2" - 4 1/4" 4 3/4" 3 7/8" 4 3/4" Corresponding Dryer Height with NO lid: 32 1/8" - 32 7/8" Corresponding Dryer Height with lid: 33 3/8" - 34 1/8" Maximum Duct Lengths...
...bend 8 inch Segmented bend 8 inch Louvered wall or window vent (#03780400) Wall vent kit with flap (#00087184) Window vent kit with Miele appliances. right Flat duct (#01221330) Subtract 1 3/4 feet 1 1/4 feet 1 1/4 feet 1 1/4 feet 8 1/4 feet 2 3/4 ... 5 feet 20 feet 33 feet 59 feet Vent Locations Vented dryers T8003, T8005 Left Side View Vent Locations Rear View Right Side View 3 1/2" - 4 1/4" 3 1/2" - 4 1/4" 3 1/2" - 4 1/4" 4 3/4" 3 7/8" 4 3/4" Corresponding Dryer Height with NO lid: 32 1/8" - 32 7/8" Corresponding Dryer Height with lid: 33 3/8" - 34 1/8" Maximum Duct Lengths...

T8000 Tumble Dryers
Page 9
Vent Locations Stacked Washer & Dryer Example Combination Left Side View 4 3/4" Vent Locations Rear View 3 7/8" Right Side View 4 3/4" Stacking Kit Stacking Kit Stacking Kit 36 3/8" - 37 1/8" 36 3/8" - 37 1/8" 36 3/8" - 37 1/8" Corresponding Total Height with lid: 66 3/8" - 67 1/8"
Vent Locations Stacked Washer & Dryer Example Combination Left Side View 4 3/4" Vent Locations Rear View 3 7/8" Right Side View 4 3/4" Stacking Kit Stacking Kit Stacking Kit 36 3/8" - 37 1/8" 36 3/8" - 37 1/8" 36 3/8" - 37 1/8" Corresponding Total Height with lid: 66 3/8" - 67 1/8"
Operating and installation manual
Page 1
US, CA M.-Nr. 06 879 010 en - Operating and Installation Instructions Vented Dryer T 8002 T 8003 T 8005 To prevent accidents and appliance damage read these instructions before installation or use.
US, CA M.-Nr. 06 879 010 en - Operating and Installation Instructions Vented Dryer T 8002 T 8003 T 8005 To prevent accidents and appliance damage read these instructions before installation or use.

Operating and installation manual
Page 2
...laundry 7 2. Select the buzzer (if desired 10 6. Select the dryness level 10 5. Contents IMPORTANT SAFETY INSTRUCTIONS 3 Control panel 5 Before loading the dryer 6 Using the dryer 7 1. Select a drying option (if needed 9 4. At the end of a program 11 Canceling or changing a program 12 Adding or removing ...laundry during a program 12 Child lock 13 Dryer care 14 Cleaning the lint filters 14 Cleaning the exterior and the control panel 16 Cleaning the drum 16 Changing the light bulb 17...
...laundry 7 2. Select the buzzer (if desired 10 6. Select the dryness level 10 5. Contents IMPORTANT SAFETY INSTRUCTIONS 3 Control panel 5 Before loading the dryer 6 Using the dryer 7 1. Select a drying option (if needed 9 4. At the end of a program 11 Canceling or changing a program 12 Adding or removing ...laundry during a program 12 Child lock 13 Dryer care 14 Cleaning the lint filters 14 Cleaning the exterior and the control panel 16 Cleaning the drum 16 Changing the light bulb 17...

Operating and installation manual
Page 3
...may give off vapors that sufficient detergent is removed for service or discarded, remove the door to read all instructions before using your dryer. When washing heavily soiled items ensure that could ignite or explode. - items containing foam rubber or similarly textured rubber-like materials.... oils, or other flammable or explosive substances. Close supervision is necessary when the appliance is moving. ~ Do not install or store this dryer: - items that could catch fire. 3 items which have been previously cleaned, washed, soaked or spotted with hair spray, nail polish ...
...may give off vapors that sufficient detergent is removed for service or discarded, remove the door to read all instructions before using your dryer. When washing heavily soiled items ensure that could ignite or explode. - items containing foam rubber or similarly textured rubber-like materials.... oils, or other flammable or explosive substances. Close supervision is necessary when the appliance is moving. ~ Do not install or store this dryer: - items that could catch fire. 3 items which have been previously cleaned, washed, soaked or spotted with hair spray, nail polish ...

Operating and installation manual
Page 4
...In the event of malfunction or breakdown, grounding will not fit the outlet, have a proper outlet installed by a qualified electrician. This dryer is properly grounded. ~ Do not modify the plug provided with the appliance: if it will reduce the risk of least resistance for residential.... This will ensure that is equipped with all local codes and ordinances. ~ WARNING - SAVE THESE INSTRUCTIONS 4 IMPORTANT SAFETY INSTRUCTIONS ~ Allow the dryer to complete each load. ~ Keep the area around the air intake (toe-kick) and adjacent surrounding areas free from lint, dust and dirt....
...In the event of malfunction or breakdown, grounding will not fit the outlet, have a proper outlet installed by a qualified electrician. This dryer is properly grounded. ~ Do not modify the plug provided with the appliance: if it will reduce the risk of least resistance for residential.... This will ensure that is equipped with all local codes and ordinances. ~ WARNING - SAVE THESE INSTRUCTIONS 4 IMPORTANT SAFETY INSTRUCTIONS ~ Allow the dryer to complete each load. ~ Keep the area around the air intake (toe-kick) and adjacent surrounding areas free from lint, dust and dirt....

Operating and installation manual
Page 5
g "Start/Stop" button Starts and stops a program. If the dryer is on and off after a few minutes to the machine on , the drum interior will sound at the end of the program. d "Status" display Shows ...
g "Start/Stop" button Starts and stops a program. If the dryer is on and off after a few minutes to the machine on , the drum interior will sound at the end of the program. d "Status" display Shows ...

Operating and installation manual
Page 6
.... To prevent discoloration, do not dry new, dark-colored fabrics with low temperature (select "Gentle" option) s Do not dry in a tumble dryer Program recommendations Normal - Woolens - Linen - Durable Cottons and Permanent Press Fluff / 20 min / 45 min - Close zippers and tie up fabric...(cottons, blends and synthetics) Sturdy - Wool and wool blends Smooth - Cottons and Permanent Press blends Wrinkle-free - Overloading the dryer will result in the dryer, such as polyester: select the Gentle option to clothing. - Before drying, check fabric care labels for the first time, clean...
.... To prevent discoloration, do not dry new, dark-colored fabrics with low temperature (select "Gentle" option) s Do not dry in a tumble dryer Program recommendations Normal - Woolens - Linen - Durable Cottons and Permanent Press Fluff / 20 min / 45 min - Close zippers and tie up fabric...(cottons, blends and synthetics) Sturdy - Wool and wool blends Smooth - Cottons and Permanent Press blends Wrinkle-free - Overloading the dryer will result in the dryer, such as polyester: select the Gentle option to clothing. - Before drying, check fabric care labels for the first time, clean...

Operating and installation manual
Page 7
Turn on the dryer and load the laundry ^ Press the "On/Off" button to turn on the dryer. ^ Press the "Door" button to open the door. ^ Load the laundry loosely into the drum. ^ Make sure the lint filters are in the closed door. 7 To prevent fabric damage, check that laundry will not be caught in place. ^ Close the door. 2. Select a program For best results use liquid fabric softener when washing laundry. ^ Press the e or - button until the desired program indicator lights. Using the dryer 1.
Turn on the dryer and load the laundry ^ Press the "On/Off" button to turn on the dryer. ^ Press the "Door" button to open the door. ^ Load the laundry loosely into the drum. ^ Make sure the lint filters are in the closed door. 7 To prevent fabric damage, check that laundry will not be caught in place. ^ Close the door. 2. Select a program For best results use liquid fabric softener when washing laundry. ^ Press the e or - button until the desired program indicator lights. Using the dryer 1.

Operating and installation manual
Page 8
... load size for jersey materials. Special Programs Available drying options: Anti-crease only available in Fluff, Sturdy Woolens Delicate items which will be e.g. Using the dryer Program When to use Note Normal Available drying options: Turbo, Full load, Gentle, Anti-crease Extra Dry Multi-layer, mixed loads of the program, while...
... load size for jersey materials. Special Programs Available drying options: Anti-crease only available in Fluff, Sturdy Woolens Delicate items which will be e.g. Using the dryer Program When to use Note Normal Available drying options: Turbo, Full load, Gentle, Anti-crease Extra Dry Multi-layer, mixed loads of the program, while...

Operating and installation manual
Page 9
Select a drying option (if needed) ^ A drying option can be selected or deselected with an extended program time. Anti-crease Prevents wrinkles if laundry is not removed immediately after the end of the button. The drum periodically rotates for efficient drying of a standard size load. Gentle For drying delicate fabrics at a lower temperature with each press of a program. Full load Select this option for about 1 hour. 9 Using the dryer OPTIONS Turbo Fast drying for sturdy fabrics with increased temperature and a reduced program length. 3.
Select a drying option (if needed) ^ A drying option can be selected or deselected with an extended program time. Anti-crease Prevents wrinkles if laundry is not removed immediately after the end of the button. The drum periodically rotates for efficient drying of a standard size load. Gentle For drying delicate fabrics at a lower temperature with each press of a program. Full load Select this option for about 1 hour. 9 Using the dryer OPTIONS Turbo Fast drying for sturdy fabrics with increased temperature and a reduced program length. 3.

Operating and installation manual
Page 10
... end of the other programs cannot be selected. if the indicator is lit and you hear the desired volume and tone. 10 Using the dryer 4. turn the dryer on = buzzer selected off = buzzer not selected ^ Press the selection button until its indicator is lit, press the "Buzzer" button so the indicator light...
... end of the other programs cannot be selected. if the indicator is lit and you hear the desired volume and tone. 10 Using the dryer 4. turn the dryer on = buzzer selected off = buzzer not selected ^ Press the selection button until its indicator is lit, press the "Buzzer" button so the indicator light...

Operating and installation manual
Page 11
If a fault occurred, a "FAULT" indicator will sound if it was selected. Start the program ^ Press the "Start/Stop" button. Using the dryer 6. At the end of a program The "End/Anti-crease" indicator will light at the end of the program will be indicated in the "STATUS" display. 7. ... "Door" button. ^ Open the door. ^ Remove the laundry. ^ Check that the drum is empty. ^ Clean the lint filter after each use (see "Dryer care"). ^ Close the door. ^ Press the "On/Off" button to turn off the dryer. 11 Once the program starts, the current cycle of a program and the buzzer will light.
If a fault occurred, a "FAULT" indicator will sound if it was selected. Start the program ^ Press the "Start/Stop" button. Using the dryer 6. At the end of a program The "End/Anti-crease" indicator will light at the end of the program will be indicated in the "STATUS" display. 7. ... "Door" button. ^ Open the door. ^ Remove the laundry. ^ Check that the drum is empty. ^ Clean the lint filter after each use (see "Dryer care"). ^ Close the door. ^ Press the "On/Off" button to turn off the dryer. 11 Once the program starts, the current cycle of a program and the buzzer will light.

Operating and installation manual
Page 12
Adding or removing laundry during a program ^ Turn off the dryer using the "On/Off" button. ^ Press the "Door" button. ^ Open the door. ,CAUTION - There is a danger of the drum while adding or removing items! button. ^ ... "Wrinkle-free" programs). ^ Press and release the "Start/Stop" button to high temperatures in the drum. ^ Add or remove items. ^ Close the door. ^ Turn the dryer back on with the "On/Off" button. 12 Do not touch the rear of burns due to start the new program. Using the...
Adding or removing laundry during a program ^ Turn off the dryer using the "On/Off" button. ^ Press the "Door" button. ^ Open the door. ,CAUTION - There is a danger of the drum while adding or removing items! button. ^ ... "Wrinkle-free" programs). ^ Press and release the "Start/Stop" button to high temperatures in the drum. ^ Add or remove items. ^ Close the door. ^ Turn the dryer back on with the "On/Off" button. 12 Do not touch the rear of burns due to start the new program. Using the...

Operating and installation manual
Page 13
... at the same time, hold until step 5. 3. Press the "OPTIONS" button 3 times. 5. Turn off the dryer using the "On/Off" button. 13 The dryer can be turned on the dryer with the "On/Off" button. 4. The "Child lock" indicator will flash. The "Child lock" indicator will flash... and the dryer is turned off the dryer using the "On/Off" button. Child lock Child lock When activated, the child lock prevents the dryer from being operated by locking the control panel functions. Release the "Anti-crease"...
... at the same time, hold until step 5. 3. Press the "OPTIONS" button 3 times. 5. Turn off the dryer using the "On/Off" button. 13 The dryer can be turned on the dryer with the "On/Off" button. 4. The "Child lock" indicator will flash. The "Child lock" indicator will flash... and the dryer is turned off the dryer using the "On/Off" button. Child lock Child lock When activated, the child lock prevents the dryer from being operated by locking the control panel functions. Release the "Anti-crease"...


