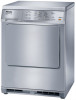
T8000 Tumble Dryers
Page 1
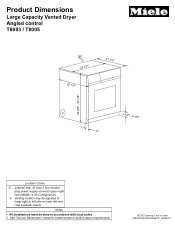
SPECIFICATION SHEETS 08262011 Notes • All installations must be adjusted to scale. Product Dimensions Large Capacity Vented Dryer Angled control T8003 / T8005 E 23 1/2" 22 1/2" 21 1/2" 33 3/8" - 34 1/8" V 3 3/4" - 4 1/2" 2" Location Codes E - 208/240 Volt, 30 Amp 5 foot molded plug power supply connects upper right rear (NEMA 14-30 Configuration). Venting location may be done in accordance with local codes • See "Cut-out Dimensions" sheet for undercounter or built-in space requirements NOTE: Drawing...
SPECIFICATION SHEETS 08262011 Notes • All installations must be adjusted to scale. Product Dimensions Large Capacity Vented Dryer Angled control T8003 / T8005 E 23 1/2" 22 1/2" 21 1/2" 33 3/8" - 34 1/8" V 3 3/4" - 4 1/2" 2" Location Codes E - 208/240 Volt, 30 Amp 5 foot molded plug power supply connects upper right rear (NEMA 14-30 Configuration). Venting location may be done in accordance with local codes • See "Cut-out Dimensions" sheet for undercounter or built-in space requirements NOTE: Drawing...
T8000 Tumble Dryers
Page 2
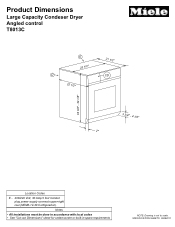
Notes • All installations must be done in accordance with local codes • See "Cut-out Dimensions" sheet for undercounter or built-in space requirements NOTE: Drawing is not to scale. Product Dimensions Large Capacity Condeser Dryer Angled control T8013C E 23 1/2" D 22 1/2" 21 1/2" CD 33 3/8" - 34 1/8" 3 3/4" - 4 1/2" 2" Location Codes E - 208/240 Volt, 30 Amp 5 foot molded plug power supply connects upper right rear (NEMA 14-30 Configuration). SPECIFICATION SHEETS 08262011
Notes • All installations must be done in accordance with local codes • See "Cut-out Dimensions" sheet for undercounter or built-in space requirements NOTE: Drawing is not to scale. Product Dimensions Large Capacity Condeser Dryer Angled control T8013C E 23 1/2" D 22 1/2" 21 1/2" CD 33 3/8" - 34 1/8" 3 3/4" - 4 1/2" 2" Location Codes E - 208/240 Volt, 30 Amp 5 foot molded plug power supply connects upper right rear (NEMA 14-30 Configuration). SPECIFICATION SHEETS 08262011
T8000 Tumble Dryers
Page 3
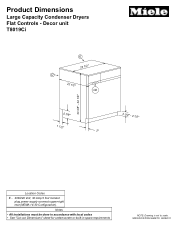
Notes • All installations must be done in accordance with local codes • See "Cut-out Dimensions" sheet for undercounter or built-in space requirements NOTE: Drawing is not to scale. Decor unit T8019Ci E 23 1/2" D 22 1/2" CD 5 7/8" 1 1/2" 2" 33 3/8" - 34 1/8" 3 3/4" - 4 1/2" Location Codes E - 208/240 Volt, 30 Amp 5 foot molded plug power supply connects upper right rear (NEMA 14-30 Configuration). SPECIFICATION SHEETS 08262011 Product Dimensions Large Capacity Condenser Dryers Flat Controls -
Notes • All installations must be done in accordance with local codes • See "Cut-out Dimensions" sheet for undercounter or built-in space requirements NOTE: Drawing is not to scale. Decor unit T8019Ci E 23 1/2" D 22 1/2" CD 5 7/8" 1 1/2" 2" 33 3/8" - 34 1/8" 3 3/4" - 4 1/2" Location Codes E - 208/240 Volt, 30 Amp 5 foot molded plug power supply connects upper right rear (NEMA 14-30 Configuration). SPECIFICATION SHEETS 08262011 Product Dimensions Large Capacity Condenser Dryers Flat Controls -
T8000 Tumble Dryers
Page 4
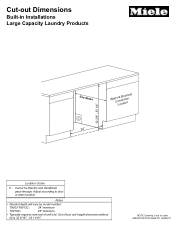
Out of unit's lid. Cut-out Dimensions Built-in Installations Large Capacity Laundry Products See Notes C 24" 32 3/8" - 35 1/4" WatCeroL&noncEealcetitcoiotnrnical Location Codes C - Cutout for Electric and Vent/Drain pass-through. NOTE: Drawing is 32 5/16" - 32 11/16". Notes • Needed depth will vary by model number: T8003-T8013C: 24" minimum T8019Ci 25" minimum • Typically requires removal of box unit height dimension without lid is not to duct or drain location. SPECIFICATION SHEETS 08262011 Adjust according to scale.
Out of unit's lid. Cut-out Dimensions Built-in Installations Large Capacity Laundry Products See Notes C 24" 32 3/8" - 35 1/4" WatCeroL&noncEealcetitcoiotnrnical Location Codes C - Cutout for Electric and Vent/Drain pass-through. NOTE: Drawing is 32 5/16" - 32 11/16". Notes • Needed depth will vary by model number: T8003-T8013C: 24" minimum T8019Ci 25" minimum • Typically requires removal of box unit height dimension without lid is not to duct or drain location. SPECIFICATION SHEETS 08262011 Adjust according to scale.
T8000 Tumble Dryers
Page 6
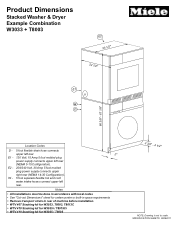
... molded plug power supply connects upper right rear (NEMA 14-30 Configuration). W - 5 foot separate flexible hot and cold water intake hoses connect upper left rear (NEMA 5-15 Configuration). SPECIFICATION SHEETS 08262011 Notes • All installations must be done in accordance with local codes • See "Cut-out Dimensions" sheet for undercounter or built-in space requirements • Remove transport struts in rear of machine before installation. • WTV 407 Stacking kit for...
... molded plug power supply connects upper right rear (NEMA 14-30 Configuration). W - 5 foot separate flexible hot and cold water intake hoses connect upper left rear (NEMA 5-15 Configuration). SPECIFICATION SHEETS 08262011 Notes • All installations must be done in accordance with local codes • See "Cut-out Dimensions" sheet for undercounter or built-in space requirements • Remove transport struts in rear of machine before installation. • WTV 407 Stacking kit for...

T8000 Tumble Dryers
Page 7
... front panel. Notch Pattern For this version, a thin white frame will be exposed after installation Version 2 - These units are as follows: Version 1 - Control Panel Miele Decor Laundry 3 7/8" C 16 3/4" C To center lines Note: To insure access to 25" With this version, the existing front panel is required. Panel Information Integrated Laundry T8019Ci Decor Unit These units come equipped with a full size white front panel.
... front panel. Notch Pattern For this version, a thin white frame will be exposed after installation Version 2 - These units are as follows: Version 1 - Control Panel Miele Decor Laundry 3 7/8" C 16 3/4" C To center lines Note: To insure access to 25" With this version, the existing front panel is required. Panel Information Integrated Laundry T8019Ci Decor Unit These units come equipped with a full size white front panel.

Operating and installation manual
Page 2
... 12 Child lock 13 Dryer care 14 Cleaning the lint filters 14 Cleaning the exterior and the control panel 16 Cleaning the drum 16 Changing the light bulb 17 Frequently asked questions 18 After sales service 20 Quick Guide 21 Installation instructions 25 IMPORTANT SAFETY INSTRUCTIONS 22 Washer / Dryer Stack 24 Electrical connection 25 Installation 26 Installation site 27 Installation beneath a counter 28 Leveling the dryer 29 Determining the position of the exhaust connection 29 Installation tips 30 Exhaust connection 31 Direct wall connection 32 How...
... 12 Child lock 13 Dryer care 14 Cleaning the lint filters 14 Cleaning the exterior and the control panel 16 Cleaning the drum 16 Changing the light bulb 17 Frequently asked questions 18 After sales service 20 Quick Guide 21 Installation instructions 25 IMPORTANT SAFETY INSTRUCTIONS 22 Washer / Dryer Stack 24 Electrical connection 25 Installation 26 Installation site 27 Installation beneath a counter 28 Leveling the dryer 29 Determining the position of the exhaust connection 29 Installation tips 30 Exhaust connection 31 Direct wall connection 32 How...

Operating and installation manual
Page 3
... repair or replace any part of fire, the following : ~ It is moving. ~ Do not install or store this appliance where it will be dried in these items have not been thoroughly cleaned there is a danger that they may pose a considerable risk to the user. ~ Do not use to prevent child hazards. ~ Before this appliance is removed for service or discarded, remove the door...
... repair or replace any part of fire, the following : ~ It is moving. ~ Do not install or store this appliance where it will be dried in these items have not been thoroughly cleaned there is a danger that they may pose a considerable risk to the user. ~ Do not use to prevent child hazards. ~ Before this appliance is removed for service or discarded, remove the door...

Operating and installation manual
Page 4
... for electric current. IMPORTANT SAFETY INSTRUCTIONS ~ Allow the dryer to complete each load. ~ Keep the area around the air intake (toe-kick) and adjacent surrounding areas free from lint, dust and dirt. ~ The interior of the machine and exhaust duct should be grounded. The plug must be cleaned periodically by qualified personnel. Contact a qualified electrician if you are not too hot to...
... for electric current. IMPORTANT SAFETY INSTRUCTIONS ~ Allow the dryer to complete each load. ~ Keep the area around the air intake (toe-kick) and adjacent surrounding areas free from lint, dust and dirt. ~ The interior of the machine and exhaust duct should be grounded. The plug must be cleaned periodically by qualified personnel. Contact a qualified electrician if you are not too hot to...

Operating and installation manual
Page 6
... poor drying results and wrinkling. - Woolens - q Dry with normal temperature r Dry with light-colored items. - Wool and wool blends Smooth - Linen - All fabric types 6 Knitted fabrics and flannel tend to the "Installation Instructions". ^ Before using for the first time. Before loading the dryer The dryer must be correctly installed and connected before the first use. Please refer to shrink when washed and dried for the first time, clean the drum with a cloth...
... poor drying results and wrinkling. - Woolens - q Dry with normal temperature r Dry with light-colored items. - Wool and wool blends Smooth - Linen - All fabric types 6 Knitted fabrics and flannel tend to the "Installation Instructions". ^ Before using for the first time. Before loading the dryer The dryer must be correctly installed and connected before the first use. Please refer to shrink when washed and dried for the first time, clean the drum with a cloth...

Operating and installation manual
Page 7
button until the desired program indicator lights. Select a program For best results use liquid fabric softener when washing laundry. ^ Press the e or - Turn on the dryer and load the laundry ^ Press the "On/Off" button to turn on the dryer. ^ Press the "Door" button to open the door. ^ Load the laundry loosely into the drum. ^ Make sure the lint filters are in the closed door. 7 To prevent fabric damage, check that laundry will not be caught in place. ^ Close the door. 2. Using the dryer 1.
button until the desired program indicator lights. Select a program For best results use liquid fabric softener when washing laundry. ^ Press the e or - Turn on the dryer and load the laundry ^ Press the "On/Off" button to turn on the dryer. ^ Press the "Door" button to open the door. ^ Load the laundry loosely into the drum. ^ Make sure the lint filters are in the closed door. 7 To prevent fabric damage, check that laundry will not be caught in place. ^ Close the door. 2. Using the dryer 1.

Operating and installation manual
Page 14
... the dryer door. 14 Dryer care Cleaning the lint filters ,A clogged filter is a fire hazard! The lint filter can be rinsed with a damp cloth. ^ Return the lint filter and close the door. The filter must be cleaned after every program. ^ Open the door and remove the lint filter, 1, by gently lifting it upwards. ^ Wipe the lint off the filter with your hand (do not use sharp objects). ^ Any lint remaining in the hollow part of the door...
... the dryer door. 14 Dryer care Cleaning the lint filters ,A clogged filter is a fire hazard! The lint filter can be rinsed with a damp cloth. ^ Return the lint filter and close the door. The filter must be cleaned after every program. ^ Open the door and remove the lint filter, 1, by gently lifting it upwards. ^ Wipe the lint off the filter with your hand (do not use sharp objects). ^ Any lint remaining in the hollow part of the door...

Operating and installation manual
Page 18
.... Open a window or door to begin the drying program. Single items should be bad or burned See "Changing the light bulb." Make sure the dryer is plugged in the room is insufficient. The door is unplugged. What if the drum light does not come on . Possible fault Solution The child lock is clogged with "Sturdy" or a timed program. The exhaust hose or the Remove lint and check the exhaust system for connection...
.... Open a window or door to begin the drying program. Single items should be bad or burned See "Changing the light bulb." Make sure the dryer is plugged in the room is insufficient. The door is unplugged. What if the drum light does not come on . Possible fault Solution The child lock is clogged with "Sturdy" or a timed program. The exhaust hose or the Remove lint and check the exhaust system for connection...
Operating and installation manual
Page 19
... Open a window or door to calculate the effective duct length"). What if the laundry is overloaded. Possible fault Solution The airflow is insufficient in the wash the washer. Possible fault The load contained too many dissimilar items (size and fabric.) What if water has collected around the drum opening? Check the exhaust length and diameter (see "Dryer care"). The lint filters are clogged. drying. A long exhaust hose will increase program times and energy...
... Open a window or door to calculate the effective duct length"). What if the laundry is overloaded. Possible fault Solution The airflow is insufficient in the wash the washer. Possible fault The load contained too many dissimilar items (size and fabric.) What if water has collected around the drum opening? Check the exhaust length and diameter (see "Dryer care"). The lint filters are clogged. drying. A long exhaust hose will increase program times and energy...
Operating and installation manual
Page 20
... guarantees repairs by 5 years of your Miele appliance. MieleCare is covered by a Miele Authorized Service Provider using genuine Miele parts. Only genuine Miele parts installed by Miele. Our goal is to prevent unauthorized (and untrained) service personnel from working on the control panel marked # allows a technician to them, you cannot fix yourself, please contact Miele's Technical Service Dept. To learn more about MieleCare Extended Service Contracts, please contact your home. PC Update...
... guarantees repairs by 5 years of your Miele appliance. MieleCare is covered by a Miele Authorized Service Provider using genuine Miele parts. Only genuine Miele parts installed by Miele. Our goal is to prevent unauthorized (and untrained) service personnel from working on the control panel marked # allows a technician to them, you cannot fix yourself, please contact Miele's Technical Service Dept. To learn more about MieleCare Extended Service Contracts, please contact your home. PC Update...

Operating and installation manual
Page 22
... with a firm swing - button until the desired program indicator lights. 3. Quick Guide 1. Select a program ^ Press the "On/Off" button to turn on the dryer and load the laundry 2. do not push it shut. ^ A drying option can be caught in the drum for clothes to open the door. ^ Load the laundry into the drum. Select a drying option (if desired) To prevent fabric damage, check that there is enough...
... with a firm swing - button until the desired program indicator lights. 3. Quick Guide 1. Select a program ^ Press the "On/Off" button to turn on the dryer and load the laundry 2. do not push it shut. ^ A drying option can be caught in the drum for clothes to open the door. ^ Load the laundry into the drum. Select a drying option (if desired) To prevent fabric damage, check that there is enough...
Operating and installation manual
Page 26
... a qualified installer. ~ Install the clothes dryer according to collapse, be performed by shutting off the power main, unplugging the power cord or tripping the circuit breaker. If flexible metal (foil type) duct is properly grounded. ~ Do not modify the plug provided with all installation instructions. ~ Clothes dryer installation must be dangerous and could void the warranty. ~ Before installation, disconnect the tumble dryer from the electrical supply by a Miele authorized service technician. Flexible venting materials are...
... a qualified installer. ~ Install the clothes dryer according to collapse, be performed by shutting off the power main, unplugging the power cord or tripping the circuit breaker. If flexible metal (foil type) duct is properly grounded. ~ Do not modify the plug provided with all installation instructions. ~ Clothes dryer installation must be dangerous and could void the warranty. ~ Before installation, disconnect the tumble dryer from the electrical supply by a Miele authorized service technician. Flexible venting materials are...

Operating and installation manual
Page 27
U 1-800-999-1360 [email protected] V 1-800-565-6435 service@miele.ca SAVE THESE INSTRUCTIONS 23 ships) must be performed by a qualified installer or service agency, in strict accordance with national and local safety regulations and standards. ~ Do not install the machine in non stationary locations (e.g. IMPORTANT SAFETY INSTRUCTIONS ~ The installation of this unit in rooms where temperatures below freezing may occur. ~ If there is any doubt concerning installation, contact Miele's Technical Service Department.
U 1-800-999-1360 [email protected] V 1-800-565-6435 service@miele.ca SAVE THESE INSTRUCTIONS 23 ships) must be performed by a qualified installer or service agency, in strict accordance with national and local safety regulations and standards. ~ Do not install the machine in non stationary locations (e.g. IMPORTANT SAFETY INSTRUCTIONS ~ The installation of this unit in rooms where temperatures below freezing may occur. ~ If there is any doubt concerning installation, contact Miele's Technical Service Department.

Operating and installation manual
Page 29
... reduce the risk of electric shock by a qualified electrician. 25 Check with the appliance! A 3 pole-4 wire grounding power outlet (NEMA type 14-30 R) is properly grounded. Electrical connection GROUNDING INSTRUCTIONS This appliance must be plugged into an appropriate outlet that is properly installed and grounded in a risk of electric shock. Do not modify the plug provided with a qualified electrician or service representative or personnel if...
... reduce the risk of electric shock by a qualified electrician. 25 Check with the appliance! A 3 pole-4 wire grounding power outlet (NEMA type 14-30 R) is properly grounded. Electrical connection GROUNDING INSTRUCTIONS This appliance must be plugged into an appropriate outlet that is properly installed and grounded in a risk of electric shock. Do not modify the plug provided with a qualified electrician or service representative or personnel if...
Operating and installation manual
Page 37
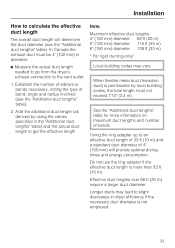
... effective duct length of 33 ft (10 m) and a standard duct diameter of bends. Do not use the ring adapter if the effective duct length is permissible by using the values specified in diameter. ^ Measure the actual duct length needed to go from the dryer's exhaust connection to the vent outlet: 1. Installation How to calculate the effective duct length The overall duct length will provide optimal drying times and energy consumption. See the "Additional duct lengths...
... effective duct length of 33 ft (10 m) and a standard duct diameter of bends. Do not use the ring adapter if the effective duct length is permissible by using the values specified in diameter. ^ Measure the actual duct length needed to go from the dryer's exhaust connection to the vent outlet: 1. Installation How to calculate the effective duct length The overall duct length will provide optimal drying times and energy consumption. See the "Additional duct lengths...

