
Operating Instructions
Page 3
... Remove the protective foil 11 Place the batteries in the remote control 11 Switch on the robot vacuum cleaner 11 Connect the base station 12 Charge the rechargeable battery 12 Set the clock 13 Define the area to be vacuumed 13 Use 13 Switching on and off 13 Starting vacuuming 13 Finishing vacuuming 14 Manually controlled vacuuming 14 Interrupting vacuuming 14 Manual navigation (without vacuuming 14 Directing the robot vacuum cleaner...
... Remove the protective foil 11 Place the batteries in the remote control 11 Switch on the robot vacuum cleaner 11 Connect the base station 12 Charge the rechargeable battery 12 Set the clock 13 Define the area to be vacuumed 13 Use 13 Switching on and off 13 Starting vacuuming 13 Finishing vacuuming 14 Manually controlled vacuuming 14 Interrupting vacuuming 14 Manual navigation (without vacuuming 14 Directing the robot vacuum cleaner...
Operating Instructions
Page 4
... filter 19 How to replace the exhaust filter 19 Cleaning the roller brush 19 Cleaning the side brushes 20 Cleaning the seal on the dust box 20 Replacing the seal on the dust box 21 Cleaning the front wheel 21 Cleaning the sensors 21 Changing the batteries in the remote control 22 Replacing the rechargeable battery 22 Storage 22 Maintenance 23 Problem solving guide 23 Fault messages 24 After sales service 25 Warranty 25 Electrical...
... filter 19 How to replace the exhaust filter 19 Cleaning the roller brush 19 Cleaning the side brushes 20 Cleaning the seal on the dust box 20 Replacing the seal on the dust box 21 Cleaning the front wheel 21 Cleaning the sensors 21 Changing the batteries in the remote control 22 Replacing the rechargeable battery 22 Storage 22 Maintenance 23 Problem solving guide 23 Fault messages 24 After sales service 25 Warranty 25 Electrical...
Operating Instructions
Page 5
Keep these instructions carefully before using it or have been shown how to use . ~ The robot vacuum cleaner must not be dangerous. ~ The robot vacuum cleaner can , however, lead to personal injury and damage to vacuum dry floor surfaces. Correct application ~ This robot vacuum cleaner is intended for cleaning flooring in a safe way and understand and recognise the consequences of incorrect operation. Any other usage, modification or...
Keep these instructions carefully before using it or have been shown how to use . ~ The robot vacuum cleaner must not be dangerous. ~ The robot vacuum cleaner can , however, lead to personal injury and damage to vacuum dry floor surfaces. Correct application ~ This robot vacuum cleaner is intended for cleaning flooring in a safe way and understand and recognise the consequences of incorrect operation. Any other usage, modification or...
Operating Instructions
Page 6
... the power cord or other work by a Miele authorised service technician. Unauthorized repairs could cause injury or machine damage and may void the warranty. ~ Repairs should only be carried out by unqualified persons can cause considerable danger to charge the rechargeable battery. 6 Do not use the parts supplied (mains cable, power supply unit and base station) to users. ~ Make sure that the mains electrical...
... the power cord or other work by a Miele authorised service technician. Unauthorized repairs could cause injury or machine damage and may void the warranty. ~ Repairs should only be carried out by unqualified persons can cause considerable danger to charge the rechargeable battery. 6 Do not use the parts supplied (mains cable, power supply unit and base station) to users. ~ Make sure that the mains electrical...
Operating Instructions
Page 7
.... ~ Batteries can leak corrosive fluids. Do not place any items in front of a fireplace. ~ Do not use the robot vacuum cleaner without the exhaust filter fitted. ~ Remove all parts with water and seek medical advice. ~ Do not stick any water, liquid or damp dirt. Do not use the robot vacuum cleaner to vacuum. 7 Wait until any freshly cleaned or shampooed carpets or floor coverings are completely dry before...
.... ~ Batteries can leak corrosive fluids. Do not place any items in front of a fireplace. ~ Do not use the robot vacuum cleaner without the exhaust filter fitted. ~ Remove all parts with water and seek medical advice. ~ Do not stick any water, liquid or damp dirt. Do not use the robot vacuum cleaner to vacuum. 7 Wait until any freshly cleaned or shampooed carpets or floor coverings are completely dry before...
Operating Instructions
Page 8
... hair near the roller brush or other moving parts of them responsibly and in printers and photocopiers, can conduct electricity. ~ Do not use the robot vacuum cleaner to vacuum up any inflammable or combustible liquids or gases and do not use the robot vacuum cleaner to vacuum toner dust. Recycle the rechargeable battery and the batteries from the remote control. Battery packs may be removed before disposal...
... hair near the roller brush or other moving parts of them responsibly and in printers and photocopiers, can conduct electricity. ~ Do not use the robot vacuum cleaner to vacuum up any inflammable or combustible liquids or gases and do not use the robot vacuum cleaner to vacuum toner dust. Recycle the rechargeable battery and the batteries from the remote control. Battery packs may be removed before disposal...
Operating Instructions
Page 9
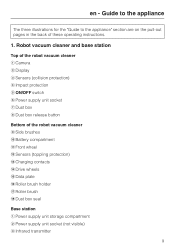
... switch f Power supply unit socket g Dust box h Dust box release button Bottom of these operating instructions. 1. Guide to the appliance The three illustrations for the "Guide to the appliance" section are on the pull-out pages in the back of the robot vacuum cleaner i Side brushes j Battery compartment k Front wheel l Sensors (toppling protection) m Charging contacts n Drive wheels o Data plate p Roller brush holder q Roller brush r Dust box seal Base station a Power supply unit storage compartment b Power...
... switch f Power supply unit socket g Dust box h Dust box release button Bottom of these operating instructions. 1. Guide to the appliance The three illustrations for the "Guide to the appliance" section are on the pull-out pages in the back of the robot vacuum cleaner i Side brushes j Battery compartment k Front wheel l Sensors (toppling protection) m Charging contacts n Drive wheels o Data plate p Roller brush holder q Roller brush r Dust box seal Base station a Power supply unit storage compartment b Power...
Operating Instructions
Page 11
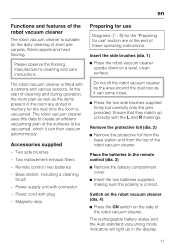
... (dia. 3) ^ Remove the battery compartment cover. ^ Insert the two batteries supplied, making sure the polarity is fitted with plug - Insert the side brushes (dia. 1) ^ Place the robot vacuum cleaner upside down on the side of the robot vacuum cleaner. Power cord with a camera and various sensors. At the start of these operating instructions. Accessories supplied - Please observe the flooring manufacturer's cleaning and care instructions. The robot vacuum cleaner is...
... (dia. 3) ^ Remove the battery compartment cover. ^ Insert the two batteries supplied, making sure the polarity is fitted with plug - Insert the side brushes (dia. 1) ^ Place the robot vacuum cleaner upside down on the side of the robot vacuum cleaner. Power cord with a camera and various sensors. At the start of these operating instructions. Accessories supplied - Please observe the flooring manufacturer's cleaning and care instructions. The robot vacuum cleaner is...

Operating Instructions
Page 13
... The minutes indicator will be cleaned. ,Watch the robot vacuum cleaner whenever it is vacuuming new surroundings for permanent fixing. The room to detect and remove any areas which the robot vacuum cleaner should not have access to start vacuuming in the Auto standard vacuuming mode. en Set the clock (dia. 12) Use Use the remote control to order from Miele. ^ Press the ~ II sensor in...
... The minutes indicator will be cleaned. ,Watch the robot vacuum cleaner whenever it is vacuuming new surroundings for permanent fixing. The room to detect and remove any areas which the robot vacuum cleaner should not have access to start vacuuming in the Auto standard vacuuming mode. en Set the clock (dia. 12) Use Use the remote control to order from Miele. ^ Press the ~ II sensor in...
Operating Instructions
Page 18
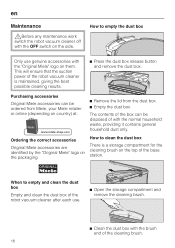
... the suction power of the robot vacuum cleaner after each use genuine accessories with the OFF switch on the side. Ordering the correct accessories Original Miele accessories are identified by the "Original Miele" logo on the top of the cleaning brush. 18 How to clean the dust box There is maintained, giving the best possible cleaning results. ^ Press the dust box release button and remove the dust box...
... the suction power of the robot vacuum cleaner after each use genuine accessories with the OFF switch on the side. Ordering the correct accessories Original Miele accessories are identified by the "Original Miele" logo on the top of the cleaning brush. 18 How to clean the dust box There is maintained, giving the best possible cleaning results. ^ Press the dust box release button and remove the dust box...
Operating Instructions
Page 19
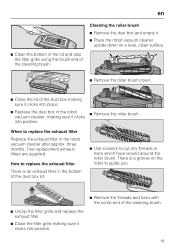
Cleaning the roller brush ^ Remove the dust box and empty it. ^ Place the robot vacuum cleaner upside down on the roller to guide you. ^ Remove the threads and hairs with the comb end of the dust box lid. ^ Use scissors to replace the exhaust filter Replace the exhaust filter in the robot vacuum cleaner after approx. three months. When to cut any threads or hairs which have wound around...
Cleaning the roller brush ^ Remove the dust box and empty it. ^ Place the robot vacuum cleaner upside down on the roller to guide you. ^ Remove the threads and hairs with the comb end of the dust box lid. ^ Use scissors to replace the exhaust filter Replace the exhaust filter in the robot vacuum cleaner after approx. three months. When to cut any threads or hairs which have wound around...
Operating Instructions
Page 20
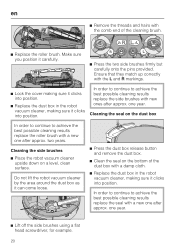
... brushes using a flat head screwdriver, for example. 20 Cleaning the seal on the dust box In order to continue to achieve the best possible cleaning results replace the roller brush with new ones after approx. Cleaning the side brushes ^ Place the robot vacuum cleaner upside down on the bottom of the cleaning brush. ^ Replace the roller brush. In order to continue to achieve the best possible cleaning results replace the side brushes...
... brushes using a flat head screwdriver, for example. 20 Cleaning the seal on the dust box In order to continue to achieve the best possible cleaning results replace the roller brush with new ones after approx. Cleaning the side brushes ^ Place the robot vacuum cleaner upside down on the bottom of the cleaning brush. ^ Replace the roller brush. In order to continue to achieve the best possible cleaning results replace the side brushes...
Operating Instructions
Page 21
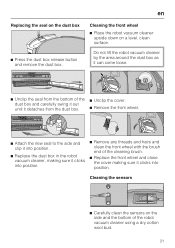
... from the bottom of the ^ Unclip the cover. en Cleaning the front wheel ^ Place the robot vacuum cleaner upside down on the dust box ^ Press the dust box release button and remove the dust box. Cleaning the sensors ^ Carefully clean the sensors on the side and the bottom of the cleaning brush. ^ Replace the front wheel and close the cover making sure it clicks into position...
... from the bottom of the ^ Unclip the cover. en Cleaning the front wheel ^ Place the robot vacuum cleaner upside down on the dust box ^ Press the dust box release button and remove the dust box. Cleaning the sensors ^ Carefully clean the sensors on the side and the bottom of the cleaning brush. ^ Replace the front wheel and close the cover making sure it clicks into position...
Operating Instructions
Page 22
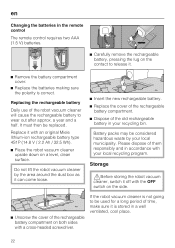
... the robot vacuum cleaner, switch it . ^ Remove the battery compartment cover. ^ Replace the batteries making sure the polarity is not going to wear out after approx. en Changing the batteries in the remote control The remote control requires two AAA (1.5 V) batteries. ^ Carefully remove the rechargeable battery, pressing the lug on both sides with a cross-headed screwdriver. Do not lift the robot vacuum cleaner by your...
... the robot vacuum cleaner, switch it . ^ Remove the battery compartment cover. ^ Replace the batteries making sure the polarity is not going to wear out after approx. en Changing the batteries in the remote control The remote control requires two AAA (1.5 V) batteries. ^ Carefully remove the rechargeable battery, pressing the lug on both sides with a cross-headed screwdriver. Do not lift the robot vacuum cleaner by your...
Operating Instructions
Page 23
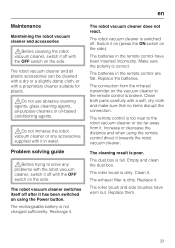
... side). The robot vacuum cleaner switches itself off with the OFF switch on using the remote control direct it towards the robot vacuum cleaner. Make sure the polarity is full. The roller brush and side brushes have been inserted incorrectly. Replace them. 23 The batteries in the remote control are flat. Increase or decrease the distance and when using the Power button. Problem solving guide ,Before trying to...
... side). The robot vacuum cleaner switches itself off with the OFF switch on using the remote control direct it towards the robot vacuum cleaner. Make sure the polarity is full. The roller brush and side brushes have been inserted incorrectly. Replace them. 23 The batteries in the remote control are flat. Increase or decrease the distance and when using the Power button. Problem solving guide ,Before trying to...
Operating Instructions
Page 24
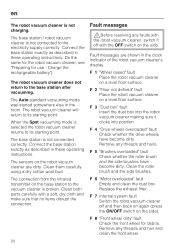
... operating instructions. The Auto standard vacuuming mode was started somewhere else in the clock indicator of the robot vacuum cleaner's display. F 1 "Wheel raised" fault Place the robot vacuum cleaner on the side. F 4 "Drive wheels overloaded" fault Check whether the drive wheels have become dirty. Fault messages ,Before resolving any faults with the robot vacuum cleaner, switch it clicks into position. Replace the exhaust filter. F 8 "Front wheel dirty" fault Check the front wheel...
... operating instructions. The Auto standard vacuuming mode was started somewhere else in the clock indicator of the robot vacuum cleaner's display. F 1 "Wheel raised" fault Place the robot vacuum cleaner on the side. F 4 "Drive wheels overloaded" fault Check whether the drive wheels have become dirty. Fault messages ,Before resolving any faults with the robot vacuum cleaner, switch it clicks into position. Replace the exhaust filter. F 8 "Front wheel dirty" fault Check the front wheel...
Operating Instructions
Page 25
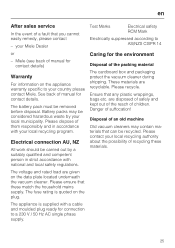
.... The battery pack must be considered hazardous waste by a suitably qualified and competent person in accordance with your local municipality. Please dispose of suffocation! Please recycle. Danger of them responsibly and in strict accordance with a cable and moulded plug ready for contact details) Warranty For information on the data plate located underneath the vacuum cleaner. The fuse rating...
.... The battery pack must be considered hazardous waste by a suitably qualified and competent person in accordance with your local municipality. Please dispose of suffocation! Please recycle. Danger of them responsibly and in strict accordance with a cable and moulded plug ready for contact details) Warranty For information on the data plate located underneath the vacuum cleaner. The fuse rating...

Operating Instructions
Page 30
... maintain, service or use or installation; Such factors include but are not limited to consumables such as batteries, filters or globes. 1.8 Customer must retain proof of household appliances and vacuum cleaners, commercial use or operation after a defect has occurred or been discovered vi. use of parts and accessories and glass breakage); vii. damage through misuse (including failure to check the Miele user manual. This warranty does not...
... maintain, service or use or installation; Such factors include but are not limited to consumables such as batteries, filters or globes. 1.8 Customer must retain proof of household appliances and vacuum cleaners, commercial use or operation after a defect has occurred or been discovered vi. use of parts and accessories and glass breakage); vii. damage through misuse (including failure to check the Miele user manual. This warranty does not...
Operating Instructions
Page 57
... applicable installation instructions; Six (6) months, for which the motor warranty is received by Miele and at any failure to conform to this Warranty shall cover the replacement or repair of all of it's Miele authorized parts and accessories, is valid during the period starting from the date of Miele upon replacement. 57 One (1) year. S189 upright units for parts and labour. One (1) year, upright and canister vacuums. Parts and...
... applicable installation instructions; Six (6) months, for which the motor warranty is received by Miele and at any failure to conform to this Warranty shall cover the replacement or repair of all of it's Miele authorized parts and accessories, is valid during the period starting from the date of Miele upon replacement. 57 One (1) year. S189 upright units for parts and labour. One (1) year, upright and canister vacuums. Parts and...

Operating Instructions
Page 58
... sole remedies under this warranty is limited to Miele's installation instruction; c) contains non-authentic Miele accessories or replacement parts, including filters, dust bags and other than a Miele authorized service centre or technician. 6. Unless otherwise stated, Miele's liability for actual damage from your premises; In no event will , at : Miele Limited Toll free: 1-800-565-6435 161 Four Valley Drive E-mail: customercare@miele.ca Vaughan, Ontario Canada L4K...
... sole remedies under this warranty is limited to Miele's installation instruction; c) contains non-authentic Miele accessories or replacement parts, including filters, dust bags and other than a Miele authorized service centre or technician. 6. Unless otherwise stated, Miele's liability for actual damage from your premises; In no event will , at : Miele Limited Toll free: 1-800-565-6435 161 Four Valley Drive E-mail: customercare@miele.ca Vaughan, Ontario Canada L4K...

