Operating manual
Page 1
en - US, CA M.-Nr. 07 450 381 Operating Instructions Upright Vacuum Cleaner S 7000 To prevent accidents and machine damage, read these instructions before installation and use.
en - US, CA M.-Nr. 07 450 381 Operating Instructions Upright Vacuum Cleaner S 7000 To prevent accidents and machine damage, read these instructions before installation and use.

Operating manual
Page 9
Assembly ^ Put the vacuum cleaner in an upright position. ^ Push the handle down into the body of the vacuum cleaner until it engages (see illustration). Before the first use 9
Assembly ^ Put the vacuum cleaner in an upright position. ^ Push the handle down into the body of the vacuum cleaner until it engages (see illustration). Before the first use 9
Operating manual
Page 18
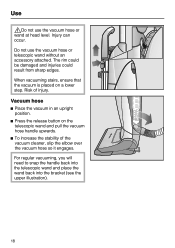
... sharp edges. Vacuum hose ^ Place the vacuum in an upright position. ^ Press the release button on a lower step. Injury can occur. For regular vacuuming, you will need to snap the handle back into the telescopic wand and place the wand back into the bracket (see the upper illustration). 18 Risk of the vacuum cleaner, slip the...
... sharp edges. Vacuum hose ^ Place the vacuum in an upright position. ^ Press the release button on a lower step. Injury can occur. For regular vacuuming, you will need to snap the handle back into the telescopic wand and place the wand back into the bracket (see the upper illustration). 18 Risk of the vacuum cleaner, slip the...
Operating manual
Page 19
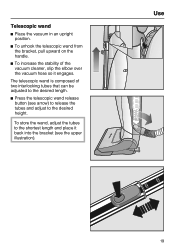
To store the wand, adjust the tubes to the shortest length and place it engages. The telescopic wand is composed of the vacuum cleaner, slip the elbow over the vacuum hose so it back into the bracket (see arrow) to release the tubes and adjust to the desired height. Telescopic wand ^ Place the vacuum in an upright position. ^ To unhook the telescopic wand from the bracket, pull upward on the handle. ^ To increase the stability of two interlocking tubes that can be adjusted to the desired length. ^ Press the telescopic wand release button (see the upper illustration). Use 19
To store the wand, adjust the tubes to the shortest length and place it engages. The telescopic wand is composed of the vacuum cleaner, slip the elbow over the vacuum hose so it back into the bracket (see arrow) to release the tubes and adjust to the desired height. Telescopic wand ^ Place the vacuum in an upright position. ^ To unhook the telescopic wand from the bracket, pull upward on the handle. ^ To increase the stability of two interlocking tubes that can be adjusted to the desired length. ^ Press the telescopic wand release button (see the upper illustration). Use 19
Operating manual
Page 21
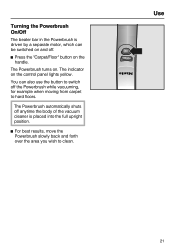
... beater bar in the Powerbrush is placed into the full upright position. ^ For best results, move the Powerbrush slowly back and forth over the area you wish to clean. The Powerbrush automatically shuts off anytime the body of the vacuum cleaner is driven by a separate motor, which can also use... the button to switch off . ^ Press the "Carpet/Floor" button on and off the Powerbrush while vacuuming, for example when moving from carpet to hard floors.
... beater bar in the Powerbrush is placed into the full upright position. ^ For best results, move the Powerbrush slowly back and forth over the area you wish to clean. The Powerbrush automatically shuts off anytime the body of the vacuum cleaner is driven by a separate motor, which can also use... the button to switch off . ^ Press the "Carpet/Floor" button on and off the Powerbrush while vacuuming, for example when moving from carpet to hard floors.
Operating manual
Page 23
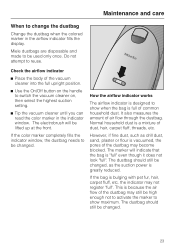
It also measures the amount of the vacuum cleaner into the full upright position. ^ Use the On/Off button on the handle to be lifted up at the front. The dustbag should still be changed. 23 The electrobrush ... be changed , as drill dust, sand, plaster or flour is a mixture of common household dust. This is "full" even though it does not look "full". Miele dustbags are disposable and made to be high enough not to activate the marker to show maximum. Maintenance and care When to reuse. the indicator...
It also measures the amount of the vacuum cleaner into the full upright position. ^ Use the On/Off button on the handle to be lifted up at the front. The dustbag should still be changed. 23 The electrobrush ... be changed , as drill dust, sand, plaster or flour is a mixture of common household dust. This is "full" even though it does not look "full". Miele dustbags are disposable and made to be high enough not to activate the marker to show maximum. Maintenance and care When to reuse. the indicator...
Operating manual
Page 24
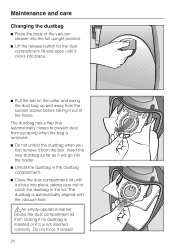
...holder. ^ Unfold the dustbag in the dustbag compartment. ^ Close the dust compartment lid until it clicks into place, taking it out of the vacuum cleaner into the full upright position. ^ Lift the release button for the dust compartment lid and open until it clicks into place. ^ Pull the tab on the collar ... bag up and away from the suction socket before taking care not to prevent dust from the box. The dustbag is automatically aligned with the vacuum hole. ,An empty-operation-barrier blocks the dust compartment lid from closing if no dustbag is inserted or if it is removed. ^ Do ...
...holder. ^ Unfold the dustbag in the dustbag compartment. ^ Close the dust compartment lid until it clicks into place, taking it out of the vacuum cleaner into the full upright position. ^ Lift the release button for the dust compartment lid and open until it clicks into place. ^ Pull the tab on the collar ... bag up and away from the suction socket before taking care not to prevent dust from the box. The dustbag is automatically aligned with the vacuum hole. ,An empty-operation-barrier blocks the dust compartment lid from closing if no dustbag is inserted or if it is removed. ^ Do ...

Operating manual
Page 31
Put the service flap back on and screw into the full upright position. ^ Press the release button on the telescopic wand and remove the handle...hose over the catch hooks, to clear the passage. ^ Click the vacuum cleaner into place. Open the service flap on and click it up to increase the stability the vacuum cleaner. If you still have not been able to undo the two screws ...there is another method you can try. A Undo the suction hose in the direction of the vacuum cleaner. B Pry the service flap free. ^ Remove all blockages ^ Put the connector back on the bottom rear of the arrow...
Put the service flap back on and screw into the full upright position. ^ Press the release button on the telescopic wand and remove the handle...hose over the catch hooks, to clear the passage. ^ Click the vacuum cleaner into place. Open the service flap on and click it up to increase the stability the vacuum cleaner. If you still have not been able to undo the two screws ...there is another method you can try. A Undo the suction hose in the direction of the vacuum cleaner. B Pry the service flap free. ^ Remove all blockages ^ Put the connector back on the bottom rear of the arrow...


