Operating manual
Page 3
... INSTRUCTIONS 4 Guide to the vacuum cleaner 7 Before the first use 9 Included accessories 10 Use 12 Power cord 12 Turning the vacuum cleaner On/Off 14 Selecting the suction power setting 15 "Automatic" setting 17 Vacuum hose 18 Telescopic wand 19 Powerbrush 20 Maintenance and care 22 Purchasing new dustbags and filters 22 Which dustbags and filters are the right ones 22 When to change the dustbag 23 Changing the dustbag 24 When to change the dust...
... INSTRUCTIONS 4 Guide to the vacuum cleaner 7 Before the first use 9 Included accessories 10 Use 12 Power cord 12 Turning the vacuum cleaner On/Off 14 Selecting the suction power setting 15 "Automatic" setting 17 Vacuum hose 18 Telescopic wand 19 Powerbrush 20 Maintenance and care 22 Purchasing new dustbags and filters 22 Which dustbags and filters are the right ones 22 When to change the dustbag 23 Changing the dustbag 24 When to change the dust...
Operating manual
Page 5
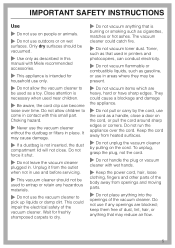
... this manual with wet hands. ~ Keep the power cord, hair, loose clothing, fingers and other parts of the body away from heated surfaces. ~ Do not unplug the vacuum cleaner by the cord, use the vacuum cleaner to dry. ~ Do not vacuum anything that used in areas where they may reduce air flow. 5 Wait for household use only. ~ Do not allow children to come in use and before servicing. ~ This vacuum cleaner should...
... this manual with wet hands. ~ Keep the power cord, hair, loose clothing, fingers and other parts of the body away from heated surfaces. ~ Do not unplug the vacuum cleaner by the cord, use the vacuum cleaner to dry. ~ Do not vacuum anything that used in areas where they may reduce air flow. 5 Wait for household use only. ~ Do not allow children to come in use and before servicing. ~ This vacuum cleaner should...
Operating manual
Page 6
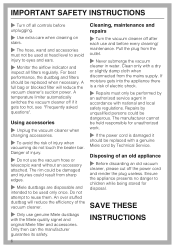
... reduce the vacuum cleaner's suction power. A full bag or blocked filter will reduce the efficiency of injury. ~ Do not use the vacuum hose or telescopic wand without an accessory attached. A temperature limiter automatically switches the vacuum cleaner off after each use genuine Miele dustbags with a genuine Miele cord by unqualified persons could result from the mains supply. Only then can the manufacturer guarantee its safety. 6 Cleaning, maintenance and repairs ~ Turn the vacuum cleaner off...
... reduce the vacuum cleaner's suction power. A full bag or blocked filter will reduce the efficiency of injury. ~ Do not use the vacuum hose or telescopic wand without an accessory attached. A temperature limiter automatically switches the vacuum cleaner off after each use genuine Miele dustbags with a genuine Miele cord by unqualified persons could result from the mains supply. Only then can the manufacturer guarantee its safety. 6 Cleaning, maintenance and repairs ~ Turn the vacuum cleaner off...
Operating manual
Page 8
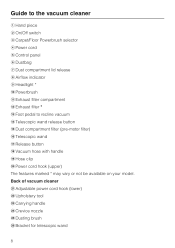
... vacuum cleaner u Adjustable power cord hook (lower) v Upholstery tool w Carrying handle x Crevice nozzle y Dusting brush z Bracket for telescopic wand 8 Guide to the vacuum cleaner a Hand piece b On/Off switch c Carpet/Floor Powerbrush selector d Power cord e Control panel f Dustbag g Dust compartment lid release h Airflow indicator i Headlight * j Powerbrush k Exhaust filter compartment l Exhaust filter * m Foot pedal to recline vacuum n Telescopic wand release button o Dust compartment filter (pre-motor filter) p Telescopic wand q Release button r Vacuum hose with handle s Hose clip t Power...
... vacuum cleaner u Adjustable power cord hook (lower) v Upholstery tool w Carrying handle x Crevice nozzle y Dusting brush z Bracket for telescopic wand 8 Guide to the vacuum cleaner a Hand piece b On/Off switch c Carpet/Floor Powerbrush selector d Power cord e Control panel f Dustbag g Dust compartment lid release h Airflow indicator i Headlight * j Powerbrush k Exhaust filter compartment l Exhaust filter * m Foot pedal to recline vacuum n Telescopic wand release button o Dust compartment filter (pre-motor filter) p Telescopic wand q Release button r Vacuum hose with handle s Hose clip t Power...
Operating manual
Page 10
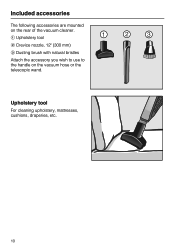
Upholstery tool For cleaning upholstery, mattresses, cushions, draperies, etc. 10 a Upholstery tool b Crevice nozzle, 12" (300 mm) c Dusting brush with natural bristles Attach the accessory you wish to use to the handle on the rear of the vacuum cleaner. Included accessories The following accessories are mounted on the vacuum hose or the telescopic wand.
Upholstery tool For cleaning upholstery, mattresses, cushions, draperies, etc. 10 a Upholstery tool b Crevice nozzle, 12" (300 mm) c Dusting brush with natural bristles Attach the accessory you wish to use to the handle on the rear of the vacuum cleaner. Included accessories The following accessories are mounted on the vacuum hose or the telescopic wand.

Operating manual
Page 14
The vacuum cleaner turns on automatically. 14 Lighting (depending on model) The headlight turns on . PremiumLine Models: The suction power levels on the control panel lights yellow. ComfortLine Models: The "On" indicator on the control panel light yellow. Use Turning the vacuum cleaner On/Off Always follow the flooring manufacturer's cleaning and care instructions. ^ Press the On/Off button on the handle.
The vacuum cleaner turns on automatically. 14 Lighting (depending on model) The headlight turns on . PremiumLine Models: The suction power levels on the control panel lights yellow. ComfortLine Models: The "On" indicator on the control panel light yellow. Use Turning the vacuum cleaner On/Off Always follow the flooring manufacturer's cleaning and care instructions. ^ Press the On/Off button on the handle.
Operating manual
Page 15
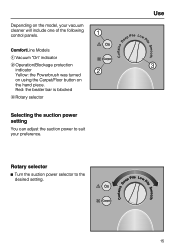
Use eep Pile Low P Curtains D ile Smooth 15 Rotary selector ^ Turn the suction power selector to suit your vacuum cleaner will include one of the following control panels. ComfortLine Models a Vacuum "On" indicator b Operation/Blockage protection indicator Yellow: the Powerbrush was turned on using the Carpet/Floor button on the model, your preference. Red: the beater bar is blocked c Rotary selector Selecting the suction power setting You can adjust the suction power to the desired setting. Depending on the hand piece.
Use eep Pile Low P Curtains D ile Smooth 15 Rotary selector ^ Turn the suction power selector to suit your vacuum cleaner will include one of the following control panels. ComfortLine Models a Vacuum "On" indicator b Operation/Blockage protection indicator Yellow: the Powerbrush was turned on using the Carpet/Floor button on the model, your preference. Red: the beater bar is blocked c Rotary selector Selecting the suction power setting You can adjust the suction power to the desired setting. Depending on the hand piece.
Operating manual
Page 16
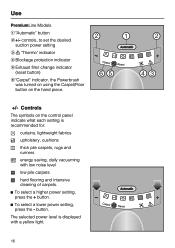
..., daily vacuuming with a yellow light. 16 controls, to set the desired suction power setting c § "Thermo" indicator d Blockage protection indicator e Exhaust filter change indicator (reset button) f "Carpet" indicator, the Powerbrush was turned on using the Carpet/Floor button on the control panel indicate what each setting is displayed with low noise level e low pile carpets f hard flooring and intensive cleaning of carpets. ^ To select a higher power setting, press the + button. ^ To select a lower power setting, press the - button. Use PremiumLine Models a "Automatic" button...
..., daily vacuuming with a yellow light. 16 controls, to set the desired suction power setting c § "Thermo" indicator d Blockage protection indicator e Exhaust filter change indicator (reset button) f "Carpet" indicator, the Powerbrush was turned on using the Carpet/Floor button on the control panel indicate what each setting is displayed with low noise level e low pile carpets f hard flooring and intensive cleaning of carpets. ^ To select a higher power setting, press the + button. ^ To select a lower power setting, press the - button. Use PremiumLine Models a "Automatic" button...
Operating manual
Page 17
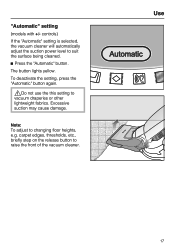
Use 17 The button lights yellow. "Automatic" setting (models with +/- controls) If the "Automatic" setting is selected, the vacuum cleaner will automatically adjust the suction power level to changing floor heights, e.g. Note: To adjust to suit the surface being cleaned. ^ Press the "Automatic" button. Excessive suction may cause damage. carpet edges, thresholds, etc., briefly step on the release button to vacuum draperies or other lightweight fabrics. To deactivate the setting, press...
Use 17 The button lights yellow. "Automatic" setting (models with +/- controls) If the "Automatic" setting is selected, the vacuum cleaner will automatically adjust the suction power level to changing floor heights, e.g. Note: To adjust to suit the surface being cleaned. ^ Press the "Automatic" button. Excessive suction may cause damage. carpet edges, thresholds, etc., briefly step on the release button to vacuum draperies or other lightweight fabrics. To deactivate the setting, press...
Operating manual
Page 18
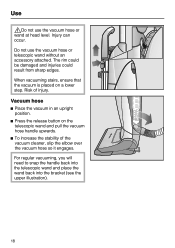
... sharp edges. Injury can occur. When vacuuming stairs, ensure that the vacuum is placed on the telescopic wand and pull the vacuum hose handle upwards. ^ To increase the stability of injury. Risk of the vacuum cleaner, slip the elbow over the vacuum hose so it engages. Do not use the vacuum hose or wand at head level. Use ,Do not use the vacuum hose or telescopic wand without an accessory attached.
... sharp edges. Injury can occur. When vacuuming stairs, ensure that the vacuum is placed on the telescopic wand and pull the vacuum hose handle upwards. ^ To increase the stability of injury. Risk of the vacuum cleaner, slip the elbow over the vacuum hose so it engages. Do not use the vacuum hose or wand at head level. Use ,Do not use the vacuum hose or telescopic wand without an accessory attached.

Operating manual
Page 20
shag. Turn the Powerbrush off to hard wear, especially in contact with a variable or uneven surface. The brush could come in high traffic areas. ,Do not use the Powerbrush to vacuum high quality, hand knotted rugs, for cleaning and restoring crushed carpet pile of wall to wall carpeting and floor coverings subject to vacuum these types of the threads being pulled out...
shag. Turn the Powerbrush off to hard wear, especially in contact with a variable or uneven surface. The brush could come in high traffic areas. ,Do not use the Powerbrush to vacuum high quality, hand knotted rugs, for cleaning and restoring crushed carpet pile of wall to wall carpeting and floor coverings subject to vacuum these types of the threads being pulled out...
Operating manual
Page 21
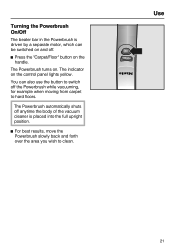
... floors. Use 21 The Powerbrush turns on the control panel lights yellow. The indicator on . You can be switched on the handle. The Powerbrush automatically shuts off . ^ Press the "Carpet/Floor" button on and off anytime the body of the vacuum cleaner is driven by a separate motor, which can also use the button to switch off the Powerbrush while vacuuming, for example when moving from carpet to clean...
... floors. Use 21 The Powerbrush turns on the control panel lights yellow. The indicator on . You can be switched on the handle. The Powerbrush automatically shuts off . ^ Press the "Carpet/Floor" button on and off anytime the body of the vacuum cleaner is driven by a separate motor, which can also use the button to switch off the Powerbrush while vacuuming, for example when moving from carpet to clean...
Operating manual
Page 22
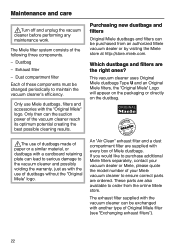
... use Miele dustbags, filters and accessories with another type of the vacuum cleaner reach its optimum potential creating the best possible cleaning results. Dustbag - Only then can be changed periodically to the vacuum cleaner and possibly voiding the warranty, just as with the vacuum cleaner can the suction power of Original Miele filter (see "Exchanging exhaust filters"). 22 The Miele filter system consists of dustbags without the "Original Miele" logo. An "Air Clean" exhaust filter...
... use Miele dustbags, filters and accessories with another type of the vacuum cleaner reach its optimum potential creating the best possible cleaning results. Dustbag - Only then can be changed periodically to the vacuum cleaner and possibly voiding the warranty, just as with the vacuum cleaner can the suction power of Original Miele filter (see "Exchanging exhaust filters"). 22 The Miele filter system consists of dustbags without the "Original Miele" logo. An "Air Clean" exhaust filter...
Operating manual
Page 23
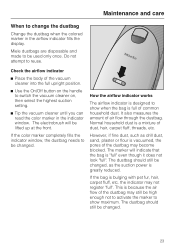
... is because the air flow of dust, hair, carpet fluff, threads, etc. How the airflow indicator works The airflow indicator is a mixture of the dustbag may still be changed. 23 If the bag is vacuumed, the pores of the vacuum cleaner into the full upright position. ^ Use the On/Off button on , then select the highest suction setting. ^ Tip the vacuum cleaner until you can read...
... is because the air flow of dust, hair, carpet fluff, threads, etc. How the airflow indicator works The airflow indicator is a mixture of the dustbag may still be changed. 23 If the bag is vacuumed, the pores of the vacuum cleaner into the full upright position. ^ Use the On/Off button on , then select the highest suction setting. ^ Tip the vacuum cleaner until you can read...
Operating manual
Page 26
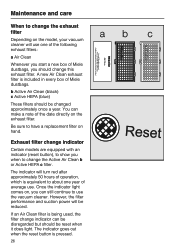
... filters: a Air Clean Whenever you start a new box of average use the vacuum cleaner. b Active Air Clean (black) c Active HEPA (blue) These filters should be reset when it does light. Exhaust filter change the Active Air Clean b or Active HEPA c filter. If an Air Clean filter is equivalent to use . Once the indicator light comes on the exhaust filter. A new Air Clean exhaust filter is pressed. 26 You can be disregarded but should be reduced. However, the filter performance and suction power will turn red...
... filters: a Air Clean Whenever you start a new box of average use the vacuum cleaner. b Active Air Clean (black) c Active HEPA (blue) These filters should be reset when it does light. Exhaust filter change the Active Air Clean b or Active HEPA c filter. If an Air Clean filter is equivalent to use . Once the indicator light comes on the exhaust filter. A new Air Clean exhaust filter is pressed. 26 You can be disregarded but should be reduced. However, the filter performance and suction power will turn red...

Operating manual
Page 27
Exchanging exhaust filters". ^ Close the filter frame and insert it back into the compartment. ^ Close the exhaust filter compartment lid. 27 Maintenance and care ^ Open the filter frame and use more than one of the two clean corners to replace the Air Clean filter with an Active Air Clean filter or Active HEPA filter see "Maintenance and care - Replacing the "Air Clean" filter Do not use one filter at a time. ^ Open the exhaust filter compartment lid. ^ Remove the filter frame. If you wish to remove the used Air Clean filter. ^ Insert a new Air Clean filter.
Exchanging exhaust filters". ^ Close the filter frame and insert it back into the compartment. ^ Close the exhaust filter compartment lid. 27 Maintenance and care ^ Open the filter frame and use more than one of the two clean corners to replace the Air Clean filter with an Active Air Clean filter or Active HEPA filter see "Maintenance and care - Replacing the "Air Clean" filter Do not use one filter at a time. ^ Open the exhaust filter compartment lid. ^ Remove the filter frame. If you wish to remove the used Air Clean filter. ^ Insert a new Air Clean filter.

Operating manual
Page 28
... the reset button until the "Exhaust filter change indicator If your vacuum cleaner has a reset button, it must be pressed each time the exhaust filter is pressed before it lights it will not be reset. 28 Resetting the exhaust filter change indicator" indicator goes out. The indicator is only reset if pressed while lit. Maintenance and care Replacing the "Active Air Clean" filter and the "Active HEPA"filter Do not use an Air Clean filter see "Maintenance...
... the reset button until the "Exhaust filter change indicator If your vacuum cleaner has a reset button, it must be pressed each time the exhaust filter is pressed before it lights it will not be reset. 28 Resetting the exhaust filter change indicator" indicator goes out. The indicator is only reset if pressed while lit. Maintenance and care Replacing the "Active Air Clean" filter and the "Active HEPA"filter Do not use an Air Clean filter see "Maintenance...
Operating manual
Page 29
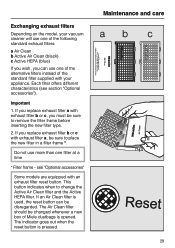
... to remove the filter frame before inserting the new filter type. 2. If you replace exhaust filter a with exhaust filter b or c, you replace exhaust filter b or c with exhaust filter a, be sure to change the Active Air Clean filter and the Active HEPA filter. Do not use one filter at a time * Filter frame - Each filter offers different characteristics (see "Optional accessories" Some models are equipped with an exhaust filter reset button. Important 1. Maintenance and care 29 The Air Clean filter should...
... to remove the filter frame before inserting the new filter type. 2. If you replace exhaust filter a with exhaust filter b or c, you replace exhaust filter b or c with exhaust filter a, be sure to change the Active Air Clean filter and the Active HEPA filter. Do not use one filter at a time * Filter frame - Each filter offers different characteristics (see "Optional accessories" Some models are equipped with an exhaust filter reset button. Important 1. Maintenance and care 29 The Air Clean filter should...
Operating manual
Page 33
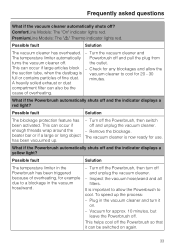
... plug from turns the vacuum cleaner off and the indicator displays a red light? Check for any blockages and allow the Powerbrush to a blockage in the vacuum hose/wand. - minutes. A heavily soiled exhaust or dust compartment filter can be the cause of overheating. Inspect the vacuum hose/wand and all filters. PremiumLine Models: The "§" Thermo indicator lights red. the outlet. This can occur if enough threads wrap around the beater bar...
... plug from turns the vacuum cleaner off and the indicator displays a red light? Check for any blockages and allow the Powerbrush to a blockage in the vacuum hose/wand. - minutes. A heavily soiled exhaust or dust compartment filter can be the cause of overheating. Inspect the vacuum hose/wand and all filters. PremiumLine Models: The "§" Thermo indicator lights red. the outlet. This can occur if enough threads wrap around the beater bar...
Operating manual
Page 35
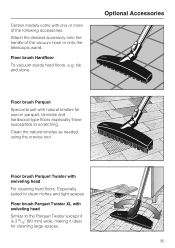
... bristles as needed, using the crevice tool. Floor brush Parquet Twister with one or more of the vacuum hose or onto the telescopic wand. Certain models come with swiveling head For cleaning hard floors. Floor brush Parquet Twister XL with natural bristles for cleaning large spaces. 35 tile and stone. Especially suited to scratching. Floor brush Hardfloor To vacuum sturdy hard floors, e.g. Optional Accessories Floor brush Parquet Special brush with swiveling head Similar...
... bristles as needed, using the crevice tool. Floor brush Parquet Twister with one or more of the vacuum hose or onto the telescopic wand. Certain models come with swiveling head For cleaning hard floors. Floor brush Parquet Twister XL with natural bristles for cleaning large spaces. 35 tile and stone. Especially suited to scratching. Floor brush Hardfloor To vacuum sturdy hard floors, e.g. Optional Accessories Floor brush Parquet Special brush with swiveling head Similar...


