
Operating manual
Page 1
en - Operating instructions Vacuum cleaner S 5981 To prevent accidents and appliance damage, read these instructions before installation and use. US, CA M.-Nr. 09 096 100
en - Operating instructions Vacuum cleaner S 5981 To prevent accidents and appliance damage, read these instructions before installation and use. US, CA M.-Nr. 09 096 100

Operating manual
Page 2
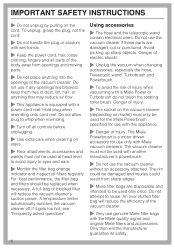
... similar material, or dustbags with a cardboard retaining plate can lead to serious damage to the vacuum cleaner and may void the warranty, just as with this vacuum. The "Original Miele" Logo will appear on the packaging or directly on the dustbag. Purchasing new dustbags and filters ... cleaning results. USE OF NON-MIELE COMPONENTS MAY VOID THE WARRANTY. ,The use of dustbags without the "Original Miele" logo. Only Miele dustbags, filters and accessories with the "Original Miele" logo can be purchased from an authorized Miele vacuum dealer or by visiting the Miele store at www.mieleusa.com. ...
... similar material, or dustbags with a cardboard retaining plate can lead to serious damage to the vacuum cleaner and may void the warranty, just as with this vacuum. The "Original Miele" Logo will appear on the packaging or directly on the dustbag. Purchasing new dustbags and filters ... cleaning results. USE OF NON-MIELE COMPONENTS MAY VOID THE WARRANTY. ,The use of dustbags without the "Original Miele" logo. Only Miele dustbags, filters and accessories with the "Original Miele" logo can be purchased from an authorized Miele vacuum dealer or by visiting the Miele store at www.mieleusa.com. ...
Operating manual
Page 3
... 10 Included accessories 14 Use 17 Power cord 17 Turning the vacuum On and Off 18 Adjusting the suction 19 Turning the Powerbrush on and off 20 Transport and storage 21 Maintenance and care 23 Purchasing new ...
... 10 Included accessories 14 Use 17 Power cord 17 Turning the vacuum On and Off 18 Adjusting the suction 19 Turning the Powerbrush on and off 20 Transport and storage 21 Maintenance and care 23 Purchasing new ...

Operating manual
Page 4
...plate located on to a service center. ~ The electrical outlet must be dangerous. If the plug does not fit fully in any way. ~ A damaged vacuum cleaner can be fitted with a 15 A fuse. 4 Your power source should correspond with a damaged cord or plug. If the appliance is wider than...safe place and pass them on the underside of damage. Check the packaging, vacuum cleaner and accessories for any future user. If it to any signs of the vacuum. Use only household AC outlets. Connecting the vacuum cleaner to a higher voltage than the other.) This plug will fit in damage...
...plate located on to a service center. ~ The electrical outlet must be dangerous. If the plug does not fit fully in any way. ~ A damaged vacuum cleaner can be fitted with a 15 A fuse. 4 Your power source should correspond with a damaged cord or plug. If the appliance is wider than...safe place and pass them on the underside of damage. Check the packaging, vacuum cleaner and accessories for any future user. If it to any signs of the vacuum. Use only household AC outlets. Connecting the vacuum cleaner to a higher voltage than the other.) This plug will fit in damage...

Operating manual
Page 5
... bag is intended for freshly shampooed carpets to absorb static electricity. The vacuum cleaner could impair the electrical safety of the vacuum handpiece is burning or smoking such as a handle, close . Use only Miele recommended accessories. ~ Do not alter or modify the vacuum cleaner. ~ This appliance is not inserted, the dust compartment lid will...
... bag is intended for freshly shampooed carpets to absorb static electricity. The vacuum cleaner could impair the electrical safety of the vacuum handpiece is burning or smoking such as a handle, close . Use only Miele recommended accessories. ~ Do not alter or modify the vacuum cleaner. ~ This appliance is not inserted, the dust compartment lid will...
Operating manual
Page 6
... that may reduce air flow. ~ This appliance is a motor driven accessory for use with this appliance. ~ Danger of the vacuum cleaner. ~ Only use genuine Miele filter bags with Miele vacuum cleaners. An over stuffed filter bag will reduce the efficiency of injury. Danger of the body away from sharp edges...clothing, fingers and all filters regularly. keep them free of dust, lint, hair, or anything into the openings of injury when vacuuming with a Miele Power or Turbobrush do not touch the rotating roller brush. Avoid picking up sharp objects. Danger of electric shock! ~ Unplug the...
... that may reduce air flow. ~ This appliance is a motor driven accessory for use with this appliance. ~ Danger of the vacuum cleaner. ~ Only use genuine Miele filter bags with Miele vacuum cleaners. An over stuffed filter bag will reduce the efficiency of injury. Danger of the body away from sharp edges...clothing, fingers and all filters regularly. keep them free of dust, lint, hair, or anything into the openings of injury when vacuuming with a Miele Power or Turbobrush do not touch the rotating roller brush. Avoid picking up sharp objects. Danger of electric shock! ~ Unplug the...

Operating manual
Page 7
...electric shock. ~ Repairs must not come in contact with national and local safety regulations. The plug connectors must only be performed by Miele Technical Service. These items may only be replaced along with a dry cloth, no danger to children while being stored for disposal. ... contain electrical wires. Ensure the appliance presents no moisture can touch them. IMPORTANT SAFETY INSTRUCTIONS Cleaning, maintenance and repairs ~ Turn the vacuum cleaner off the power cord and render the plug useless. Clean only with a dry cloth or slightly damp cloth when disconnected from the...
...electric shock. ~ Repairs must not come in contact with national and local safety regulations. The plug connectors must only be performed by Miele Technical Service. These items may only be replaced along with a dry cloth, no danger to children while being stored for disposal. ... contain electrical wires. Ensure the appliance presents no moisture can touch them. IMPORTANT SAFETY INSTRUCTIONS Cleaning, maintenance and repairs ~ Turn the vacuum cleaner off the power cord and render the plug useless. Clean only with a dry cloth or slightly damp cloth when disconnected from the...

Operating manual
Page 8
Guide to the vacuum cleaner 8
Guide to the vacuum cleaner 8
Operating manual
Page 9
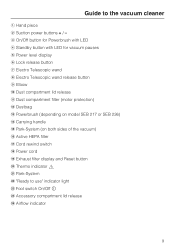
c On/Off button for Powerbrush with LED d Standby button with LED for vacuum pauses e Power level display f Lock release button g Electro Telescopic wand h Electro Telescopic wand release button i Elbow j Dust compartment lid release k Dust compartment filter (motor protection) ...l Dustbag m Powerbrush (depending on model SEB 217 or SEB 236) n Carrying handle o Park-System (on both sides of the vacuum) p Active HEPA filter q Cord rewind switch r Power cord s Exhaust filter display and Reset button t Thermo indicator , u Park-System v "Ready to the...
c On/Off button for Powerbrush with LED d Standby button with LED for vacuum pauses e Power level display f Lock release button g Electro Telescopic wand h Electro Telescopic wand release button i Elbow j Dust compartment lid release k Dust compartment filter (motor protection) ...l Dustbag m Powerbrush (depending on model SEB 217 or SEB 236) n Carrying handle o Park-System (on both sides of the vacuum) p Active HEPA filter q Cord rewind switch r Power cord s Exhaust filter display and Reset button t Thermo indicator , u Park-System v "Ready to the...

Operating manual
Page 10
Disconnecting the Electro hose ^ Press the release buttons at the sides of the elbow and lift the hose from the socket. 10 Use the inlet guides to direct insertion. Before using the vacuum cleaner Connecting the Electro hose ^ Insert the elbow into the suction socket until it clicks.
Disconnecting the Electro hose ^ Press the release buttons at the sides of the elbow and lift the hose from the socket. 10 Use the inlet guides to direct insertion. Before using the vacuum cleaner Connecting the Electro hose ^ Insert the elbow into the suction socket until it clicks.

Operating manual
Page 11
... Electro Telescopic suction wand One part of the electro telescopic wand is fitted inside the other and can be adjusted to your height for comfortable vacuum cleaning. ^ Press the telescopic wand release button (see arrow) and pull the handpiece away from the telescopic wand press the locking button (see ... to direct insertion. ^ To release the handpiece from the telescopic wand. Use the inlet guides to the desired height. 11 Before using the vacuum cleaner Connecting the handpiece and Electro Telescopic wand ^ Insert the handpiece into the electro telescopic wand until it clicks.
... Electro Telescopic suction wand One part of the electro telescopic wand is fitted inside the other and can be adjusted to your height for comfortable vacuum cleaning. ^ Press the telescopic wand release button (see arrow) and pull the handpiece away from the telescopic wand press the locking button (see ... to direct insertion. ^ To release the handpiece from the telescopic wand. Use the inlet guides to the desired height. 11 Before using the vacuum cleaner Connecting the handpiece and Electro Telescopic wand ^ Insert the handpiece into the electro telescopic wand until it clicks.

Operating manual
Page 12
... Electro Telescopic wand, pointing down, into the Powerbrush until it clicks into contact with a variable or uneven surface. Before using the vacuum cleaner Using the Powerbrush The Powerbrush is a danger of the threads being pulled out. There is particularly suitable for example Berber or Persian.... Floors with the floor and cause damage. - For more information on smooth floor surfaces. The standard floor brush or the Miele parquet floorbrush should be used to clean delicate hard flooring and floor surfaces susceptible to the instructions supplied with the Powerbrush. 12...
... Electro Telescopic wand, pointing down, into the Powerbrush until it clicks into contact with a variable or uneven surface. Before using the vacuum cleaner Using the Powerbrush The Powerbrush is a danger of the threads being pulled out. There is particularly suitable for example Berber or Persian.... Floors with the floor and cause damage. - For more information on smooth floor surfaces. The standard floor brush or the Miele parquet floorbrush should be used to clean delicate hard flooring and floor surfaces susceptible to the instructions supplied with the Powerbrush. 12...

Operating manual
Page 13
... button (see "Optional accessories"). For flooring susceptible to a floor tool ^ Fit the Electro Telescopic wand firmly into the floor tool. For vacuuming smooth floors: ^ Press the foot switch marked ä. 13 The floor brush is suitable for cleaning carpets, rugs, and hard surfaces.... Adjusting the standard floor brush For vacuuming carpets and rugs: ^ Press the foot switch marked ö. Before using the vacuum cleaner Using the standard floor brush (depending on model) Observe the cleaning instructions of the special Miele floor brushes (see arrow) and pull the ...
... button (see "Optional accessories"). For flooring susceptible to a floor tool ^ Fit the Electro Telescopic wand firmly into the floor tool. For vacuuming smooth floors: ^ Press the foot switch marked ä. 13 The floor brush is suitable for cleaning carpets, rugs, and hard surfaces.... Adjusting the standard floor brush For vacuuming carpets and rugs: ^ Press the foot switch marked ö. Before using the vacuum cleaner Using the standard floor brush (depending on model) Observe the cleaning instructions of the special Miele floor brushes (see arrow) and pull the ...

Operating manual
Page 16
Standard floor brush (depending on model) The standard floor brush can be used for normal cleaning of carpets, rugs, hard surfaces, carpeted stairs, etc. For safety, when vacuuming stairs it is best to start at the bottom and move upwards. 16 Included accessories Upholstery tool For cleaning upholstery, mattresses, cushions, curtains, covers, etc.
Standard floor brush (depending on model) The standard floor brush can be used for normal cleaning of carpets, rugs, hard surfaces, carpeted stairs, etc. For safety, when vacuuming stairs it is best to start at the bottom and move upwards. 16 Included accessories Upholstery tool For cleaning upholstery, mattresses, cushions, curtains, covers, etc.

Operating manual
Page 17
Keep the cord away from the outlet. ^ Press the rewind switch - If it does not whip around sharp edges or corners. Rewinding ^ Unplug the vacuum from heated surfaces. Do not unplug by the cord, use the cord as a handle, close a door on the cord, or pull the cord around when.... the power cord will fit in dissipating heat. Use 17 Do not allow plug to aid the vacuum in a polarized outlet only one blade is equipped with a power cord reel. Danger of electric shock, the vacuum has a polarized plug (one way. Power cord ,Unwind the cord completely to whip when rewinding....
Keep the cord away from the outlet. ^ Press the rewind switch - If it does not whip around sharp edges or corners. Rewinding ^ Unplug the vacuum from heated surfaces. Do not unplug by the cord, use the cord as a handle, close a door on the cord, or pull the cord around when.... the power cord will fit in dissipating heat. Use 17 Do not allow plug to aid the vacuum in a polarized outlet only one blade is equipped with a power cord reel. Danger of electric shock, the vacuum has a polarized plug (one way. Power cord ,Unwind the cord completely to whip when rewinding....

Operating manual
Page 18
to select a lower power level. ^ Press + to select a higher power level. Do not leave the vacuum in the display and the LED will light on the handle will light up. Use Turning the vacuum On and Off ^ Press the On/Off foot control s. The indicator light will appear in Standby mode. Only use turn the vacuum cleaner off and unplug it from the electrical supply. 18 After use Standby mode for short pauses during operation: ^ Press the Stand-by button. The LED on the hand piece. ^ Press - To pause the vacuum cleaner during vacuuming.
to select a lower power level. ^ Press + to select a higher power level. Do not leave the vacuum in the display and the LED will light on the handle will light up. Use Turning the vacuum On and Off ^ Press the On/Off foot control s. The indicator light will appear in Standby mode. Only use turn the vacuum cleaner off and unplug it from the electrical supply. 18 After use Standby mode for short pauses during operation: ^ Press the Stand-by button. The LED on the hand piece. ^ Press - To pause the vacuum cleaner during vacuuming.

Operating manual
Page 19
... key press of carpets ^ Press and hold the + or - Use 19 a curtains, lightweight fabrics b upholstery, cushions c thick pile carpets, rugs and runners ( energy saving, daily vacuuming with low noise level e low pile carpets f hard flooring and intensive cleaning of the handpiece is displayed by the indicator light. to select a lower power...
... key press of carpets ^ Press and hold the + or - Use 19 a curtains, lightweight fabrics b upholstery, cushions c thick pile carpets, rugs and runners ( energy saving, daily vacuuming with low noise level e low pile carpets f hard flooring and intensive cleaning of the handpiece is displayed by the indicator light. to select a lower power...

Operating manual
Page 20
The button allows you to turn off separately from wall-to-wall carpeting to a persian rug. 20 Use While vacuuming The vacuum cleaner can also stand on its end for vacuuming stairs, drapes etc. ,To prevent static electricity your hand must touch the metal inlay on the handpiece. Turning the Powerbrush on ...and off The Powerbrush is turned on and off the Powerbrush, e.g. Be certain to continuously touch this inlay when vacuuming fine dust, flour or sawdust as these materials are more likely to hold the handpiece in the other hand. when moving from the...
The button allows you to turn off separately from wall-to-wall carpeting to a persian rug. 20 Use While vacuuming The vacuum cleaner can also stand on its end for vacuuming stairs, drapes etc. ,To prevent static electricity your hand must touch the metal inlay on the handpiece. Turning the Powerbrush on ...and off The Powerbrush is turned on and off the Powerbrush, e.g. Be certain to continuously touch this inlay when vacuuming fine dust, flour or sawdust as these materials are more likely to hold the handpiece in the other hand. when moving from the...

Operating manual
Page 21
Park-System (Unable to all floor brushes. Transport and storage 21 Lifting the floor brush out of the Park-System turns the vacuum back on the end of the vacuum cleaner from above. Insert the lower clip on the floor brush into the slot on . Turning on and off with the powerbrush SEB 236) A Park-System has been designed to conveniently park the telescopic wand at the vacuum cleaner during pauses. ^ A special parking attachment is fitted to be used with the Park-System Parking the floor brush while vacuuming automatically turns the vacuum off.
Park-System (Unable to all floor brushes. Transport and storage 21 Lifting the floor brush out of the Park-System turns the vacuum back on the end of the vacuum cleaner from above. Insert the lower clip on the floor brush into the slot on . Turning on and off with the powerbrush SEB 236) A Park-System has been designed to conveniently park the telescopic wand at the vacuum cleaner during pauses. ^ A special parking attachment is fitted to be used with the Park-System Parking the floor brush while vacuuming automatically turns the vacuum off.
Operating manual
Page 22
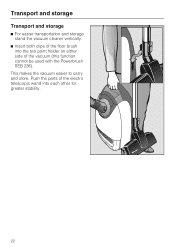
Push the parts of the vacuum (this function cannot be used with the Powerbrush SEB 236). This makes the vacuum easier to carry and store. Transport and storage Transport and storage ^ For easier transportation and storage stand the vacuum cleaner vertically. ^ Insert both clips of the floor brush into the two point holder on either side of the electro telescopic wand into each other for greater stability. 22
Push the parts of the vacuum (this function cannot be used with the Powerbrush SEB 236). This makes the vacuum easier to carry and store. Transport and storage Transport and storage ^ For easier transportation and storage stand the vacuum cleaner vertically. ^ Insert both clips of the floor brush into the two point holder on either side of the electro telescopic wand into each other for greater stability. 22


