Operating manual
Page 3
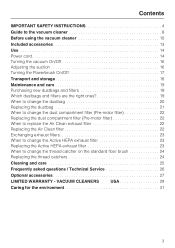
... IMPORTANT SAFETY INSTRUCTIONS 4 Guide to the vacuum cleaner 8 Before using the vacuum cleaner 10 Included accessories 13 Use 14 Power cord 14 Turning the vacuum On/Off 16 Adjusting the suction 16 Turning the Powerbrush On/Off 17 Transport and storage 18 Maintenance and care 19 Purchasing new dustbags and filters 19 Which dustbags and filters are the right ones 19 When to change the dustbag 20 Replacing the dustbag...
... IMPORTANT SAFETY INSTRUCTIONS 4 Guide to the vacuum cleaner 8 Before using the vacuum cleaner 10 Included accessories 13 Use 14 Power cord 14 Turning the vacuum On/Off 16 Adjusting the suction 16 Turning the Powerbrush On/Off 17 Transport and storage 18 Maintenance and care 19 Purchasing new dustbags and filters 19 Which dustbags and filters are the right ones 19 When to change the dustbag 20 Replacing the dustbag...

Operating manual
Page 4
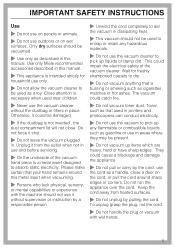
... are not sure of the vacuum cleaner before connecting the power cord to a service center. ~ The electrical outlet must be fitted with a damaged cord or plug. Do not alter the plug in a polarized outlet only one way. Do not use a damaged appliance. ~ Do not use DC power sources. If it to an electrical outlet. Use only household AC outlets. Your power source should , has been...
... are not sure of the vacuum cleaner before connecting the power cord to a service center. ~ The electrical outlet must be fitted with a damaged cord or plug. Do not alter the plug in a polarized outlet only one way. Do not use a damaged appliance. ~ Do not use DC power sources. If it to an electrical outlet. Use only household AC outlets. Your power source should , has been...
Operating manual
Page 5
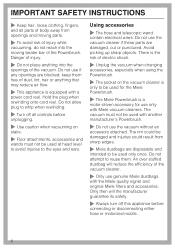
... dust. Keep the cord away from the outlet when not in use the vacuum cleaner to pick up any hazardous materials. ~ Do not use and before servicing. ~ On the underside of the vacuum cleaner. Do not force it without the dustbag or filters in areas where they may be vacuumed. ~ Use only as a handle, close . Wait for household use in place. Unplug it could impair the electrical...
... dust. Keep the cord away from the outlet when not in use the vacuum cleaner to pick up any hazardous materials. ~ Do not use and before servicing. ~ On the underside of the vacuum cleaner. Do not force it without the dustbag or filters in areas where they may be vacuumed. ~ Use only as a handle, close . Wait for household use in place. Unplug it could impair the electrical...
Operating manual
Page 6
... vacuuming on the vacuum cleaner is only to reuse them free of the vacuum. Avoid picking up sharp objects. Hold the plug when rewinding onto cord reel. Only then will reduce the efficiency of the vacuum cleaner. ~ Only use the vacuum cleaner if these parts are damaged, cut or punctured. IMPORTANT SAFETY INSTRUCTIONS ~ Keep hair, loose clothing, fingers, and all controls before connecting or disconnecting either hose or motorized nozzle...
... vacuuming on the vacuum cleaner is only to reuse them free of the vacuum. Avoid picking up sharp objects. Hold the plug when rewinding onto cord reel. Only then will reduce the efficiency of the vacuum cleaner. ~ Only use the vacuum cleaner if these parts are damaged, cut or punctured. IMPORTANT SAFETY INSTRUCTIONS ~ Keep hair, loose clothing, fingers, and all controls before connecting or disconnecting either hose or motorized nozzle...
Operating manual
Page 7
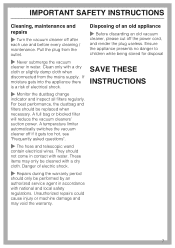
... filters regularly. Pull the plug from the mains supply. If moisture gets into the appliance there is a risk of electric shock. ~ Repairs during the warranty period should be performed by an authorized service agent in water. For best performance, the dustbag and filters should only be replaced when necessary. IMPORTANT SAFETY INSTRUCTIONS Cleaning, maintenance and repairs ~ Turn the vacuum cleaner off after each use and before every cleaning / maintenance...
... filters regularly. Pull the plug from the mains supply. If moisture gets into the appliance there is a risk of electric shock. ~ Repairs during the warranty period should be performed by an authorized service agent in water. For best performance, the dustbag and filters should only be replaced when necessary. IMPORTANT SAFETY INSTRUCTIONS Cleaning, maintenance and repairs ~ Turn the vacuum cleaner off after each use and before every cleaning / maintenance...
Operating manual
Page 9
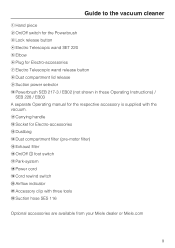
... your Miele dealer or Miele.com 9 Guide to the vacuum cleaner a Hand piece b On/Off switch for the Powerbrush c Lock release button d Electro Telescopic wand SET 220 e Elbow f Plug for Electro-accessories g Electro Telescopic wand release button h Dust compartment lid release i Suction power selector j Powerbrush SEB 217-3 / EB02 (not shown in these Operating Instructions) / SEB 228 / EB03 A separate Operating manual for Electro-accessories m Dustbag n Dust compartment filter (pre-motor filter) o Exhaust filter p On/Off s foot switch q Park-system r Power cord s Cord rewind switch t Airflow...
... your Miele dealer or Miele.com 9 Guide to the vacuum cleaner a Hand piece b On/Off switch for the Powerbrush c Lock release button d Electro Telescopic wand SET 220 e Elbow f Plug for Electro-accessories g Electro Telescopic wand release button h Dust compartment lid release i Suction power selector j Powerbrush SEB 217-3 / EB02 (not shown in these Operating Instructions) / SEB 228 / EB03 A separate Operating manual for Electro-accessories m Dustbag n Dust compartment filter (pre-motor filter) o Exhaust filter p On/Off s foot switch q Park-system r Power cord s Cord rewind switch t Airflow...
Operating manual
Page 10
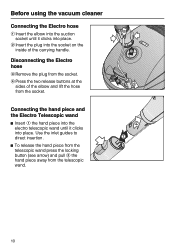
... hand piece into the electro telescopic wand until it clicks into place. Use the inlet guides to direct insertion. ^ To release the hand piece from the telescopic wand press the locking button (see arrow) and pull b the hand piece away from the socket. Disconnecting the Electro hose c Remove the plug from the telescopic wand. 10 d Press the two release buttons at the sides of the carrying handle...
... hand piece into the electro telescopic wand until it clicks into place. Use the inlet guides to direct insertion. ^ To release the hand piece from the telescopic wand press the locking button (see arrow) and pull b the hand piece away from the socket. Disconnecting the Electro hose c Remove the plug from the telescopic wand. 10 d Press the two release buttons at the sides of the carrying handle...

Operating manual
Page 11
... types of wall to wall carpeting and floor coverings subject to the Electro Telescopic wand ^ Insert a the Electro Telescopic wand into the Powerbrush until it clicks into contact with a variable or uneven surface. Before using the vacuum cleaner Using the Powerbrush Observe the cleaning instructions of the threads being pulled out. The brush could come into place. ^ To release the parts, press the lock release button...
... types of wall to wall carpeting and floor coverings subject to the Electro Telescopic wand ^ Insert a the Electro Telescopic wand into the Powerbrush until it clicks into contact with a variable or uneven surface. Before using the vacuum cleaner Using the Powerbrush Observe the cleaning instructions of the threads being pulled out. The brush could come into place. ^ To release the parts, press the lock release button...

Operating manual
Page 12
... start at the bottom and move upwards. 12 To clean hard flooring: ^ Press the foot switch marked ä or ). Before using the vacuum cleaner Using the standard floor brush (depending on model) Observe the cleaning instructions of the floor manufacturer. Adjusting the floor brush c To clean carpets and area rugs: ^ Press the foot switch marked ö or %. Connecting the floor brush ^ Place the floor brush into place. ^ To separate the parts b, press the locking button...
... start at the bottom and move upwards. 12 To clean hard flooring: ^ Press the foot switch marked ä or ). Before using the vacuum cleaner Using the standard floor brush (depending on model) Observe the cleaning instructions of the floor manufacturer. Adjusting the floor brush c To clean carpets and area rugs: ^ Press the foot switch marked ö or %. Connecting the floor brush ^ Place the floor brush into place. ^ To separate the parts b, press the locking button...

Operating manual
Page 13
The parquet floor brush can be cleaned with natural bristles intended for the included accessories Position the accessories as indicated. The following accessories are included: a Dust brush with natural bristles b Upholstery tool c Crevice nozzle d Accessory clip for cleaning parquet and laminate floors, especially those susceptible to scratching. Floor brush Parquet-3 (depending on model) Special brush with the vacuum cleaner using the crevice nozzle if necessary. 13 Included accessories Accessory clip ^ Press onto the elbow until it clicks into place.
The parquet floor brush can be cleaned with natural bristles intended for the included accessories Position the accessories as indicated. The following accessories are included: a Dust brush with natural bristles b Upholstery tool c Crevice nozzle d Accessory clip for cleaning parquet and laminate floors, especially those susceptible to scratching. Floor brush Parquet-3 (depending on model) Special brush with the vacuum cleaner using the crevice nozzle if necessary. 13 Included accessories Accessory clip ^ Press onto the elbow until it clicks into place.
Operating manual
Page 16
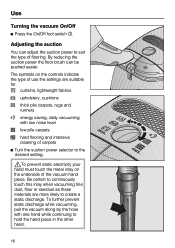
... the hose with low noise level ( low pile carpets ) hard flooring and intensive cleaning of carpets ^ Turn the suction power selector to the desired setting. ,To prevent static electricity your hand must touch the metal inlay on the underside of the vacuum hand piece. Use Turning the vacuum On/Off ^ Press the On/Off foot switch s. Adjusting the suction You can be pushed easier. By reducing the suction power the floor brush can adjust the suction power...
... the hose with low noise level ( low pile carpets ) hard flooring and intensive cleaning of carpets ^ Turn the suction power selector to the desired setting. ,To prevent static electricity your hand must touch the metal inlay on the underside of the vacuum hand piece. Use Turning the vacuum On/Off ^ Press the On/Off foot switch s. Adjusting the suction You can be pushed easier. By reducing the suction power the floor brush can adjust the suction power...

Operating manual
Page 18
... the vacuum cleaner vertically. ^ Insert the parking clip attachment on the floor tool or floor brush into the slot on the end of the vacuum cleaner from above . Insert the lower clip on the floor brush into the parking slot from above (does not apply to all telescopic tubing parts completely together. on a ramp, push all floor brushes. Transport and storage Park system (Cannot be used...
... the vacuum cleaner vertically. ^ Insert the parking clip attachment on the floor tool or floor brush into the slot on the end of the vacuum cleaner from above . Insert the lower clip on the floor brush into the parking slot from above (does not apply to all telescopic tubing parts completely together. on a ramp, push all floor brushes. Transport and storage Park system (Cannot be used...
Operating manual
Page 19
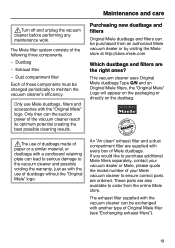
... any maintenance work. Only use Miele dustbags, filters and accessories with a cardboard retaining plate can the suction power of the following three components. - Purchasing new dustbags and filters Original Miele dustbags and filters can be changed periodically to maintain the vacuum cleaner's efficiency. If you would like to purchase additional Miele filters separately, contact your Miele vacuum cleaner to ensure correct parts are also available to the vacuum cleaner and possibly voiding the warranty, just...
... any maintenance work. Only use Miele dustbags, filters and accessories with a cardboard retaining plate can the suction power of the following three components. - Purchasing new dustbags and filters Original Miele dustbags and filters can be changed periodically to maintain the vacuum cleaner's efficiency. If you would like to purchase additional Miele filters separately, contact your Miele vacuum cleaner to ensure correct parts are also available to the vacuum cleaner and possibly voiding the warranty, just...

Operating manual
Page 20
..., if fine dust, such as the suction power is bulging with the floor brush only, other attachments can affect the function of the dustbag may not register "full". Maintenance and care When to the vacuum cleaner. Miele dustbags are disposable and made to show when the bag is vacuumed, the pores of the airflow indicator. ^ Turn the vacuum cleaner on model) to change the dustbag Change the dustbag...
..., if fine dust, such as the suction power is bulging with the floor brush only, other attachments can affect the function of the dustbag may not register "full". Maintenance and care When to the vacuum cleaner. Miele dustbags are disposable and made to show when the bag is vacuumed, the pores of the airflow indicator. ^ Turn the vacuum cleaner on model) to change the dustbag Change the dustbag...
Operating manual
Page 22
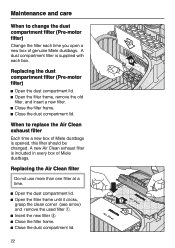
...) and remove the used filter a. ^ Insert the new filter b. ^ Close the filter frame. ^ Close the dust compartment lid. 22 Maintenance and care When to replace the Air Clean exhaust filter Each time a new box of Miele dustbags is opened, this filter should be changed. When to change the dust compartment filter (Pre-motor filter) Change the filter each box. Replacing the dust compartment filter (Pre-motor filter) ^ Open the dust compartment lid. ^ Open the filter frame, remove the old filter, and insert a new filter. ^ Close the filter frame...
...) and remove the used filter a. ^ Insert the new filter b. ^ Close the filter frame. ^ Close the dust compartment lid. 22 Maintenance and care When to replace the Air Clean exhaust filter Each time a new box of Miele dustbags is opened, this filter should be changed. When to change the dust compartment filter (Pre-motor filter) Change the filter each box. Replacing the dust compartment filter (Pre-motor filter) ^ Open the dust compartment lid. ^ Open the filter frame, remove the old filter, and insert a new filter. ^ Close the filter frame...

Operating manual
Page 23
Replacing the Active HEPA exhaust filter ^ Open the dust compartment lid. ^ Remove the used instead of the date directly on the model, there may also be an Active HEPA exhaust filter included which can make a note of the standard Air Clean exhaust filter. In order to change the Active HEPA exhaust filter Change this filter approximately once a year. You can be removed. Exchanging exhaust filters Depending on the exhaust filter. Maintenance and care 23...
Replacing the Active HEPA exhaust filter ^ Open the dust compartment lid. ^ Remove the used instead of the date directly on the model, there may also be an Active HEPA exhaust filter included which can make a note of the standard Air Clean exhaust filter. In order to change the Active HEPA exhaust filter Change this filter approximately once a year. You can be removed. Exchanging exhaust filters Depending on the exhaust filter. Maintenance and care 23...
Operating manual
Page 24
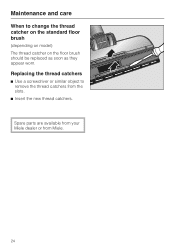
Maintenance and care When to remove the thread catchers from Miele. 24 Spare parts are available from your Miele dealer or from the slots. ^ Insert the new thread catchers. Replacing the thread catchers ^ Use a screwdriver or similar object to change the thread catcher on the standard floor brush (depending on model) The thread catcher on the floor brush should be replaced as soon as they appear worn.
Maintenance and care When to remove the thread catchers from Miele. 24 Spare parts are available from your Miele dealer or from the slots. ^ Insert the new thread catchers. Replacing the thread catchers ^ Use a screwdriver or similar object to change the thread catcher on the standard floor brush (depending on model) The thread catcher on the floor brush should be replaced as soon as they appear worn.

Operating manual
Page 25
... cleaned using a dry cloth, dusting brush or a second vacuum to these Operating Instructions. ,Do not submerge the vacuum in water. If moisture gets into the appliance there is the risk of an electric shock. ,Turn off the vacuum and unplug it from the outlet before performing any dust. Cleaning and care 25 They will damage the surface. Monitor the airflow indicator and inspect all purpose cleaners...
... cleaned using a dry cloth, dusting brush or a second vacuum to these Operating Instructions. ,Do not submerge the vacuum in water. If moisture gets into the appliance there is the risk of an electric shock. ,Turn off the vacuum and unplug it from the outlet before performing any dust. Cleaning and care 25 They will damage the surface. Monitor the airflow indicator and inspect all purpose cleaners...
Operating manual
Page 26
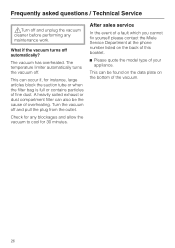
... of a fault which you cannot fix yourself please contact the Miele Service Department at the phone number listed on the bottom of fine dust. What if the vacuum turns off . This can be the cause of your appliance. Check for any maintenance work. This can occur if, for instance, large articles block the suction tube or when the filter bag is full or contains particles...
... of a fault which you cannot fix yourself please contact the Miele Service Department at the phone number listed on the bottom of fine dust. What if the vacuum turns off . This can be the cause of your appliance. Check for any maintenance work. This can occur if, for instance, large articles block the suction tube or when the filter bag is full or contains particles...
Operating manual
Page 27
... carpeting. Floor brush Parquet - 3 Special brush with one or more of the floor manufacturer. Turbo / Floor brushes Turbobrush Turbo Comfort - 3 Intended for vacuuming upholstery, mattresses, car seats, carpeted stairs and other products can be purchased from the Miele Store at www.Mieleusa.com. Some models come standard with natural bristles intended for vacuuming niches and tight spaces. Floor brush Hard floor - 3 To vacuum sturdy hard floors, e.g. Optional accessories Observe the cleaning instructions...
... carpeting. Floor brush Parquet - 3 Special brush with one or more of the floor manufacturer. Turbo / Floor brushes Turbobrush Turbo Comfort - 3 Intended for vacuuming upholstery, mattresses, car seats, carpeted stairs and other products can be purchased from the Miele Store at www.Mieleusa.com. Some models come standard with natural bristles intended for vacuuming niches and tight spaces. Floor brush Hard floor - 3 To vacuum sturdy hard floors, e.g. Optional accessories Observe the cleaning instructions...


