Operating manual
Page 3
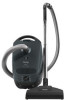
Contents IMPORTANT SAFETY INSTRUCTIONS 4 Guide to the vacuum cleaner 8 Before using the vacuum cleaner 10 Using the included accessories 12 Operation 14 Power cord 14 Turning the vacuum On/Off 15 Adjusting the suction 16 Opening the air inlet valve 16 Transport and storage 17 Maintenance and care 18 Purchasing new dustbags and filters 18 Which dustbags and filters are the right ones 18 When to change the dustbag 19 Replacing the dustbag...
Contents IMPORTANT SAFETY INSTRUCTIONS 4 Guide to the vacuum cleaner 8 Before using the vacuum cleaner 10 Using the included accessories 12 Operation 14 Power cord 14 Turning the vacuum On/Off 15 Adjusting the suction 16 Opening the air inlet valve 16 Transport and storage 17 Maintenance and care 18 Purchasing new dustbags and filters 18 Which dustbags and filters are the right ones 18 When to change the dustbag 19 Replacing the dustbag...
Operating manual
Page 4
.... ~ A damaged vacuum cleaner can be followed, including the following: READ ALL INSTRUCTIONS BEFORE USING THIS APPLIANCE WARNING- Do not alter the plug in the outlet, reverse the plug. Do not use a damaged appliance. ~ Do not use DC power sources. To reduce the risk of fire, electric shock or injury: Before Using ~ Check the voltage rating of the vacuum cleaner before connecting the power cord to install the...
.... ~ A damaged vacuum cleaner can be followed, including the following: READ ALL INSTRUCTIONS BEFORE USING THIS APPLIANCE WARNING- Do not alter the plug in the outlet, reverse the plug. Do not use a damaged appliance. ~ Do not use DC power sources. To reduce the risk of fire, electric shock or injury: Before Using ~ Check the voltage rating of the vacuum cleaner before connecting the power cord to install the...
Operating manual
Page 5
... or combustible liquids such as gasoline or use the vacuum cleaner without the dustbag or filters in dissipating heat. ~ This vacuum should be present. ~ Do not vacuum up liquids or damp dirt. IMPORTANT SAFETY INSTRUCTIONS Use ~ Do not use on people or animals. ~ Do not use the cord as a handle, close . Do not run the appliance over the cord. Only dry surfaces should not be damaged. ~ If...
... or combustible liquids such as gasoline or use the vacuum cleaner without the dustbag or filters in dissipating heat. ~ This vacuum should be present. ~ Do not vacuum up liquids or damp dirt. IMPORTANT SAFETY INSTRUCTIONS Use ~ Do not use on people or animals. ~ Do not use the cord as a handle, close . Do not run the appliance over the cord. Only dry surfaces should not be damaged. ~ If...
Operating manual
Page 6
... moving parts. ~ Do not place anything into the openings of the vacuum. Using accessories ~ The socket on stairs. ~ Floor attachments, accessories and wands must not be used at head level to avoid injuries to whip when rewinding. ~ Turn off this appliance before unplugging. ~ Use caution when vacuuming on the vacuum cleaner is only to be used with the Miele Powerbrush. ~ Unplug the vacuum when changing accessories, especially when using the...
... moving parts. ~ Do not place anything into the openings of the vacuum. Using accessories ~ The socket on stairs. ~ Floor attachments, accessories and wands must not be used at head level to avoid injuries to whip when rewinding. ~ Turn off this appliance before unplugging. ~ Use caution when vacuuming on the vacuum cleaner is only to be used with the Miele Powerbrush. ~ Unplug the vacuum when changing accessories, especially when using the...
Operating manual
Page 7
... bag or blocked filter will reduce the vacuum cleaners' suction power. For best performance, the dustbag and filters should only be replaced when necessary. If moisture gets into the appliance there is a risk of an old appliance ~ Before discarding an old vacuum cleaner, please cut off if it gets too hot, see "Maintenance and Care - IMPORTANT SAFETY INSTRUCTIONS Cleaning, maintenance and repairs ~ Turn the vacuum cleaner off automatically?". ~ Repairs...
... bag or blocked filter will reduce the vacuum cleaners' suction power. For best performance, the dustbag and filters should only be replaced when necessary. If moisture gets into the appliance there is a risk of an old appliance ~ Before discarding an old vacuum cleaner, please cut off if it gets too hot, see "Maintenance and Care - IMPORTANT SAFETY INSTRUCTIONS Cleaning, maintenance and repairs ~ Turn the vacuum cleaner off automatically?". ~ Repairs...

Operating manual
Page 9
... are available from your model. Guide to the vacuum cleaner a Hand piece b Air inlet valve c Lock release button d Telescopic wand e Hose connector f Telescopic wand release button g Dust compartment lid release h Suction power selector i Floor brush * j Carrying handle k Socket for Powerbrush l Dustbag m Dust compartment filter (pre-motor filter) n Exhaust filter o On/Off s foot switch p Park-System q Power cord r Cord rewind switch s Airflow indicator t Accessory clip with three tools u Suction hose The features marked * may vary or not be available on your Miele dealer or Miele.com 9
... are available from your model. Guide to the vacuum cleaner a Hand piece b Air inlet valve c Lock release button d Telescopic wand e Hose connector f Telescopic wand release button g Dust compartment lid release h Suction power selector i Floor brush * j Carrying handle k Socket for Powerbrush l Dustbag m Dust compartment filter (pre-motor filter) n Exhaust filter o On/Off s foot switch p Park-System q Power cord r Cord rewind switch s Airflow indicator t Accessory clip with three tools u Suction hose The features marked * may vary or not be available on your Miele dealer or Miele.com 9
Operating manual
Page 10
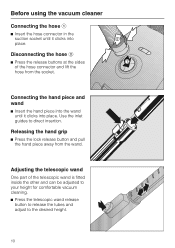
... into place. Use the inlet guides to the desired height. 10 Disconnecting the hose b ^ Press the release buttons at the sides of the telescopic wand is fitted inside the other and can be adjusted to your height for comfortable vacuum cleaning. ^ Press the telescopic wand release button to release the tubes and adjust to direct insertion. Adjusting the telescopic wand One part of the hose connector and...
... into place. Use the inlet guides to the desired height. 10 Disconnecting the hose b ^ Press the release buttons at the sides of the telescopic wand is fitted inside the other and can be adjusted to your height for comfortable vacuum cleaning. ^ Press the telescopic wand release button to release the tubes and adjust to direct insertion. Adjusting the telescopic wand One part of the hose connector and...
Operating manual
Page 11
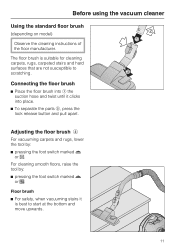
... susceptible to start at the bottom and move upwards. 11 For cleaning smooth floors, raise the tool by : ^ pressing the foot switch marked ö or %. Before using the vacuum cleaner Using the standard floor brush (depending on model) Observe the cleaning instructions of the floor manufacturer. The floor brush is best to scratching. Connecting the floor brush ^ Place the floor brush into place. ^ To separate the parts b, press the lock release button and pull...
... susceptible to start at the bottom and move upwards. 11 For cleaning smooth floors, raise the tool by : ^ pressing the foot switch marked ö or %. Before using the vacuum cleaner Using the standard floor brush (depending on model) Observe the cleaning instructions of the floor manufacturer. The floor brush is best to scratching. Connecting the floor brush ^ Place the floor brush into place. ^ To separate the parts b, press the lock release button and pull...
Operating manual
Page 13
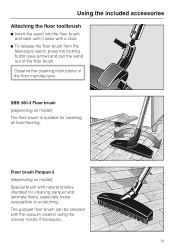
The parquet floor brush can be cleaned with the vacuum cleaner using the crevice nozzle if necessary. 13 SBB 300-3 Floor brush (depending on model) Special brush with natural bristles intended for cleaning all hard flooring. Observe the cleaning instructions of the floor brush. Using the included accessories Attaching the floor tool/brush ^ Insert the wand into the floor brush and twist until it locks with a click. ^ To release the floor brush from the telescopic wand, press the locking button (see...
The parquet floor brush can be cleaned with the vacuum cleaner using the crevice nozzle if necessary. 13 SBB 300-3 Floor brush (depending on model) Special brush with natural bristles intended for cleaning all hard flooring. Observe the cleaning instructions of the floor brush. Using the included accessories Attaching the floor tool/brush ^ Insert the wand into the floor brush and twist until it locks with a click. ^ To release the floor brush from the telescopic wand, press the locking button (see...
Operating manual
Page 14
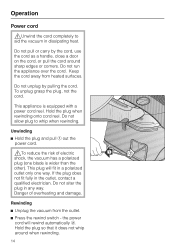
... not run the appliance over the cord. Do not unplug by the cord, use the cord as a handle, close a door on the cord, or pull the cord around when rewinding. 14 This appliance is wider than the other). Unwinding ^ Hold the plug and pull a out the power cord. ,To reduce the risk of overheating and damage. This plug will rewind automatically b. Danger of electric shock, the vacuum...
... not run the appliance over the cord. Do not unplug by the cord, use the cord as a handle, close a door on the cord, or pull the cord around when rewinding. 14 This appliance is wider than the other). Unwinding ^ Hold the plug and pull a out the power cord. ,To reduce the risk of overheating and damage. This plug will rewind automatically b. Danger of electric shock, the vacuum...
Operating manual
Page 16
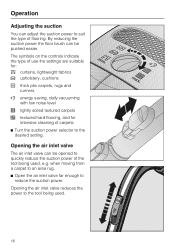
... vacuuming with low noise level ( lightly soiled textured carpets ) textured hard flooring, and for intensive cleaning of carpets ^ Turn the suction power selector to reduce the suction power. Opening the air inlet valve The air inlet valve can be pushed easier. Opening the air inlet valve reduces the power to the tool being used . 16 By reducing the suction power the floor brush can adjust the suction power to suit the type of flooring. Operation Adjusting the suction You can be opened...
... vacuuming with low noise level ( lightly soiled textured carpets ) textured hard flooring, and for intensive cleaning of carpets ^ Turn the suction power selector to reduce the suction power. Opening the air inlet valve The air inlet valve can be pushed easier. Opening the air inlet valve reduces the power to the tool being used . 16 By reducing the suction power the floor brush can adjust the suction power to suit the type of flooring. Operation Adjusting the suction You can be opened...
Operating manual
Page 18
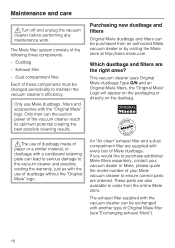
... model number of your Miele vacuum cleaner to the vacuum cleaner and possibly voiding the warranty, just as with every box of Original Miele filter (see "Exchanging exhaust filters"). 18 Maintenance and care ,Turn off and unplug the vacuum cleaner before performing any maintenance work. Purchasing new dustbags and filters Original Miele dustbags and filters can lead to serious damage to ensure correct parts are the right ones? These parts are supplied with the use...
... model number of your Miele vacuum cleaner to the vacuum cleaner and possibly voiding the warranty, just as with every box of Original Miele filter (see "Exchanging exhaust filters"). 18 Maintenance and care ,Turn off and unplug the vacuum cleaner before performing any maintenance work. Purchasing new dustbags and filters Original Miele dustbags and filters can lead to serious damage to ensure correct parts are the right ones? These parts are supplied with the use...
Operating manual
Page 19
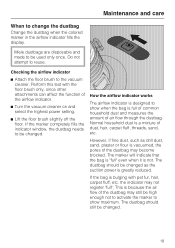
... needs to change the dustbag Change the dustbag when the colored marker in the airflow indicator fills the display. Perform this test with pet fur, hair, carpet fluff, etc. The dustbag should be changed as drill dust, sand, plaster or flour is because the air flow of the airflow indicator. ^ Turn the vacuum cleaner on and select the highest power setting. ^ Lift the floor brush...
... needs to change the dustbag Change the dustbag when the colored marker in the airflow indicator fills the display. Perform this test with pet fur, hair, carpet fluff, etc. The dustbag should be changed as drill dust, sand, plaster or flour is because the air flow of the airflow indicator. ^ Turn the vacuum cleaner on and select the highest power setting. ^ Lift the floor brush...
Operating manual
Page 21
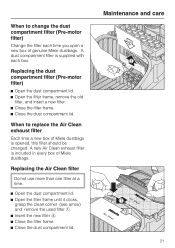
... remove the used filter a. ^ Insert the new filter b. ^ Close the filter frame. ^ Close the dust compartment lid. When to replace the Air Clean exhaust filter Each time a new box of Miele dustbags is supplied with each time you open a new box of Miele dustbags. A dust compartment filter is opened, this filter should be changed. Maintenance and care 21 Replacing the dust compartment filter (Pre-motor filter) ^ Open the dust compartment lid. ^ Open the filter frame, remove the old filter, and insert a new filter. ^ Close the filter...
... remove the used filter a. ^ Insert the new filter b. ^ Close the filter frame. ^ Close the dust compartment lid. When to replace the Air Clean exhaust filter Each time a new box of Miele dustbags is supplied with each time you open a new box of Miele dustbags. A dust compartment filter is opened, this filter should be changed. Maintenance and care 21 Replacing the dust compartment filter (Pre-motor filter) ^ Open the dust compartment lid. ^ Open the filter frame, remove the old filter, and insert a new filter. ^ Close the filter...
Operating manual
Page 22
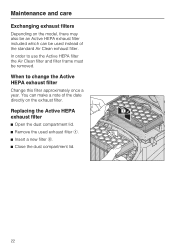
... filter. Replacing the Active HEPA exhaust filter ^ Open the dust compartment lid. ^ Remove the used instead of the date directly on the model, there may also be an Active HEPA exhaust filter included which can be removed. In order to change the Active HEPA exhaust filter Change this filter approximately once a year. When to use the Active HEPA filter the Air Clean filter and filter frame must be used exhaust filter a. ^ Insert a new filter b. ^ Close the dust compartment lid. 22 Maintenance...
... filter. Replacing the Active HEPA exhaust filter ^ Open the dust compartment lid. ^ Remove the used instead of the date directly on the model, there may also be an Active HEPA exhaust filter included which can be removed. In order to change the Active HEPA exhaust filter Change this filter approximately once a year. When to use the Active HEPA filter the Air Clean filter and filter frame must be used exhaust filter a. ^ Insert a new filter b. ^ Close the dust compartment lid. 22 Maintenance...
Operating manual
Page 23
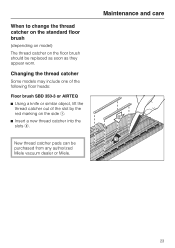
Changing the thread catcher Some models may include one of the following floor heads: Floor brush SBD 350-3 or AIRTEQ ^ Using a knife or similar object, lift the thread catcher out of the slot by the red marking on the floor brush should be purchased from any authorized Miele vacuum dealer or Miele. New thread catcher pads can be replaced as soon as they appear worn. Maintenance and care 23 When to change the thread catcher on the standard floor brush (depending on model) The thread catcher on the side a. ^ Insert a new thread catcher into the slots b.
Changing the thread catcher Some models may include one of the following floor heads: Floor brush SBD 350-3 or AIRTEQ ^ Using a knife or similar object, lift the thread catcher out of the slot by the red marking on the floor brush should be purchased from any authorized Miele vacuum dealer or Miele. New thread catcher pads can be replaced as soon as they appear worn. Maintenance and care 23 When to change the thread catcher on the standard floor brush (depending on model) The thread catcher on the side a. ^ Insert a new thread catcher into the slots b.
Operating manual
Page 24
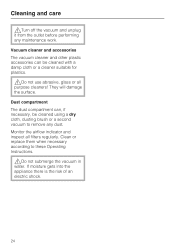
... filters regularly. They will damage the surface. Cleaning and care ,Turn off the vacuum and unplug it from the outlet before performing any dust. Clean or replace them when necessary according to remove any maintenance work. If moisture gets into the appliance there is the risk of an electric shock. 24 Dust compartment The dust compartment can be cleaned using a dry cloth, dusting brush or a second vacuum to these Operating Instructions...
... filters regularly. They will damage the surface. Cleaning and care ,Turn off the vacuum and unplug it from the outlet before performing any dust. Clean or replace them when necessary according to remove any maintenance work. If moisture gets into the appliance there is the risk of an electric shock. 24 Dust compartment The dust compartment can be cleaned using a dry cloth, dusting brush or a second vacuum to these Operating Instructions...
Operating manual
Page 26
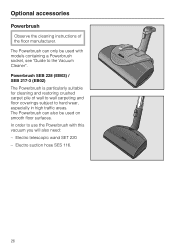
... is particularly suitable for cleaning and restoring crushed carpet pile of the floor manufacturer. In order to use the Powerbrush with models containing a Powerbrush socket, see "Guide to hard wear, especially in high traffic areas. Electro suction hose SES 116. 26 Electro telescopic wand SET 220 - Optional accessories Powerbrush Observe the cleaning instructions of wall to wall carpeting and floor coverings subject to the Vacuum Cleaner".
... is particularly suitable for cleaning and restoring crushed carpet pile of the floor manufacturer. In order to use the Powerbrush with models containing a Powerbrush socket, see "Guide to hard wear, especially in high traffic areas. Electro suction hose SES 116. 26 Electro telescopic wand SET 220 - Optional accessories Powerbrush Observe the cleaning instructions of wall to wall carpeting and floor coverings subject to the Vacuum Cleaner".
Operating manual
Page 27
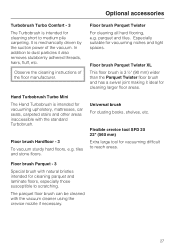
... mm) Extra large tool for vacuuming niches and tight spaces. Floor brush Parquet - 3 Special brush with the vacuum cleaner using the crevice nozzle if necessary. 27 Floor brush Hardfloor - 3 To vacuum sturdy hard floors, e.g. parquet and tiles. Hand Turbobrush Turbo Mini The Hand Turbobrush is intended for cleaning short to reach areas. Floor brush Parquet Twister For cleaning all hard flooring, e.g. Observe the cleaning instructions of the vacuum. Optional accessories Turbobrush Turbo Comfort - 3 The Turbobrush...
... mm) Extra large tool for vacuuming niches and tight spaces. Floor brush Parquet - 3 Special brush with the vacuum cleaner using the crevice nozzle if necessary. 27 Floor brush Hardfloor - 3 To vacuum sturdy hard floors, e.g. parquet and tiles. Hand Turbobrush Turbo Mini The Hand Turbobrush is intended for cleaning short to reach areas. Floor brush Parquet Twister For cleaning all hard flooring, e.g. Observe the cleaning instructions of the vacuum. Optional accessories Turbobrush Turbo Comfort - 3 The Turbobrush...
Operating manual
Page 28
This can be found on the data plate on the back of this booklet. ^ Please quote the model type of the vacuum. 28 Technical Service After sales service In the event of a fault which you cannot fix yourself please contact the Miele Service Department at the phone number listed on the bottom of your appliance.
This can be found on the data plate on the back of this booklet. ^ Please quote the model type of the vacuum. 28 Technical Service After sales service In the event of a fault which you cannot fix yourself please contact the Miele Service Department at the phone number listed on the bottom of your appliance.


