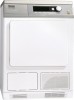

Specs
Page 8
... C / PT 5135 C EL Stand: 31.05.2005 Seite 8 Technical datasheet Tumble dryers: Heating: PT 7135 C / PT 5135 C Electric (EL) Legend: Circled, bold-type abbreviations: Connection required Abbreviations surrounded by broken circle: Connection optional or required, depending on model Optional extras: UM Miele plinth UG/UO 5005 (UG = Box plinth/UO = Open plinth) Height Model mm Width UG (UO) mm Depth UG (UO) mm...
... C / PT 5135 C EL Stand: 31.05.2005 Seite 8 Technical datasheet Tumble dryers: Heating: PT 7135 C / PT 5135 C Electric (EL) Legend: Circled, bold-type abbreviations: Connection required Abbreviations surrounded by broken circle: Connection optional or required, depending on model Optional extras: UM Miele plinth UG/UO 5005 (UG = Box plinth/UO = Open plinth) Height Model mm Width UG (UO) mm Depth UG (UO) mm...

Specs
Page 9
...: 31.05.2005 Seite 9 Fixing materials for cold air discharge vent Condensate drain hose Max. Standard voltage (as supplied) Frequency Rated load Fuse rating Connection cable, min. transient throughput Max. cross-section Length of supply lead (H05 RN-F without plug) (supplied) V Hz kW A mm² mm N 4. The use of unit) °C mm mm l/min mm Fittings (supplied) Miele plinth UG/UO 5005 4 ×...
...: 31.05.2005 Seite 9 Fixing materials for cold air discharge vent Condensate drain hose Max. Standard voltage (as supplied) Frequency Rated load Fuse rating Connection cable, min. transient throughput Max. cross-section Length of supply lead (H05 RN-F without plug) (supplied) V Hz kW A mm² mm N 4. The use of unit) °C mm mm l/min mm Fittings (supplied) Miele plinth UG/UO 5005 4 ×...
Specs
Page 10
... a height of machine) Net weight Dynamic floor load, max. Average heat dissipation (dependent on site Payment system 6 × 50 8 × 40 Possible extensions The following extensions are possible: Installation of payment system Installation as washer-dryer stack Connection to serial interface, RS 232 Machine data Width Depth Height Knocked-down dimensions (W × H) Recommended rear wall gap (measured to front of 1.6 m) mm...
... a height of machine) Net weight Dynamic floor load, max. Average heat dissipation (dependent on site Payment system 6 × 50 8 × 40 Possible extensions The following extensions are possible: Installation of payment system Installation as washer-dryer stack Connection to serial interface, RS 232 Machine data Width Depth Height Knocked-down dimensions (W × H) Recommended rear wall gap (measured to front of 1.6 m) mm...
Product Manual
Page 2
... Selecting/Changing a Favorite 19 Low temp 21 Saving a Favorite 21 Cleaning and Care 22 Cleaning the lint filters 22 Cleaning the exterior and the control panel 24 Cleaning the heat exchanger 25 Frequently asked questions 28 After sales service 34 Optional accessories 34 INSTALLATION INSTRUCTIONS 35 IMPORTANT SAFETY INSTRUCTIONS 36 Installation 37 External drainage of the condensed water 41 Electrical connection 42 Technical Data 43 Caring for the environment 44 Settings J 45 Opening...
... Selecting/Changing a Favorite 19 Low temp 21 Saving a Favorite 21 Cleaning and Care 22 Cleaning the lint filters 22 Cleaning the exterior and the control panel 24 Cleaning the heat exchanger 25 Frequently asked questions 28 After sales service 34 Optional accessories 34 INSTALLATION INSTRUCTIONS 35 IMPORTANT SAFETY INSTRUCTIONS 36 Installation 37 External drainage of the condensed water 41 Electrical connection 42 Technical Data 43 Caring for the environment 44 Settings J 45 Opening...
Product Manual
Page 3
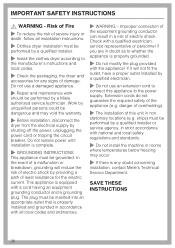
... the user. ~ Clean the lint filter before or after each load. ~ Keep the area around the exhaust opening (toe-kick) and adjacent surrounding areas free of lint, dust and dirt. ~ The interior of the machine and exhaust duct should only be machine dried. ~ Before maintenance, or cleaning and care disconnect the dryer from the electrical supply pulling the plug or tripping the circuit breaker. ~ Make sure that children can access the...
... the user. ~ Clean the lint filter before or after each load. ~ Keep the area around the exhaust opening (toe-kick) and adjacent surrounding areas free of lint, dust and dirt. ~ The interior of the machine and exhaust duct should only be machine dried. ~ Before maintenance, or cleaning and care disconnect the dryer from the electrical supply pulling the plug or tripping the circuit breaker. ~ Make sure that children can access the...

Product Manual
Page 5
... with all local codes and ordinances. ,WARNING - The plug must be inserted into an appropriate outlet that is properly grounded. ~ Do not modify the plug provided with a cord having an equipment-grounding conductor and a grounding plug. Improper connection of electric shock. Contact a qualified electrician if you are in doubt as to the drying compartment. IMPORTANT SAFETY INSTRUCTIONS ~ GROUNDING INSTRUCTIONS This appliance...
... with all local codes and ordinances. ,WARNING - The plug must be inserted into an appropriate outlet that is properly grounded. ~ Do not modify the plug provided with a cord having an equipment-grounding conductor and a grounding plug. Improper connection of electric shock. Contact a qualified electrician if you are in doubt as to the drying compartment. IMPORTANT SAFETY INSTRUCTIONS ~ GROUNDING INSTRUCTIONS This appliance...

Product Manual
Page 11
.../fabric, size and residual moisture after spinning. ,Do not dry items that no filling can come out. - Do not use softener sheets in poor drying. - They could cause the dryer to overheat. ^ Close the door with a firm swing or lean against the dryer and push it closed door. Silicates contained in order to open the drum door. ^ Load the laundry loosely into the drum. Check hems and...
.../fabric, size and residual moisture after spinning. ,Do not dry items that no filling can come out. - Do not use softener sheets in poor drying. - They could cause the dryer to overheat. ^ Close the door with a firm swing or lean against the dryer and push it closed door. Silicates contained in order to open the drum door. ^ Load the laundry loosely into the drum. Check hems and...

Product Manual
Page 12
... is displayed. - or The "Start" button lights. ^ Select from the respective submenus. and/or "Timer" - and/or "Timer" from the "Program selection" menu by turning the jog shuttle. 4. Note: The displayed duration (remaining time) can be started or if the program is canceled the credit is opened after the program has started . ^ Press the "Start" button. If the door is lost. 12 machine...
... is displayed. - or The "Start" button lights. ^ Select from the respective submenus. and/or "Timer" - and/or "Timer" from the "Program selection" menu by turning the jog shuttle. 4. Note: The displayed duration (remaining time) can be started or if the program is canceled the credit is opened after the program has started . ^ Press the "Start" button. If the door is lost. 12 machine...

Product Manual
Page 13
... anti-crease phase the drum will turn in time. Run time 1 h. ^ Use the a button to open , the light goes off after a few minutes (saving energy). ^ Close the door. "Cooling down" is not immediately removed from wrinkling. This may be the case with hot air, the cool down phase. Check the drum for any missed pieces of a program in the dryer can be damaged because of time once a certain temperature is the program...
... anti-crease phase the drum will turn in time. Run time 1 h. ^ Use the a button to open , the light goes off after a few minutes (saving energy). ^ Close the door. "Cooling down" is not immediately removed from wrinkling. This may be the case with hot air, the cool down phase. Check the drum for any missed pieces of a program in the dryer can be damaged because of time once a certain temperature is the program...
Product Manual
Page 14
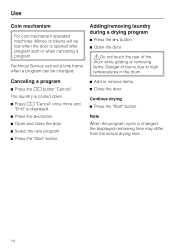
... opened after program start or when canceling a program. Adding/removing laundry during a drying program ^ Press the a button. ^ Open the door. ,Do not touch the rear of the drum while adding or removing items. Danger of burns due to high temperatures in the drum. ^ Add or remove items. ^ Close the door. Use Coin mechanism For coin mechanism operated machines: Money or tokens will be changed the displayed remaining time...
... opened after program start or when canceling a program. Adding/removing laundry during a drying program ^ Press the a button. ^ Open the door. ,Do not touch the rear of the drum while adding or removing items. Danger of burns due to high temperatures in the drum. ^ Add or remove items. ^ Close the door. Use Coin mechanism For coin mechanism operated machines: Money or tokens will be changed the displayed remaining time...

Product Manual
Page 22
... the Miele Spare Parts Department or use a cleaning brush which is available as an optional extra from items being dried is facing the correct way. ^ Also clean the door seal (2) with a damp cloth. ^ Open the door and pull the lint filter (1) out as illustrated. ^ Use your fingers or a vacuum cleaner to remove the fluff from the hollow part of the filter. ,* The fluff filters should be checked and cleaned...
... the Miele Spare Parts Department or use a cleaning brush which is available as an optional extra from items being dried is facing the correct way. ^ Also clean the door seal (2) with a damp cloth. ^ Open the door and pull the lint filter (1) out as illustrated. ^ Use your fingers or a vacuum cleaner to remove the fluff from the hollow part of the filter. ,* The fluff filters should be checked and cleaned...

Product Manual
Page 23
... into position. Do the same on any of the filters, they are damp or wet. Replacing the filters ,Do not replace the filters if they can also be removed and cleaned under hot, running water. ^ Open the door and pull the fluff filter out of the door opening as described previously. Cleaning and Care Cleaning them with care. 23 The two filters in the door opening by the dial out of the...
... into position. Do the same on any of the filters, they are damp or wet. Replacing the filters ,Do not replace the filters if they can also be removed and cleaned under hot, running water. ^ Open the door and pull the fluff filter out of the door opening as described previously. Cleaning and Care Cleaning them with care. 23 The two filters in the door opening by the dial out of the...

Product Manual
Page 27
... and access areas you cannot reach by hand! ^ Also make sure the rubber seals are visible. ^ Remove any soiling still visible inside the housing unit by hand using and damp cloth. The rubber seals must not be removed and must be free of the unit until it clicks into the groove. 27 Cleaning and Care When replacing the cover after cleaning...
... and access areas you cannot reach by hand! ^ Also make sure the rubber seals are visible. ^ Remove any soiling still visible inside the housing unit by hand using and damp cloth. The rubber seals must not be removed and must be free of the unit until it clicks into the groove. 27 Cleaning and Care When replacing the cover after cleaning...

Product Manual
Page 29
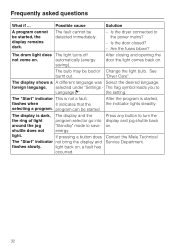
... work at its optimum or not efficiently. See "Settings menu J. Clean the heat exchanger. Possible cause: clogging by lint or detergent residues. - Cleaning the lint filters in usually all the possible causes described under "The program runs too long or stops.". Confirm with "OK". At the end of a program Maintenance message or Clean the heat exchanger appears Clean out airways Drain fault Program finish time changed...
... work at its optimum or not efficiently. See "Settings menu J. Clean the heat exchanger. Possible cause: clogging by lint or detergent residues. - Cleaning the lint filters in usually all the possible causes described under "The program runs too long or stops.". Confirm with "OK". At the end of a program Maintenance message or Clean the heat exchanger appears Clean out airways Drain fault Program finish time changed...

Product Manual
Page 30
... block the heat exchanger. Remove any objects that are blocking are blocked. Check the exhaust parts regularly connection is clogged - Regard the maximum load size per program. In some cases "Clean out airways" is in the washer. THe lint filters must be completely dry. The dryer has over-loaded. Possible fault Solution The program runs too long or stops. Check all the possible causes and open and shut the dryer door. The vents below the door - wall vent duct...
... block the heat exchanger. Remove any objects that are blocking are blocked. Check the exhaust parts regularly connection is clogged - Regard the maximum load size per program. In some cases "Clean out airways" is in the washer. THe lint filters must be completely dry. The dryer has over-loaded. Possible fault Solution The program runs too long or stops. Check all the possible causes and open and shut the dryer door. The vents below the door - wall vent duct...
Product Manual
Page 32
... energy. After the program is not a fault. Contact the Miele Technical Service Department. 32 The fault cannot be started. See burnt out. If pressing a button does The "Start" indicator not bring the display and flashes slowly. Are the fuses blown? The "Start" indicator This is started , the display remains dark. selecting a program. light. selected under "Settings - The drum light does The light turns off not come on . The bulb...
... energy. After the program is not a fault. Contact the Miele Technical Service Department. 32 The fault cannot be started. See burnt out. If pressing a button does The "Start" indicator not bring the display and flashes slowly. Are the fuses blown? The "Start" indicator This is started , the display remains dark. selecting a program. light. selected under "Settings - The drum light does The light turns off not come on . The bulb...
Product Manual
Page 36
... use a damaged appliance. ~ Repair and maintenance work should be grounded. If it will reduce the risk of a malfunction or breakdown, grounding will not fit the outlet, have a proper outlet installed by a Miele authorized service technician. In the event of electric shock by a qualified installer. ~ Install the clothes dryer according to the manufacturer's instructions and local codes. ~ Check the packaging, the dryer and accessories for the electric current. Improper connection of electric...
... use a damaged appliance. ~ Repair and maintenance work should be grounded. If it will reduce the risk of a malfunction or breakdown, grounding will not fit the outlet, have a proper outlet installed by a Miele authorized service technician. In the event of electric shock by a qualified installer. ~ Install the clothes dryer according to the manufacturer's instructions and local codes. ~ Check the packaging, the dryer and accessories for the electric current. Improper connection of electric...
Product Manual
Page 45
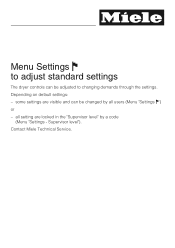
some settings are locked in the "Supervisor level" by all setting are visible and can be changed by a code (Menu "Settings - Supervisor level"). Depending on default settings: - all users (Menu "Settings J") or - Contact Miele Technical Service. Menu Settings J to adjust standard settings The dryer controls can be adjusted to changing demands through the settings.
some settings are locked in the "Supervisor level" by all setting are visible and can be changed by a code (Menu "Settings - Supervisor level"). Depending on default settings: - all users (Menu "Settings J") or - Contact Miele Technical Service. Menu Settings J to adjust standard settings The dryer controls can be adjusted to changing demands through the settings.
Sell Sheet
Page 1
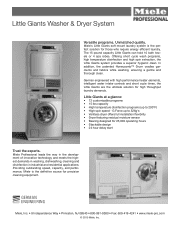
... solution for 25,000 operating hours • Stackable design • 24 hour delay start Trust the experts. The 15 pound capacity Little Giants can hold 10 bath towels or 4 spa robes. German engineered with high performance heater elements, intelligent water intake controls and short cycle times, the Little Giants are the ultimate solution for precision cleaning equipment. Miele's Little Giants soft mount...
... solution for 25,000 operating hours • Stackable design • 24 hour delay start Trust the experts. The 15 pound capacity Little Giants can hold 10 bath towels or 4 spa robes. German engineered with high performance heater elements, intelligent water intake controls and short cycle times, the Little Giants are the ultimate solution for precision cleaning equipment. Miele's Little Giants soft mount...
Sell Sheet
Page 2
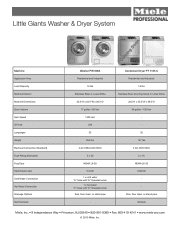
... • 800-991-9380 • Fax: 609-419-4241 • www.miele-pro.com © 2015 Miele, Inc. Little Giants Washer & Dryer System Coming Soon Machine Application Area Load Capacity Machine Exterior Machine Dimensions Drum Volume Spin Speed G Force Languages Weight Electrical Connection (Standard) Fuse Rating (Standard) Plug Type Total Rated Load Cold Water Connection Hot Water Connection Drainage Options Vent Diameter Washer PW 6065 Residential and Industrial 15 lbs Stainless Steel or Lotus White...
... • 800-991-9380 • Fax: 609-419-4241 • www.miele-pro.com © 2015 Miele, Inc. Little Giants Washer & Dryer System Coming Soon Machine Application Area Load Capacity Machine Exterior Machine Dimensions Drum Volume Spin Speed G Force Languages Weight Electrical Connection (Standard) Fuse Rating (Standard) Plug Type Total Rated Load Cold Water Connection Hot Water Connection Drainage Options Vent Diameter Washer PW 6065 Residential and Industrial 15 lbs Stainless Steel or Lotus White...

