
Manuals
Page 4
... Cleaning the control panel 89 Cleaning the appliance front 89 Cleaning the wash cabinet 89 Cleaning the door and the door seal 90 Cleaning the filters in the wash cabinet 90 Cleaning the spray arms...92 Frequently asked questions 94 Technical problems...94 Unusual behavior of the dishwasher 96 Noises...97 Poor cleaning results ...98 Frequently asked questions 100 Cleaning the filters in the water inlet 100 Cleaning the drain pump and non-return valve 101 After sales service ...103 Installation instructions 104 Caring...
... Cleaning the control panel 89 Cleaning the appliance front 89 Cleaning the wash cabinet 89 Cleaning the door and the door seal 90 Cleaning the filters in the wash cabinet 90 Cleaning the spray arms...92 Frequently asked questions 94 Technical problems...94 Unusual behavior of the dishwasher 96 Noises...97 Poor cleaning results ...98 Frequently asked questions 100 Cleaning the filters in the water inlet 100 Cleaning the drain pump and non-return valve 101 After sales service ...103 Installation instructions 104 Caring...

Manuals
Page 7
... operated by the Miele Service Department or an authorized Miele Service dealer. If in the area around the commercial dishwasher should you use . electric shock). Be sure to follow the installation instructions in this commercial dishwasher can Miele guarantee the safety standards of the appliance. The electrical safety of damage from condensation, the furniture in any externally visible damage. Installation, repair and other work...
... operated by the Miele Service Department or an authorized Miele Service dealer. If in the area around the commercial dishwasher should you use . electric shock). Be sure to follow the installation instructions in this commercial dishwasher can Miele guarantee the safety standards of the appliance. The electrical safety of damage from condensation, the furniture in any externally visible damage. Installation, repair and other work...

Manuals
Page 8
... - IMPORTANT SAFETY INSTRUCTIONS Do not connect the dishwasher to the electrical supply. 8 However, the commercial dishwasher must remain connected to the electrical supply by the Miele Service Department or an authorized Miele Service dealer. Before maintenance, disconnect the commercial dishwasher from Miele. proper installation - For safety reasons, this may only be used if the connecting cable is damaged, it is turned off. Do not shorten the water inlet hose, even if...
... - IMPORTANT SAFETY INSTRUCTIONS Do not connect the dishwasher to the electrical supply. 8 However, the commercial dishwasher must remain connected to the electrical supply by the Miele Service Department or an authorized Miele Service dealer. Before maintenance, disconnect the commercial dishwasher from Miele. proper installation - For safety reasons, this may only be used if the connecting cable is damaged, it is turned off. Do not shorten the water inlet hose, even if...

Manuals
Page 10
... being cleaned before loading them in the vicinity Supervise children when they are anywhere near this dishwasher. IMPORTANT SAFETY INSTRUCTIONS Do not wash items soiled with ash, sand, wax, lubricants, or paint in the cabinet. with a water hose or high-pressure cleaner. Ensure that the stainless steel outer casing of the accessories. Only use genuine Miele original spare parts...
... being cleaned before loading them in the vicinity Supervise children when they are anywhere near this dishwasher. IMPORTANT SAFETY INSTRUCTIONS Do not wash items soiled with ash, sand, wax, lubricants, or paint in the cabinet. with a water hose or high-pressure cleaner. Ensure that the stainless steel outer casing of the accessories. Only use genuine Miele original spare parts...

Manuals
Page 12
Appliance description Appliance overview a Door lock b Upper spray arm (not visible) c Runner for upper basket d Connection for upper basket spray arm e Lower spray arm f Runner for lower basket g Data plate h Rinse aid reservoir i Door lock barrel j Reservoir for reactivation salt k Dispenser for powder detergent l Filter combination m Back: Connection for DOS modules External dispensing pump for liquid detergent (DOS1) External dispensing pump for rinse aid (DOS4) 12
Appliance description Appliance overview a Door lock b Upper spray arm (not visible) c Runner for upper basket d Connection for upper basket spray arm e Lower spray arm f Runner for lower basket g Data plate h Rinse aid reservoir i Door lock barrel j Reservoir for reactivation salt k Dispenser for powder detergent l Filter combination m Back: Connection for DOS modules External dispensing pump for liquid detergent (DOS1) External dispensing pump for rinse aid (DOS4) 12

Manuals
Page 27
... program cycle by an authorized dealer. Refill rinse aid at the end of every subsequent program. This will go out a few seconds after it with detergent (including liquid detergent). Normal plus Temperature Duration : 55 °C 23 Min If rinse aid is necessary to the external DOS module must be carried out only by Miele Service or by pressing the OK button. Conversion...
... program cycle by an authorized dealer. Refill rinse aid at the end of every subsequent program. This will go out a few seconds after it with detergent (including liquid detergent). Normal plus Temperature Duration : 55 °C 23 Min If rinse aid is necessary to the external DOS module must be carried out only by Miele Service or by pressing the OK button. Conversion...

Manuals
Page 40
... the display. Confirm the message with a level indicator which is equipped with the OK button. Miele use and recommend: Red: for rinse aid Blue: for dispensing liquid process chemicals. An empty dispensing system must be connected for detergent The DOS module is easy to clean. Unscrew and remove the siphon. Refill DOS K OK Refill the appropriate process chemical at the end of...
... the display. Confirm the message with a level indicator which is equipped with the OK button. Miele use and recommend: Red: for rinse aid Blue: for dispensing liquid process chemicals. An empty dispensing system must be connected for detergent The DOS module is easy to clean. Unscrew and remove the siphon. Refill DOS K OK Refill the appropriate process chemical at the end of...

Manuals
Page 41
... the optimum detergents and additives to use for liquid dispensing, please contact Miele Service. 41 Observe the color coding. Wipe up any irregularities. To ensure trouble-free operation, regular maintenance of the container and screw it on tightly. Follow the appropriate safety regulations. For cleaning specific types of process chemicals used by Miele Service or an authorized Miele dealer. The DOS G 60 module dispensing hoses must be...
... the optimum detergents and additives to use for liquid dispensing, please contact Miele Service. 41 Observe the color coding. Wipe up any irregularities. To ensure trouble-free operation, regular maintenance of the container and screw it on tightly. Follow the appropriate safety regulations. For cleaning specific types of process chemicals used by Miele Service or an authorized Miele dealer. The DOS G 60 module dispensing hoses must be...

Manuals
Page 52
... called up. If delay start before adding detergent. Normal plus Temperature Turn on in the Settings menu (see "Operation, Selecting a program"). A delay start time, will flash. Press the OK button. Delay start must be delayed, e.g. Setting the start time When using the delay start "). Start time : Use the arrow buttons (higher) and (lower) to the dispenser, with the result that the detergent compartment is dry before it has started, switch the dishwasher off , it...
... called up. If delay start before adding detergent. Normal plus Temperature Turn on in the Settings menu (see "Operation, Selecting a program"). A delay start time, will flash. Press the OK button. Delay start must be delayed, e.g. Setting the start time When using the delay start "). Start time : Use the arrow buttons (higher) and (lower) to the dispenser, with the result that the detergent compartment is dry before it has started, switch the dishwasher off , it...

Manuals
Page 92
... far as it will go and then pull the spray arm downwards to remove it. Remove the lower basket. Using the knurled nut turn the lower spray arm to the right as far as it will go and then pull the spray arm upwards to remove it . 92 Cleaning and care Cleaning the spray arms This dishwasher has three different spray arms. Particles of food can get stuck in the...
... far as it will go and then pull the spray arm downwards to remove it. Remove the lower basket. Using the knurled nut turn the lower spray arm to the right as far as it will go and then pull the spray arm upwards to remove it . 92 Cleaning and care Cleaning the spray arms This dishwasher has three different spray arms. Particles of food can get stuck in the...

Manuals
Page 94
... circuit breaker has tripped. Reset the circuit breaker (minimum fuse rating - Frequently asked questions With the help of the following fault messages is displayed: Check water intake Fault 403-405 Possible cause and solution The dishwasher is turned on . Select the desired program. Press the Start/Stop button. 94 One of these operating instructions. Repair work by a suitably qualified person in strict...
... circuit breaker has tripped. Reset the circuit breaker (minimum fuse rating - Frequently asked questions With the help of the following fault messages is displayed: Check water intake Fault 403-405 Possible cause and solution The dishwasher is turned on . Select the desired program. Press the Start/Stop button. 94 One of these operating instructions. Repair work by a suitably qualified person in strict...

Manuals
Page 96
.... Water remains in the wash cabinet is blocked. Clean the drain pump or the non-return valve (see "Cleaning and care"). The drain hose kinked. Remove the kink. Frequently asked questions"). display: Salt container lid not closed correctly The dispenser cover cannot be closed . It is not properly closed . The inside of the program. Turn the dishwasher off after a short while. The display and indicator lights remain dark. The filter combination...
.... Water remains in the wash cabinet is blocked. Clean the drain pump or the non-return valve (see "Cleaning and care"). The drain hose kinked. Remove the kink. Frequently asked questions"). display: Salt container lid not closed correctly The dispenser cover cannot be closed . It is not properly closed . The inside of the program. Turn the dishwasher off after a short while. The display and indicator lights remain dark. The filter combination...

Manuals
Page 100
... reconnect the water inlet hose correctly before tightening it or disconnect or disable the fuse). Close the faucet. Unscrew the water inlet valve. Carefully pull out the large surface area filter 1. Take the seal ring out of the screw connection. Withdraw fine filter 2 using pointed pliers. Clean the filters or replace them with new ones if necessary. Replace the filters and seals, making sure...
... reconnect the water inlet hose correctly before tightening it or disconnect or disable the fuse). Close the faucet. Unscrew the water inlet valve. Carefully pull out the large surface area filter 1. Take the seal ring out of the screw connection. Withdraw fine filter 2 using pointed pliers. Clean the filters or replace them with new ones if necessary. Replace the filters and seals, making sure...

Manuals
Page 103
... at the back of this manual, you are both shown on the data plate, located at the top of the following, quoting the fault code shown in this manual. When contacting Miele, please quote the model number of your Miele dealer or - After sales service After sales service If, despite following the instructions in the display: - your dishwasher together with the 8 digit machine...
... at the back of this manual, you are both shown on the data plate, located at the top of the following, quoting the fault code shown in this manual. When contacting Miele, please quote the model number of your Miele dealer or - After sales service After sales service If, despite following the instructions in the display: - your dishwasher together with the 8 digit machine...

Install Instruction
Page 5
... connection Cold water connection Max. Electrical connection (208 V) Voltage (default) Rated load Fuse rating Minimum cross-section Length of electrical cord (UL 921) with plug Electrical connection Voltage (convertible) Rated load Fuse rating Minimum cross-section Length of electrical cord (UL 921) with plug Electrical connection Electrical connection (240 V) Voltage (default) Rated load Fuse rating Minimum cross-section Length of electrical cord (UL 921) with plug Electrical connection Voltage (convertible) Rated load Fuse rating Minimum cross-section Length of connection hose (supplied...
... connection Cold water connection Max. Electrical connection (208 V) Voltage (default) Rated load Fuse rating Minimum cross-section Length of electrical cord (UL 921) with plug Electrical connection Voltage (convertible) Rated load Fuse rating Minimum cross-section Length of electrical cord (UL 921) with plug Electrical connection Electrical connection (240 V) Voltage (default) Rated load Fuse rating Minimum cross-section Length of electrical cord (UL 921) with plug Electrical connection Voltage (convertible) Rated load Fuse rating Minimum cross-section Length of connection hose (supplied...

Install Instruction
Page 6
flow pressure with extended water intake Max. Machine feet Height adjustable Foot diameter Entry point into housing 0 - 2 3/8" 1 3/8" 8 M 0-60 mm 35 mm 8 M Heat dissipation to 2 dosing systems at the rear panel for liquid cleaning agent and rinse aid. temperature Max. on removal 1194 btu/h 1365 btu/h 0.35 kWh/h 0.40 kWh/h page 5 / 6 Installation plan PG 8056 flow pressure Min. On-site hose connector (external diameter x length...
flow pressure with extended water intake Max. Machine feet Height adjustable Foot diameter Entry point into housing 0 - 2 3/8" 1 3/8" 8 M 0-60 mm 35 mm 8 M Heat dissipation to 2 dosing systems at the rear panel for liquid cleaning agent and rinse aid. temperature Max. on removal 1194 btu/h 1365 btu/h 0.35 kWh/h 0.40 kWh/h page 5 / 6 Installation plan PG 8056 flow pressure Min. On-site hose connector (external diameter x length...
Sell Sheet
Page 1
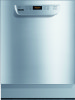
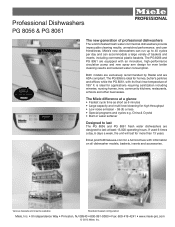
Miele's new dishwashers can run up to 40 cycles per day and can accommodate a large variety of professional dishwashers The world's fastest fresh water commercial dishwashers provide impeccable cleaning results, unmatched performance, and user friendliness. The Miele difference at least 15,000 operating hours. The PG 8056 is ideal for applications requiring sanitization including wineries, nursing homes, inns, community kitchens, restaurants, schools and other businesses. China & Crystal...
Miele's new dishwashers can run up to 40 cycles per day and can accommodate a large variety of professional dishwashers The world's fastest fresh water commercial dishwashers provide impeccable cleaning results, unmatched performance, and user friendliness. The Miele difference at least 15,000 operating hours. The PG 8056 is ideal for applications requiring sanitization including wineries, nursing homes, inns, community kitchens, restaurants, schools and other businesses. China & Crystal...
Sell Sheet
Page 2
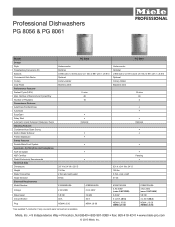
... AutoClose/ComfortClose AutoOpen EasyOpen Delay Start Automatic Liquid Detergent Dispenser Pump Cleaning Features Condenser/Auto Open Drying Built-In Water Softener Perfect GlassCare Safety Features Double WaterProof System Approvals, Certifications and Compliance ADA Compliant NSF Certified Riedel Exclusively Recommends Technical Data Dimensions Weight Water Connection Noise Emission Electrical Requirements Model Number PG 8056 Undercounter Optional U 890 with 2 x E 816 and 2 x E 165, O 891 with 1 x E 810 Optional Cutlery Holder Stainless steel 6 mins 40 10 •...
... AutoClose/ComfortClose AutoOpen EasyOpen Delay Start Automatic Liquid Detergent Dispenser Pump Cleaning Features Condenser/Auto Open Drying Built-In Water Softener Perfect GlassCare Safety Features Double WaterProof System Approvals, Certifications and Compliance ADA Compliant NSF Certified Riedel Exclusively Recommends Technical Data Dimensions Weight Water Connection Noise Emission Electrical Requirements Model Number PG 8056 Undercounter Optional U 890 with 2 x E 816 and 2 x E 165, O 891 with 1 x E 810 Optional Cutlery Holder Stainless steel 6 mins 40 10 •...
Accessories Sell Sheet
Page 2
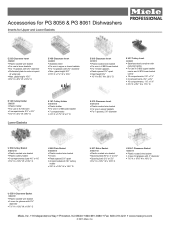
... wire basket • For use in lower baskets • For 17 glasses with 2⅝" diameter • Perforated plate to reduce impact of water jets • Max. glass height 10¾" • 8¾" H x 9⅝" W x 19½" D E 459 Glassware Insert 4326630 • Stainless steel • For use in upper or lower baskets • For 12 glasses with 2¾" diameter • Max. Accessories for PG 8056 & PG 8061 Dishwashers...
... wire basket • For use in lower baskets • For 17 glasses with 2⅝" diameter • Perforated plate to reduce impact of water jets • Max. glass height 10¾" • 8¾" H x 9⅝" W x 19½" D E 459 Glassware Insert 4326630 • Stainless steel • For use in upper or lower baskets • For 12 glasses with 2¾" diameter • Max. Accessories for PG 8056 & PG 8061 Dishwashers...

Accessories Sell Sheet
Page 4
...;" - 9⅛" with 2 brackets, lid and rear panel to convert standard unit into freestanding unit Basket Combinations DOS G80/1 Dosing Module 67747025USA • Dispenser module for liquid detergent • 2 AC 208V 60Hz / 2 AC 240V 60Hz • 7⅞" siphon for PG 8056 & PG 8061 Dishwashers Accessories ABL 50 Spacer Trim 67211401D • Stainless steel • Allows height adjustment to 28⅜" cabinet size • Height 2" UO...
...;" - 9⅛" with 2 brackets, lid and rear panel to convert standard unit into freestanding unit Basket Combinations DOS G80/1 Dosing Module 67747025USA • Dispenser module for liquid detergent • 2 AC 208V 60Hz / 2 AC 240V 60Hz • 7⅞" siphon for PG 8056 & PG 8061 Dishwashers Accessories ABL 50 Spacer Trim 67211401D • Stainless steel • Allows height adjustment to 28⅜" cabinet size • Height 2" UO...


