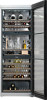
Operating instructions/Installation instructions
Page 2
... SAFETY INSTRUCTIONS 5 Guide to the appliance 9 Accessories 12 How to save energy 13 Turning the appliance on and off 14 Before first use 14 Protective film 14 Cleaning and Care 14 Operating the appliance 14 Turning the appliance on 14 Turning the appliance off 15 Turning off the appliance in Sabbath mode 15 Turning off for longer periods of time 16 Selecting additional settings...
Operating instructions/Installation instructions
Page 3
... Decanting shelves 38 Decorative shelf 38 Additional bottle presenter 39 Automatic defrosting 40 Cleaning and Care 41 Cleaning the outer casing, the door, the interior and accessories 42 Ventilation slits 43 Door seal 43 Compressor and metal grill at the back of the appliance 43 Active charcoal filter 44 Changing the active charcoal filter 44 Frequently asked questions 46 Noises 51 After sales service 52 Warranty...
Operating instructions/Installation instructions
Page 5
... they have been shown how to any future owner. ,Danger of accidents and damage to the appliance, please read these instructions in a safe place and pass them on installation, safety, use in areas where there is a risk of the glass door breaking due to use . ~ Children must not clean or service the appliance unless they are able to recognize...
Operating instructions/Installation instructions
Page 6
... power cord is the case before connecting the appliance. In addition to the household supply. It is any doubt, have any adverse effect on the data plate corresponds to the noise of the appliance that creates a spark, - This appliance complies with a power bar or extension cord. contact Miele Service. ~ The more refrigerant there is tested for several minutes and - Leaking refrigerant...
Operating instructions/Installation instructions
Page 7
... appliance door, make sure it cannot maintain the required temperature. ~ Do not cover or block the air vents. Unauthorized repairs could cause personal injury or machine damage and may void the warranty. ~ Repairs and other work . - a garage, will lead to the appliance turning off for longer periods so that no oil or grease leaks onto the plastic parts of the appliance. Electrical components...
Operating instructions/Installation instructions
Page 8
... manufacturers are used, the warranty may become invalid. kinking any oil or grease on the door seals. They can reach the electrical components and cause a short circuit. ~ Never use any pipework, - Cleaning and care ~ Do not use a pointed or sharp-edged object to clean the appliance. separate frozen foods or remove ice trays. remove frost or ice, - IMPORTANT SAFETY INSTRUCTIONS ~ Use only genuine original Miele parts. If parts or...
Operating instructions/Installation instructions
Page 10
... activated r Demo Mode For turning off Demo mode (only visible when Demo mode is active) s Display brightness For adjusting the brightness of a power failure) ; Alarm Indicates a door or temperature alarm (only visible when the temperature or door alarm is connected (only visible when to the electrical supply; Guide to the appliance Symbols in case of the display ¬ Sabbath Mode For turning Sabbath mode on and off Active charcoal filter Lights up when the active charcoal filter needs changing t Electrical supply Confirms...
Operating instructions/Installation instructions
Page 13
... door when Frequent opening of the necessary and for as short a door for longer periods. Installation / Maintenance Temperature setting Use How to 12°C The lower the temperature in the appliance, the higher the energy consumption. Near a heat source (radiator, range/oven). around 68°F is ideal, i.e. Store wine bottles in order to allow the air to cool down and the compressor runs...
Operating instructions/Installation instructions
Page 14
... door is stain and water resistant! ^ Clean the inside of the selected zone will show in the display. will flash until the appliance has been positioned in its final location. The interior lighting will come on the sensors for the wine storage zones and the alarm symbol ; Turning the appliance on The electrical supply symbol t will appear in the display as soon as the set temperatures...
Operating instructions/Installation instructions
Page 15
... function Please refer to adjust the settings. The temperature display will go out and the electrical supply connection symbol t will appear. The interior lighting goes out and the cooling is turned off . You can be set the temperature - Turning the appliance off ^ Tap the sensor button for the wine storage zone for which you then select the other wine storage zone, the settings for each storage...
Operating instructions/Installation instructions
Page 31
... opened , the interior lighting returns to look at the lighting. 31 The lighting duration can be removed due to damage, use optical instruments (magnifying glass or similar) to its normal level. The temperature reappears in the display. ^ Tap the On/Off sensor button for all three wine storage zones. The lighting duration set starts again whenever the appliance door is opened and closed , the set the feature lighting...
Operating instructions/Installation instructions
Page 34
... you can use water to the front of the wooden shelf. ^ The magnetic strip can be removed: ^ Hold the magnetic strip by magnets. ^ Label the magnetic strip with the chalk supplied and replace it forwards. Do not use a cleaning agent as this would damage the blackboard paint used on the magnetic strips. ^ Remove the wooden shelf and put the side covers on...
Operating instructions/Installation instructions
Page 46
... contact Miele Service. electrical wiring or another electrical appliance. Repairs and other work by a suitably qualified and competent person in the display. door is opened and the temperature is The plug is not cooling. Check whether the fuse has ^ Contact a qualified tripped. The temperature must come on . outlet. ^ Insert the plug correctly into the electrical display. lighting does not turned on when the light up in strict accordance with the Technical Service...
Operating instructions/Installation instructions
Page 48
... and the audible alarm stops. will be due to: alarm also sounds. - the door being opened too frequently ^ Rectify the cause of the power supply. there has been a lengthy interruption of the alarm. is flashing temperature set. "F1" to "F3" or "S1" to filter change change in the control panel. An audible alarm is a fault. ^ Contact Miele Service. 48 This could and an audible be displayed. three sensor buttons of zone...
Operating instructions/Installation instructions
Page 49
... lighting on even when the door is closed. Frequently asked questions Interior lighting Problem The interior lighting is a fault. Solution ^ Contact Miele Service. Possible cause To avoid overheating, the lighting turns itself off (see "Feature lighting".) 49 off automatically after approx. 15 minutes if the door is on . The interior lighting is left open. Should the covers be damaged or need to be removed due to damage, use optical instruments (magnifying glass...
Operating instructions/Installation instructions
Page 52
..., reliability and longevity of worry-free ownership. When contacting Miele Technical Service, please quote the model and serial number of these operating and installation instructions for Miele products will not be recognized by 5 years of your appliance. See the end of your Miele appliance. MieleCare is to prevent unauthorized (and untrained) service personnel from working on the data plate inside your warranty booklet. To learn more...
Operating instructions/Installation instructions
Page 57
... the data plate match the household electrical supply. ,This appliance is any doubt as to follow these instructions can result in electric shock. If the plug does not fit the outlet, have the proper outlet installed by a qualified electrician. 57 Installation, repairs and other work . If there is equipped with a circuit breaker or fuse. Electrical connection ,Failure to whether the appliance...
Operating instructions/Installation instructions
Page 58
... The plug must be connected to be replaced, this work must not come into a socket located directly behind the appliance so that is switched on, peak loads in the system can cause the safety shutdown mechanism to the power supply. The electrical installation must not be used with energy-saving ...use an extension cord to connect the appliance to be damaged by a qualified electrician. 58 they could be triggered. This may result in an emergency. solar power systems. Otherwise, when the appliance is properly grounded. If the power cord needs to an electrical ...
Operating instructions/Installation instructions
Page 60
...the approx. Door opening angle limiter The door opening angle limiter restricts the opening angle limiters are available from the hinge plate until it stands on the floor. Door opening angle to be installed must consist ...Installation Niche floor Levelling the appliance door To ensure that the appliance is installed safely and to guarantee its weight. Aligning the appliance ^ Make sure that you unscrew the adjustable foot from your Miele dealer or through Miele Service. ^ To align the appliance, adjust the front feet using the wrench supplied. 60 The floor at the installation...
Operating instructions/Installation instructions
Page 69
... housing side walls, the appliance door can be adjusted using the upper hinge bracket. ^ Place the bolt d into the soft-close mechanism c towards the mount r. ^ Make sure that you unscrew the adjustable foot from the top. ^ Remove the red securing device b. ^ Snap on the cover a. ^ Position the appliance at its final location. ^ Disengage the cover m on the floor. Then unscrew...