

KM5773 Product Dimensions
Page 1
See notes 36 1/8" 19 11/16" 1 9/16" max. 2" min Location Codes E - 208-240 Volt, 50 Amp 3-wire power supply connects rear left bottom Notes • All installations must be done in height includes 1 3/8" for electrical connection NOTE: Drawing is 2 9/16" thick. Total built-in accordance with local codes. • Unit depth is not to scale. SPECIFICATION SHEETS 060811 Product and Cut-out Dimensions Touch Control Induction Cooktop KM5773 E 23 5/8" min 36 5/8" 20 1/4" 3 15/16" -
See notes 36 1/8" 19 11/16" 1 9/16" max. 2" min Location Codes E - 208-240 Volt, 50 Amp 3-wire power supply connects rear left bottom Notes • All installations must be done in height includes 1 3/8" for electrical connection NOTE: Drawing is 2 9/16" thick. Total built-in accordance with local codes. • Unit depth is not to scale. SPECIFICATION SHEETS 060811 Product and Cut-out Dimensions Touch Control Induction Cooktop KM5773 E 23 5/8" min 36 5/8" 20 1/4" 3 15/16" -
Product Manual
Page 2
... INSTRUCTIONS 4 Guide to the cooktop 10 Cooktop 10 Control panel 11 Burner display 12 Timer display 13 Burner data 13 Induction 14 How it works 14 Noises 15 Cookware 16 Before using for the first time 17 Heat the cooktop 17 Resetting the touch controls 18 Use 19 Touch controls 19 Turning on the cooktop 19 Turning on a burner 19 Settings 20 Auto-heat 21 Cooking without Auto-heat 22 Booster function 23 Turning off a burner 25 Turning...
... INSTRUCTIONS 4 Guide to the cooktop 10 Cooktop 10 Control panel 11 Burner display 12 Timer display 13 Burner data 13 Induction 14 How it works 14 Noises 15 Cookware 16 Before using for the first time 17 Heat the cooktop 17 Resetting the touch controls 18 Use 19 Touch controls 19 Turning on the cooktop 19 Turning on a burner 19 Settings 20 Auto-heat 21 Cooking without Auto-heat 22 Booster function 23 Turning off a burner 25 Turning...
Product Manual
Page 3
Contents Cleaning and Care 33 Programming 34 Frequently asked questions 37 Technical Service 40 Installation instructions 41 IMPORTANT SAFETY INSTRUCTIONS 42 Installation 44 Installation dimensions 45 Ventilation 46 Installing the cooktop 47 Electrical connection 49 Help protect our environment 50 3
Contents Cleaning and Care 33 Programming 34 Frequently asked questions 37 Technical Service 40 Installation instructions 41 IMPORTANT SAFETY INSTRUCTIONS 42 Installation 44 Installation dimensions 45 Ventilation 46 Installing the cooktop 47 Electrical connection 49 Help protect our environment 50 3
Product Manual
Page 4
... power supply. ~ To guarantee the electrical safety of your appliance is imperative that this appliance, continuity must exist between cooktop and countertop for residential cooking only. It is properly installed and grounded by a qualified electrician. ~ Only for frame/facet cooktops: A small gap will decrease as the cooktop is warrantied despite the small gap. 4 IMPORTANT SAFETY INSTRUCTIONS READ THE OPERATING INSTRUCTIONS CAREFULLY BEFORE USING...
... power supply. ~ To guarantee the electrical safety of your appliance is imperative that this appliance, continuity must exist between cooktop and countertop for residential cooking only. It is properly installed and grounded by a qualified electrician. ~ Only for frame/facet cooktops: A small gap will decrease as the cooktop is warrantied despite the small gap. 4 IMPORTANT SAFETY INSTRUCTIONS READ THE OPERATING INSTRUCTIONS CAREFULLY BEFORE USING...

Product Manual
Page 5
.... ~ Do not use the cooktop for residential cooking, and for more information. ~ Be sure to use it has been properly installed in the countertop. ~ This appliance is turned on. Although unlikely that an electromagnetic field develops when the cooktop is equipped with an overheating protection feature. Follow the manufacturer's instructions. ~ Never heat up empty pans. IMPORTANT SAFETY INSTRUCTIONS Use ~ Only use the appliance until...
.... ~ Do not use the cooktop for residential cooking, and for more information. ~ Be sure to use it has been properly installed in the countertop. ~ This appliance is turned on. Although unlikely that an electromagnetic field develops when the cooktop is equipped with an overheating protection feature. Follow the manufacturer's instructions. ~ Never heat up empty pans. IMPORTANT SAFETY INSTRUCTIONS Use ~ Only use the appliance until...
Product Manual
Page 6
... pots and pans out of children's reach. Children climbing on the burners or changing the settings. Once sufficient time has passed and the cooktop surface is high enough to cause a burn, the Residual Heat Indicator will go out. ~ Protect your hands with oil or fat. Flames could be injured. ~ Use the Child Safety Lock to prevent children from turning on the cooktop to reach...
... pots and pans out of children's reach. Children climbing on the burners or changing the settings. Once sufficient time has passed and the cooktop surface is high enough to cause a burn, the Residual Heat Indicator will go out. ~ Protect your hands with oil or fat. Flames could be injured. ~ Use the Child Safety Lock to prevent children from turning on the cooktop to reach...

Product Manual
Page 7
...heat-resistant material. 7 Built-up pressure may produce toxic fumes if applied to avoid steam burns. ~ Do not let flammable materials, i.e. Drawers under the cooktop are to be careful to a hot surface. ~ When wiping spills on the appliance. ~ Never cover the cooktop with a cloth. Do not store small items or paper in injury. ~ Before removing pots and pans... fan and cause damage or impair cooling. Some cleaners may cause the container to cool before cleaning. cooking grease, accumulate on a hot cooktop with a cooling fan. IMPORTANT SAFETY INSTRUCTIONS ~ Do not heat ...
...heat-resistant material. 7 Built-up pressure may produce toxic fumes if applied to avoid steam burns. ~ Do not let flammable materials, i.e. Drawers under the cooktop are to be careful to a hot surface. ~ When wiping spills on the appliance. ~ Never cover the cooktop with a cloth. Do not store small items or paper in injury. ~ Before removing pots and pans... fan and cause damage or impair cooling. Some cleaners may cause the container to cool before cleaning. cooking grease, accumulate on a hot cooktop with a cooling fan. IMPORTANT SAFETY INSTRUCTIONS ~ Do not heat ...

Product Manual
Page 8
... difficult to remove. ~ Do not use pots or pans with pronounced edges or ridges on the ceramic cooktop. These could penetrate electrical components and cause a short circuit. 8 See "Cookware" for more information. IMPORTANT SAFETY INSTRUCTIONS Damage protection ~ Never place hot pots or pans on the touch controls, this may cause damage. ~ Do not use a steam cleaner to fall on the burners when they...
... difficult to remove. ~ Do not use pots or pans with pronounced edges or ridges on the ceramic cooktop. These could penetrate electrical components and cause a short circuit. 8 See "Cookware" for more information. IMPORTANT SAFETY INSTRUCTIONS Damage protection ~ Never place hot pots or pans on the touch controls, this may cause damage. ~ Do not use a steam cleaner to fall on the burners when they...
Product Manual
Page 9
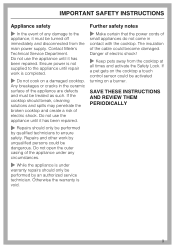
... turning on the cooktop a touch control sensor could become damaged. Contact Miele's Technical Service Department. Do not use the appliance until repair work by qualified technicians to ensure safety. Do not open the outer casing of the appliance under warranty repairs should only be performed by an authorized service technician. If a pet gets on a burner. Further safety notes ~ Make certain that the power...
... turning on the cooktop a touch control sensor could become damaged. Contact Miele's Technical Service Department. Do not use the appliance until repair work by qualified technicians to ensure safety. Do not open the outer casing of the appliance under warranty repairs should only be performed by an authorized service technician. If a pet gets on a burner. Further safety notes ~ Make certain that the power...

Product Manual
Page 14
... cooktop will not work when a magnetic based pan is placed on it up quickly. Induction automatically recognizes the size of the pan is too small. - Beware of the pan. if the pan is taken off automatically after use. - Induction How it is switched on. When a burner is located under each burner. The burner will switch off the burner when it works An induction coil is switched on , or when there is residual heat...
... cooktop will not work when a magnetic based pan is placed on it up quickly. Induction automatically recognizes the size of the pan is too small. - Beware of the pan. if the pan is taken off automatically after use. - Induction How it is switched on. When a burner is located under each burner. The burner will switch off the burner when it works An induction coil is switched on , or when there is residual heat...

Product Manual
Page 16
... pans Unsuitable pans: - If the base diameter of the pan is suitable. enameled steel pans - The burner will not work. Pan size To make optimum use of the burners, choose cookware that you can do so, do not use on an induction cooktop, hold a magnet to the base of the burner. Induction Cookware Suitable pans include: - stainless steel pans without a magnetic base - If the magnet sticks, the pan is smaller than the inner marking, the induction heating...
... pans Unsuitable pans: - If the base diameter of the pan is suitable. enameled steel pans - The burner will not work. Pan size To make optimum use of the burners, choose cookware that you can do so, do not use on an induction cooktop, hold a magnet to the base of the burner. Induction Cookware Suitable pans include: - stainless steel pans without a magnetic base - If the magnet sticks, the pan is smaller than the inner marking, the induction heating...
Product Manual
Page 18
... circuit breaker to the power supply, and - if there is an interruption to the cooktop or turn off the power main for 1 minute. when the cooktop is restored. during use in the rear left and right burner displays, ^ Make sure no direct light (sun or artificial) beams on . The surrounding area of the touch controls the Child Safety Lock indicator lights and the cooktop cannot be manually reset...
... circuit breaker to the power supply, and - if there is an interruption to the cooktop or turn off the power main for 1 minute. when the cooktop is restored. during use in the rear left and right burner displays, ^ Make sure no direct light (sun or artificial) beams on . The surrounding area of the touch controls the Child Safety Lock indicator lights and the cooktop cannot be manually reset...
Product Manual
Page 21
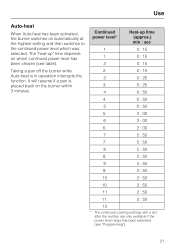
... continued cooking settings with a dot after the number are only available if the power level range has been extended (see table). It will resume if a pan is in operation interrupts the function. Continued power level* Heat-up " time depends on the burner within 3 minutes. Use Auto-heat When Auto-heat has been activated, the burner switches on automatically at the highest setting and then switches to...
... continued cooking settings with a dot after the number are only available if the power level range has been extended (see table). It will resume if a pan is in operation interrupts the function. Continued power level* Heat-up " time depends on the burner within 3 minutes. Use Auto-heat When Auto-heat has been activated, the burner switches on automatically at the highest setting and then switches to...

Product Manual
Page 33
... (oven) cleaners, dishwasher detergent, scouring pads, steel wool or hard brushes. Follow the manufacturer's instructions. Make sure that pot and pan bases are allowed to cool and clean as possible, while the burner is still hot. If they become pitted. ^ Turn the burner off. ^ Using a shielded scraper blade, scrape the melted item immediately off any soiling using a cleaner for ceramic surfaces. The ceramic surface can be removed...
... (oven) cleaners, dishwasher detergent, scouring pads, steel wool or hard brushes. Follow the manufacturer's instructions. Make sure that pot and pan bases are allowed to cool and clean as possible, while the burner is still hot. If they become pitted. ^ Turn the burner off. ^ Using a shielded scraper blade, scrape the melted item immediately off any soiling using a cleaner for ceramic surfaces. The ceramic surface can be removed...

Product Manual
Page 37
.... The Child Safety Lock is in the demo mode. The main fuse has blown. Turn the burner off or place suitable cookware on . Frequently asked questions ,Repairs should only be turned on type and for induction or sufficient in size. Reconnect the power and turn the appliance on it still does not heat, contact Miele Technical Service. Possible fault Solution The cooktop is activated. Possible...
.... The Child Safety Lock is in the demo mode. The main fuse has blown. Turn the burner off or place suitable cookware on . Frequently asked questions ,Repairs should only be turned on type and for induction or sufficient in size. Reconnect the power and turn the appliance on it still does not heat, contact Miele Technical Service. Possible fault Solution The cooktop is activated. Possible...
Product Manual
Page 40
... program; Please note that guarantees repairs by Miele. When contacting Technical Service quote the serial number and model of worry free ownership. Technical Service In the event of a fault which you cannot easily fix yourself, please contact the Miele Technical Service Department using genuine Miele parts. Our goal is to prevent unauthorized (and untrained) service personnel from working on your Miele products, possibly doing further damage...
... program; Please note that guarantees repairs by Miele. When contacting Technical Service quote the serial number and model of worry free ownership. Technical Service In the event of a fault which you cannot easily fix yourself, please contact the Miele Technical Service Department using genuine Miele parts. Our goal is to prevent unauthorized (and untrained) service personnel from working on your Miele products, possibly doing further damage...

Product Manual
Page 42
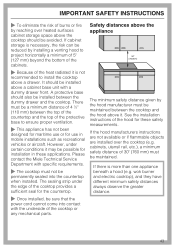
... and venting hood should be installed first to prevent damage to the cooktop. ~ The cooktop should only be installed above an oven if it has a built-in the illustrations while maintaining the required safety distances shown. Heat radiated by the cooktop may damage them. ~ The cooktop must only be installed as shown in cooling fan. 2 " recommended 2 " 50mm b not recommended not allowed 42 IMPORTANT SAFETY INSTRUCTIONS...
... and venting hood should be installed first to prevent damage to the cooktop. ~ The cooktop should only be installed above an oven if it has a built-in the illustrations while maintaining the required safety distances shown. Heat radiated by the cooktop may damage them. ~ The cooktop must only be installed as shown in cooling fan. 2 " recommended 2 " 50mm b not recommended not allowed 42 IMPORTANT SAFETY INSTRUCTIONS...
Product Manual
Page 43
... the cooktop. wok burner and electric cooktop), and they have different minimum safety distances always observe the greater distance. 43 If the hood manufacturers instructions are not available or if flammable objects are installed over heated surfaces cabinet storage space above it. IMPORTANT SAFETY INSTRUCTIONS ~ To eliminate the risk of burns or fire by reaching over the cooktop (e.g. A protective base should be sure that the power...
... the cooktop. wok burner and electric cooktop), and they have different minimum safety distances always observe the greater distance. 43 If the hood manufacturers instructions are not available or if flammable objects are installed over heated surfaces cabinet storage space above it. IMPORTANT SAFETY INSTRUCTIONS ~ To eliminate the risk of burns or fire by reaching over the cooktop (e.g. A protective base should be sure that the power...

Product Manual
Page 47
... This cooktop has a seal underneath to ensure an effective seal. Remember to maintain a minimum distance of 2" (50 mm) between the frame and the countertop will reduce as the cooktop is important to keep it securely in the illustration. Do not use sealant. ^ Connect the cooktop to the main power supply. ^ Turn the cooktop on all sides. Installation Cut out Installing the cooktop ^ Make the countertop cut surfaces with a suitable heat...
... This cooktop has a seal underneath to ensure an effective seal. Remember to maintain a minimum distance of 2" (50 mm) between the frame and the countertop will reduce as the cooktop is important to keep it securely in the illustration. Do not use sealant. ^ Connect the cooktop to the main power supply. ^ Turn the cooktop on all sides. Installation Cut out Installing the cooktop ^ Make the countertop cut surfaces with a suitable heat...
Product Manual
Page 49
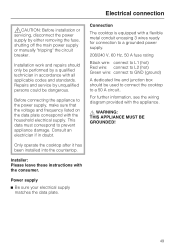
... wiring diagram provided with the household electrical supply. Electrical connection ,CAUTION: Before installation or servicing, disconnect the power supply by unqualified persons could be dangerous. Installer: Please leave these instructions with all applicable codes and standards. Consult an electrician if in accordance with the consumer. Repairs and service by either removing the fuse, shutting off the main power supply or manually "tripping" the circuit breaker. Installation work and repairs should be used to connect the cooktop...
... wiring diagram provided with the household electrical supply. Electrical connection ,CAUTION: Before installation or servicing, disconnect the power supply by unqualified persons could be dangerous. Installer: Please leave these instructions with all applicable codes and standards. Consult an electrician if in accordance with the consumer. Repairs and service by either removing the fuse, shutting off the main power supply or manually "tripping" the circuit breaker. Installation work and repairs should be used to connect the cooktop...

