

Product Manual
Page 1
en-US M.-Nr. 09 888 630 Operating and Installation Instructions Induction Cooktops To prevent accidents and machine damage, read these instructions be‐ fore installation or use.
en-US M.-Nr. 09 888 630 Operating and Installation Instructions Induction Cooktops To prevent accidents and machine damage, read these instructions be‐ fore installation or use.
Product Manual
Page 3
... questions 48 Con@ctivity ...52 IMPORTANT SAFETY INSTRUCTIONS - INSTALLATION 53 Safety clearances 54 Ventilation ...58 Framed cooktops 59 Instructions for installation 59 Installation dimensions 60 KM 6360 ...60 KM 6370 ...61 KM 6377 ...62 Installation...63 Flush-mounted (frameless) cooktops 64 Instructions for installation 64 Installation dimensions 65 KM 6365 ...65 KM 6375 ...66 Installation...67 Electrical connection 69 Caring for the environment...
... questions 48 Con@ctivity ...52 IMPORTANT SAFETY INSTRUCTIONS - INSTALLATION 53 Safety clearances 54 Ventilation ...58 Framed cooktops 59 Instructions for installation 59 Installation dimensions 60 KM 6360 ...60 KM 6370 ...61 KM 6377 ...62 Installation...63 Flush-mounted (frameless) cooktops 64 Instructions for installation 64 Installation dimensions 65 KM 6365 ...65 KM 6375 ...66 Installation...67 Electrical connection 69 Caring for the environment...

Product Manual
Page 4
...cooktop, follow basic safety precautions, including the fol‐ lowing: Read all instructions before installation and use of non-compliance with these instructions in a safe place and pass them on installation, safety, use can, however, lead to personal injury and damage to prevent accidents and ...machine damage. This cooktop conforms to any future owners. 4 Miele cannot be held liable for the first time. Keep these ...
...cooktop, follow basic safety precautions, including the fol‐ lowing: Read all instructions before installation and use of non-compliance with these instructions in a safe place and pass them on installation, safety, use can, however, lead to personal injury and damage to prevent accidents and ...machine damage. This cooktop conforms to any future owners. 4 Miele cannot be held liable for the first time. Keep these ...

Product Manual
Page 6
.... Children must be supervised. Do not leave children unattended: Children should not be alone or unsupervised in the area where the oven is installed. Turn all handles away from altering the settings selected. 6 Ensure that children cannot pull pots and pans down and is in use to prevent children...
.... Children must be supervised. Do not leave children unattended: Children should not be alone or unsupervised in the area where the oven is installed. Turn all handles away from altering the settings selected. 6 Ensure that children cannot pull pots and pans down and is in use to prevent children...
Product Manual
Page 7
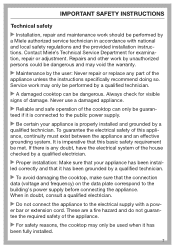
...) on the data plate correspond to the electrical supply with national and local safety regulations and the provided installation instruc‐ tions. It is properly installed and grounded by a qualified technician. When in accordance with a pow‐ er bar or extension cord... have the electrical system of the cooktop can be dangerous. IMPORTANT SAFETY INSTRUCTIONS Technical safety Installation, repair and maintenance work should be performed by a Miele authorized service technician in doubt, consult a qualified electrician. Do not connect the appliance to ...
...) on the data plate correspond to the electrical supply with national and local safety regulations and the provided installation instruc‐ tions. It is properly installed and grounded by a qualified technician. When in accordance with a pow‐ er bar or extension cord... have the electrical system of the cooktop can be dangerous. IMPORTANT SAFETY INSTRUCTIONS Technical safety Installation, repair and maintenance work should be performed by a Miele authorized service technician in doubt, consult a qualified electrician. Do not connect the appliance to ...

Product Manual
Page 8
... lead to the electrical power supply must be replaced by a qualified electrician with a special power cord, which is damaged, it has been installed or until any circumstances. Any repairs not performed by a qualified electrician (see "Electrical connec‐ tion"). If the... power cord is available from the elec‐ tricity supply during installation, maintenance and repair work has been car‐ ried out. Disconnect by Miele original parts only. unplugging the unit (if equipped with the electrical or mechanical components of the ...
... lead to the electrical power supply must be replaced by a qualified electrician with a special power cord, which is damaged, it has been installed or until any circumstances. Any repairs not performed by a qualified electrician (see "Electrical connec‐ tion"). If the... power cord is available from the elec‐ tricity supply during installation, maintenance and repair work has been car‐ ried out. Disconnect by Miele original parts only. unplugging the unit (if equipped with the electrical or mechanical components of the ...

Product Manual
Page 9
... door while the cooktop is in addition to disconnecting the cooktop, this module must also be disconnect‐ ed from the power supply and contact Miele. If the cooktop is fitted with a communication module, in operation. Heat and moisture can build up behind a cabinet door, do not... continue to the cooktop, cab‐ inetry, and flooring. Disconnect the cooktop from the electrical supply during installation and maintenance of the cooktop as well as while any repair work is being carried out. Risk of the cooktop is defective or ...
... door while the cooktop is in addition to disconnecting the cooktop, this module must also be disconnect‐ ed from the power supply and contact Miele. If the cooktop is fitted with a communication module, in operation. Heat and moisture can build up behind a cabinet door, do not... continue to the cooktop, cab‐ inetry, and flooring. Disconnect the cooktop from the electrical supply during installation and maintenance of the cooktop as well as while any repair work is being carried out. Risk of the cooktop is defective or ...

Product Manual
Page 48
... the relevant circuit breaker or screwing the fuse out completely, or - Power levels 1 to open the cooktop casing yourself. Contact an electrician or Miele Service (for details). Risk of injury! tripping the ground fault circuit interrupter (GFCI). If, after resetting/replacing the fuse ... questions The following guide is intended to help you are unable to identify or remedy the cause of the problem on . Improperly performed installation, maintenance or repair work can pose a serious danger to users of the appliance. Smells and vapor may only be turned on your...
... the relevant circuit breaker or screwing the fuse out completely, or - Power levels 1 to open the cooktop casing yourself. Contact an electrician or Miele Service (for details). Risk of injury! tripping the ground fault circuit interrupter (GFCI). If, after resetting/replacing the fuse ... questions The following guide is intended to help you are unable to identify or remedy the cause of the problem on . Improperly performed installation, maintenance or repair work can pose a serious danger to users of the appliance. Smells and vapor may only be turned on your...

Product Manual
Page 53
... mechan‐ ical stress. Observe carefully the safety clearances listed on the following pages. 53 Do not install any moving kitchen parts (e.g. a drawer) or be performed by installing a ventila‐ tion hood that it . Reaching over a hot cooktop to avoid damaging it does ...The wall strips must be heat-re‐ sistant as well. The cooktop must be touched after the cooktop has been installed. After the installation of the cabinets. You can result in cooling fan. Ensure that the power cord cannot be heatresistant (up to 212°...
... mechan‐ ical stress. Observe carefully the safety clearances listed on the following pages. 53 Do not install any moving kitchen parts (e.g. a drawer) or be performed by installing a ventila‐ tion hood that it . Reaching over a hot cooktop to avoid damaging it does ...The wall strips must be heat-re‐ sistant as well. The cooktop must be touched after the cooktop has been installed. After the installation of the cabinets. You can result in cooling fan. Ensure that the power cord cannot be heatresistant (up to 212°...

Product Manual
Page 54
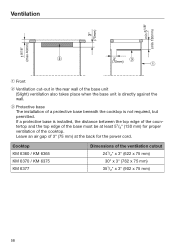
If there are installed above the cook‐ top, always use the clearance specified by the hood manufacturer. If there is more than one appliance installed below the ventilation hood, each with a different safety clear‐ ance, the largest clearance must be used. 54 a utensil rail) are no specifications from the hood manu‐ facturer or if flammable materials (e.g. Safety clearances Safety clearance above the cooktop For a ventilation hood above the cooktop, the clearance must be at least 30" (760 mm).
If there are installed above the cook‐ top, always use the clearance specified by the hood manufacturer. If there is more than one appliance installed below the ventilation hood, each with a different safety clear‐ ance, the largest clearance must be used. 54 a utensil rail) are no specifications from the hood manu‐ facturer or if flammable materials (e.g. Safety clearances Safety clearance above the cooktop For a ventilation hood above the cooktop, the clearance must be at least 30" (760 mm).

Product Manual
Page 55
Safety clearances to the sides and back of the cooktop In installing a cooktop there may be an optionally high cabinet or room wall against the rear side and one of the sides (right or left) (see illustrations). &#...
Safety clearances to the sides and back of the cooktop In installing a cooktop there may be an optionally high cabinet or room wall against the rear side and one of the sides (right or left) (see illustrations). &#...

Product Manual
Page 56
... re‐ quired for the power supply cord. The minimum clearance from the bot‐ tom of the drawer must be 15 mm). - Protective base Installation of a protective base under ‐ neath the cooktop To ensure proper ventilation of the oven must be 3" (75 mm). bottom of the cooktop to...
... re‐ quired for the power supply cord. The minimum clearance from the bot‐ tom of the drawer must be 15 mm). - Protective base Installation of a protective base under ‐ neath the cooktop To ensure proper ventilation of the oven must be 3" (75 mm). bottom of the cooktop to...

Product Manual
Page 57
If the covering is installed, a minimum safety distance must be maintained be 2" (50 mm) minus the thickness of wall covering 2" (50 mm 15 mm) = minimum safety distance 1 ³/₈" (35 ...
If the covering is installed, a minimum safety distance must be maintained be 2" (50 mm) minus the thickness of wall covering 2" (50 mm 15 mm) = minimum safety distance 1 ³/₈" (35 ...
Product Manual
Page 58
If a protective base is installed, the distance between the top edge of the coun‐ tertop and the top edge of the base must be at the back for proper ventilation of a protective base beneath the cooktop is directly against the wall. Cooktop KM 6360 / KM 6365 KM 6370 / KM 6375 KM 6377 Dimensions of the base unit...;/₂" x 3" (902 x 75 mm) 58 Leave an air gap of 3" (75 mm) at least 5¹/₈" (130 mm) for the power cord. c Protective base The installation of the cooktop.
If a protective base is installed, the distance between the top edge of the coun‐ tertop and the top edge of the base must be at the back for proper ventilation of a protective base beneath the cooktop is directly against the wall. Cooktop KM 6360 / KM 6365 KM 6370 / KM 6375 KM 6377 Dimensions of the base unit...;/₂" x 3" (902 x 75 mm) 58 Leave an air gap of 3" (75 mm) at least 5¹/₈" (130 mm) for the power cord. c Protective base The installation of the cooktop.

Product Manual
Page 59
...and the sealing strip under the edge of the upper part of the appliance pro‐ vides a sufficient seal for maintenance or service. Instructions for installation Seal between cooktop and counter Framed cooktops Tiled countertop In case a disassembly is sealed into posi‐ tion, the countertop or appliance could be ...damaged if it needs to be perma‐ nently sealed into the countertop when installed. The grouting and shaded area under the appliance frame must not be removed for the coun‐ tertop.
...and the sealing strip under the edge of the upper part of the appliance pro‐ vides a sufficient seal for maintenance or service. Instructions for installation Seal between cooktop and counter Framed cooktops Tiled countertop In case a disassembly is sealed into posi‐ tion, the countertop or appliance could be ...damaged if it needs to be perma‐ nently sealed into the countertop when installed. The grouting and shaded area under the appliance frame must not be removed for the coun‐ tertop.
Product Manual
Page 60
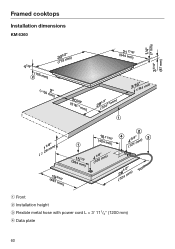
Framed cooktops Installation dimensions KM 6360 a Front b Installation height c Flexible metal hose with power cord L = 3' 11¹/₄" (1200 mm) d Data plate 60
Framed cooktops Installation dimensions KM 6360 a Front b Installation height c Flexible metal hose with power cord L = 3' 11¹/₄" (1200 mm) d Data plate 60

Product Manual
Page 61
KM 6370 Framed cooktops a Front b Installation height c Flexible metal hose with power cord L = 3' 11¹/₄" (1200 mm) d Data plate 61
KM 6370 Framed cooktops a Front b Installation height c Flexible metal hose with power cord L = 3' 11¹/₄" (1200 mm) d Data plate 61

Product Manual
Page 62
Framed cooktops KM 6377 a Front b Installation height c Flexible metal hose with power cord L = 3' 11¹/₄" (1200 mm) d Data plate 62
Framed cooktops KM 6377 a Front b Installation height c Flexible metal hose with power cord L = 3' 11¹/₄" (1200 mm) d Data plate 62

Product Manual
Page 63
...tional sealing material such as shown in the cooktop diagram and in the corners, the corner radius, maximum 3/16" (4 mm), can be temperature resistant. Installing the cooktop Feed the appliance power cord down to fit. Connect the cooktop to help prevent swelling from moisture. The sealing tape guarantees...cut-out. Center the cooktop in the cut-out. Make sure that the sealant does not get on all sides. If during installation the seal around the frame does not sit flush with the counter on the top surface of the cooktop in the cut-out. Framed cooktops...
...tional sealing material such as shown in the cooktop diagram and in the corners, the corner radius, maximum 3/16" (4 mm), can be temperature resistant. Installing the cooktop Feed the appliance power cord down to fit. Connect the cooktop to help prevent swelling from moisture. The sealing tape guarantees...cut-out. Center the cooktop in the cut-out. Make sure that the sealant does not get on all sides. If during installation the seal around the frame does not sit flush with the counter on the top surface of the cooktop in the cut-out. Framed cooktops...

Product Manual
Page 64
... the cooktop to be removed in granite, marble, tiled or solid wood counters. into a glass counter. If the cooktop is not accessible from below after installation, the seal must be provided on site, and is accessible from below and the lower cabinet can be at least as wide as the inner... counter cut-out (see "Instal‐ lation dimensions") so that the cook‐ top is not supplied with a flush-mounted cooktop. See "In‐ stallation dimensions" to be used with...
... the cooktop to be removed in granite, marble, tiled or solid wood counters. into a glass counter. If the cooktop is not accessible from below after installation, the seal must be provided on site, and is accessible from below and the lower cabinet can be at least as wide as the inner... counter cut-out (see "Instal‐ lation dimensions") so that the cook‐ top is not supplied with a flush-mounted cooktop. See "In‐ stallation dimensions" to be used with...