
Product Manual
Page 2
... System lock / Safety lock 40 Safety shut-off ...29 Residual heat indicator 29 Setting the power level - Contents IMPORTANT SAFETY INSTRUCTIONS 4 Overview ...15 KM 6360 / KM 6365 15 KM 6370 / KM 6375 16 KM 6377...17 DirectSelection Plus controls 18 Cooking zone data 19 Before using for the first time 22 Cleaning the cooktop for the first time 22 Turning on the cooktop for the first time 22 Induction ...23 How it works...
... System lock / Safety lock 40 Safety shut-off ...29 Residual heat indicator 29 Setting the power level - Contents IMPORTANT SAFETY INSTRUCTIONS 4 Overview ...15 KM 6360 / KM 6365 15 KM 6370 / KM 6375 16 KM 6377...17 DirectSelection Plus controls 18 Cooking zone data 19 Before using for the first time 22 Cleaning the cooktop for the first time 22 Turning on the cooktop for the first time 22 Induction ...23 How it works...
Product Manual
Page 3
INSTALLATION 53 Safety clearances 54 Ventilation ...58 Framed cooktops 59 Instructions for installation 59 Installation dimensions 60 KM 6360 ...60 KM 6370 ...61 KM 6377 ...62 Installation...63 Flush-mounted (frameless) cooktops 64 Instructions for installation 64 Installation dimensions 65 KM 6365 ...65 KM 6375 ...66 Installation...67 Electrical connection 69 Caring for the environment 71 Technical service, data plate, warranty 72 MieleCare...73 3 Contents Overheat protection 42 Cleaning and care 43 Programming...45 Frequently asked questions 48 Con...
INSTALLATION 53 Safety clearances 54 Ventilation ...58 Framed cooktops 59 Instructions for installation 59 Installation dimensions 60 KM 6360 ...60 KM 6370 ...61 KM 6377 ...62 Installation...63 Flush-mounted (frameless) cooktops 64 Instructions for installation 64 Installation dimensions 65 KM 6365 ...65 KM 6375 ...66 Installation...67 Electrical connection 69 Caring for the environment 71 Technical service, data plate, warranty 72 MieleCare...73 3 Contents Overheat protection 42 Cleaning and care 43 Programming...45 Frequently asked questions 48 Con...

Product Manual
Page 6
...or unsupervised in the area where the oven is installed. Otherwise, they are disposed of safely and kept out of the reach of children. Activate the system lock to ensure that children cannot turn on the appliance. Children ...pans down and is in use . Children must be supervised. Do not leave children unattended: Children should not be tempted into climbing onto the appliance. Danger of any plastic wrappings, bags, etc. IMPORTANT SAFETY INSTRUCTIONS Children As with it. The cooktop gets hot when in use and remains hot...
...or unsupervised in the area where the oven is installed. Otherwise, they are disposed of safely and kept out of the reach of children. Activate the system lock to ensure that children cannot turn on the appliance. Children ...pans down and is in use . Children must be supervised. Do not leave children unattended: Children should not be tempted into climbing onto the appliance. Danger of any plastic wrappings, bags, etc. IMPORTANT SAFETY INSTRUCTIONS Children As with it. The cooktop gets hot when in use and remains hot...
Product Manual
Page 7
... the instructions specifically recommend doing so. Always check for examina‐ tion, repair or adjustment. When in accordance with a pow‐ er bar or extension cord. Repairs and other work by unauthorized persons could be dangerous and may void the warranty. Maintenance by the user: Never repair or replace any doubt, have the electrical system of the cooktop can be dangerous. Service work...
... the instructions specifically recommend doing so. Always check for examina‐ tion, repair or adjustment. When in accordance with a pow‐ er bar or extension cord. Repairs and other work by unauthorized persons could be dangerous and may void the warranty. Maintenance by the user: Never repair or replace any doubt, have the electrical system of the cooktop can be dangerous. Service work...

Product Manual
Page 8
...; Connection of the cooktop will endanger your safety and may lead to appliance malfunctions. removing the fuse, - "tripping" the circuit breaker, or - IMPORTANT SAFETY INSTRUCTIONS This appliance must not be completely disconnected from Miele Service. See "Electrical connection." The appliance must be replaced by - En‐ sure that power is available from the elec‐ tricity supply during installation, maintenance and repair work has...
...; Connection of the cooktop will endanger your safety and may lead to appliance malfunctions. removing the fuse, - "tripping" the circuit breaker, or - IMPORTANT SAFETY INSTRUCTIONS This appliance must not be completely disconnected from Miele Service. See "Electrical connection." The appliance must be replaced by - En‐ sure that power is available from the elec‐ tricity supply during installation, maintenance and repair work has...

Product Manual
Page 9
... the door while the cooktop is in addition to disconnecting the cooktop, this module must also be disconnect‐ ed from the power supply and contact Miele. If the cooktop is installed behind the closed door and cause damage to use it. IMPORTANT SAFETY INSTRUCTIONS If the cooktop is fitted with a communication module, in operation. If the ceramic surface of electric shock!
... the door while the cooktop is in addition to disconnecting the cooktop, this module must also be disconnect‐ ed from the power supply and contact Miele. If the cooktop is installed behind the closed door and cause damage to use it. IMPORTANT SAFETY INSTRUCTIONS If the cooktop is fitted with a communication module, in operation. If the ceramic surface of electric shock!

Product Manual
Page 11
... yourself. When using an electrical appliance, e.g. Do not let them get under pan bases. Do not drop anything on the ceramic surface. Do not place hot pans on inadvertently. IMPORTANT SAFETY INSTRUCTIONS If the cooktop is covered, there is a risk that the material of the cover will ignite, explode or melt if the range is still hot or if turned on the sensor buttons...
... yourself. When using an electrical appliance, e.g. Do not let them get under pan bases. Do not drop anything on the ceramic surface. Do not place hot pans on inadvertently. IMPORTANT SAFETY INSTRUCTIONS If the cooktop is covered, there is a risk that the material of the cover will ignite, explode or melt if the range is still hot or if turned on the sensor buttons...

Product Manual
Page 12
... of oils and fats. Wear oven gloves. Be sure to cool down . Never allow solid or liquid sugar, or pieces of plastic or aluminum foil to get onto the burners when they can cause damage to the ceramic glass. It is being used. Pots and pans with bases with smooth bases. Lift pans into place can catch fire. However...
... of oils and fats. Wear oven gloves. Be sure to cool down . Never allow solid or liquid sugar, or pieces of plastic or aluminum foil to get onto the burners when they can cause damage to the ceramic glass. It is being used. Pots and pans with bases with smooth bases. Lift pans into place can catch fire. However...

Product Manual
Page 31
... set contin‐ ued cooking level flashes. With extended power levels (see chart). The heat-up time depends on automat‐ ically at the highest level and then switches to flash. or select a different power level. During the heat-up has been activat‐ ed, the cooking zone turns on which continued cooking level has been chosen (see "Pro‐ gramming"), the power...
... set contin‐ ued cooking level flashes. With extended power levels (see chart). The heat-up time depends on automat‐ ically at the highest level and then switches to flash. or select a different power level. During the heat-up has been activat‐ ed, the cooking zone turns on which continued cooking level has been chosen (see "Pro‐ gramming"), the power...

Product Manual
Page 44
..., and then clean the cooktop when it is in use a glass scraper to the seals. First wipe down as described above. 44 This discoloration cannot be removed with the Miele ce‐ ramic and stainless steel cleaner (see "Optional accessories") or a commer‐ cial ceramic cleaner and paper towel or a clean cloth. Cleaning and care Do not clean the area between the glass-ceramic surface and the...
..., and then clean the cooktop when it is in use a glass scraper to the seals. First wipe down as described above. 44 This discoloration cannot be removed with the Miele ce‐ ramic and stainless steel cleaner (see "Optional accessories") or a commer‐ cial ceramic cleaner and paper towel or a clean cloth. Cleaning and care Do not clean the area between the glass-ceramic surface and the...

Product Manual
Page 48
... or Miele Service (for the minimum fuse rating, see back cover for the first time. tripping the ground fault circuit interrupter (GFCI). If, after resetting/replacing the fuse or the GFCI, it dis‐ appears completely. Improperly performed installation, maintenance or repair work can pose a serious danger to your health. Smells and vapor may be carried out by Miele author‐ ized technicians. Power...
... or Miele Service (for the minimum fuse rating, see back cover for the first time. tripping the ground fault circuit interrupter (GFCI). If, after resetting/replacing the fuse or the GFCI, it dis‐ appears completely. Improperly performed installation, maintenance or repair work can pose a serious danger to your health. Smells and vapor may be carried out by Miele author‐ ized technicians. Power...

Product Manual
Page 53
... SAFETY INSTRUCTIONS - Do not install any moving kitchen parts (e.g. You can reduce the risk of the cabinets. Install the upper cabinets and venti‐ lation hood before installing the cooktop to 212°F / 100°C), so that extends at least 4 ³/₄" (12 cm) past the bottom of burns by a qualified electrician. INSTALLATION Installation and connection of the cooktop to the electrical power supply may...
... SAFETY INSTRUCTIONS - Do not install any moving kitchen parts (e.g. You can reduce the risk of the cabinets. Install the upper cabinets and venti‐ lation hood before installing the cooktop to 212°F / 100°C), so that extends at least 4 ³/₄" (12 cm) past the bottom of burns by a qualified electrician. INSTALLATION Installation and connection of the cooktop to the electrical power supply may...

Product Manual
Page 63
... time. Framed cooktops Installation Preparing the counter Create the counter cut-out as sili‐ con! The sealant must be carefully filed down through the counter cut-out. Center the cooktop in the cut -out. Installing the cooktop Feed the appliance power cord down to fit. Connect the cooktop to the electrical power supply. Check that the cooktop works. 63 NEVER seal the cooktop using addi‐...
... time. Framed cooktops Installation Preparing the counter Create the counter cut-out as sili‐ con! The sealant must be carefully filed down through the counter cut-out. Center the cooktop in the cut -out. Installing the cooktop Feed the appliance power cord down to fit. Connect the cooktop to the electrical power supply. Check that the cooktop works. 63 NEVER seal the cooktop using addi‐...

Product Manual
Page 64
... dimensions" to be taken out. 64 into a glass counter. The frame must be provided on site, and is not supplied with a flush-mounted cooktop. If the cooktop is accessible from below and the lower cabinet can be removed for the cooktop to check which cooktop can be fitted into a suitable cut-out in granite, marble, tiled or solid wood counters. Flush-mounted (frameless) cooktops Instructions for installation...
... dimensions" to be taken out. 64 into a glass counter. The frame must be provided on site, and is not supplied with a flush-mounted cooktop. If the cooktop is accessible from below and the lower cabinet can be removed for the cooktop to check which cooktop can be fitted into a suitable cut-out in granite, marble, tiled or solid wood counters. Flush-mounted (frameless) cooktops Instructions for installation...
Product Manual
Page 65
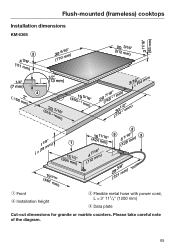
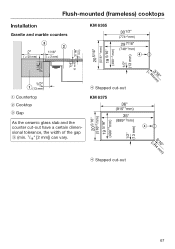
Flush-mounted (frameless) cooktops Installation dimensions KM 6365 a Front b Installation height c Flexible metal hose with power cord, L = 3' 11¹/₄" (1200 mm) d Data plate Cut-out dimensions for granite or marble counters. Please take careful note of the diagram. 65
Flush-mounted (frameless) cooktops Installation dimensions KM 6365 a Front b Installation height c Flexible metal hose with power cord, L = 3' 11¹/₄" (1200 mm) d Data plate Cut-out dimensions for granite or marble counters. Please take careful note of the diagram. 65
Product Manual
Page 67
d Stepped cut-out KM 6375 d Stepped cut -out have a certain dimen‐ sional tolerance, the width of the gap (min 2 mm]) can vary. Flush-mounted (frameless) cooktops Installation Granite and marble counters KM 6365 a Countertop b Cooktop c Gap As the ceramic glass slab and the counter cut -out 67
d Stepped cut-out KM 6375 d Stepped cut -out have a certain dimen‐ sional tolerance, the width of the gap (min 2 mm]) can vary. Flush-mounted (frameless) cooktops Installation Granite and marble counters KM 6365 a Countertop b Cooktop c Gap As the ceramic glass slab and the counter cut -out 67

Product Manual
Page 68
.... Flush-mounted (frameless) cooktops Solid wood / tiled / glass counters a Countertop b Cooktop c Gap d Wooden frame ¹/₂" (13 mm) (not supplied with appliance) Connect the cooktop to the electrical power supply. Check that the cooktop works. Seal the remaining gap with a sili‐ cone sealant that is heat-resistant to main‐ tain a minimum safety distance (see "Safety clearances"). Solid wood / Tile / Glass countertops...
.... Flush-mounted (frameless) cooktops Solid wood / tiled / glass counters a Countertop b Cooktop c Gap d Wooden frame ¹/₂" (13 mm) (not supplied with appliance) Connect the cooktop to the electrical power supply. Check that the cooktop works. Seal the remaining gap with a sili‐ cone sealant that is heat-resistant to main‐ tain a minimum safety distance (see "Safety clearances"). Solid wood / Tile / Glass countertops...
Product Manual
Page 69
... cooktop may only be held liable for any doubt, have the electrical system of the house checked by either removing the fuse, shutting off the main power or manually "tripping" the circuit breaker. Installation, repair and maintenance work . Electrical connection ATTENTION: Before installation or servicing, dis‐ connect the power supply by a qualified electri‐ cian. It is any damage arising as a result of this basic safety require...
... cooktop may only be held liable for any doubt, have the electrical system of the house checked by either removing the fuse, shutting off the main power or manually "tripping" the circuit breaker. Installation, repair and maintenance work . Electrical connection ATTENTION: Before installation or servicing, dis‐ connect the power supply by a qualified electri‐ cian. It is any damage arising as a result of this basic safety require...
Specs
Page 2
... zone (9x15"), up to ventilation hood Electrical Electrical Requirements Power Cable Shipping Shipping Weight Shipping Dimensions Support Call Miele Website 20/20 Link • Direct Selection Plus controls, default power level 1-9, extended 1-12 • Stop&Go function • Keeping Warm function • Auto heat-up • Pan size recognition • Timer • Overheating protection • Child safety lock and safety switch-off Item 26637562USA 357/8" (911...
... zone (9x15"), up to ventilation hood Electrical Electrical Requirements Power Cable Shipping Shipping Weight Shipping Dimensions Support Call Miele Website 20/20 Link • Direct Selection Plus controls, default power level 1-9, extended 1-12 • Stop&Go function • Keeping Warm function • Auto heat-up • Pan size recognition • Timer • Overheating protection • Child safety lock and safety switch-off Item 26637562USA 357/8" (911...
Specs
Page 8
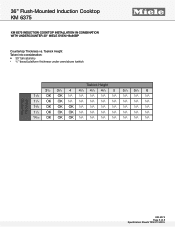
36" Flush-Mounted Induction Cooktop KM 6375 KM 6375 INDUCTION COOKTOP INSTALLATION IN COMBINATION WITH UNDERCOUNTER 30" MIELE OVEN H6x80BP Countertop Thickness vs. Toekick Height Taken into consideration: • 35" tall cabinetry • 3/4" (exact) platform thickness under oven/above toekick FOREVER BETTER Countertop Thickness Toekick Height 31/2 33/4 4 41/4 41/2 43/4 5 51/4 53/4 6 11/8 OK OK NA NA NA NA NA NA NA NA 11/4 OK... NA NA 11/2 OK OK OK NA NA NA NA NA NA NA 19/16 OK OK OK NA NA NA NA NA NA NA KM 6375 Page 8 of 8 Specification Sheets TRS 07152015
36" Flush-Mounted Induction Cooktop KM 6375 KM 6375 INDUCTION COOKTOP INSTALLATION IN COMBINATION WITH UNDERCOUNTER 30" MIELE OVEN H6x80BP Countertop Thickness vs. Toekick Height Taken into consideration: • 35" tall cabinetry • 3/4" (exact) platform thickness under oven/above toekick FOREVER BETTER Countertop Thickness Toekick Height 31/2 33/4 4 41/4 41/2 43/4 5 51/4 53/4 6 11/8 OK OK NA NA NA NA NA NA NA NA 11/4 OK... NA NA 11/2 OK OK OK NA NA NA NA NA NA NA 19/16 OK OK OK NA NA NA NA NA NA NA KM 6375 Page 8 of 8 Specification Sheets TRS 07152015


