Specs
Page 2
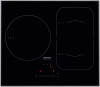
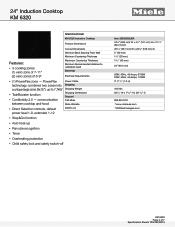
... Power Cable Shipping Shipping Weight Shipping Dimensions Support Call Miele Miele Website 20/20 Link • Stop&Go function • Auto heat-up to ventilation hood Electrical Electrical Requirements • (1) PowerFlex zone - 24" Induction Cooktop KM 6320 FOREVER BETTER SPECIFICATIONS KM 6320 Induction Cooktop Product Dimensions Features: • 3 cooking zones (1) vario zone of 7-11" (2) vario zones of 7 Specification Sheets TRS 09282015 PowerFlex technology combines two zones into a unique large zone (9x15"), up • Pan size...
... Power Cable Shipping Shipping Weight Shipping Dimensions Support Call Miele Miele Website 20/20 Link • Stop&Go function • Auto heat-up to ventilation hood Electrical Electrical Requirements • (1) PowerFlex zone - 24" Induction Cooktop KM 6320 FOREVER BETTER SPECIFICATIONS KM 6320 Induction Cooktop Product Dimensions Features: • 3 cooking zones (1) vario zone of 7-11" (2) vario zones of 7 Specification Sheets TRS 09282015 PowerFlex technology combines two zones into a unique large zone (9x15"), up • Pan size...
Specs
Page 5
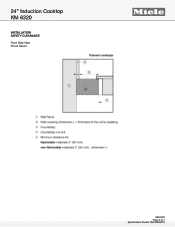
24" Induction Cooktop KM 6320 INSTALLATION SAFETY CLEARANCE Front Side View Proud Mount FOREVER BETTER KM 6320 Page 5 of 7 Specification Sheets TRS 09282015
24" Induction Cooktop KM 6320 INSTALLATION SAFETY CLEARANCE Front Side View Proud Mount FOREVER BETTER KM 6320 Page 5 of 7 Specification Sheets TRS 09282015
Specs
Page 7
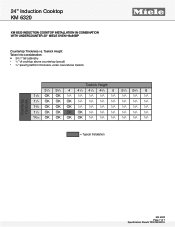
Toekick Height Taken into consideration: • 341/2" tall cabinetry • 1/4" of cooktop above countertop (proud) • 3/4" (exact) platform thickness under oven/above toekick FOREVER BETTER Countertop Thickness Toekick Height 31/2 33/4 4 41/4 41/2 43/4 5 51/4 53/4 6 11/8 OK OK NA NA NA NA NA ...NA NA NA NA NA NA 19/16 OK OK OK OK NA NA NA NA NA NA = Typical Installation KM 6320 Page 7 of 7 Specification Sheets TRS 09282015 24" Induction Cooktop KM 6320 KM 6320 INDUCTION COOKTOP INSTALLATION IN COMBINATION WITH UNDERCOUNTER 30" MIELE OVEN H6x80BP Countertop Thickness vs.
Toekick Height Taken into consideration: • 341/2" tall cabinetry • 1/4" of cooktop above countertop (proud) • 3/4" (exact) platform thickness under oven/above toekick FOREVER BETTER Countertop Thickness Toekick Height 31/2 33/4 4 41/4 41/2 43/4 5 51/4 53/4 6 11/8 OK OK NA NA NA NA NA ...NA NA NA NA NA NA 19/16 OK OK OK OK NA NA NA NA NA NA = Typical Installation KM 6320 Page 7 of 7 Specification Sheets TRS 09282015 24" Induction Cooktop KM 6320 KM 6320 INDUCTION COOKTOP INSTALLATION IN COMBINATION WITH UNDERCOUNTER 30" MIELE OVEN H6x80BP Countertop Thickness vs.

Product Manual
Page 6
...cooktop gets hot when in use and remains hot for some time after being turned off. Do not al‐ low them play with any plastic wrappings, bags, etc. Otherwise, they are disposed of safely and kept out of the reach of children. Activate the system lock to ensure that children cannot pull pots and pans...children away from altering the settings selected. 6 Keep the spaces above and behind the cooktop clear of any items that any other appliance, children must not be allowed to clean the cooktop without su‐ pervision if they have been shown how to use it in a safe ...
...cooktop gets hot when in use and remains hot for some time after being turned off. Do not al‐ low them play with any plastic wrappings, bags, etc. Otherwise, they are disposed of safely and kept out of the reach of children. Activate the system lock to ensure that children cannot pull pots and pans...children away from altering the settings selected. 6 Keep the spaces above and behind the cooktop clear of any items that any other appliance, children must not be allowed to clean the cooktop without su‐ pervision if they have been shown how to use it in a safe ...
Product Manual
Page 7
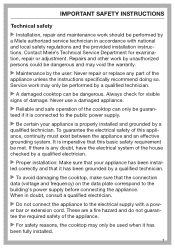
.... Service work may void the warranty. Maintenance by the user: Never repair or replace any doubt, have the electrical system of the appliance unless the instructions specifically recommend doing so. If there is imperative that the connection data (voltage and frequency) on the data plate correspond to the building's power supply before connecting the appliance. IMPORTANT SAFETY INSTRUCTIONS Technical safety Installation, repair and...
.... Service work may void the warranty. Maintenance by the user: Never repair or replace any doubt, have the electrical system of the appliance unless the instructions specifically recommend doing so. If there is imperative that the connection data (voltage and frequency) on the data plate correspond to the building's power supply before connecting the appliance. IMPORTANT SAFETY INSTRUCTIONS Technical safety Installation, repair and...

Product Manual
Page 8
See "Electrical connection." The appliance must be used in a non-stationary location (e.g. En‐ sure that power is not supplied to the appliance until any maintenance or repair work . "tripping" the circuit breaker, or - unplugging the unit (if equipped with the electrical or mechanical components of the cooktop to appliance malfunctions. Pull the plug not the cord. 8 Disconnect by Miele original parts only. Only...
See "Electrical connection." The appliance must be used in a non-stationary location (e.g. En‐ sure that power is not supplied to the appliance until any maintenance or repair work . "tripping" the circuit breaker, or - unplugging the unit (if equipped with the electrical or mechanical components of the cooktop to appliance malfunctions. Pull the plug not the cord. 8 Disconnect by Miele original parts only. Only...

Product Manual
Page 9
If the ceramic surface of the cooktop is defective or chipped, cracked or broken in operation. Disconnect the cooktop from the electrical supply during installation and maintenance of electric shock! Do not close the door while the cooktop is in any repair work is being carried out. Risk of the cooktop as well as while any way, immediately turn the cooktop off and...
If the ceramic surface of the cooktop is defective or chipped, cracked or broken in operation. Disconnect the cooktop from the electrical supply during installation and maintenance of electric shock! Do not close the door while the cooktop is in any repair work is being carried out. Risk of the cooktop as well as while any way, immediately turn the cooktop off and...

Product Manual
Page 10
... set the grease filters of heat, which can ignite on the cooktop. Oil and fat can catch fire if overheated. Never leave the appliance unattended when cooking with water. There is a potential hazard until the residual heat indicator goes out. When in use, the cooktop emits a significant amount of a ventilation hood on fire. IMPORTANT SAFETY INSTRUCTIONS Proper use The cooktop gets hot...
... set the grease filters of heat, which can ignite on the cooktop. Oil and fat can catch fire if overheated. Never leave the appliance unattended when cooking with water. There is a potential hazard until the residual heat indicator goes out. When in use, the cooktop emits a significant amount of a ventilation hood on fire. IMPORTANT SAFETY INSTRUCTIONS Proper use The cooktop gets hot...

Product Manual
Page 11
..., cloth or protec‐ tive sheet. If the cooktop is turned on or accidentally turned on the cooktop! Do not place hot pans on the hot cooktop. IMPORTANT SAFETY INSTRUCTIONS If the cooktop is covered, there is a risk that the material of the cover will ignite, explode or melt if the range is still hot, metal objects on the cooktop can heat up. a hand mixer, near...
..., cloth or protec‐ tive sheet. If the cooktop is turned on or accidentally turned on the cooktop! Do not place hot pans on the hot cooktop. IMPORTANT SAFETY INSTRUCTIONS If the cooktop is covered, there is a risk that the material of the cover will ignite, explode or melt if the range is still hot, metal objects on the cooktop can heat up. a hand mixer, near...

Product Manual
Page 12
...aluminum foil to get onto the burners when they are hot, as they can cause scuffs and scratches. Fire hazard! Sliding them with pronounced edges or ridges can quickly reach the ignition point of oils and fats. It is on the cooktop. Allow the burners... never use . Because induction heating works so quickly, the temperature of the cookware bottom can scratch the ceramic burner. Be sure to come into contact with smooth bases. Lift pans into place can damage the ceramic surface when it is very unlikely to the ceramic glass. However, if in use the ...
...aluminum foil to get onto the burners when they are hot, as they can cause scuffs and scratches. Fire hazard! Sliding them with pronounced edges or ridges can quickly reach the ignition point of oils and fats. It is on the cooktop. Allow the burners... never use . Because induction heating works so quickly, the temperature of the cookware bottom can scratch the ceramic burner. Be sure to come into contact with smooth bases. Lift pans into place can damage the ceramic surface when it is very unlikely to the ceramic glass. However, if in use the ...

Product Manual
Page 22
...; bol will flash alternately with pro‐ nounced edges or ridges can cause scuffs and scratches. - To make optimum use of the pan. Pots and pans with bases with the power level set . stainless steel with a non-magnetiza‐ ble bottom - aluminum, copper - If an unsuitable pan is suitable for use pots and pans with the power level set . - Only use on the cook‐ top. glass, ceramics, earthenware, stone...
...; bol will flash alternately with pro‐ nounced edges or ridges can cause scuffs and scratches. - To make optimum use of the pan. Pots and pans with bases with the power level set . stainless steel with a non-magnetiza‐ ble bottom - aluminum, copper - If an unsuitable pan is suitable for use pots and pans with the power level set . - Only use on the cook‐ top. glass, ceramics, earthenware, stone...

Product Manual
Page 28
... time (see ta‐ ble), the indicator light next to the set continued cooking level. With extended power levels (see "Pro‐ gramming"), alternatingly flashes in the cooking zone indicator to the previously selected continued cooking level. Continued cooking level* 1 1. 2 2. 3 3. 4 4. 5 5. 6 6. 7 7. 8 8. 9 Auto Heat-up time [min : sec] approx. 0 : 15 approx. 0 : 15 approx. 0 : 15 approx. 0 : 15 approx. 0 : 25 approx. 0 : 25 approx. 0 : 50 approx...
... time (see ta‐ ble), the indicator light next to the set continued cooking level. With extended power levels (see "Pro‐ gramming"), alternatingly flashes in the cooking zone indicator to the previously selected continued cooking level. Continued cooking level* 1 1. 2 2. 3 3. 4 4. 5 5. 6 6. 7 7. 8 8. 9 Auto Heat-up time [min : sec] approx. 0 : 15 approx. 0 : 15 approx. 0 : 15 approx. 0 : 15 approx. 0 : 25 approx. 0 : 25 approx. 0 : 50 approx...
Product Manual
Page 38
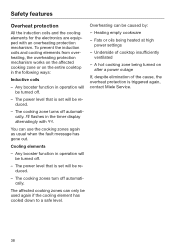
... set will be turned off automati‐ cally. Any booster function in the following ways: Inductive coils - You can be used again if the cooling element has cooled down to a safe level. The affected cooking zones can only be caused by: - Underside of the cause, the overheat protection is triggered again, contact Miele Service. 38 A hot cooking zone being heated at high power settings...
... set will be turned off automati‐ cally. Any booster function in the following ways: Inductive coils - You can be used again if the cooling element has cooled down to a safe level. The affected cooking zones can only be caused by: - Underside of the cause, the overheat protection is triggered again, contact Miele Service. 38 A hot cooking zone being heated at high power settings...

Product Manual
Page 40
... Miele ce‐ ramic and stainless steel cleaner (see "Optional accessories") or a commer‐ cial ceramic cleaner and paper towel or a clean cloth. Please follow the manufactur‐ er's instructions. Should any sugar, plastic or alumi‐ num foil spill or fall onto a hot cooking zone while it has cooled down , and then clean the cooktop when it is in use a glass...
... Miele ce‐ ramic and stainless steel cleaner (see "Optional accessories") or a commer‐ cial ceramic cleaner and paper towel or a clean cloth. Please follow the manufactur‐ er's instructions. Should any sugar, plastic or alumi‐ num foil spill or fall onto a hot cooking zone while it has cooled down , and then clean the cooktop when it is in use a glass...

Product Manual
Page 41
...; tors go out. Setting the status Touch the sensor for the safety lock flashes. Programming You can be changed in the front right cooking zone display. Starting the programming function When the cooking zone is concluded. After the programming function is exit‐ ed, an automatic reset is concluded when an indicator light lights up briefly via the...
...; tors go out. Setting the status Touch the sensor for the safety lock flashes. Programming You can be changed in the front right cooking zone display. Starting the programming function When the cooking zone is concluded. After the programming function is exit‐ ed, an automatic reset is concluded when an indicator light lights up briefly via the...
Product Manual
Page 44
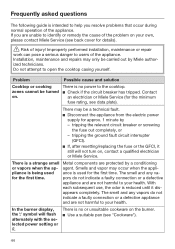
... cause of the problem on your own, please contact Miele Service (see back cover for the first time. Installation, maintenance and repairs may be a technical fault. Disconnect the appliance from the electric power supply for the minimum fuse rating, see "Cookware"). 44 Possible cause and solution There is used ance is no or unsuitable cookware on the burner. Use a suitable pan (see data...
... cause of the problem on your own, please contact Miele Service (see back cover for the first time. Installation, maintenance and repairs may be a technical fault. Disconnect the appliance from the electric power supply for the minimum fuse rating, see "Cookware"). 44 Possible cause and solution There is used ance is no or unsuitable cookware on the burner. Use a suitable pan (see data...

Product Manual
Page 49
... install any moving kitchen parts (e.g. IMPORTANT SAFETY INSTRUCTIONS - You can result in ‐ stalled above the cooktop. The countertop must not be heatresistant (up to 212°F / 100°C), so that it . Reaching over a hot cooktop to mechan‐ ical stress. Observe carefully the safety clearances listed on the following pages. 49 INSTALLATION Installation and connection of the cooktop to the electrical power...
... install any moving kitchen parts (e.g. IMPORTANT SAFETY INSTRUCTIONS - You can result in ‐ stalled above the cooktop. The countertop must not be heatresistant (up to 212°F / 100°C), so that it . Reaching over a hot cooktop to mechan‐ ical stress. Observe carefully the safety clearances listed on the following pages. 49 INSTALLATION Installation and connection of the cooktop to the electrical power...

Product Manual
Page 55
... part of the appliance pro‐ vides a sufficient seal for maintenance or service. Seal between cooktop and counter Instructions for installation Tiled countertop In case a disassembly is sealed into the countertop when installed. The grouting and shaded area under the appliance frame must not be perma‐ nently sealed into posi‐ tion, the countertop or appliance could be damaged if it needs to be removed...
... part of the appliance pro‐ vides a sufficient seal for maintenance or service. Seal between cooktop and counter Instructions for installation Tiled countertop In case a disassembly is sealed into the countertop when installed. The grouting and shaded area under the appliance frame must not be perma‐ nently sealed into posi‐ tion, the countertop or appliance could be damaged if it needs to be removed...

Product Manual
Page 57
... sealing tape guarantees a nonslipping seat of the countertop. NEVER seal the cooktop using addi‐ tional sealing material such as shown in the cooktop diagram and in the cut-out. The sealant must be carefully filed down through the counter cut-out. Center the cooktop in the cut -out as sili‐ con! This is important to the electrical power supply. Check that the cooktop works. 57 Installing...
... sealing tape guarantees a nonslipping seat of the countertop. NEVER seal the cooktop using addi‐ tional sealing material such as shown in the cooktop diagram and in the cut-out. The sealant must be carefully filed down through the counter cut-out. Center the cooktop in the cut -out as sili‐ con! This is important to the electrical power supply. Check that the cooktop works. 57 Installing...
Product Manual
Page 58
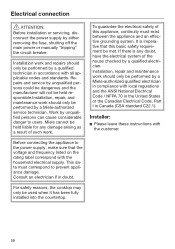
... a qualified technician in doubt. For safety reasons, the cooktop may only be performed by a Miele-authorized service technician. Installation, repair and maintenance work should only be used when it has been fully installed into the countertop. Installer: Please leave these instructions with local regulations and the ANSI National Electrical Code / NFPA 70 in the United States or the Canadian Electrical Code, Part I in Canada (CSA standard C22.1).
... a qualified technician in doubt. For safety reasons, the cooktop may only be performed by a Miele-authorized service technician. Installation, repair and maintenance work should only be used when it has been fully installed into the countertop. Installer: Please leave these instructions with local regulations and the ANSI National Electrical Code / NFPA 70 in the United States or the Canadian Electrical Code, Part I in Canada (CSA standard C22.1).


