Operating and Installation manual
Page 1
US, CA M.-Nr. 07 844 710 en - Operating and Installation Instructions Ceramic Cooktop KM 5840 KM 5860 KM 5880 To prevent accidents and appliance damage, read these instructions before installation or use.
US, CA M.-Nr. 07 844 710 en - Operating and Installation Instructions Ceramic Cooktop KM 5840 KM 5860 KM 5880 To prevent accidents and appliance damage, read these instructions before installation or use.

Operating and Installation manual
Page 3
... Setting the timer 22 Turning a burner off automatically 24 Using both timer functions at the same time 25 Safety features 26 Child safety lock / System lock 26 Stop and Go 27 Safety shut-off 28 Overheat protection 29 Cleaning and Care 30 Programming 31 Frequently asked questions 34 Technical Service 37 IMPORTANT INSTALLATION SAFETY INSTRUCTIONS 40 Installation 43 Sealing 44 Tiled surfaces 44 Installation dimensions 45 Installation 48 Electrical connection...
... Setting the timer 22 Turning a burner off automatically 24 Using both timer functions at the same time 25 Safety features 26 Child safety lock / System lock 26 Stop and Go 27 Safety shut-off 28 Overheat protection 29 Cleaning and Care 30 Programming 31 Frequently asked questions 34 Technical Service 37 IMPORTANT INSTALLATION SAFETY INSTRUCTIONS 40 Installation 43 Sealing 44 Tiled surfaces 44 Installation dimensions 45 Installation 48 Electrical connection...
Operating and Installation manual
Page 4
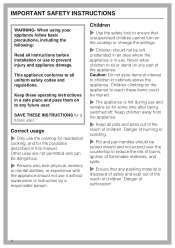
... extend over the countertop to sit or stand on the cooktop or change the settings. ~ Children should not use it without supervision or instruction by a responsible person. IMPORTANT SAFETY INSTRUCTIONS WARNING- When using your appliance follow basic precautions, including the following: Read all uniform safety codes and regulations. Never allow children to reduce the risk of burns, ignition of flammable materials...
... extend over the countertop to sit or stand on the cooktop or change the settings. ~ Children should not use it without supervision or instruction by a responsible person. IMPORTANT SAFETY INSTRUCTIONS WARNING- When using your appliance follow basic precautions, including the following: Read all uniform safety codes and regulations. Never allow children to reduce the risk of burns, ignition of flammable materials...
Operating and Installation manual
Page 5
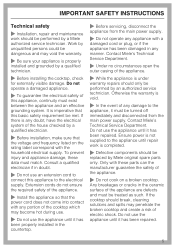
... cooktop. Contact Miele's Technical Service Department. Ensure power is not supplied to connect this appliance, continuity must match. Do not use an extension cord to the appliance until it has been properly installed in doubt. ~ Do not use the appliance until repair work should be met. IMPORTANT SAFETY INSTRUCTIONS Technical safety ~ Installation, repair and maintenance work is under warranty repairs should only be replaced by Miele original spare parts...
... cooktop. Contact Miele's Technical Service Department. Ensure power is not supplied to connect this appliance, continuity must match. Do not use an extension cord to the appliance until it has been properly installed in doubt. ~ Do not use the appliance until repair work should be met. IMPORTANT SAFETY INSTRUCTIONS Technical safety ~ Installation, repair and maintenance work is under warranty repairs should only be replaced by Miele original spare parts...

Operating and Installation manual
Page 6
.... Items could be drawn up pressure may present a fire hazard. ~ Never leave an appliance unattended at high settings or when cooking with oil or fat. Flames could melt or catch fire from residual heat or if the appliance is not visible through the dark glass. When the cooktop is shut off after use . ~ Never cover the burner with oven mitts or potholders when...
.... Items could be drawn up pressure may present a fire hazard. ~ Never leave an appliance unattended at high settings or when cooking with oil or fat. Flames could melt or catch fire from residual heat or if the appliance is not visible through the dark glass. When the cooktop is shut off after use . ~ Never cover the burner with oven mitts or potholders when...
Operating and Installation manual
Page 7
... used on the cooktop. It melts at high temperatures. cooking grease, accumulate on the appliance. ~ Do not use pots and pans with pronounced edges or ridges on the ceramic surface of facet cooktops) may produce toxic fumes if applied to cover the heating element. Steam could penetrate electrical components and cause a short circuit. ~ Do not allow the cooktop to clean this appliance. Danger of electric shock! ~ The control panel...
... used on the cooktop. It melts at high temperatures. cooking grease, accumulate on the appliance. ~ Do not use pots and pans with pronounced edges or ridges on the ceramic surface of facet cooktops) may produce toxic fumes if applied to cover the heating element. Steam could penetrate electrical components and cause a short circuit. ~ Do not allow the cooktop to clean this appliance. Danger of electric shock! ~ The control panel...
Operating and Installation manual
Page 8
... when the appliance is shut off and the Residual Heat indicators have gone out. SAVE THESE INSTRUCTIONS AND REVIEW THEM PERIODICALLY 8 IMPORTANT SAFETY INSTRUCTIONS ~ Any spills should only be operated with aluminum base can damage the underlying electronics. ~ If the cooktop built in the area of the control panel. These spots can be removed with ceramic glass or stainless steel cleaner (see "Cleaning and Care"). ~ Never heat up an empty...
... when the appliance is shut off and the Residual Heat indicators have gone out. SAVE THESE INSTRUCTIONS AND REVIEW THEM PERIODICALLY 8 IMPORTANT SAFETY INSTRUCTIONS ~ Any spills should only be operated with aluminum base can damage the underlying electronics. ~ If the cooktop built in the area of the control panel. These spots can be removed with ceramic glass or stainless steel cleaner (see "Cleaning and Care"). ~ Never heat up an empty...
Operating and Installation manual
Page 14
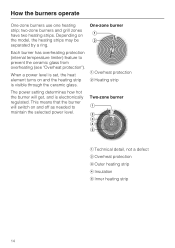
... heat element turns on and the heating strip is electronically regulated. Two-zone burner a Technical detail, not a defect b Overheat protection c Outer heating strip d Insulation e Inner heating strip 14 two-zone burners and grill zones have two heating strips. a Overheat protection b Heating strip The power setting determines how hot the burner will switch on the model, the heating strips may be separated by a ring. How the burners operate One-zone burners use one heating...
... heat element turns on and the heating strip is electronically regulated. Two-zone burner a Technical detail, not a defect b Overheat protection c Outer heating strip d Insulation e Inner heating strip 14 two-zone burners and grill zones have two heating strips. a Overheat protection b Heating strip The power setting determines how hot the burner will switch on the model, the heating strips may be separated by a ring. How the burners operate One-zone burners use one heating...
Operating and Installation manual
Page 20
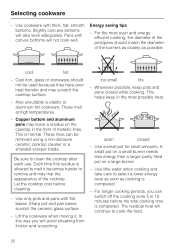
... partly filled pot on the cooktop in the most even and energy efficient cooking, the diameter of the cooktop. Lift the cookware when moving it becomes harder to 10 minutes before cleaning. - too small fits - For longer cooking periods, you will not cook well. Use cookware with flat bases. These lines can switch off the cooking zone 5 to remove and may scratch the cooktop surface. - Pans...
... partly filled pot on the cooktop in the most even and energy efficient cooking, the diameter of the cooktop. Lift the cookware when moving it becomes harder to 10 minutes before cleaning. - too small fits - For longer cooking periods, you will not cook well. Use cookware with flat bases. These lines can switch off the cooking zone 5 to remove and may scratch the cooktop surface. - Pans...
Operating and Installation manual
Page 26
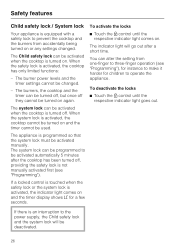
... indicator light comes on . When the system lock is not manually activated first (see "Programming"), for instance to make it harder for a few seconds. The system lock can be turned off, but once off they cannot be turned on again. ^ Touch the $ control until the respective indicator light goes out. The burner power levels and the timer settings cannot be changed . The burners, the cooktop and...
... indicator light comes on . When the system lock is not manually activated first (see "Programming"), for instance to make it harder for a few seconds. The system lock can be turned off, but once off they cannot be turned on again. ^ Touch the $ control until the respective indicator light goes out. The burner power levels and the timer settings cannot be changed . The burners, the cooktop and...

Operating and Installation manual
Page 28
..."). 28 Safety features Safety shut-off Safety shut-off for cooking times that are too long If a burner is heated for example by fingers, food that boils over or by an object placed on ^ Clean the control panel or remove the in the usual way. Safety shut-off if the touch controls are only available with a "+" are covered Your cooktop will go out.
..."). 28 Safety features Safety shut-off Safety shut-off for cooking times that are too long If a burner is heated for example by fingers, food that boils over or by an object placed on ^ Clean the control panel or remove the in the usual way. Safety shut-off if the touch controls are only available with a "+" are covered Your cooktop will go out.
Operating and Installation manual
Page 30
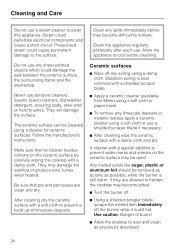
..., while the burner is still hot. Do not use any limescale deposits or metallic residue apply a ceramic cleaner using a damp cloth. After cleaning dry the ceramic surface with a damp cloth and dry. Pressurized steam could penetrate electrical components and cause a short circuit. Follow the manufacturer's instructions. Clean any soiling using a soft cloth or use abrasive cleaners, caustic (oven) cleaners, dishwasher detergent, scouring pads, steel wool or hard...
..., while the burner is still hot. Do not use any limescale deposits or metallic residue apply a ceramic cleaner using a damp cloth. After cleaning dry the ceramic surface with a damp cloth and dry. Pressurized steam could penetrate electrical components and cause a short circuit. Follow the manufacturer's instructions. Clean any soiling using a soft cloth or use abrasive cleaners, caustic (oven) cleaners, dishwasher detergent, scouring pads, steel wool or hard...
Operating and Installation manual
Page 34
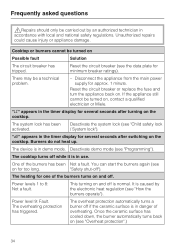
... power supply for minimum breaker ratings). Deactivate the system lock (see "Programming"). You can start the burners again (see on Possible fault Solution The circuit breaker has tripped. Reset the circuit breaker (see the data plate for approx. 1 minute. Frequently asked questions ,Repairs should only be carried out by the electronic heat regulation (see "How the burners operate"). Cooktop or burners cannot be a technical problem. - Reset the circuit breaker or replace the fuse...
... power supply for minimum breaker ratings). Deactivate the system lock (see "Programming"). You can start the burners again (see on Possible fault Solution The circuit breaker has tripped. Reset the circuit breaker (see the data plate for approx. 1 minute. Frequently asked questions ,Repairs should only be carried out by the electronic heat regulation (see "How the burners operate"). Cooktop or burners cannot be a technical problem. - Reset the circuit breaker or replace the fuse...
Operating and Installation manual
Page 40
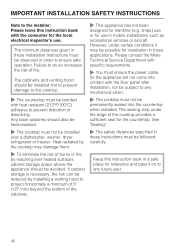
... splashes should be subject to any future user. 40 Please contact the Miele Technical Service Department with the floor panel after installation, nor be avoided. Keep this instruction book with the consumer for the appliance will not come into contact with specific requirements. ~ You must ensure the power cable for the local electrical inspector's use in order to ensure safe operation.
... splashes should be subject to any future user. 40 Please contact the Miele Technical Service Department with the floor panel after installation, nor be avoided. Keep this instruction book with the consumer for the appliance will not come into contact with specific requirements. ~ You must ensure the power cable for the local electrical inspector's use in order to ensure safe operation.

Operating and Installation manual
Page 41
If there is not required. wok burner and electric cooktop), and they have different minimum safety distances, always observe the greater distance. 41 If the hood manufacturer's instructions are not available or if flammable objects are installed over the cooktop (e.g. cabinets, utensil rail, etc.), a minimum safety distance of the cabinet so that the power cord can be passed through. A gap of at least 4 ½ " (110...
If there is not required. wok burner and electric cooktop), and they have different minimum safety distances, always observe the greater distance. 41 If the hood manufacturer's instructions are not available or if flammable objects are installed over the cooktop (e.g. cabinets, utensil rail, etc.), a minimum safety distance of the cabinet so that the power cord can be passed through. A gap of at least 4 ½ " (110...

Operating and Installation manual
Page 42
... required safety distances shown. not allowed recommended not recommended not recommended 42 IMPORTANT INSTALLATION SAFETY INSTRUCTIONS Safety distances to the closest adjacent piece of furniture (for instance, a high cabinet) or a room wall. KM 5840 = 2" (50 mm) KM 5860 / KM 5880 = 4" (100 mm) c 2" (50 mm) minimum distance from the countertop cut -out to the rear edge of furniture (for instance, a high cabinet) or a room wall. Do not install...
... required safety distances shown. not allowed recommended not recommended not recommended 42 IMPORTANT INSTALLATION SAFETY INSTRUCTIONS Safety distances to the closest adjacent piece of furniture (for instance, a high cabinet) or a room wall. KM 5840 = 2" (50 mm) KM 5860 / KM 5880 = 4" (100 mm) c 2" (50 mm) minimum distance from the countertop cut -out to the rear edge of furniture (for instance, a high cabinet) or a room wall. Do not install...

Operating and Installation manual
Page 43
... the countertop cut-out and the covering, since high temperatures can damage these materials. Cooktops flush with non-flammable materials 2" (50 mm) minus x 43 Installation Safety distance from the wall covering If a wall covering is made of non-combustible materials (such as wood), the distance between the countertop cut-out and the wall covering must be maintained between the countertop cut-out and the wall covering must be a minimum...
... the countertop cut-out and the covering, since high temperatures can damage these materials. Cooktops flush with non-flammable materials 2" (50 mm) minus x 43 Installation Safety distance from the wall covering If a wall covering is made of non-combustible materials (such as wood), the distance between the countertop cut-out and the wall covering must be maintained between the countertop cut-out and the wall covering must be a minimum...
Operating and Installation manual
Page 48
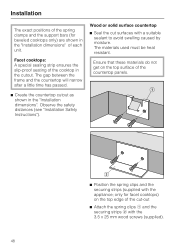
... the countertop cutout as shown in the "Installation dimensions" of the countertop panels. ^ Position the spring clips and the securing strips (supplied with a suitable sealant to avoid swelling caused by moisture. only for beveled cooktops only) are shown in the "Installation dimensions". Observe the safety distances (see "Installation Safety Instructions"). Facet cooktops: A special sealing strip ensures the slip-proof seating of the cut surfaces with...
... the countertop cutout as shown in the "Installation dimensions" of the countertop panels. ^ Position the spring clips and the securing strips (supplied with a suitable sealant to avoid swelling caused by moisture. only for beveled cooktops only) are shown in the "Installation dimensions". Observe the safety distances (see "Installation Safety Instructions"). Facet cooktops: A special sealing strip ensures the slip-proof seating of the cut surfaces with...

Operating and Installation manual
Page 50
... appliance seal sits tightly on the countertop to ensure it clicks into the countertop. If during installation the seal around the frame does not sit flush with the countertop in the corners, the corner radius, maximum 3/16" (4 mm), can also be lifted out using a special tool. Installation Insert the cooktop ^ Feed the power cord down through the cut-out. ^ Place the cooktop lightly on...
... appliance seal sits tightly on the countertop to ensure it clicks into the countertop. If during installation the seal around the frame does not sit flush with the countertop in the corners, the corner radius, maximum 3/16" (4 mm), can also be lifted out using a special tool. Installation Insert the cooktop ^ Feed the power cord down through the cut-out. ^ Place the cooktop lightly on...

Operating and Installation manual
Page 51
... connected to a grounded power supply. A disconnection incorporated in the isolator switch (including switch, fuses and relays). For further information, see the wiring diagram provided with the consumer. Electrical connection ,CAUTION: Before installation or servicing, disconnect the power supply by unqualified persons could be dangerous and the manufacturer will not be held responsible. Repairs and service by either removing the fuse, shutting off the main power or manually "tripping" the circuit breaker. Power...
... connected to a grounded power supply. A disconnection incorporated in the isolator switch (including switch, fuses and relays). For further information, see the wiring diagram provided with the consumer. Electrical connection ,CAUTION: Before installation or servicing, disconnect the power supply by unqualified persons could be dangerous and the manufacturer will not be held responsible. Repairs and service by either removing the fuse, shutting off the main power or manually "tripping" the circuit breaker. Power...


