Operating and Installation manual
Page 1
en - US, CA M.-Nr. 07 844 710 Operating and Installation Instructions Ceramic Cooktop KM 5840 KM 5860 KM 5880 To prevent accidents and appliance damage, read these instructions before installation or use.
en - US, CA M.-Nr. 07 844 710 Operating and Installation Instructions Ceramic Cooktop KM 5840 KM 5860 KM 5880 To prevent accidents and appliance damage, read these instructions before installation or use.

Operating and Installation manual
Page 3
... Setting the timer 22 Turning a burner off automatically 24 Using both timer functions at the same time 25 Safety features 26 Child safety lock / System lock 26 Stop and Go 27 Safety shut-off 28 Overheat protection 29 Cleaning and Care 30 Programming 31 Frequently asked questions 34 Technical Service 37 IMPORTANT INSTALLATION SAFETY INSTRUCTIONS 40 Installation 43 Sealing 44 Tiled surfaces 44 Installation dimensions 45 Installation 48 Electrical connection...
... Setting the timer 22 Turning a burner off automatically 24 Using both timer functions at the same time 25 Safety features 26 Child safety lock / System lock 26 Stop and Go 27 Safety shut-off 28 Overheat protection 29 Cleaning and Care 30 Programming 31 Frequently asked questions 34 Technical Service 37 IMPORTANT INSTALLATION SAFETY INSTRUCTIONS 40 Installation 43 Sealing 44 Tiled surfaces 44 Installation dimensions 45 Installation 48 Electrical connection...
Operating and Installation manual
Page 4
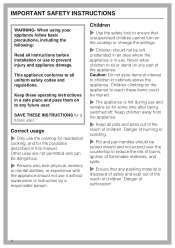
... part of children. When using your appliance follow basic precautions, including the following: Read all uniform safety codes and regulations. Keep these items could be turned inward and not extend over the countertop to sit or stand on the cooktop or change the settings. ~ Children should not use and remains so for a future user. Children ~ Use the safety lock to all instructions before installation or use...
... part of children. When using your appliance follow basic precautions, including the following: Read all uniform safety codes and regulations. Keep these items could be turned inward and not extend over the countertop to sit or stand on the cooktop or change the settings. ~ Children should not use and remains so for a future user. Children ~ Use the safety lock to all instructions before installation or use...
Operating and Installation manual
Page 5
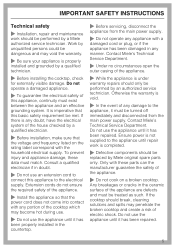
... any doubt, have the electrical system of the appliance. ~ While the appliance is under warranty repairs should only be replaced by Miele original spare parts only. Ensure power is not supplied to the appliance until it has been properly installed in the ceramic surface of the cooktop which may become hot during use. ~ Do not use the appliance until repair work should be dangerous and may...
... any doubt, have the electrical system of the appliance. ~ While the appliance is under warranty repairs should only be replaced by Miele original spare parts only. Ensure power is not supplied to the appliance until it has been properly installed in the ceramic surface of the cooktop which may become hot during use. ~ Do not use the appliance until repair work should be dangerous and may...

Operating and Installation manual
Page 6
... or any fire or flame. 6 Built-up into the hood by the suction and the grease filters may remain hot enough to cause harm, even though the glow is high enough to the high temperatures radiated, objects left near the appliance. ~ Do not heat unopened containers. Always switch the cooking zone(s) off , the surface may ignite. ~ Never use . Always heat oil slowly, monitoring it...
... or any fire or flame. 6 Built-up into the hood by the suction and the grease filters may remain hot enough to cause harm, even though the glow is high enough to the high temperatures radiated, objects left near the appliance. ~ Do not heat unopened containers. Always switch the cooking zone(s) off , the surface may ignite. ~ Never use . Always heat oil slowly, monitoring it...
Operating and Installation manual
Page 7
... size pot or pan will expose a portion of the heating element and may cause damage. ~ Use the proper pan size. Grains of plastic or foil to cool before cleaning. Steam could penetrate electrical components and cause a short circuit. ~ Do not allow the cooktop to fall on the burners when they can cause scratches. ~ When wiping spills on the ceramic cooktop. If these residues are clean, free...
... size pot or pan will expose a portion of the heating element and may cause damage. ~ Use the proper pan size. Grains of plastic or foil to cool before cleaning. Steam could penetrate electrical components and cause a short circuit. ~ Do not allow the cooktop to fall on the burners when they can cause scratches. ~ When wiping spills on the ceramic cooktop. If these residues are clean, free...
Operating and Installation manual
Page 8
... when the appliance is shut off and the Residual Heat indicators have gone out. These spots can be removed with ceramic glass or stainless steel cleaner (see "Cleaning and Care"). ~ Never heat up an empty pot, unless the manufacturer explicitly allows this can damage the underlying electronics. ~ If the cooktop built in the area of the control panel. SAVE THESE INSTRUCTIONS AND REVIEW THEM PERIODICALLY 8 This can...
... when the appliance is shut off and the Residual Heat indicators have gone out. These spots can be removed with ceramic glass or stainless steel cleaner (see "Cleaning and Care"). ~ Never heat up an empty pot, unless the manufacturer explicitly allows this can damage the underlying electronics. ~ If the cooktop built in the area of the control panel. SAVE THESE INSTRUCTIONS AND REVIEW THEM PERIODICALLY 8 This can...
Operating and Installation manual
Page 14
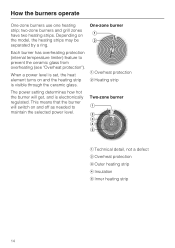
two-zone burners and grill zones have two heating strips. Depending on and off as needed to prevent the ceramic glass from overheating (see "Overheat protection"). When a power level is set, the heat element turns on and the heating strip is electronically regulated. a Overheat protection b Heating strip The power setting determines how hot the burner will switch on the model, the heating strips may be separated by a ring. One-zone burner Each burner has...
two-zone burners and grill zones have two heating strips. Depending on and off as needed to prevent the ceramic glass from overheating (see "Overheat protection"). When a power level is set, the heat element turns on and the heating strip is electronically regulated. a Overheat protection b Heating strip The power setting determines how hot the burner will switch on the model, the heating strips may be separated by a ring. One-zone burner Each burner has...
Operating and Installation manual
Page 20
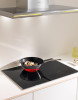
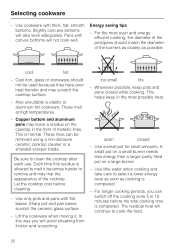
... completed. - Sharp pot and pan bases scratch the ceramic glass surface. - A small pot on a small burner needs less energy then a larger partly filled pot on the cooktop in the most even and energy efficient cooking, the diameter of the pots/pans should not be removed using a non-abrasive ceramic cooktop cleaner or a shielded scraper blade. For longer cooking periods, you will also work adequately. Lift the cookware...
... completed. - Sharp pot and pan bases scratch the ceramic glass surface. - A small pot on a small burner needs less energy then a larger partly filled pot on the cooktop in the most even and energy efficient cooking, the diameter of the pots/pans should not be removed using a non-abrasive ceramic cooktop cleaner or a shielded scraper blade. For longer cooking periods, you will also work adequately. Lift the cookware...
Operating and Installation manual
Page 26
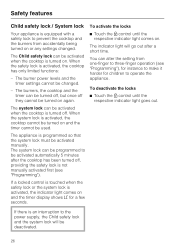
.... The burner power levels and the timer settings cannot be used. The Child safety lock can be programmed to prevent the cooktop and the burners from one-finger to three-finger operation (see "Programming"). The indicator light will be deactivated. 26 The system lock can be activated manually. To deactivate the locks ^ Touch the $ control until the respective indicator light comes on or any settings changed . - Safety...
.... The burner power levels and the timer settings cannot be used. The Child safety lock can be programmed to prevent the cooktop and the burners from one-finger to three-finger operation (see "Programming"). The indicator light will be deactivated. 26 The system lock can be activated manually. To deactivate the locks ^ Touch the $ control until the respective indicator light comes on or any settings changed . - Safety...
Operating and Installation manual
Page 30
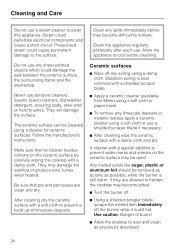
... toxic fumes when heated. If they become pitted. ^ Turn the burner off. ^ Using a shielded scraper blade, scrape the melted item immediately off any soiling using a damp cloth. Clean the appliance regularly, preferably after each use abrasive cleaners, caustic (oven) cleaners, dishwasher detergent, scouring pads, steel wool or hard brushes. They will damage the surface. Follow the manufacturer's instructions. Ceramic surfaces ^ Wipe off the...
... toxic fumes when heated. If they become pitted. ^ Turn the burner off. ^ Using a shielded scraper blade, scrape the melted item immediately off any soiling using a damp cloth. Clean the appliance regularly, preferably after each use abrasive cleaners, caustic (oven) cleaners, dishwasher detergent, scouring pads, steel wool or hard brushes. They will damage the surface. Follow the manufacturer's instructions. Ceramic surfaces ^ Wipe off the...
Operating and Installation manual
Page 34
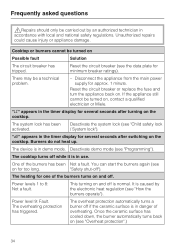
.... Power level 9: Fault. If the appliance still cannot be carried out by the electronic heat regulation (see on for one of the burners has been Not a fault. Deactivate the system lock (see "Programming"). Reset the circuit breaker or replace the fuse and turn the appliance back on the cooktop. Reset the circuit breaker (see "Overheat protection".) 34 "dE" appears in demo mode. Once the ceramic surface has...
.... Power level 9: Fault. If the appliance still cannot be carried out by the electronic heat regulation (see on for one of the burners has been Not a fault. Deactivate the system lock (see "Programming"). Reset the circuit breaker or replace the fuse and turn the appliance back on the cooktop. Reset the circuit breaker (see "Overheat protection".) 34 "dE" appears in demo mode. Once the ceramic surface has...
Operating and Installation manual
Page 40
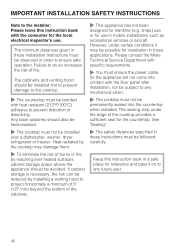
... the Miele Technical Service Department with specific requirements. ~ You must be observed in order to prevent distortion or dissolving. The minimum distances given in these instructions must ensure the power cable for the appliance will not come into the countertop when installed. However, under the edge of fire. ships) use or for use . Any back splashes should be reduced by installing a venting hood to...
... the Miele Technical Service Department with specific requirements. ~ You must be observed in order to prevent distortion or dissolving. The minimum distances given in these instructions must ensure the power cable for the appliance will not come into the countertop when installed. However, under the edge of fire. ships) use or for use . Any back splashes should be reduced by installing a venting hood to...

Operating and Installation manual
Page 41
... cooktop, the distance between the upper edge of the work surface and the upper edge of the divider must be passed through. A gap of at least 1 3/8"" (35 mm) must be provided between the rear edge of the divider and the rear wall of the hood for these safety measurements. See the installation instructions of the cabinet so that the power...
... cooktop, the distance between the upper edge of the work surface and the upper edge of the divider must be passed through. A gap of at least 1 3/8"" (35 mm) must be provided between the rear edge of the divider and the rear wall of the hood for these safety measurements. See the installation instructions of the cabinet so that the power...

Operating and Installation manual
Page 42
... adjacent piece of furniture (for instance, a high cabinet) or a room wall. KM 5840 = 2" (50 mm) KM 5860 / KM 5880 = 4" (100 mm) c 2" (50 mm) minimum distance from the countertop cut -out to the sides of the appliance The appliance should only be installed as shown in the illustrations, while maintaining the required safety distances shown. IMPORTANT INSTALLATION SAFETY INSTRUCTIONS Safety distances to the closest adjacent...
... adjacent piece of furniture (for instance, a high cabinet) or a room wall. KM 5840 = 2" (50 mm) KM 5860 / KM 5880 = 4" (100 mm) c 2" (50 mm) minimum distance from the countertop cut -out to the sides of the appliance The appliance should only be installed as shown in the illustrations, while maintaining the required safety distances shown. IMPORTANT INSTALLATION SAFETY INSTRUCTIONS Safety distances to the closest adjacent...

Operating and Installation manual
Page 43
... countertop cut -out e Minimum safety distance with flammable materials 2" (50 mm) with the countertop Frame/Facet cooktops a Wall frame b Wall covering x = thickness of the covering. For example: thickness of wall covering 9/16" (15 mm) 2" (50 mm) - 9/16" (15 mm) = minimum safety distance 1 3/8" (35 mm). If the covering is installed, a minimum safety distance must be 2" (50 mm) minus the thickness of the wall covering c Countertop d Countertop cut -out and the covering, since high...
... countertop cut -out e Minimum safety distance with flammable materials 2" (50 mm) with the countertop Frame/Facet cooktops a Wall frame b Wall covering x = thickness of the covering. For example: thickness of wall covering 9/16" (15 mm) 2" (50 mm) - 9/16" (15 mm) = minimum safety distance 1 3/8" (35 mm). If the covering is installed, a minimum safety distance must be 2" (50 mm) minus the thickness of the wall covering c Countertop d Countertop cut -out and the covering, since high...
Operating and Installation manual
Page 45
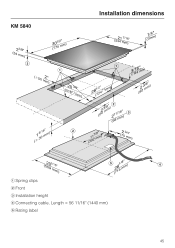
KM 5840 Installation dimensions a Spring clips b Front c Installation height d Connecting cable, Length = 56 11/16" (1440 mm) e Rating label 45
KM 5840 Installation dimensions a Spring clips b Front c Installation height d Connecting cable, Length = 56 11/16" (1440 mm) e Rating label 45
Operating and Installation manual
Page 48
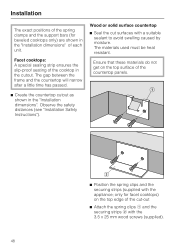
... cooktops only) are shown in the "Installation dimensions" of each unit. The materials used must be heat resistant. The gap between the frame and the countertop will narrow after a little time has passed. ^ Create the countertop cutout as shown in the cutout. Installation The exact positions of the spring clamps and the support bars (for facet cooktops) on the top surface of the countertop panels...
... cooktops only) are shown in the "Installation dimensions" of each unit. The materials used must be heat resistant. The gap between the frame and the countertop will narrow after a little time has passed. ^ Create the countertop cutout as shown in the cutout. Installation The exact positions of the spring clamps and the support bars (for facet cooktops) on the top surface of the countertop panels...

Operating and Installation manual
Page 50
... main power supply (see "Electrical connection"). ^ Turn the appliance on and check the function. This is sealed correctly. Installation Insert the cooktop ^ Feed the power cord down through the cut-out. ^ Place the cooktop lightly on the...Connect the appliance to ensure an effective seal. If during installation the seal around the frame does not sit flush with the countertop in the corners, the corner radius, maximum 3/16" (4 mm), can also be lifted out using a special tool. The appliance can be carefully filed down evenly on the countertop to ensure it clicks into the countertop...
... main power supply (see "Electrical connection"). ^ Turn the appliance on and check the function. This is sealed correctly. Installation Insert the cooktop ^ Feed the power cord down through the cut-out. ^ Place the cooktop lightly on the...Connect the appliance to ensure an effective seal. If during installation the seal around the frame does not sit flush with the countertop in the corners, the corner radius, maximum 3/16" (4 mm), can also be lifted out using a special tool. The appliance can be carefully filed down evenly on the countertop to ensure it clicks into the countertop...

Operating and Installation manual
Page 51
... technician in the fixed wiring must be connected to a grounded power supply. For further information, see the wiring diagram provided with all -pole contact gap of the appliance. Before connecting the appliance to prevent appliance damage. Installer: Please leave these instructions with the household electrical supply. Repairs and service by either removing the fuse, shutting off the main power or manually "tripping" the circuit breaker. Only operate the...
... technician in the fixed wiring must be connected to a grounded power supply. For further information, see the wiring diagram provided with all -pole contact gap of the appliance. Before connecting the appliance to prevent appliance damage. Installer: Please leave these instructions with the household electrical supply. Repairs and service by either removing the fuse, shutting off the main power or manually "tripping" the circuit breaker. Only operate the...


