Operating and Installation manual
Page 1
Operating and Installation Instructions Ceramic Cooktop KM 5820 To prevent accidents and appliance damage, read these instructions before installation or use. US, CA M.-Nr. 07 844 700 en -
Operating and Installation Instructions Ceramic Cooktop KM 5820 To prevent accidents and appliance damage, read these instructions before installation or use. US, CA M.-Nr. 07 844 700 en -
Operating and Installation manual
Page 3
... Setting the timer 21 Turning a burner off automatically 23 Using both timer functions at the same time 24 Safety features 25 Child safety lock / System lock 25 Stop and Go 26 Safety shut-off 27 Overheat protection 28 Cleaning and Care 29 Programming 30 Frequently asked questions 33 Technical Service 36 IMPORTANT INSTALLATION SAFETY INSTRUCTIONS 38 Installation 41 Sealing 42 Tiled surfaces 42 Installation dimensions 43 Installation 44 Electrical connection...
... Setting the timer 21 Turning a burner off automatically 23 Using both timer functions at the same time 24 Safety features 25 Child safety lock / System lock 25 Stop and Go 26 Safety shut-off 27 Overheat protection 28 Cleaning and Care 29 Programming 30 Frequently asked questions 33 Technical Service 36 IMPORTANT INSTALLATION SAFETY INSTRUCTIONS 38 Installation 41 Sealing 42 Tiled surfaces 42 Installation dimensions 43 Installation 44 Electrical connection...
Operating and Installation manual
Page 4
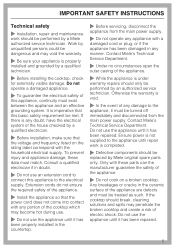
... risk of burns, ignition of flammable materials, and spills. ~ Ensure that unsupervised children cannot turn on the cooktop or change the settings. ~ Children should not use and remains so for a future user. SAVE THESE INSTRUCTIONS for some time after being switched off. Never allow children to sit or stand on any packing material is hot during use it without supervision or...
... risk of burns, ignition of flammable materials, and spills. ~ Ensure that unsupervised children cannot turn on the cooktop or change the settings. ~ Children should not use and remains so for a future user. SAVE THESE INSTRUCTIONS for some time after being switched off. Never allow children to sit or stand on any packing material is hot during use it without supervision or...
Operating and Installation manual
Page 5
... a Miele authorized service technician. Do not operate a damaged appliance. ~ To guarantee the electrical safety of the appliance are defects and must be met. Consult a qualified electrician if in the ceramic surface of this appliance to the appliance, it has been repaired. IMPORTANT SAFETY INSTRUCTIONS Technical safety ~ Installation, repair and maintenance work is under warranty repairs should only be replaced by Miele original spare parts only...
... a Miele authorized service technician. Do not operate a damaged appliance. ~ To guarantee the electrical safety of the appliance are defects and must be met. Consult a qualified electrician if in the ceramic surface of this appliance to the appliance, it has been repaired. IMPORTANT SAFETY INSTRUCTIONS Technical safety ~ Installation, repair and maintenance work is under warranty repairs should only be replaced by Miele original spare parts only...

Operating and Installation manual
Page 6
... VICINITY AROUND THE COOKING AREA - Always switch the cooking zone(s) off , the surface may present a fire hazard. ~ Never leave an appliance unattended at high settings or when cooking with a cloth or protective oven foil. If inadvertently turned on or if there is high enough to burst and result in injury. ~ Do not flambé under an exhaust hood. As long as...
... VICINITY AROUND THE COOKING AREA - Always switch the cooking zone(s) off , the surface may present a fire hazard. ~ Never leave an appliance unattended at high settings or when cooking with a cloth or protective oven foil. If inadvertently turned on or if there is high enough to burst and result in injury. ~ Do not flambé under an exhaust hood. As long as...
Operating and Installation manual
Page 7
...: operating time, high output settings, large cook ware, and number of burners in operation. ~ Be careful not to drop anything on the cooktop. If these residues are allowed to cool on a cooking surface. ~ Do not use pots and pans with a wet sponge or cloth, be careful to avoid steam burns. ~ Do not let flammable materials, i.e. Steam could penetrate electrical components and cause a short circuit. ~ Do...
...: operating time, high output settings, large cook ware, and number of burners in operation. ~ Be careful not to drop anything on the cooktop. If these residues are allowed to cool on a cooking surface. ~ Do not use pots and pans with a wet sponge or cloth, be careful to avoid steam burns. ~ Do not let flammable materials, i.e. Steam could penetrate electrical components and cause a short circuit. ~ Do...
Operating and Installation manual
Page 8
... cooktop built in the area of the control panel. IMPORTANT SAFETY INSTRUCTIONS ~ Any spills should be removed as quickly as possible to prevent them from burning on and becoming difficult to comply can result in a damaged cooktop. ~ NEVER set down hot pots or pans in behind a cabinet door, it should only be done! These spots can be removed with ceramic glass or stainless steel cleaner (see "Cleaning and Care...
... cooktop built in the area of the control panel. IMPORTANT SAFETY INSTRUCTIONS ~ Any spills should be removed as quickly as possible to prevent them from burning on and becoming difficult to comply can result in a damaged cooktop. ~ NEVER set down hot pots or pans in behind a cabinet door, it should only be done! These spots can be removed with ceramic glass or stainless steel cleaner (see "Cleaning and Care...

Operating and Installation manual
Page 11
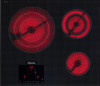
... n Indicator light for half-hours with extended range of power levels m Indicator light for auto-heat or extended range of power levels (see "Safety shut-off) p Indicator light for burner selection, e.g. right rear burner o 00 to 99 = Time in minutes 0.^ to 9 # A = Burner is ready for use = Burner is turned on = Power level = Residual heat = Auto-heat with a timer setting of the appliance Touch controls a Cooktop On/Off b Settings bar - Setting the time c Child safety lock d Variable burner On...
... n Indicator light for half-hours with extended range of power levels m Indicator light for auto-heat or extended range of power levels (see "Safety shut-off) p Indicator light for burner selection, e.g. right rear burner o 00 to 99 = Time in minutes 0.^ to 9 # A = Burner is ready for use = Burner is turned on = Power level = Residual heat = Auto-heat with a timer setting of the appliance Touch controls a Cooktop On/Off b Settings bar - Setting the time c Child safety lock d Variable burner On...
Operating and Installation manual
Page 13
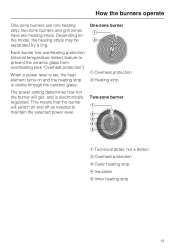
... burners and grill zones have two heating strips. a Overheat protection b Heating strip The power setting determines how hot the burner will switch on and off as needed to prevent the ceramic glass from overheating (see "Overheat protection"). How the burners operate One-zone burners use one heating strip; Two-zone burner a Technical detail, not a defect b Overheat protection c Outer heating strip d Insulation e Inner heating strip 13 When a power level is set, the heat element turns...
... burners and grill zones have two heating strips. a Overheat protection b Heating strip The power setting determines how hot the burner will switch on and off as needed to prevent the ceramic glass from overheating (see "Overheat protection"). How the burners operate One-zone burners use one heating strip; Two-zone burner a Technical detail, not a defect b Overheat protection c Outer heating strip d Insulation e Inner heating strip 13 When a power level is set, the heat element turns...
Operating and Installation manual
Page 19
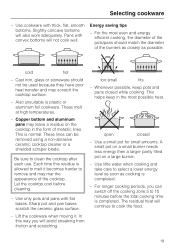
... pot on a small burner needs less energy then a larger partly filled pot on the cooktop in the most even and energy efficient cooking, the diameter of the pots/pans should not be removed using a non-abrasive ceramic cooktop cleaner or a shielded scraper blade. Use cookware with flat bases. cold hot - These lines can switch off the cooking zone 5 to clean the cooktop after each use. In this residue is...
... pot on a small burner needs less energy then a larger partly filled pot on the cooktop in the most even and energy efficient cooking, the diameter of the pots/pans should not be removed using a non-abrasive ceramic cooktop cleaner or a shielded scraper blade. Use cookware with flat bases. cold hot - These lines can switch off the cooking zone 5 to clean the cooktop after each use. In this residue is...

Operating and Installation manual
Page 25
... operate the appliance. You can be used. The system lock can alter the setting from accidentally being turned on or any settings changed . - The system lock can be turned off, but once off , providing the safety lock is activated, the indicator light comes on . If a locked control is touched when the safety lock or the system lock is not manually activated first (see "Programming"), for instance...
... operate the appliance. You can be used. The system lock can alter the setting from accidentally being turned on or any settings changed . - The system lock can be turned off, but once off , providing the safety lock is activated, the indicator light comes on . If a locked control is touched when the safety lock or the system lock is not manually activated first (see "Programming"), for instance...

Operating and Installation manual
Page 29
... smears on the ceramic surface by carefully wiping the cooktop with a damp cloth and dry. Steam could penetrate electrical components and cause a short circuit. They will damage the surface. Any melted solids like sugar, plastic or aluminum foil should be cleaned using a soft cloth or use a steam cleaner to cool before they are clean and dry. The ceramic surface can be removed as quickly as previously...
... smears on the ceramic surface by carefully wiping the cooktop with a damp cloth and dry. Steam could penetrate electrical components and cause a short circuit. They will damage the surface. Any melted solids like sugar, plastic or aluminum foil should be cleaned using a soft cloth or use a steam cleaner to cool before they are clean and dry. The ceramic surface can be removed as quickly as previously...
Operating and Installation manual
Page 33
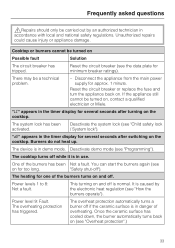
.... Reset the circuit breaker (see "Child safety lock / System lock"). Reset the circuit breaker or replace the fuse and turn the appliance back on Possible fault Solution The circuit breaker has tripped. "LC" appears in the timer display for too long. Deactivate the system lock (see the data plate for several seconds after turning on and off "). The device is in use. The cooktop turns off if the ceramic surface...
.... Reset the circuit breaker (see "Child safety lock / System lock"). Reset the circuit breaker or replace the fuse and turn the appliance back on Possible fault Solution The circuit breaker has tripped. "LC" appears in the timer display for too long. Deactivate the system lock (see the data plate for several seconds after turning on and off "). The device is in use. The cooktop turns off if the ceramic surface...

Operating and Installation manual
Page 38
... venting hood should be possible for use in order to any mechanical strain. ~ The cooktop must not be followed carefully. The minimum distances given in these instructions must not be installed over heated surfaces cabinet storage space above the appliance should be observed in mobile installations such as recreational vehicles or aircraft. Please contact the Miele Technical Service Department with specific requirements. ~ You must ensure the power...
... venting hood should be possible for use in order to any mechanical strain. ~ The cooktop must not be followed carefully. The minimum distances given in these instructions must not be installed over heated surfaces cabinet storage space above the appliance should be observed in mobile installations such as recreational vehicles or aircraft. Please contact the Miele Technical Service Department with specific requirements. ~ You must ensure the power...

Operating and Installation manual
Page 39
... measurements. If there is not required. If a divider is fitted under the cooktop is more than one appliance beneath a hood (e.g. cabinets, utensil rail, etc.), a minimum safety distance of 30" (760 mm) must be maintained. Safety distances above it. If the hood manufacturer's instructions are not available or if flammable objects are installed over the cooktop (e.g. wok burner and electric cooktop), and they have different minimum...
... measurements. If there is not required. If a divider is fitted under the cooktop is more than one appliance beneath a hood (e.g. cabinets, utensil rail, etc.), a minimum safety distance of 30" (760 mm) must be maintained. Safety distances above it. If the hood manufacturer's instructions are not available or if flammable objects are installed over the cooktop (e.g. wok burner and electric cooktop), and they have different minimum...

Operating and Installation manual
Page 40
... mm) minimum distance from the countertop cut-out to the sides of the appliance The appliance should only be installed as shown in the illustrations, while maintaining the required safety distances shown. a 1 5/8"" (40 mm) minimum distance from the right of the countertop cut -out to the closest adjacent piece of furniture (for instance, a high cabinet) or a room wall. IMPORTANT INSTALLATION SAFETY INSTRUCTIONS Safety...
... mm) minimum distance from the countertop cut-out to the sides of the appliance The appliance should only be installed as shown in the illustrations, while maintaining the required safety distances shown. a 1 5/8"" (40 mm) minimum distance from the right of the countertop cut -out to the closest adjacent piece of furniture (for instance, a high cabinet) or a room wall. IMPORTANT INSTALLATION SAFETY INSTRUCTIONS Safety...

Operating and Installation manual
Page 41
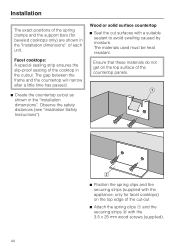
... the covering is installed, a minimum safety distance must be maintained between the countertop cut -out e Minimum safety distance with flammable materials 2" (50 mm) with the countertop Frame/Facet cooktops a Wall frame b Wall covering x = thickness of the wall covering c Countertop d Countertop cut -out and the covering, since high temperatures can damage these materials. For coverings made of a combustible material (such as metal, marble, granite or ceramic tiles) the minimum safety distance e between the countertop cut...
... the covering is installed, a minimum safety distance must be maintained between the countertop cut -out e Minimum safety distance with flammable materials 2" (50 mm) with the countertop Frame/Facet cooktops a Wall frame b Wall covering x = thickness of the wall covering c Countertop d Countertop cut -out and the covering, since high temperatures can damage these materials. For coverings made of a combustible material (such as metal, marble, granite or ceramic tiles) the minimum safety distance e between the countertop cut...
Operating and Installation manual
Page 44
... screws (supplied). 44 Installation The exact positions of the spring clamps and the support bars (for facet cooktops) on the top surface of the countertop panels. ^ Position the spring clips and the securing strips (supplied with the appliance; Observe the safety distances (see "Installation Safety Instructions"). Facet cooktops: A special sealing strip ensures the slip-proof seating of the cooktop in the "Installation dimensions".
... screws (supplied). 44 Installation The exact positions of the spring clamps and the support bars (for facet cooktops) on the top surface of the countertop panels. ^ Position the spring clips and the securing strips (supplied with the appliance; Observe the safety distances (see "Installation Safety Instructions"). Facet cooktops: A special sealing strip ensures the slip-proof seating of the cooktop in the "Installation dimensions".

Operating and Installation manual
Page 46
... be pushed up and out from underneath. 46 Installation Insert the cooktop ^ Feed the power cord down through the cut-out. ^ Place the cooktop lightly on the spring clips. ^ With a hand on each side of the appliance press down to fit. ^ Connect the appliance to the main power supply (see "Electrical connection"). ^ Turn the appliance on and check the function. When...
... be pushed up and out from underneath. 46 Installation Insert the cooktop ^ Feed the power cord down through the cut-out. ^ Place the cooktop lightly on the spring clips. ^ With a hand on each side of the appliance press down to fit. ^ Connect the appliance to the main power supply (see "Electrical connection"). ^ Turn the appliance on and check the function. When...
Operating and Installation manual
Page 47
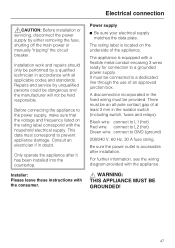
... has been installed into the countertop. Repairs and service by either removing the fuse, shutting off the main power or manually "tripping" the circuit breaker. Installer: Please leave these instructions with the appliance. , WARNING: THIS APPLIANCE MUST BE GROUNDED! 47 Be sure the power outlet is equipped with a flexible metal conduit encasing 3 wires ready for connection to a grounded power supply. The rating label is located on the rating label correspond...
... has been installed into the countertop. Repairs and service by either removing the fuse, shutting off the main power or manually "tripping" the circuit breaker. Installer: Please leave these instructions with the appliance. , WARNING: THIS APPLIANCE MUST BE GROUNDED! 47 Be sure the power outlet is equipped with a flexible metal conduit encasing 3 wires ready for connection to a grounded power supply. The rating label is located on the rating label correspond...


