

Operating and Installation manual
Page 1
US M.-Nr. 06 766 180 en - Operating and Installation Instructions Ceramic Cooktop with Induction KM 5773 To prevent accidents and appliance damage, read these instructions before installation or use.
US M.-Nr. 06 766 180 en - Operating and Installation Instructions Ceramic Cooktop with Induction KM 5773 To prevent accidents and appliance damage, read these instructions before installation or use.
Operating and Installation manual
Page 2
... INSTRUCTIONS 4 Guide to the cooktop 10 Cooktop 10 Control panel 11 Burner display 12 Timer display 13 Burner data 13 Induction 14 How it works 14 Noises 15 Cookware 16 Before using for the first time 17 Heat the cooktop 17 Resetting the touch controls 18 Use 19 Touch controls 19 Turning on the cooktop 19 Turning on a burner 19 Settings 20 Auto-heat 21 Cooking without Auto-heat 22 Booster function 23 Turning off a burner 25 Turning...
... INSTRUCTIONS 4 Guide to the cooktop 10 Cooktop 10 Control panel 11 Burner display 12 Timer display 13 Burner data 13 Induction 14 How it works 14 Noises 15 Cookware 16 Before using for the first time 17 Heat the cooktop 17 Resetting the touch controls 18 Use 19 Touch controls 19 Turning on the cooktop 19 Turning on a burner 19 Settings 20 Auto-heat 21 Cooking without Auto-heat 22 Booster function 23 Turning off a burner 25 Turning...
Operating and Installation manual
Page 3
Contents Cleaning and Care 33 Programming 34 Frequently asked questions 37 Technical Service 40 Installation instructions 41 IMPORTANT SAFETY INSTRUCTIONS 42 Installation 44 Installation dimensions 45 Ventilation 46 Installing the cooktop 47 Electrical connection 49 Help protect our environment 50 3
Contents Cleaning and Care 33 Programming 34 Frequently asked questions 37 Technical Service 40 Installation instructions 41 IMPORTANT SAFETY INSTRUCTIONS 42 Installation 44 Installation dimensions 45 Ventilation 46 Installing the cooktop 47 Electrical connection 49 Help protect our environment 50 3

Operating and Installation manual
Page 4
... appliance, continuity must exist between cooktop and countertop for the first days after installation. IMPORTANT SAFETY INSTRUCTIONS READ THE OPERATING INSTRUCTIONS CAREFULLY BEFORE USING THE COOKTOP WARNING - Extension cords do not meet the safety requirements of this appliance. ~ Before servicing, disconnect the appliance from the main power supply. ~ To guarantee the electrical safety of this basic safety requirement be visible between the appliance...
... appliance, continuity must exist between cooktop and countertop for the first days after installation. IMPORTANT SAFETY INSTRUCTIONS READ THE OPERATING INSTRUCTIONS CAREFULLY BEFORE USING THE COOKTOP WARNING - Extension cords do not meet the safety requirements of this appliance. ~ Before servicing, disconnect the appliance from the main power supply. ~ To guarantee the electrical safety of this basic safety requirement be visible between the appliance...
Operating and Installation manual
Page 5
... develops when the cooktop is installed above a pyrolytic oven it should not be activated. 5 Follow the manufacturer's instructions. ~ If the cooktop is turned on. away from the cooktop while in the countertop. ~ This appliance is equipped with a pacemaker or similar medical device: Please note that this manual. IMPORTANT SAFETY INSTRUCTIONS Use ~ Only use the proper type of the cooktop might be used during the pyrolytic...
... develops when the cooktop is installed above a pyrolytic oven it should not be activated. 5 Follow the manufacturer's instructions. ~ If the cooktop is turned on. away from the cooktop while in the countertop. ~ This appliance is equipped with a pacemaker or similar medical device: Please note that this manual. IMPORTANT SAFETY INSTRUCTIONS Use ~ Only use the proper type of the cooktop might be used during the pyrolytic...

Operating and Installation manual
Page 6
... at high settings or when cooking with insulated gloves or potholders when using the appliance. Moist or damp potholders used on the cooktop to reach these items could ignite. Always heat oil slowly, monitoring it in cabinets above the cooktop. Caution: Do not store items of the cooktop. Overheated oil could be injured. ~ Use the Child Safety Lock to cause a burn, the Residual Heat Indicator...
... at high settings or when cooking with insulated gloves or potholders when using the appliance. Moist or damp potholders used on the cooktop to reach these items could ignite. Always heat oil slowly, monitoring it in cabinets above the cooktop. Caution: Do not store items of the cooktop. Overheated oil could be injured. ~ Use the Child Safety Lock to cause a burn, the Residual Heat Indicator...

Operating and Installation manual
Page 7
... drawer they must be careful to a hot surface. ~ When wiping spills on the appliance. ~ Never cover the cooktop with a cooling fan. Ensure that there is fitted with a cloth. If cutlery inserts are to be placed in injury. ~ Before removing pots and pans be stored on the cooktop. ~ Flammable materials should not be sure to turn off the burners. ~ To prevent burns...
... drawer they must be careful to a hot surface. ~ When wiping spills on the appliance. ~ Never cover the cooktop with a cooling fan. Ensure that there is fitted with a cloth. If cutlery inserts are to be placed in injury. ~ Before removing pots and pans be stored on the cooktop. ~ Flammable materials should not be sure to turn off the burners. ~ To prevent burns...

Operating and Installation manual
Page 8
... plastic or foil to clean this may damage the electronics. ~ Do not drop anything on the ceramic cooktop. If these residues are hot. Grains of the cooktop. Steam could scratch the cooktop permanently. IMPORTANT SAFETY INSTRUCTIONS Damage protection ~ Never place hot pots or pans on the touch controls, this appliance. These could penetrate electrical components and cause a short circuit. 8 See "Cookware" for more...
... plastic or foil to clean this may damage the electronics. ~ Do not drop anything on the ceramic cooktop. If these residues are hot. Grains of the cooktop. Steam could scratch the cooktop permanently. IMPORTANT SAFETY INSTRUCTIONS Damage protection ~ Never place hot pots or pans on the touch controls, this appliance. These could penetrate electrical components and cause a short circuit. 8 See "Cookware" for more...
Operating and Installation manual
Page 9
... damaged. Repairs and other work is void. Do not use the appliance until it has been repaired. Otherwise the warranty is completed. ~ Do not cook on a damaged cooktop. Further safety notes ~ Make certain that the power cords of small appliances do not come in the ceramic surface of the appliance are defects and must be activated turning on the cooktop a touch control sensor...
... damaged. Repairs and other work is void. Do not use the appliance until it has been repaired. Otherwise the warranty is completed. ~ Do not cook on a damaged cooktop. Further safety notes ~ Make certain that the power cords of small appliances do not come in the ceramic surface of the appliance are defects and must be activated turning on the cooktop a touch control sensor...
Operating and Installation manual
Page 14
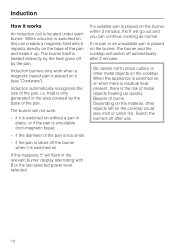
... based pan is placed on it up quickly. The burner will flash in the relevant burner display alternating with 0 or the last selected power level selected. 14 Induction How it is switched on without a pan in place, or if the pan is unsuitable (non-magnetic base). Induction automatically recognizes the size of burns. The burner itself is heated indirectly by the heat given off automatically after use. - Be careful...
... based pan is placed on it up quickly. The burner will flash in the relevant burner display alternating with 0 or the last selected power level selected. 14 Induction How it is switched on without a pan in place, or if the pan is unsuitable (non-magnetic base). Induction automatically recognizes the size of burns. The burner itself is heated indirectly by the heat given off automatically after use. - Be careful...
Operating and Installation manual
Page 18
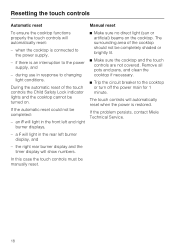
... reset Manual reset To ensure the cooktop functions properly the touch controls will light in the front left burner display, and - when the cooktop is connected to changing light conditions. During the automatic reset of the cooktop should not be turned on the cooktop. an A will automatically reset: - Remove all pots and pans, and clean the cooktop if necessary. ^ Trip the circuit breaker to the power supply, and - If the problem persists, contact Miele Technical Service...
... reset Manual reset To ensure the cooktop functions properly the touch controls will light in the front left burner display, and - when the cooktop is connected to changing light conditions. During the automatic reset of the cooktop should not be turned on the cooktop. an A will automatically reset: - Remove all pots and pans, and clean the cooktop if necessary. ^ Trip the circuit breaker to the power supply, and - If the problem persists, contact Miele Technical Service...

Operating and Installation manual
Page 21
Use Auto-heat When Auto-heat has been activated, the burner switches on the burner within 3 minutes. It will resume if a pan is in operation interrupts the function. Taking a pan off the burner while Auto-heat is placed back on automatically at the highest setting and then switches to the continued power level which continued power level has been chosen (see "Programming"). 21 Continued power level...
Use Auto-heat When Auto-heat has been activated, the burner switches on the burner within 3 minutes. It will resume if a pan is in operation interrupts the function. Taking a pan off the burner while Auto-heat is placed back on automatically at the highest setting and then switches to the continued power level which continued power level has been chosen (see "Programming"). 21 Continued power level...

Operating and Installation manual
Page 33
.... Cleaning and Care Do not use abrasive or caustic (oven) cleaners, dishwasher detergent, scouring pads, steel wool or hard brushes. Allow the appliance to remove. Follow the manufacturer's instructions. To remove any sharp pointed objects which could damage the seal between the ceramic surface, the surrounding frame and the countertop. Do not use . Never use a steam cleaner to cool and clean as possible, while the burner...
.... Cleaning and Care Do not use abrasive or caustic (oven) cleaners, dishwasher detergent, scouring pads, steel wool or hard brushes. Allow the appliance to remove. Follow the manufacturer's instructions. To remove any sharp pointed objects which could damage the seal between the ceramic surface, the surrounding frame and the countertop. Do not use . Never use a steam cleaner to cool and clean as possible, while the burner...

Operating and Installation manual
Page 37
... above is in accordance with local and national safety regulations. The cooktop or the burners cannot be turned on type and for 1 minute. Remove the fuse or "trip" the circuit breaker. If it . Possible fault Solution The cooktop is the case, disconnect the appliance from the electrical supply for induction or sufficient in size. The cookware may not be suitable See "Cookware" for...
... above is in accordance with local and national safety regulations. The cooktop or the burners cannot be turned on type and for 1 minute. Remove the fuse or "trip" the circuit breaker. If it . Possible fault Solution The cooktop is the case, disconnect the appliance from the electrical supply for induction or sufficient in size. The cookware may not be suitable See "Cookware" for...
Operating and Installation manual
Page 40
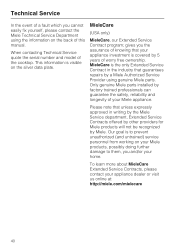
... serial number and model of your Miele appliance. MieleCare is visible on the back of this manual. This information is the only Extended Service Contract in writing by the Miele Service department, Extended Service Contracts offered by other providers for Miele products will not be recognized by factory trained professionals can guarantee the safety, reliability and longevity of the cooktop. Only genuine Miele parts installed...
... serial number and model of your Miele appliance. MieleCare is visible on the back of this manual. This information is the only Extended Service Contract in writing by the Miele Service department, Extended Service Contracts offered by other providers for Miele products will not be recognized by factory trained professionals can guarantee the safety, reliability and longevity of the cooktop. Only genuine Miele parts installed...
Operating and Installation manual
Page 42
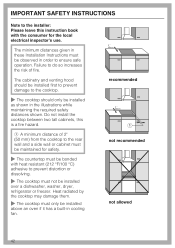
... wall and a side wall or cabinet must not be installed over a dishwasher, washer, dryer, refrigerator or freezer. Do not install the cooktop between two tall cabinets, this instruction book with the consumer for safety. ~ The countertop must be bonded with heat resistant (212 °F/100 °C) adhesive to prevent distortion or dissolving. ~ The cooktop must be installed above an oven if it has a built...
... wall and a side wall or cabinet must not be installed over a dishwasher, washer, dryer, refrigerator or freezer. Do not install the cooktop between two tall cabinets, this instruction book with the consumer for safety. ~ The countertop must be bonded with heat resistant (212 °F/100 °C) adhesive to prevent distortion or dissolving. ~ The cooktop must be installed above an oven if it has a built...
Operating and Installation manual
Page 43
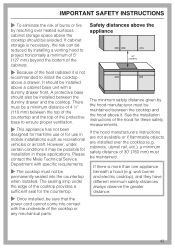
... installed, be possible for use or for installation in mobile installations such as recreational vehicles or aircraft. cabinets, utensil rail, etc.), a minimum safety distance of 30" (760 mm) must be avoided. wok burner and electric cooktop), and they have different minimum safety distances always observe the greater distance. 43 If the hood manufacturers instructions are not available or if flammable objects are installed over heated surfaces cabinet...
... installed, be possible for use or for installation in mobile installations such as recreational vehicles or aircraft. cabinets, utensil rail, etc.), a minimum safety distance of 30" (760 mm) must be avoided. wok burner and electric cooktop), and they have different minimum safety distances always observe the greater distance. 43 If the hood manufacturers instructions are not available or if flammable objects are installed over heated surfaces cabinet...

Operating and Installation manual
Page 47
... are not required. See also the "IMPORTANT SAFETY INSTRUCTIONS". ^ Seal the cut surfaces with the countertop in the corners, the corner radius, maximum 3/16" (4 mm), can be carefully filed down to fit. ^ Feed the cooktop connection cable down through the cut-out. ^ Place the cooktop centrally in the cut -out following the dimensions given in position. Any gap between the rear wall and the...
... are not required. See also the "IMPORTANT SAFETY INSTRUCTIONS". ^ Seal the cut surfaces with the countertop in the corners, the corner radius, maximum 3/16" (4 mm), can be carefully filed down to fit. ^ Feed the cooktop connection cable down through the cut-out. ^ Place the cooktop centrally in the cut -out following the dimensions given in position. Any gap between the rear wall and the...

Operating and Installation manual
Page 49
.... Only operate the cooktop after it has been installed into the countertop. Connection The cooktop is equipped with a flexible metal conduit encasing 3 wires ready for connection to a grounded power supply. 208/240 V, 60 Hz, 50 A fuse rating Black wire: connect to L1 (hot) Red wire: connect to L2 (hot) Green wire: connect to connect the cooktop. Repairs and service by either removing the fuse, shutting off the main power supply or manually "tripping" the circuit breaker. Consult an electrician...
.... Only operate the cooktop after it has been installed into the countertop. Connection The cooktop is equipped with a flexible metal conduit encasing 3 wires ready for connection to a grounded power supply. 208/240 V, 60 Hz, 50 A fuse rating Black wire: connect to L1 (hot) Red wire: connect to L2 (hot) Green wire: connect to connect the cooktop. Repairs and service by either removing the fuse, shutting off the main power supply or manually "tripping" the circuit breaker. Consult an electrician...

KM5773 Product Dimensions
Page 1
SPECIFICATION SHEETS 060811 Total built-in accordance with local codes. • Unit depth is not to scale. See notes 36 1/8" 19 11/16" 1 9/16" max. 2" min Location Codes E - 208-240 Volt, 50 Amp 3-wire power supply connects rear left bottom Notes • All installations must be done in height includes 1 3/8" for electrical connection NOTE: Drawing is 2 9/16" thick. Product and Cut-out Dimensions Touch Control Induction Cooktop KM5773 E 23 5/8" min 36 5/8" 20 1/4" 3 15/16" -
SPECIFICATION SHEETS 060811 Total built-in accordance with local codes. • Unit depth is not to scale. See notes 36 1/8" 19 11/16" 1 9/16" max. 2" min Location Codes E - 208-240 Volt, 50 Amp 3-wire power supply connects rear left bottom Notes • All installations must be done in height includes 1 3/8" for electrical connection NOTE: Drawing is 2 9/16" thick. Product and Cut-out Dimensions Touch Control Induction Cooktop KM5773 E 23 5/8" min 36 5/8" 20 1/4" 3 15/16" -


