
Operating and Installation manual
Page 1
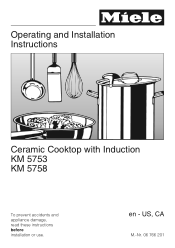
Operating and Installation Instructions Ceramic Cooktop with Induction KM 5753 KM 5758 To prevent accidents and appliance damage, read these instructions before installation or use. US, CA M.-Nr. 06 766 201 en -
Operating and Installation Instructions Ceramic Cooktop with Induction KM 5753 KM 5758 To prevent accidents and appliance damage, read these instructions before installation or use. US, CA M.-Nr. 06 766 201 en -
Operating and Installation manual
Page 3
Contents Cleaning and Care 31 Programming 32 Frequently asked questions 35 Technical Service 37 Installation instructions 39 IMPORTANT SAFETY INSTRUCTIONS 40 Installation 42 Installation dimensions 43 Ventilation 44 Installing the cooktop 45 Electrical connection 47 Help protect our environment 48 3
Contents Cleaning and Care 31 Programming 32 Frequently asked questions 35 Technical Service 37 Installation instructions 39 IMPORTANT SAFETY INSTRUCTIONS 40 Installation 42 Installation dimensions 43 Ventilation 44 Installing the cooktop 45 Electrical connection 47 Help protect our environment 48 3

Operating and Installation manual
Page 4
... INSTRUCTIONS CAREFULLY BEFORE USING THE COOKTOP WARNING - If there is any doubt, have the electrical system of the house checked by a qualified electrician. ~ Only for frame/facet cooktops: A small gap will decrease as the cooktop is properly installed and grounded by a qualified technician in accordance with national and local safety regulations. ~ Do not connect the appliance to the main electrical supply using...
... INSTRUCTIONS CAREFULLY BEFORE USING THE COOKTOP WARNING - If there is any doubt, have the electrical system of the house checked by a qualified electrician. ~ Only for frame/facet cooktops: A small gap will decrease as the cooktop is properly installed and grounded by a qualified technician in accordance with national and local safety regulations. ~ Do not connect the appliance to the main electrical supply using...
Operating and Installation manual
Page 5
... in operation. Follow the manufacturer's instructions. ~ If the cooktop is equipped with a pacemaker or similar medical device: Please note that this manual. Damage may result. ~ Do not use it should not use the appliance until it has been properly installed in the countertop. ~ This appliance is installed above a pyrolytic oven it without supervision or instruction by a responsible person. ~ Individuals with...
... in operation. Follow the manufacturer's instructions. ~ If the cooktop is equipped with a pacemaker or similar medical device: Please note that this manual. Damage may result. ~ Do not use it should not use the appliance until it has been properly installed in the countertop. ~ This appliance is installed above a pyrolytic oven it without supervision or instruction by a responsible person. ~ Individuals with...

Operating and Installation manual
Page 6
... the hot heating elements. Use only dry, heat resistant potholders. Flames could ignite. See "Child Safety lock" for quite a while after being turned off. At high settings, be cautious of children's reach. As long as the surface temperature is high enough to reduce the risk of burns, ignition of loose fitting or hanging clothing when operating the cooktop, they may present a fire hazard. ~ Pot and pan...
... the hot heating elements. Use only dry, heat resistant potholders. Flames could ignite. See "Child Safety lock" for quite a while after being turned off. At high settings, be cautious of children's reach. As long as the surface temperature is high enough to reduce the risk of burns, ignition of loose fitting or hanging clothing when operating the cooktop, they may present a fire hazard. ~ Pot and pan...

Operating and Installation manual
Page 7
IMPORTANT SAFETY INSTRUCTIONS ~ Do not heat unopened containers. Built-up pressure may cause the container to burst and result in this drawer. Drawers under the cooktop are kept in injury. ~ Before removing pots and pans be stored on or near the appliance. ~ The cooktop is fitted with a cooling fan. Ensure that there is fitted directly underneath the cooktop, ensure that no aerosols...
IMPORTANT SAFETY INSTRUCTIONS ~ Do not heat unopened containers. Built-up pressure may cause the container to burst and result in this drawer. Drawers under the cooktop are kept in injury. ~ Before removing pots and pans be stored on or near the appliance. ~ The cooktop is fitted with a cooling fan. Ensure that there is fitted directly underneath the cooktop, ensure that no aerosols...

Operating and Installation manual
Page 8
... cooktop permanently. Make sure that the bases of any pots and pans are clean, free of any fat or oils, and are allowed to cool on the ceramic surface pitting or even cracking may damage the electronics. ~ Do not drop anything on the ceramic surface of salt and sand can cause scratches. IMPORTANT SAFETY INSTRUCTIONS Damage protection ~ Never place hot pots or pans...
... cooktop permanently. Make sure that the bases of any pots and pans are clean, free of any fat or oils, and are allowed to cool on the ceramic surface pitting or even cracking may damage the electronics. ~ Do not drop anything on the ceramic surface of salt and sand can cause scratches. IMPORTANT SAFETY INSTRUCTIONS Damage protection ~ Never place hot pots or pans...
Operating and Installation manual
Page 9
... INSTRUCTIONS AND REVIEW THEM PERIODICALLY 9 Contact Miele's Technical Service Department. Otherwise the warranty is completed. ~ Do not cook on a damaged cooktop. The insulation of the cable could be turned off immediately and disconnected from the cooktop at all times and activate the Safety Lock. Further safety notes ~ Make certain that the power cords of small appliances do not come in the ceramic surface...
... INSTRUCTIONS AND REVIEW THEM PERIODICALLY 9 Contact Miele's Technical Service Department. Otherwise the warranty is completed. ~ Do not cook on a damaged cooktop. The insulation of the cable could be turned off immediately and disconnected from the cooktop at all times and activate the Safety Lock. Further safety notes ~ Make certain that the power cords of small appliances do not come in the ceramic surface...

Operating and Installation manual
Page 13
... objects heating up . if the pan is switched on the base of the pan. If no pan or an unsuitable pan is placed on the burner, the burner and the cooktop will switch off the burner when it is the risk of burns. If a suitable pan is unsuitable (non-magnetic base). if the diameter of the pan, i.e. Induction automatically recognizes the size of the pan is located under each burner.
... objects heating up . if the pan is switched on the base of the pan. If no pan or an unsuitable pan is placed on the burner, the burner and the cooktop will switch off the burner when it is the risk of burns. If a suitable pan is unsuitable (non-magnetic base). if the diameter of the pan, i.e. Induction automatically recognizes the size of the pan is located under each burner.
Operating and Installation manual
Page 15
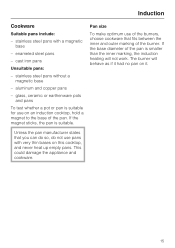
... Induction Cookware Suitable pans include: - enameled steel pans - glass, ceramic or earthenware pots and pans To test whether a pot or pan is suitable. The burner will not work. aluminum and copper pans - Pan size To make optimum use of the pan. stainless steel pans without a magnetic base - stainless steel pans with very thin bases on an induction cooktop, hold a magnet to the base of the burners, choose cookware that you can do so, do not use on this cooktop, and never heat...
... Induction Cookware Suitable pans include: - enameled steel pans - glass, ceramic or earthenware pots and pans To test whether a pot or pan is suitable. The burner will not work. aluminum and copper pans - Pan size To make optimum use of the pan. stainless steel pans without a magnetic base - stainless steel pans with very thin bases on an induction cooktop, hold a magnet to the base of the burners, choose cookware that you can do so, do not use on this cooktop, and never heat...

Operating and Installation manual
Page 17
... a power level between 1 and 9 by pressing the + or - Turn on with auto-heat. 17 to: cook with - Each time a command is registered, a signal will turn itself off automatically (see a dash - NEVER place hot cookware on the desired burner. ^ Touch the ON/OFF "s" cooktop touch control. Turning on a burner ^ Touch the s On/Off touch control for more information. Use Touch controls The control panel on your ceramic cooktop is...
... a power level between 1 and 9 by pressing the + or - Turn on with auto-heat. 17 to: cook with - Each time a command is registered, a signal will turn itself off automatically (see a dash - NEVER place hot cookware on the desired burner. ^ Touch the ON/OFF "s" cooktop touch control. Turning on a burner ^ Touch the s On/Off touch control for more information. Use Touch controls The control panel on your ceramic cooktop is...

Operating and Installation manual
Page 19
... "Programming - It will resume if a pan is in operation interrupts the function. The "heat-up time (approx.) min : sec 1 0 : 15 1. 0 : 15 2 0 : 15 2. 0 : 15 3 0 : 25 3. 0 : 25 4 0 : 50 4. 0 : 50 5 2 : 00 5. 5 : 50 6 5 : 50 6. 2 : 50 7 2 : 50 7. 2 : 50 8 2 : 50 8. 2 : 50 9 - * The continued cooking settings with a dot after the number are only available if the power level range has been extended (see table).
... "Programming - It will resume if a pan is in operation interrupts the function. The "heat-up time (approx.) min : sec 1 0 : 15 1. 0 : 15 2 0 : 15 2. 0 : 15 3 0 : 25 3. 0 : 25 4 0 : 50 4. 0 : 50 5 2 : 00 5. 5 : 50 6 5 : 50 6. 2 : 50 7 2 : 50 7. 2 : 50 8 2 : 50 8. 2 : 50 9 - * The continued cooking settings with a dot after the number are only available if the power level range has been extended (see table).

Operating and Installation manual
Page 20
to the right of settings (see "Programming - P2"), A flashes alternately with the continued power level until the desired continued power level appears, e.g. 6. sensor until the heat-up time a dot will adjust accordingly. The Auto-heat time will light to lower or increase the continued power level. In the extended range of the continued power level, and go out when it is completed. 20 During the heat-up time has completed. At any point during the Auto-heat time you can use + or - Use Activating Auto-heat ^ Press the -
to the right of settings (see "Programming - P2"), A flashes alternately with the continued power level until the desired continued power level appears, e.g. 6. sensor until the heat-up time a dot will adjust accordingly. The Auto-heat time will light to lower or increase the continued power level. In the extended range of the continued power level, and go out when it is completed. 20 During the heat-up time has completed. At any point during the Auto-heat time you can use + or - Use Activating Auto-heat ^ Press the -

Operating and Installation manual
Page 31
... cooktop to harden the cooktop may damage the cooktop or produce toxic fumes when heated. Use caution: Danger of limescale deposits. Never use . Make sure that pot and pan bases are allowed to cool and clean as possible, while the burner is best removed with a shielded scraper blade. ^ Apply a ceramic cleaner using a soft cloth and a shielded scraper blade if necessary. ^ After cleaning wipe the ceramic surface...
... cooktop to harden the cooktop may damage the cooktop or produce toxic fumes when heated. Use caution: Danger of limescale deposits. Never use . Make sure that pot and pan bases are allowed to cool and clean as possible, while the burner is best removed with a shielded scraper blade. ^ Apply a ceramic cleaner using a soft cloth and a shielded scraper blade if necessary. ^ After cleaning wipe the ceramic surface...

Operating and Installation manual
Page 37
... Miele appliance. When contacting Technical Service quote the serial number and model of the cooktop. gives you and/or your appliance investment is visible on the back of this manual. MieleCare (USA only) MieleCare, our Extended Service Contract program; Only genuine Miele parts installed by a Miele Authorized Service Provider using the information on the silver data plate. Please note that guarantees repairs by factory trained professionals...
... Miele appliance. When contacting Technical Service quote the serial number and model of the cooktop. gives you and/or your appliance investment is visible on the back of this manual. MieleCare (USA only) MieleCare, our Extended Service Contract program; Only genuine Miele parts installed by a Miele Authorized Service Provider using the information on the silver data plate. Please note that guarantees repairs by factory trained professionals...
Operating and Installation manual
Page 40
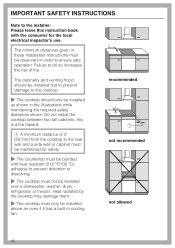
... wall or cabinet must be installed above an oven if it has a built-in the illustrations while maintaining the required safety distances shown. The minimum distances given in these Installation Instructions must be observed in order to prevent distortion or dissolving. ~ The cooktop must not be installed as shown in cooling fan. 2 " recommended 2 " 50mm b not recommended not allowed 40 Heat radiated by the cooktop...
... wall or cabinet must be installed above an oven if it has a built-in the illustrations while maintaining the required safety distances shown. The minimum distances given in these Installation Instructions must be observed in order to prevent distortion or dissolving. ~ The cooktop must not be installed as shown in cooling fan. 2 " recommended 2 " 50mm b not recommended not allowed 40 Heat radiated by the cooktop...

Operating and Installation manual
Page 41
... cooktop. wok burner and electric cooktop), and they have different minimum safety distances always observe the greater distance. 41 If there is necessary, the risk can be reduced by installing a venting hood to install the cooktop above a cabinet base unit with specific requirements. ~ The cooktop must be permanently sealed into contact with the underside of the cooktop or any mechanical parts. See the installation instructions of the hood for the countertop. ~ Once installed, be installed...
... cooktop. wok burner and electric cooktop), and they have different minimum safety distances always observe the greater distance. 41 If there is necessary, the risk can be reduced by installing a venting hood to install the cooktop above a cabinet base unit with specific requirements. ~ The cooktop must be permanently sealed into contact with the underside of the cooktop or any mechanical parts. See the installation instructions of the hood for the countertop. ~ Once installed, be installed...

Operating and Installation manual
Page 45
.... ^ Feed the cooktop connection cable down through the cut-out. ^ Place the cooktop centrally in the cut surfaces with the countertop on and check the function. See also the "IMPORTANT SAFETY INSTRUCTIONS". ^ Seal the cut -out. This is used. 45 Any gap between the rear wall and the right or left side. Installation Cut out Installing the cooktop ^ Make the countertop cut-out following the dimensions given in position.
.... ^ Feed the cooktop connection cable down through the cut-out. ^ Place the cooktop centrally in the cut surfaces with the countertop on and check the function. See also the "IMPORTANT SAFETY INSTRUCTIONS". ^ Seal the cut -out. This is used. 45 Any gap between the rear wall and the right or left side. Installation Cut out Installing the cooktop ^ Make the countertop cut-out following the dimensions given in position.
Operating and Installation manual
Page 47
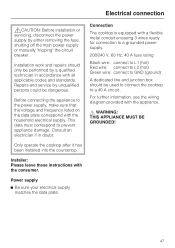
.... Only operate the cooktop after it has been installed into the countertop. For further information, see the wiring diagram provided with the consumer. Installation work and repairs should be dangerous. Repairs and service by unqualified persons could be used to connect the cooktop to GND (ground) A dedicated line and junction box should only be performed by either removing the fuse, shutting off the main power supply or manually "tripping" the circuit breaker.
.... Only operate the cooktop after it has been installed into the countertop. For further information, see the wiring diagram provided with the consumer. Installation work and repairs should be dangerous. Repairs and service by unqualified persons could be used to connect the cooktop to GND (ground) A dedicated line and junction box should only be performed by either removing the fuse, shutting off the main power supply or manually "tripping" the circuit breaker.
KM5753 Product Dimensions
Page 1
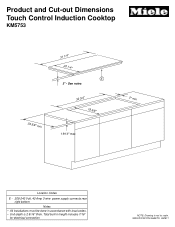
See notes 30 3/4" 19 5/8" 1 9/16" max. 2" min Location Codes E - 208-240 Volt, 40 Amp 3-wire power supply connects rear right bottom Notes • All installations must be done in height includes 7/16" for electrical connection NOTE: Drawing is 2 9/16" thick. Total built-in accordance with local codes. • Unit depth is not to scale. Product and Cut-out Dimensions Touch Control Induction Cooktop KM5753 23 5/8" min 31 1/4" 20 1/4" E 3" - SPECIFICATION SHEETS 060811
See notes 30 3/4" 19 5/8" 1 9/16" max. 2" min Location Codes E - 208-240 Volt, 40 Amp 3-wire power supply connects rear right bottom Notes • All installations must be done in height includes 7/16" for electrical connection NOTE: Drawing is 2 9/16" thick. Total built-in accordance with local codes. • Unit depth is not to scale. Product and Cut-out Dimensions Touch Control Induction Cooktop KM5753 23 5/8" min 31 1/4" 20 1/4" E 3" - SPECIFICATION SHEETS 060811


