
Operating and Installation manual
Page 1
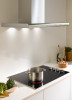
Operating and Installation Instructions Ceramic Cooktop KM 5621 KM 5624 KM 5627 To prevent accidents and appliance damage, read these instructions before installation or use. en - US, CA M.-Nr. 07 844 520
Operating and Installation Instructions Ceramic Cooktop KM 5621 KM 5624 KM 5627 To prevent accidents and appliance damage, read these instructions before installation or use. en - US, CA M.-Nr. 07 844 520
Operating and Installation manual
Page 2
Contents IMPORTANT SAFETY INSTRUCTIONS 3 Description of the cooktop 8 KM 5621 8 KM 5624 9 KM 5627 10 Before using for the first time 11 Clean the cooktop 11 Heat the cooktop 11 How the burners operate 12 Operation 13 Turning on 13 Turning on the second heating ring 13 Turning off 13 Residual heat... Frequently asked questions 18 Technical Service 19 IMPORTANT INSTALLATION SAFETY INSTRUCTIONS 22 Installation 25 Sealing 26 Tiled surfaces 26 Installation dimensions 27 KM 5621 27 KM 5624 28 KM 5627 29 Installation 30 Electrical connection 33 Help protect our environment 34 2
Contents IMPORTANT SAFETY INSTRUCTIONS 3 Description of the cooktop 8 KM 5621 8 KM 5624 9 KM 5627 10 Before using for the first time 11 Clean the cooktop 11 Heat the cooktop 11 How the burners operate 12 Operation 13 Turning on 13 Turning on the second heating ring 13 Turning off 13 Residual heat... Frequently asked questions 18 Technical Service 19 IMPORTANT INSTALLATION SAFETY INSTRUCTIONS 22 Installation 25 Sealing 26 Tiled surfaces 26 Installation dimensions 27 KM 5621 27 KM 5624 28 KM 5627 29 Installation 30 Electrical connection 33 Help protect our environment 34 2
Operating and Installation manual
Page 3
... all pots and pans out of the reach of children. Correct usage ~ Only use . This appliance conforms to reach these operating instructions in use the cooktop for residential cooking, and for a future user. IMPORTANT SAFETY INSTRUCTIONS WARNING- Children ~ Children should be left unattended in an area where the appliance is disposed...
... all pots and pans out of the reach of children. Correct usage ~ Only use . This appliance conforms to reach these operating instructions in use the cooktop for residential cooking, and for a future user. IMPORTANT SAFETY INSTRUCTIONS WARNING- Children ~ Children should be left unattended in an area where the appliance is disposed...
Operating and Installation manual
Page 4
... persons could be replaced by a qualified electrician. ~ Before installation, make sure that the voltage and frequency listed on a broken cooktop. Extension cords do not ensure the required safety of the appliance. ~ Install the appliance so that this appliance, continuity must be...appliance until it has been repaired. Work by a qualified technician. ~ Before installing the cooktop, check for externally visible damage. If there is any portion of electric shock. Contact Miele's Technical Service Department. ~ Under no circumstances open the outer casing of the house checked ...
... persons could be replaced by a qualified electrician. ~ Before installation, make sure that the voltage and frequency listed on a broken cooktop. Extension cords do not ensure the required safety of the appliance. ~ Install the appliance so that this appliance, continuity must be...appliance until it has been repaired. Work by a qualified technician. ~ Before installing the cooktop, check for externally visible damage. If there is any portion of electric shock. Contact Miele's Technical Service Department. ~ Under no circumstances open the outer casing of the house checked ...

Operating and Installation manual
Page 5
... remain hot enough to heat a room. IMPORTANT SAFETY INSTRUCTIONS Safety ~ DO NOT TOUCH THE COOKING AREA OR THE VICINITY AROUND THE COOKING AREA - When the cooktop is shut off after use, do not touch or let clothing or other flammable materials contact the cooking area or the vicinity around the cooking...
... remain hot enough to heat a room. IMPORTANT SAFETY INSTRUCTIONS Safety ~ DO NOT TOUCH THE COOKING AREA OR THE VICINITY AROUND THE COOKING AREA - When the cooktop is shut off after use, do not touch or let clothing or other flammable materials contact the cooking area or the vicinity around the cooking...
Operating and Installation manual
Page 6
... steam burns. ~ Do not let flammable materials, i.e. Steam could penetrate electrical components and cause a short circuit. ~ Do not allow the cooktop to cover the heating element. Never heat an empty pan unless the pan manufacturer states that you can do not use a steam cleaner to cool...burners when they can cause scratches. Even lightweight objects may occur. 6 Grains of plastic or foil to a hot surface. ~ Keep the cooktop clean. Fire hazard. ~ To prevent burns and breathing difficulty, allow either solid or liquid sugar, pieces of salt and sand can be careful...
... steam burns. ~ Do not let flammable materials, i.e. Steam could penetrate electrical components and cause a short circuit. ~ Do not allow the cooktop to cover the heating element. Never heat an empty pan unless the pan manufacturer states that you can do not use a steam cleaner to cool...burners when they can cause scratches. Even lightweight objects may occur. 6 Grains of plastic or foil to a hot surface. ~ Keep the cooktop clean. Fire hazard. ~ To prevent burns and breathing difficulty, allow either solid or liquid sugar, pieces of salt and sand can be careful...
Operating and Installation manual
Page 7
...be removed as quickly as possible to prevent them from burning on and becoming difficult to comply can damage the underlying electronics. ~ If the cooktop built in the "Residual Heat" indicator area. Close the door only when the appliance is shut off and the Residual Heat indicators have .... IMPORTANT SAFETY INSTRUCTIONS ~ Any spills should only be operated with aluminum base can cause shiny metallic spots. This can result in a damaged cooktop. ~ NEVER set down hot pots or pans in behind a cabinet door, it should be done! SAVE THESE INSTRUCTIONS AND REVIEW THEM PERIODICALLY 7
...be removed as quickly as possible to prevent them from burning on and becoming difficult to comply can damage the underlying electronics. ~ If the cooktop built in the "Residual Heat" indicator area. Close the door only when the appliance is shut off and the Residual Heat indicators have .... IMPORTANT SAFETY INSTRUCTIONS ~ Any spills should only be operated with aluminum base can cause shiny metallic spots. This can result in a damaged cooktop. ~ NEVER set down hot pots or pans in behind a cabinet door, it should be done! SAVE THESE INSTRUCTIONS AND REVIEW THEM PERIODICALLY 7
Operating and Installation manual
Page 8
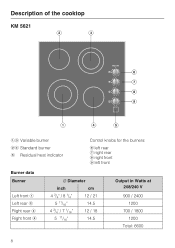
Description of the cooktop KM 5621 ac Variable burner bd Standard burner e Residual heat indicator Control knobs for the burners: f left rear g right rear h right front i left front Burner data Burner Left front a Left rear b Right rear c Right front d C Diameter inch cm 4 3/4" / 8 1/4" 5 11/16" 4 3/4" / 7 1/16" 5 11/16" 12 / 21 14.5 12 / 18 14.5 Output in Watts at 208/240 V 900 / 2400 1200 700 / 1800 1200 Total: 6600 8
Description of the cooktop KM 5621 ac Variable burner bd Standard burner e Residual heat indicator Control knobs for the burners: f left rear g right rear h right front i left front Burner data Burner Left front a Left rear b Right rear c Right front d C Diameter inch cm 4 3/4" / 8 1/4" 5 11/16" 4 3/4" / 7 1/16" 5 11/16" 12 / 21 14.5 12 / 18 14.5 Output in Watts at 208/240 V 900 / 2400 1200 700 / 1800 1200 Total: 6600 8

Operating and Installation manual
Page 9
KM 5624 Description of the cooktop ac Variable burner bd Standard burner e Residual heat indicator Control knobs for the burners: f left rear g right rear h right front i left front Burner data Burner Left front a Left rear b Right rear c Right front d C Diameter inch cm 7 1/16" / 9 1/16" 5 11/16" 4 3/4" / 7 1/16" 4 3/4" / 7 1/16" 18 / 23 14.5 12 / 18 12 / 18 Output in Watts at 208/240V 1600 / 2500 1200 700 / 1800 700 / 1800 Total: 7300 9
KM 5624 Description of the cooktop ac Variable burner bd Standard burner e Residual heat indicator Control knobs for the burners: f left rear g right rear h right front i left front Burner data Burner Left front a Left rear b Right rear c Right front d C Diameter inch cm 7 1/16" / 9 1/16" 5 11/16" 4 3/4" / 7 1/16" 4 3/4" / 7 1/16" 18 / 23 14.5 12 / 18 12 / 18 Output in Watts at 208/240V 1600 / 2500 1200 700 / 1800 700 / 1800 Total: 7300 9
Operating and Installation manual
Page 10
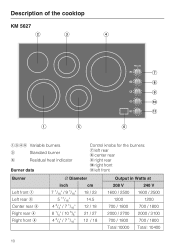
Description of the cooktop KM 5627 acde Variable burners b Standard burner f Residual heat indicator Burner data Control knobs for the burners: g left rear h center rear i right rear j right front k left ...
Description of the cooktop KM 5627 acde Variable burners b Standard burner f Residual heat indicator Burner data Control knobs for the burners: g left rear h center rear i right rear j right front k left ...

Operating and Installation manual
Page 11
... electrical safety of your appliance is heated. Despite this may give off a slight odor the first time the appliance is always ensured. Heat the cooktop Only for the first time, clean the appliance with a damp cloth and dry with a soft cloth. It will dissipate after a short time ...and does not indicate a faulty connection or appliance defect. 11 Before using for the first time Clean the cooktop ^ Before using for facet cooktops: A small gap between the cooktop and the work surface may be visible in the first days of the appliance have a protective coating which may cause...
... electrical safety of your appliance is heated. Despite this may give off a slight odor the first time the appliance is always ensured. Heat the cooktop Only for the first time, clean the appliance with a damp cloth and dry with a soft cloth. It will dissipate after a short time ...and does not indicate a faulty connection or appliance defect. 11 Before using for the first time Clean the cooktop ^ Before using for facet cooktops: A small gap between the cooktop and the work surface may be visible in the first days of the appliance have a protective coating which may cause...

Operating and Installation manual
Page 14
The residual heat indicator will go out. Operation Residual heat indicator After turning on . Danger of burns! 14 Do not touch the burner or rest any objects on the cooktop when the residual heat indicator is on a burner, for example the left front, a specified temperature is safe to the touch. After turning off the burner, the residual heat indicator will turn off once the cooking zone is reached, the associated residual heat indicator lights up.
The residual heat indicator will go out. Operation Residual heat indicator After turning on . Danger of burns! 14 Do not touch the burner or rest any objects on the cooktop when the residual heat indicator is on a burner, for example the left front, a specified temperature is safe to the touch. After turning off the burner, the residual heat indicator will turn off once the cooking zone is reached, the associated residual heat indicator lights up.

Operating and Installation manual
Page 15
...water when cooking and take care to remove and may mar the appearance of the pots/pans should not be removed using a non-abrasive ceramic cooktop cleaner or a shielded scraper blade. For the most possible heat. These melt at high temperatures. - Use only pots and pans with thick... before cleaning. - The residual heat will not cook well. Copper bottom and aluminum pans may scratch the cooktop surface. - This is plastic or aluminum foil cookware. Let the cooktop cool before the total cooking time is allowed to melt it . open closed while cooking. In this residue...
...water when cooking and take care to remove and may mar the appearance of the pots/pans should not be removed using a non-abrasive ceramic cooktop cleaner or a shielded scraper blade. For the most possible heat. These melt at high temperatures. - Use only pots and pans with thick... before cleaning. - The residual heat will not cook well. Copper bottom and aluminum pans may scratch the cooktop surface. - This is plastic or aluminum foil cookware. Let the cooktop cool before the total cooking time is allowed to melt it . open closed while cooking. In this residue...

Operating and Installation manual
Page 17
... each use any spills immediately before cleaning. Stubborn soiling is best removed with a shielded scraper blade. ^ Apply a ceramic cleaner (available from Miele) using a soft cloth or paper towel. ^ To remove any soiling using a soft cloth or use a shielded scraper blade if necessary. ...penetrate electrical components and cause a short circuit. Steam could cause permanent damage to prevent a build up of burns! ^ Allow the cooktop to cool before they are clean and dry. Follow the manufacturer's instructions. After cleaning dry the ceramic surface with a damp cloth and...
... each use any spills immediately before cleaning. Stubborn soiling is best removed with a shielded scraper blade. ^ Apply a ceramic cleaner (available from Miele) using a soft cloth or paper towel. ^ To remove any soiling using a soft cloth or use a shielded scraper blade if necessary. ...penetrate electrical components and cause a short circuit. Steam could cause permanent damage to prevent a build up of burns! ^ Allow the cooktop to cool before they are clean and dry. Follow the manufacturer's instructions. After cleaning dry the ceramic surface with a damp cloth and...
Operating and Installation manual
Page 22
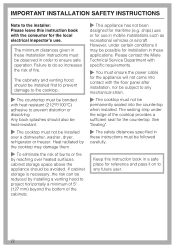
Heat radiated by the cooktop may be observed in these Installation Instructions must not be bonded with the floor panel after installation, nor be subject to any future user. 22 Please contact the Miele Technical Service Department with specific requirements. ~ You must ensure the ... dryer, refrigerator or freezer. The minimum distances given in mobile installations such as recreational vehicles or aircraft. Failure to the cooktop. ~ The countertop must be installed over heated surfaces cabinet storage space above the appliance should be installed first to prevent ...
Heat radiated by the cooktop may be observed in these Installation Instructions must not be bonded with the floor panel after installation, nor be subject to any future user. 22 Please contact the Miele Technical Service Department with specific requirements. ~ You must ensure the ... dryer, refrigerator or freezer. The minimum distances given in mobile installations such as recreational vehicles or aircraft. Failure to the cooktop. ~ The countertop must be installed over heated surfaces cabinet storage space above the appliance should be installed first to prevent ...

Operating and Installation manual
Page 23
... surface and the upper edge of the divider must be at least 1 3/8"" (35 mm) must be maintained. wok burner and electric cooktop), and they have different minimum safety distances, always observe the greater distance. 23 IMPORTANT INSTALLATION SAFETY INSTRUCTIONS Safety distance from divider Installation of... a divider under the cooktop, the distance between the rear edge of the divider and the rear wall of the cabinet so that the power cord can...
... surface and the upper edge of the divider must be at least 1 3/8"" (35 mm) must be maintained. wok burner and electric cooktop), and they have different minimum safety distances, always observe the greater distance. 23 IMPORTANT INSTALLATION SAFETY INSTRUCTIONS Safety distance from divider Installation of... a divider under the cooktop, the distance between the rear edge of the divider and the rear wall of the cabinet so that the power cord can...

Operating and Installation manual
Page 25
...safety distance e between the countertop cut -out and the wall covering must be 2" (50 mm) minus the thickness of the covering. Cooktops flush with non-flammable materials 2" (50 mm) minus x 25 If the covering is installed, a minimum safety distance must be maintained between... the countertop cut -out e Minimum safety distance with flammable materials 2" (50 mm) with the countertop Frame/Facet cooktops a Wall frame b Wall covering x = thickness of the wall covering c Countertop d Countertop cut -out and the covering, since high temperatures can...
...safety distance e between the countertop cut -out and the wall covering must be 2" (50 mm) minus the thickness of the covering. Cooktops flush with non-flammable materials 2" (50 mm) minus x 25 If the covering is installed, a minimum safety distance must be maintained between... the countertop cut -out e Minimum safety distance with flammable materials 2" (50 mm) with the countertop Frame/Facet cooktops a Wall frame b Wall covering x = thickness of the wall covering c Countertop d Countertop cut -out and the covering, since high temperatures can...

Operating and Installation manual
Page 26
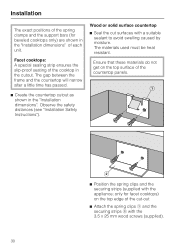
... when installed. The grouting a and shaded area under the edge of the appliance can provide an adequate seal against the countertop. 26 Installation Frame/Facet Cooktops Sealing Tiled surfaces The appliance must be removed for the countertop.
... when installed. The grouting a and shaded area under the edge of the appliance can provide an adequate seal against the countertop. 26 Installation Frame/Facet Cooktops Sealing Tiled surfaces The appliance must be removed for the countertop.
Operating and Installation manual
Page 30
... exact positions of the spring clamps and the support bars (for facet cooktops) on the top surface of the cooktop in the "Installation dimensions". The materials used must be heat resistant. only for beveled cooktops only) are shown in the "Installation dimensions" of the cut surfaces... with the appliance; Observe the safety distances (see "Installation Safety Instructions"). Facet cooktops: A special sealing strip ensures the slip-proof seating of the countertop panels. ^ Position the spring clips and the securing strips (...
... exact positions of the spring clamps and the support bars (for facet cooktops) on the top surface of the cooktop in the "Installation dimensions". The materials used must be heat resistant. only for beveled cooktops only) are shown in the "Installation dimensions" of the cut surfaces... with the appliance; Observe the safety distances (see "Installation Safety Instructions"). Facet cooktops: A special sealing strip ensures the slip-proof seating of the countertop panels. ^ Position the spring clips and the securing strips (...

Operating and Installation manual
Page 31
Installation ^ Coat the lateral edges and the lower edge of the spring clips and securing strips with the top edge of the cooktop. 31 Granite countertop Strong double-sided adhesive tape and silicon are required for facet cooktops only) The spring clips and the securing strips must be on or flush with silicon. ^ Using adhesive tape c attach the spring clips and the securing strips (for installation (not included).
Installation ^ Coat the lateral edges and the lower edge of the spring clips and securing strips with the top edge of the cooktop. 31 Granite countertop Strong double-sided adhesive tape and silicon are required for facet cooktops only) The spring clips and the securing strips must be on or flush with silicon. ^ Using adhesive tape c attach the spring clips and the securing strips (for installation (not included).