
Operating and Installation manual
Page 1
US, CA M.-Nr. 07 844 520 Operating and Installation Instructions Ceramic Cooktop KM 5621 KM 5624 KM 5627 To prevent accidents and appliance damage, read these instructions before installation or use. en -
US, CA M.-Nr. 07 844 520 Operating and Installation Instructions Ceramic Cooktop KM 5621 KM 5624 KM 5627 To prevent accidents and appliance damage, read these instructions before installation or use. en -
Operating and Installation manual
Page 2
... 11 Clean the cooktop 11 Heat the cooktop 11 How the burners operate 12 Operation 13 Turning on 13 Turning on the second heating ring 13 Turning off 13 Residual heat indicator 14 Selecting cookware 15 Overheat protection 16 Cleaning and Care 17 Frequently asked questions 18 Technical Service 19 IMPORTANT INSTALLATION SAFETY INSTRUCTIONS 22 Installation 25 Sealing 26 Tiled surfaces 26 Installation dimensions 27 KM 5621 27 KM 5624 28 KM 5627 29 Installation 30 Electrical connection...
... 11 Clean the cooktop 11 Heat the cooktop 11 How the burners operate 12 Operation 13 Turning on 13 Turning on the second heating ring 13 Turning off 13 Residual heat indicator 14 Selecting cookware 15 Overheat protection 16 Cleaning and Care 17 Frequently asked questions 18 Technical Service 19 IMPORTANT INSTALLATION SAFETY INSTRUCTIONS 22 Installation 25 Sealing 26 Tiled surfaces 26 Installation dimensions 27 KM 5621 27 KM 5624 28 KM 5627 29 Installation 30 Electrical connection...
Operating and Installation manual
Page 3
... to children in this manual. When using your appliance follow basic precautions, including the following: Read all instructions before installation or use and remains so for a future user. SAVE THESE INSTRUCTIONS for some time after being switched off. Correct usage ~ Only use it without supervision or instruction by a responsible person. Danger of burning or scalding. ~ Pot and pan handles should be...
... to children in this manual. When using your appliance follow basic precautions, including the following: Read all instructions before installation or use and remains so for a future user. SAVE THESE INSTRUCTIONS for some time after being switched off. Correct usage ~ Only use it without supervision or instruction by a responsible person. Danger of burning or scalding. ~ Pot and pan handles should be...
Operating and Installation manual
Page 4
... with the household electrical supply. Ensure power is properly installed and grounded by a qualified technician. ~ Before installing the cooktop, check for externally visible damage. Do not use the appliance until repair work should be replaced by Miele original spare parts only. If there is completed. ~ Defective components should be performed by a Miele authorized service technician. Extension cords do not ensure the required safety of...
... with the household electrical supply. Ensure power is properly installed and grounded by a qualified technician. ~ Before installing the cooktop, check for externally visible damage. Do not use the appliance until repair work should be replaced by Miele original spare parts only. If there is completed. ~ Defective components should be performed by a Miele authorized service technician. Extension cords do not ensure the required safety of...

Operating and Installation manual
Page 5
... if the appliance is residual heat, a fire could be drawn up pressure may present a fire hazard. ~ Never leave an appliance unattended at high settings or when cooking with oil or fat. Always switch the cooking zone(s) off , the surface may ignite. ~ Never use . ~ Never cover the burner with oven mitts or potholders when using the appliance. During and after use the appliance to touch. ~ Protect...
... if the appliance is residual heat, a fire could be drawn up pressure may present a fire hazard. ~ Never leave an appliance unattended at high settings or when cooking with oil or fat. Always switch the cooking zone(s) off , the surface may ignite. ~ Never use . ~ Never cover the burner with oven mitts or potholders when using the appliance. During and after use the appliance to touch. ~ Protect...
Operating and Installation manual
Page 6
..., high output settings, large cook ware, and number of burners in ignition of any pots and pans are clean, free of clothing or handles becoming hot. Never heat an empty pan unless the pan manufacturer states that they are allowed to clean this appliance. If these residues are hot. Grains of the cable could scratch the cooktop permanently. Some cleaners may cause damage. ~ Use the proper pan size. Fire...
..., high output settings, large cook ware, and number of burners in ignition of any pots and pans are clean, free of clothing or handles becoming hot. Never heat an empty pan unless the pan manufacturer states that they are allowed to clean this appliance. If these residues are hot. Grains of the cable could scratch the cooktop permanently. Some cleaners may cause damage. ~ Use the proper pan size. Fire...
Operating and Installation manual
Page 7
... in a damaged cooktop. ~ NEVER set down hot pots or pans in behind a cabinet door, it should be removed as quickly as possible to prevent them from burning on and becoming difficult to comply can damage the underlying electronics. ~ If the cooktop built in the "Residual Heat" indicator area. Failure to remove. ~ Aluminum cookware or cookware with ceramic glass or stainless steel cleaner (see "Cleaning and Care"). ~ Never heat up an...
... in a damaged cooktop. ~ NEVER set down hot pots or pans in behind a cabinet door, it should be removed as quickly as possible to prevent them from burning on and becoming difficult to comply can damage the underlying electronics. ~ If the cooktop built in the "Residual Heat" indicator area. Failure to remove. ~ Aluminum cookware or cookware with ceramic glass or stainless steel cleaner (see "Cleaning and Care"). ~ Never heat up an...
Operating and Installation manual
Page 12
When a power level is set, the heat element turns on the model, the heating strips may be separated by a ring. Depending on and the heating strip is electronically regulated. a Overheat protection b Heating strip The power setting determines how hot the burner will switch on and off as needed to prevent the ceramic glass from overheating (see "Overheat protection"). How the burners operate One-zone burners use one heating strip; One-zone burner Each burner has...
When a power level is set, the heat element turns on the model, the heating strips may be separated by a ring. Depending on and the heating strip is electronically regulated. a Overheat protection b Heating strip The power setting determines how hot the burner will switch on and off as needed to prevent the ceramic glass from overheating (see "Overheat protection"). How the burners operate One-zone burners use one heating strip; One-zone burner Each burner has...

Operating and Installation manual
Page 15
... poor heat transfer and may scratch the cooktop surface. - Use cookware with thick, flat, smooth bottoms. Slightly concave bottoms will continue to 10 minutes before cleaning. - cold hot - Cast iron, glass or stoneware should match the diameter of the pots/pans should not be removed using a non-abrasive ceramic cooktop cleaner or a shielded scraper blade. A small pot on a small burner needs less energy then a larger partly...
... poor heat transfer and may scratch the cooktop surface. - Use cookware with thick, flat, smooth bottoms. Slightly concave bottoms will continue to 10 minutes before cleaning. - cold hot - Cast iron, glass or stoneware should match the diameter of the pots/pans should not be removed using a non-abrasive ceramic cooktop cleaner or a shielded scraper blade. A small pot on a small burner needs less energy then a larger partly...

Operating and Installation manual
Page 17
... the cooktop to remove. The ceramic surface can be removed as quickly as previously described. 17 A cleaner with a soft cloth to prevent water marks and smears on the ceramic surface by carefully wiping the cooktop with a damp cloth. Clean the appliance regularly, preferably after each use abrasive cleaners, caustic (oven) cleaners, dishwasher detergent, scouring pads, steel wool or hard brushes. Ceramic surfaces ^ Wipe off the burner while...
... the cooktop to remove. The ceramic surface can be removed as quickly as previously described. 17 A cleaner with a soft cloth to prevent water marks and smears on the ceramic surface by carefully wiping the cooktop with a damp cloth. Clean the appliance regularly, preferably after each use abrasive cleaners, caustic (oven) cleaners, dishwasher detergent, scouring pads, steel wool or hard brushes. Ceramic surfaces ^ Wipe off the burner while...
Operating and Installation manual
Page 18
.... the contents do not heat The circuit breaker has up when turned on tripped. Frequently asked questions ,Repairs should be carried out only by the electronic heat output control (see "How the burners operate"). The heating element Power levels 1 to 8: not a turns off during use. The "overheat protection" has triggered. Problem Possible cause Solution Burners do not start cooking. If the problem persists contact Miele. burner was too long...
.... the contents do not heat The circuit breaker has up when turned on tripped. Frequently asked questions ,Repairs should be carried out only by the electronic heat output control (see "How the burners operate"). The heating element Power levels 1 to 8: not a turns off during use. The "overheat protection" has triggered. Problem Possible cause Solution Burners do not start cooking. If the problem persists contact Miele. burner was too long...
Operating and Installation manual
Page 22
... this instruction book with the floor panel after installation, nor be subject to do so increases the risk of the cooktop provides a sufficient seal for maritime (e.g. ships) use or for the appliance will not come into the countertop when installed. The minimum distances given in these applications. The cabinetry and venting hood should be avoided. Please contact the Miele Technical Service Department with specific requirements...
... this instruction book with the floor panel after installation, nor be subject to do so increases the risk of the cooktop provides a sufficient seal for maritime (e.g. ships) use or for the appliance will not come into the countertop when installed. The minimum distances given in these applications. The cabinetry and venting hood should be avoided. Please contact the Miele Technical Service Department with specific requirements...

Operating and Installation manual
Page 23
... the installation instructions of a divider under the cooktop, the distance between the upper edge of the work surface and the upper edge of the divider must be maintained between the rear edge of the divider and the rear wall of the cabinet so that the power cord can be provided between the cooktop and the hood above the appliance The minimum...
... the installation instructions of a divider under the cooktop, the distance between the upper edge of the work surface and the upper edge of the divider must be maintained between the rear edge of the divider and the rear wall of the cabinet so that the power cord can be provided between the cooktop and the hood above the appliance The minimum...

Operating and Installation manual
Page 24
...) minimum distance from the left of the countertop cut -out to the sides of the appliance The appliance should only be installed as shown in the illustrations, while maintaining the required safety distances shown. Do not install the appliance between two tall cabinets, this is a fire hazard. IMPORTANT INSTALLATION SAFETY INSTRUCTIONS Safety distances to the rear edge of countertop or wall.
...) minimum distance from the left of the countertop cut -out to the sides of the appliance The appliance should only be installed as shown in the illustrations, while maintaining the required safety distances shown. Do not install the appliance between two tall cabinets, this is a fire hazard. IMPORTANT INSTALLATION SAFETY INSTRUCTIONS Safety distances to the rear edge of countertop or wall.

Operating and Installation manual
Page 25
...) = minimum safety distance 1 3/8" (35 mm). Cooktops flush with non-flammable materials 2" (50 mm) minus x 25 For coverings made of a combustible material (such as metal, marble, granite or ceramic tiles) the minimum safety distance e between the countertop cut -out e Minimum safety distance with flammable materials 2" (50 mm) with the countertop Frame/Facet cooktops a Wall frame b Wall covering x = thickness of the wall covering c Countertop d Countertop cut -out and the covering, since high temperatures...
...) = minimum safety distance 1 3/8" (35 mm). Cooktops flush with non-flammable materials 2" (50 mm) minus x 25 For coverings made of a combustible material (such as metal, marble, granite or ceramic tiles) the minimum safety distance e between the countertop cut -out e Minimum safety distance with flammable materials 2" (50 mm) with the countertop Frame/Facet cooktops a Wall frame b Wall covering x = thickness of the wall covering c Countertop d Countertop cut -out and the covering, since high temperatures...

Operating and Installation manual
Page 26
... could be damaged if it needs to be permanently sealed into the countertop when installed. Installation Frame/Facet Cooktops Sealing Tiled surfaces The appliance must be flat and even so that the frame will lie evenly and the sealing strip under the edge of the upper part of the appliance provides a sufficient seal for maintenance or service. The grouting a and shaded area...
... could be damaged if it needs to be permanently sealed into the countertop when installed. Installation Frame/Facet Cooktops Sealing Tiled surfaces The appliance must be flat and even so that the frame will lie evenly and the sealing strip under the edge of the upper part of the appliance provides a sufficient seal for maintenance or service. The grouting a and shaded area...
Operating and Installation manual
Page 27
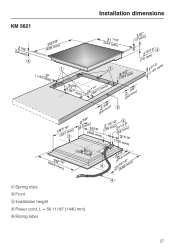
Installation dimensions KM 5621 2 (54 1/8" mm) c (622465m/8m" ) a ( 0 50 m2m" ) 0 (54241m7m/1)6" (17/m4"m) (7521m5m/1)6"c a 3/R146"mm (103/3106"mm) (512803+-/18m" m) 5/16" 22 (567 +- 1mm) (2603m/8m" ) (6203m/8m" ) b 19(459/116bm" m) 5/8" 2 (67 mm1) 61/8" (409 mm) 2(7515m/1m6")2(6181c/m16m") (10031m5m/16)" (50920m1m/16)" (208 8m3m/1)6" e 29(1251(4/55845"/1m86mm" )m) d a Spring clips b Front c Installation height d Power cord, L = 56 11/16" (1440 mm) e Rating label 27
Installation dimensions KM 5621 2 (54 1/8" mm) c (622465m/8m" ) a ( 0 50 m2m" ) 0 (54241m7m/1)6" (17/m4"m) (7521m5m/1)6"c a 3/R146"mm (103/3106"mm) (512803+-/18m" m) 5/16" 22 (567 +- 1mm) (2603m/8m" ) (6203m/8m" ) b 19(459/116bm" m) 5/8" 2 (67 mm1) 61/8" (409 mm) 2(7515m/1m6")2(6181c/m16m") (10031m5m/16)" (50920m1m/16)" (208 8m3m/1)6" e 29(1251(4/55845"/1m86mm" )m) d a Spring clips b Front c Installation height d Power cord, L = 56 11/16" (1440 mm) e Rating label 27
Operating and Installation manual
Page 30
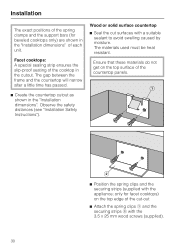
...The materials used must be heat resistant. Ensure that these materials do not get on the top edge of the cut surfaces with the appliance; Facet cooktops: A special sealing strip ensures the slip-proof seating of the cooktop in the "Installation dimensions" of the countertop panels. ^ Position... only for beveled cooktops only) are shown in the cutout. The gap between the frame and the countertop will narrow after a little time has passed. ^ Create the countertop cutout as shown in the "Installation dimensions". Observe the safety distances (see "Installation Safety Instructions").
...The materials used must be heat resistant. Ensure that these materials do not get on the top edge of the cut surfaces with the appliance; Facet cooktops: A special sealing strip ensures the slip-proof seating of the cooktop in the "Installation dimensions" of the countertop panels. ^ Position... only for beveled cooktops only) are shown in the cutout. The gap between the frame and the countertop will narrow after a little time has passed. ^ Create the countertop cutout as shown in the "Installation dimensions". Observe the safety distances (see "Installation Safety Instructions").

Operating and Installation manual
Page 32
... clicks into the countertop. This is sealed correctly. Installation Insert the cooktop ^ Feed the power cord down through the cut-out. ^ Place the cooktop lightly on the spring clips. ^ With a hand on each side of the appliance press down to fit. ^ Connect the appliance to the main power supply (see "Electrical connection"). ^ Turn the appliance on and check the function. The appliance may be carefully...
... clicks into the countertop. This is sealed correctly. Installation Insert the cooktop ^ Feed the power cord down through the cut-out. ^ Place the cooktop lightly on the spring clips. ^ With a hand on each side of the appliance press down to fit. ^ Connect the appliance to the main power supply (see "Electrical connection"). ^ Turn the appliance on and check the function. The appliance may be carefully...
Operating and Installation manual
Page 33
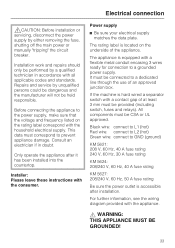
... GND (ground) KM 5621: 208 V, 60 Hz, 40 A fuse rating 240 V, 60 Hz, 30 A fuse rating KM 5624: 208/240 V, 60 Hz, 40 A fuse rating KM 5627: 208/240 V, 60 Hz, 50 A fuse rating Be sure the power outlet is hard wired a separator switch with the consumer. Repairs and service by either removing the fuse, shutting off the main power or manually "tripping" the circuit breaker. Electrical connection ,CAUTION: Before installation or servicing, disconnect the power supply by unqualified...
... GND (ground) KM 5621: 208 V, 60 Hz, 40 A fuse rating 240 V, 60 Hz, 30 A fuse rating KM 5624: 208/240 V, 60 Hz, 40 A fuse rating KM 5627: 208/240 V, 60 Hz, 50 A fuse rating Be sure the power outlet is hard wired a separator switch with the consumer. Repairs and service by either removing the fuse, shutting off the main power or manually "tripping" the circuit breaker. Electrical connection ,CAUTION: Before installation or servicing, disconnect the power supply by unqualified...


