Operating manual
Page 1
Operating Instructions Ceramic Cooktop KM 421 KM 424 KM 427 To prevent accidents and machine damage, read the Operating Manual before installation or use. en - US, CA M.-Nr. 05 647 560
Operating Instructions Ceramic Cooktop KM 421 KM 424 KM 427 To prevent accidents and machine damage, read the Operating Manual before installation or use. en - US, CA M.-Nr. 05 647 560
Operating manual
Page 2
Contents IMPORTANT SAFETY INSTRUCTIONS 3 Help protect our environment 9 Guide to the cooktop 10 KM 421 10 KM 424 11 KM 427 12 Before using for the first time 13 Clean the cooktop 13 Heat the cooktop 13 Use 14 Turning on and off 14 Operating / Residual heat indicator 14 Settings 15 Overheating protection 16 Selecting cookware 17 The cooking surface 17 Cleaning and Care 19 Frequently asked questions 20 Technical Service 21 2
Contents IMPORTANT SAFETY INSTRUCTIONS 3 Help protect our environment 9 Guide to the cooktop 10 KM 421 10 KM 424 11 KM 427 12 Before using for the first time 13 Clean the cooktop 13 Heat the cooktop 13 Use 14 Turning on and off 14 Operating / Residual heat indicator 14 Settings 15 Overheating protection 16 Selecting cookware 17 The cooking surface 17 Cleaning and Care 19 Frequently asked questions 20 Technical Service 21 2

Operating manual
Page 3
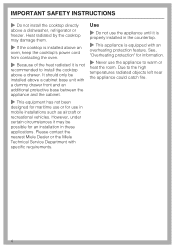
...for which this basic safety requirement is properly installed and grounded by either shutting off the power main or manually "tripping" the circuit breaker. 3 It is imperative ...regulations. When using an extension cord. This appliance is intended. The manufacturer cannot be held responsible for residential cooking. IMPORTANT SAFETY INSTRUCTIONS READ THE OPERATING INSTRUCTIONS CAREFULLY BEFORE USING THE COOKTOP WARNING - Extension cords do not meet the safety requirements of , an effective grounding system. ~ Do not connect the appliance to the main electrical supply using...
...for which this basic safety requirement is properly installed and grounded by either shutting off the power main or manually "tripping" the circuit breaker. 3 It is imperative ...regulations. When using an extension cord. This appliance is intended. The manufacturer cannot be held responsible for residential cooking. IMPORTANT SAFETY INSTRUCTIONS READ THE OPERATING INSTRUCTIONS CAREFULLY BEFORE USING THE COOKTOP WARNING - Extension cords do not meet the safety requirements of , an effective grounding system. ~ Do not connect the appliance to the main electrical supply using...
Operating manual
Page 4
... fire. 4 Due to install the cooktop above an oven, keep the cooktop's power cord from contacting the oven. ~ Because of the heat radiated it is properly installed in the countertop. ~ This appliance is equipped with an overheating protection feature. Please contact the nearest Miele Dealer or the Miele Technical Service Department with specific requirements. IMPORTANT SAFETY INSTRUCTIONS ~ Do not install the cooktop directly above a cabinet base unit with a dummy drawer...
... fire. 4 Due to install the cooktop above an oven, keep the cooktop's power cord from contacting the oven. ~ Because of the heat radiated it is properly installed in the countertop. ~ This appliance is equipped with an overheating protection feature. Please contact the nearest Miele Dealer or the Miele Technical Service Department with specific requirements. IMPORTANT SAFETY INSTRUCTIONS ~ Do not install the cooktop directly above a cabinet base unit with a dummy drawer...
Operating manual
Page 5
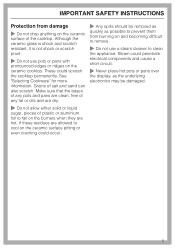
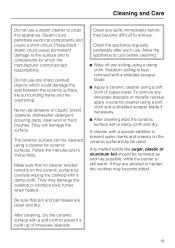
... ceramic cooktop. These could penetrate electrical components and cause a short circuit. ~ Never place hot pots or pans over the display, as possible to cool on the ceramic surface pitting or even cracking could occur. ~ Any spills should be removed as quickly as the underlying electronics may be damaged. 5 Grains of the cooktop. Make sure that the bases of any pots and pans are clean, free...
... ceramic cooktop. These could penetrate electrical components and cause a short circuit. ~ Never place hot pots or pans over the display, as possible to cool on the ceramic surface pitting or even cracking could occur. ~ Any spills should be removed as quickly as the underlying electronics may be damaged. 5 Grains of the cooktop. Make sure that the bases of any pots and pans are clean, free...

Operating manual
Page 6
... potholder touch the hot heating element. Wait until they can result in color. The proper size pot or pan will expose a portion of clothing or handles becoming hot. They should be turned inward and not extend over liquids, which may cause the container to reduce the risk of burns, ignition of children. Do not use . Build-up pressure may produce...
... potholder touch the hot heating element. Wait until they can result in color. The proper size pot or pan will expose a portion of clothing or handles becoming hot. They should be turned inward and not extend over liquids, which may cause the container to reduce the risk of burns, ignition of children. Do not use . Build-up pressure may produce...
Operating manual
Page 7
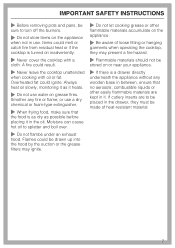
...cooktop unattended when cooking with a cloth. Always heat oil slowly, monitoring it as possible before placing it . Moisture can cause hot oil to splatter and boil over. ~ Do not flambé under an exhaust hood. Flames could melt or catch fire from residual heat or if the cooktop is turned... Smother any fire or flame, or use . IMPORTANT SAFETY INSTRUCTIONS ~ Before removing pots and pans, be sure to turn off the burners. ~ Do not store items on grease fires. A fire could ignite. Items could be drawn up into the hood by the suction or the grease filters may present a fire ...
...cooktop unattended when cooking with a cloth. Always heat oil slowly, monitoring it as possible before placing it . Moisture can cause hot oil to splatter and boil over. ~ Do not flambé under an exhaust hood. Flames could melt or catch fire from residual heat or if the cooktop is turned... Smother any fire or flame, or use . IMPORTANT SAFETY INSTRUCTIONS ~ Before removing pots and pans, be sure to turn off the burners. ~ Do not store items on grease fires. A fire could ignite. Items could be drawn up into the hood by the suction or the grease filters may present a fire ...
Operating manual
Page 8
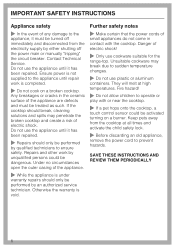
... cooktop. Otherwise the warranty is completed. ~ Do not cook on a burner. They will melt at all times and activate the child safety lock. ~ Before discarding an old appliance, remove the power cord to prevent hazards. SAVE THESE INSTRUCTIONS AND REVIEW THEM PERIODICALLY 8 Repairs and other work is void. Danger of electric shock! ~ Only use plastic or aluminum containers. Contact Technical Service. If the cooktop should break, cleaning...
... cooktop. Otherwise the warranty is completed. ~ Do not cook on a burner. They will melt at all times and activate the child safety lock. ~ Before discarding an old appliance, remove the power cord to prevent hazards. SAVE THESE INSTRUCTIONS AND REVIEW THEM PERIODICALLY 8 Repairs and other work is void. Danger of electric shock! ~ Only use plastic or aluminum containers. Contact Technical Service. If the cooktop should break, cleaning...
Operating manual
Page 15
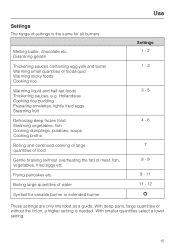
... omelettes, lightly fried eggs Steaming fruit Defrosting deep frozen food Steaming vegetables, fish Cooking dumplings, potatoes, soups Cooking broths Boiling and continued cooking of large quantities of food Gentle braising (without the lid on, a higher setting is the same for variable burner or extended burner Settings 1-2 1-3 3-5 4-6 7 8-9 9 - 11 11 - 12 n These settings are only intended as a guide. Use Settings The range of settings is needed. Frying...
... omelettes, lightly fried eggs Steaming fruit Defrosting deep frozen food Steaming vegetables, fish Cooking dumplings, potatoes, soups Cooking broths Boiling and continued cooking of large quantities of food Gentle braising (without the lid on, a higher setting is the same for variable burner or extended burner Settings 1-2 1-3 3-5 4-6 7 8-9 9 - 11 11 - 12 n These settings are only intended as a guide. Use Settings The range of settings is needed. Frying...
Operating manual
Page 19
... ceramic surface may damage the cooktop or produce toxic fumes when heated. Follow the manufacturer's instructions. Any melted solids like sugar, plastic or aluminum foil should be cleaned using a soft cloth or paper towel. Cleaning and Care Do not use a steam cleaner to components for ceramic surfaces. A cleaner with a shielded scraper blade. ^ Apply a ceramic cleaner using a cleaner for which could penetrate electrical components and cause a short circuit...
... ceramic surface may damage the cooktop or produce toxic fumes when heated. Follow the manufacturer's instructions. Any melted solids like sugar, plastic or aluminum foil should be cleaned using a soft cloth or paper towel. Cleaning and Care Do not use a steam cleaner to components for ceramic surfaces. A cleaner with a shielded scraper blade. ^ Apply a ceramic cleaner using a cleaner for which could penetrate electrical components and cause a short circuit...

Operating manual
Page 21
... back of this manual. Please note that your Miele appliance. When contacting Technical Service quote the serial number and model of the cooktop. gives you and/or your appliance dealer or visit us online at: http://miele.com/mielecare 21 Technical Service In the event of a fault which you cannot easily fix yourself, please contact the Miele Technical Service Department using genuine Miele parts.
... back of this manual. Please note that your Miele appliance. When contacting Technical Service quote the serial number and model of the cooktop. gives you and/or your appliance dealer or visit us online at: http://miele.com/mielecare 21 Technical Service In the event of a fault which you cannot easily fix yourself, please contact the Miele Technical Service Department using genuine Miele parts.
Installation manual
Page 2
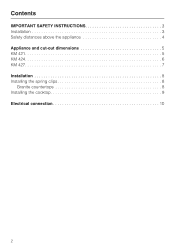
Contents IMPORTANT SAFETY INSTRUCTIONS Installation 3 Safety distances above the appliance 4 Appliance and cut-out dimensions KM 421 5 KM 424 6 KM 427 7 Installation Installing the spring clips 8 Granite countertops 8 Installing the cooktop 9 Electrical connection 2
Contents IMPORTANT SAFETY INSTRUCTIONS Installation 3 Safety distances above the appliance 4 Appliance and cut-out dimensions KM 421 5 KM 424 6 KM 427 7 Installation Installing the spring clips 8 Granite countertops 8 Installing the cooktop 9 Electrical connection 2
Installation manual
Page 3
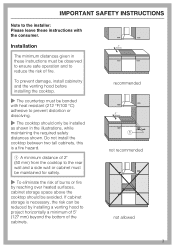
To prevent damage, install cabinetry and the venting hood before installing the cooktop. ~ The countertop must be bonded with the consumer. IMPORTANT SAFETY INSTRUCTIONS Note to prevent distortion or dissolving. ~ The cooktop should be maintained for safety. ~ To eliminate the risk of fire. Installation The minimum distances given in the illustrations, while maintaining the required safety distances shown. If cabinet storage is a fire...
To prevent damage, install cabinetry and the venting hood before installing the cooktop. ~ The countertop must be bonded with the consumer. IMPORTANT SAFETY INSTRUCTIONS Note to prevent distortion or dissolving. ~ The cooktop should be maintained for safety. ~ To eliminate the risk of fire. Installation The minimum distances given in the illustrations, while maintaining the required safety distances shown. If cabinet storage is a fire...
Installation manual
Page 4
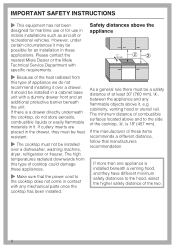
... high temperatures radiated downwards from this type of the cooktop, c, is installed beneath a venting hood, and they must be heat resistant. ~ The cooktop must be possible for use in it over a dishwasher, washing machine, dryer, refrigerator or freezer. If the manufacturer of at least 30" (760 mm), b, between the appliance and any mechanical parts once the cooktop has been installed. IMPORTANT SAFETY INSTRUCTIONS...
... high temperatures radiated downwards from this type of the cooktop, c, is installed beneath a venting hood, and they must be heat resistant. ~ The cooktop must be possible for use in it over a dishwasher, washing machine, dryer, refrigerator or freezer. If the manufacturer of at least 30" (760 mm), b, between the appliance and any mechanical parts once the cooktop has been installed. IMPORTANT SAFETY INSTRUCTIONS...

Installation manual
Page 5
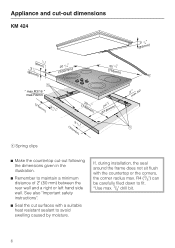
.... 3/8" drill bit. 5 R4 (3/8") can be carefully filed down to avoid swelling caused by moisture. See also "Important safety instructions". ^ Seal the cut -out following the dimensions given in the illustration. ^ Remember to maintain a minimum distance of 2" (50 mm) between the rear wall and a right or left hand side wall. KM 421 Appliance and cut-out dimensions (835m3 8"m) (8m5 1m6") (835m3 8m" ) (2503125...
.... 3/8" drill bit. 5 R4 (3/8") can be carefully filed down to avoid swelling caused by moisture. See also "Important safety instructions". ^ Seal the cut -out following the dimensions given in the illustration. ^ Remember to maintain a minimum distance of 2" (50 mm) between the rear wall and a right or left hand side wall. KM 421 Appliance and cut-out dimensions (835m3 8"m) (8m5 1m6") (835m3 8m" ) (2503125...
Installation manual
Page 6
... safety instructions". ^ Seal the cut -out following the dimensions given in the illustration. ^ Remember to maintain a minimum distance of 2" (50 mm) between the rear wall and a right or left hand side wall. R4 (3/8") can be carefully filed down to avoid swelling caused by moisture. If, during installation, the seal around the frame does not sit flush with a suitable heat resistant sealant...
... safety instructions". ^ Seal the cut -out following the dimensions given in the illustration. ^ Remember to maintain a minimum distance of 2" (50 mm) between the rear wall and a right or left hand side wall. R4 (3/8") can be carefully filed down to avoid swelling caused by moisture. If, during installation, the seal around the frame does not sit flush with a suitable heat resistant sealant...
Installation manual
Page 7
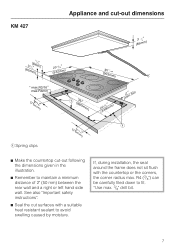
... safety instructions". ^ Seal the cut -out following the dimensions given in the illustration. ^ Remember to maintain a minimum distance of 2" (50 mm) between the rear wall and a right or left hand side wall. R4 (3/8") can be carefully filed down to avoid swelling caused by moisture. If, during installation, the seal around the frame does not sit flush with a suitable heat resistant sealant...
... safety instructions". ^ Seal the cut -out following the dimensions given in the illustration. ^ Remember to maintain a minimum distance of 2" (50 mm) between the rear wall and a right or left hand side wall. R4 (3/8") can be carefully filed down to avoid swelling caused by moisture. If, during installation, the seal around the frame does not sit flush with a suitable heat resistant sealant...
Installation manual
Page 9
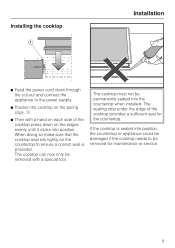
... the cooktop needs to the power supply. ^ Position the cooktop on the spring clips, a. ^ Then with a special tool. The cooktop can now only be removed for the countertop. The sealing strip under the edge of the cooktop press down through the cut-out and connect the appliance to be removed with a hand on each side of the cooktop provides a sufficient seal for maintenance or service...
... the cooktop needs to the power supply. ^ Position the cooktop on the spring clips, a. ^ Then with a special tool. The cooktop can now only be removed for the countertop. The sealing strip under the edge of the cooktop press down through the cut-out and connect the appliance to be removed with a hand on each side of the cooktop provides a sufficient seal for maintenance or service...

Installation manual
Page 10
... the wiring diagram provided with 3 leads; Electrical connection All electrical work should be connected to a dedicated line through the use of electric shock, disconnect the power supply by a qualified electrician in accordance with the consumer. L1 (black), L2 (red) and GND (green). They must be by tripping the circuit breaker or removing the fuse to the unit before installation or service. ^ Note to the installer: Please leave these instructions...
... the wiring diagram provided with 3 leads; Electrical connection All electrical work should be connected to a dedicated line through the use of electric shock, disconnect the power supply by a qualified electrician in accordance with the consumer. L1 (black), L2 (red) and GND (green). They must be by tripping the circuit breaker or removing the fuse to the unit before installation or service. ^ Note to the installer: Please leave these instructions...
KM421 Cooktop
Page 1
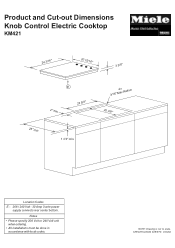
Notes • Please specify 208 Volt or 240 Volt unit when ordering. • All installations must be done in accordance with local codes. SPECIFICATION SHEETS 010402 NOTE: Drawing is not to scale. Product and Cut-out Dimensions Knob Control Electric Cooktop KM421 24 3/16" 20 15/16" 3 3/8" E 2" min 23 5/8" 25" min 1 1/2" min. 3/16" 4 x Max Radius 20 3/8" Location Codes E - 208 / 240 Volt - 30 Amp 3-wire power supply connects rear center bottom.
Notes • Please specify 208 Volt or 240 Volt unit when ordering. • All installations must be done in accordance with local codes. SPECIFICATION SHEETS 010402 NOTE: Drawing is not to scale. Product and Cut-out Dimensions Knob Control Electric Cooktop KM421 24 3/16" 20 15/16" 3 3/8" E 2" min 23 5/8" 25" min 1 1/2" min. 3/16" 4 x Max Radius 20 3/8" Location Codes E - 208 / 240 Volt - 30 Amp 3-wire power supply connects rear center bottom.


