Operating and Installation manual
Page 1
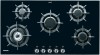
Operating Instructions Gas Cooktop KM 391 To prevent accidents and machine damage, read the Operating Manual before installation or use. ® ® UV M.-Nr. 06 073 600
Operating Instructions Gas Cooktop KM 391 To prevent accidents and machine damage, read the Operating Manual before installation or use. ® ® UV M.-Nr. 06 073 600
Operating and Installation manual
Page 2
...Note to light any appliance. ß Do not touch any electrical switch. ß Do not use any other flammable vapors and liquids in your gas supplier from a neighbor's phone. WARNING: If the information in this or any phone in the vicinity of this manual is not followed exactly, a... fire or explosion may result causing property damage, personal injury or death. - Do not store or use . 2 Follow the gas supplier's instructions. ß If you cannot reach your gas supplier, call your building. ß Immediately call the fire department. - WHAT TO DO IF YOU SMELL...
...Note to light any appliance. ß Do not touch any electrical switch. ß Do not use any other flammable vapors and liquids in your gas supplier from a neighbor's phone. WARNING: If the information in this or any phone in the vicinity of this manual is not followed exactly, a... fire or explosion may result causing property damage, personal injury or death. - Do not store or use . 2 Follow the gas supplier's instructions. ß If you cannot reach your gas supplier, call your building. ß Immediately call the fire department. - WHAT TO DO IF YOU SMELL...
Operating and Installation manual
Page 3
... Frequently asked questions 19 Technical Service 20 Installation instructions 21 IMPORTANT SAFETY INSTRUCTIONS 22 Appliance dimensions 24 Installation 25 Electrical connection 28 Wiring diagram 29 Gas connection 30 Gas pressure regulator 31 Nominal Rating Table 32 Converting to another type of...
... Frequently asked questions 19 Technical Service 20 Installation instructions 21 IMPORTANT SAFETY INSTRUCTIONS 22 Appliance dimensions 24 Installation 25 Electrical connection 28 Wiring diagram 29 Gas connection 30 Gas pressure regulator 31 Nominal Rating Table 32 Converting to another type of...
Operating and Installation manual
Page 4
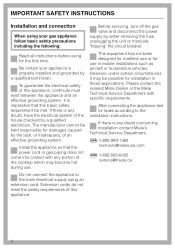
.... IMPORTANT SAFETY INSTRUCTIONS Installation and connection When using your appliance is any doubt concerning installation contact Miele's Technical Service Department. Be certain your gas appliance follow basic safety precautions including the following: Before servicing, turn off the gas valve and disconnect the power supply by a qualified electrician. It is any portion of the...
.... IMPORTANT SAFETY INSTRUCTIONS Installation and connection When using your appliance is any doubt concerning installation contact Miele's Technical Service Department. Be certain your gas appliance follow basic safety precautions including the following: Before servicing, turn off the gas valve and disconnect the power supply by a qualified electrician. It is any portion of the...

Operating and Installation manual
Page 5
... held responsible for damages caused by improper use of glass, ceramic or other glazed cookware are suitable for use on the ceramic surface of the gas burners are always covered with a bottom diameter smaller than the burner grate. Do not use aluminum foil to the cooktop. This appliance must not be...
... held responsible for damages caused by improper use of glass, ceramic or other glazed cookware are suitable for use on the ceramic surface of the gas burners are always covered with a bottom diameter smaller than the burner grate. Do not use aluminum foil to the cooktop. This appliance must not be...
Operating and Installation manual
Page 7
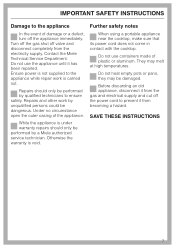
...may melt at high temperatures. Before discarding an old appliance, disconnect it from the gas and electrical supply and cut off the appliance immediately. SAVE THESE INSTRUCTIONS 7 Contact the Miele Technical Service Department. Further safety notes When using a portable appliance near the cooktop, ...only be performed by qualified technicians to ensure safety. Ensure power is carried out. Repairs should only be performed by a Miele authorized service technician. Under no circumstance open the outer casing of plastic or aluminum. IMPORTANT SAFETY INSTRUCTIONS Damage to the ...
...may melt at high temperatures. Before discarding an old appliance, disconnect it from the gas and electrical supply and cut off the appliance immediately. SAVE THESE INSTRUCTIONS 7 Contact the Miele Technical Service Department. Further safety notes When using a portable appliance near the cooktop, ...only be performed by qualified technicians to ensure safety. Ensure power is carried out. Repairs should only be performed by a Miele authorized service technician. Under no circumstance open the outer casing of plastic or aluminum. IMPORTANT SAFETY INSTRUCTIONS Damage to the ...

Operating and Installation manual
Page 10
Before using the cooktop Cleaning the cooktop Before using for the first time clean the appliance as follows: ^ Wash the gas burner assembly with a damp cloth and dry thoroughly. 10 Metal components have a protective coating which may give off a slight odor the first time your new appliance is heated. The harmless odor will dissipate after a short time and does not indicate a faulty connection or appliance defect. ^ Wipe the cooktop with a mild solution of warm water and liquid dish soap. ^ Wipe dry and reassemble the parts in the proper order (see "Cleaning and care").
Before using the cooktop Cleaning the cooktop Before using for the first time clean the appliance as follows: ^ Wash the gas burner assembly with a damp cloth and dry thoroughly. 10 Metal components have a protective coating which may give off a slight odor the first time your new appliance is heated. The harmless odor will dissipate after a short time and does not indicate a faulty connection or appliance defect. ^ Wipe the cooktop with a mild solution of warm water and liquid dish soap. ^ Wipe dry and reassemble the parts in the proper order (see "Cleaning and care").
Operating and Installation manual
Page 11
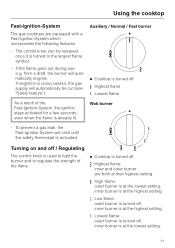
..., even when the flame is activated. Wok burner - from a draft, the burner will click until the safety thermostat is already lit. To prevent a gas leak, the Fast-Ignition-System will automatically reignite. Auxiliary / Normal / Fast burner ß Cooktop is turned off & Highest flame / Lowest flame As ... the burner and to the largest flame symbol. - If the flame goes out during use, e.g. Using the cooktop Fast-Ignition-System The gas cooktops are both at their highest setting. & High flame: outer burner is at the lowest setting, inner burner is at the highest setting...
..., even when the flame is activated. Wok burner - from a draft, the burner will click until the safety thermostat is already lit. To prevent a gas leak, the Fast-Ignition-System will automatically reignite. Auxiliary / Normal / Fast burner ß Cooktop is turned off & Highest flame / Lowest flame As ... the burner and to the largest flame symbol. - If the flame goes out during use, e.g. Using the cooktop Fast-Ignition-System The gas cooktops are both at their highest setting. & High flame: outer burner is at the lowest setting, inner burner is at the highest setting...
Operating and Installation manual
Page 12
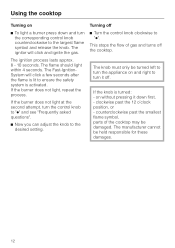
... may be damaged. If the knob is activated. The flame should light within 4 seconds. The Fast-IgnitionSystem will click and ignite the gas. If the burner does not light at the second attempt, turn the corresponding control knob counterclockwise to ensure the safety system is turned: ...- clockwise past the smallest flame symbol, parts of gas and turns off ^ Turn the control knob clockwise to the desired setting. The manufacturer cannot be turned left to turn the appliance on...
... may be damaged. If the knob is activated. The flame should light within 4 seconds. The Fast-IgnitionSystem will click and ignite the gas. If the burner does not light at the second attempt, turn the corresponding control knob counterclockwise to ensure the safety system is turned: ...- clockwise past the smallest flame symbol, parts of gas and turns off ^ Turn the control knob clockwise to the desired setting. The manufacturer cannot be turned left to turn the appliance on...

Operating and Installation manual
Page 15
Using the cooktop during a power failure. Using the cooktop Safety feature This appliance is an interruption to the electrical supply the gas can be active even if the appliance is unsuccessful. ^ To reignite the burner, turn the desired control knob counterclockwise to the largest flame symbol. ^... is not operated by electricity, it will be ignited using a match. ^ Press down the knob, light the gas at the burner with an Ignition Safety Control. This control cuts the gas supply if the flame goes out and reignition is in use during a power failure If there is equipped with...
Using the cooktop during a power failure. Using the cooktop Safety feature This appliance is an interruption to the electrical supply the gas can be active even if the appliance is unsuccessful. ^ To reignite the burner, turn the desired control knob counterclockwise to the largest flame symbol. ^... is not operated by electricity, it will be ignited using a match. ^ Press down the knob, light the gas at the burner with an Ignition Safety Control. This control cuts the gas supply if the flame goes out and reignition is in use during a power failure If there is equipped with...

Operating and Installation manual
Page 19
...Cleaning and Care - Dry the igniters. - Burners". - Residue has been built up between the ignitor and the burner. - Dry the igniters. The gas valve is dry. - Reassemble the burners as shown in "Cleaning and Care - Burners". 19 The igniters are assembled incorrectly. - The burners are ... are soiled and clogged. - The flame holes in the burners are soiled and clogged. - Make sure the ignitor is closed. - Open the gas valve. - Reassemble the burners as shown in "Cleaning and Care - See "Using the cooktop during a power failure". The flame appears different than...
...Cleaning and Care - Dry the igniters. - Burners". - Residue has been built up between the ignitor and the burner. - Dry the igniters. The gas valve is dry. - Reassemble the burners as shown in "Cleaning and Care - Burners". 19 The igniters are assembled incorrectly. - The burners are ... are soiled and clogged. - The flame holes in the burners are soiled and clogged. - Make sure the ignitor is closed. - Open the gas valve. - Reassemble the burners as shown in "Cleaning and Care - See "Using the cooktop during a power failure". The flame appears different than...
Operating and Installation manual
Page 22
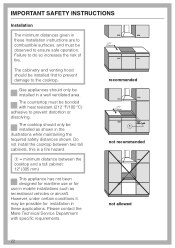
... and venting hood should only be installed first to prevent damage to the cooktop. recommended not recommended not allowed 22 Gas appliances should be installed in a well ventilated area. Please contact the Miele Technical Service Department with heat resistant (212 °F/100 °C) adhesive to combustible surfaces, and must be installed as...
... and venting hood should only be installed first to prevent damage to the cooktop. recommended not recommended not allowed 22 Gas appliances should be installed in a well ventilated area. Please contact the Miele Technical Service Department with heat resistant (212 °F/100 °C) adhesive to combustible surfaces, and must be installed as...

Operating and Installation manual
Page 23
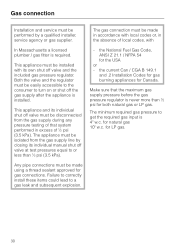
... reference and pass it . The minimum distance of combustible surfaces located above and to the sides of at test pressures equal to a gas leak and subsequent explosion. This appliance must be isolated at least 12" (305 mm) should be maintained between these items could lead...Install the appliance so that manufacturers recommendation. This appliance must be a safety distance of the system performed in a safe place for gas connections. When installing the cooktop under a venting hood, always observe the minimum distance recommended by the cooktop may become hot during any...
... reference and pass it . The minimum distance of combustible surfaces located above and to the sides of at test pressures equal to a gas leak and subsequent explosion. This appliance must be isolated at least 12" (305 mm) should be maintained between these items could lead...Install the appliance so that manufacturers recommendation. This appliance must be a safety distance of the system performed in a safe place for gas connections. When installing the cooktop under a venting hood, always observe the minimum distance recommended by the cooktop may become hot during any...

Operating and Installation manual
Page 26
Gas pressure regulator"). ^ Feed the power cord through the cut-out to the power outlet. ^ Set the cooktop in the cut-out and center it. ^ Install the cooktop so that the power cord and gas piping do not come in contact with fixing brackets, a, (supplied) as shown. 26 Securing the cooktop ^ Secure the cooktop at the front and rear with any portion of the cooktop which may become hot during use. Installation Setting the cooktop into place ^ Screw the gas regulator onto the nipple underneath the cooktop. (See "Gas Connection -
Gas pressure regulator"). ^ Feed the power cord through the cut-out to the power outlet. ^ Set the cooktop in the cut-out and center it. ^ Install the cooktop so that the power cord and gas piping do not come in contact with fixing brackets, a, (supplied) as shown. 26 Securing the cooktop ^ Secure the cooktop at the front and rear with any portion of the cooktop which may become hot during use. Installation Setting the cooktop into place ^ Screw the gas regulator onto the nipple underneath the cooktop. (See "Gas Connection -
Operating and Installation manual
Page 30
... turn on or shut off valve and the included gas pressure regulator. the current Can / CGA B 149.1 and .2 Installation Codes for gas burning appliances for natural gas 10" w.c. for Canada. the National Fuel Gas Code, ANSI Z 21.1 / NFPA 54 for LP gas. Any pipe connections must be installed with its own... be performed by closing its individual manual shut off valve at test pressures equal to or less than ½ psi for both natural gas or LP gas. The gas connection must be made in the absence of ½ psi (3.5 kPa). for the USA or - This appliance must be made using...
... turn on or shut off valve and the included gas pressure regulator. the current Can / CGA B 149.1 and .2 Installation Codes for gas burning appliances for natural gas 10" w.c. for Canada. the National Fuel Gas Code, ANSI Z 21.1 / NFPA 54 for LP gas. Any pipe connections must be installed with its own... be performed by closing its individual manual shut off valve at test pressures equal to or less than ½ psi for both natural gas or LP gas. The gas connection must be made in the absence of ½ psi (3.5 kPa). for the USA or - This appliance must be made using...
Operating and Installation manual
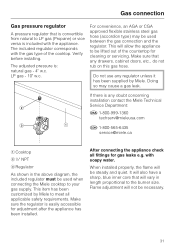
Page 31
... water. This will not be necessary. 31 This item has been customized by Miele. Flame adjustment will allow the appliance to be used between the gas connection and the regulator. LP gas - 10" w.c. When installed properly, the flame will vary in the above.... After connecting the appliance check all applicable safety requirements. Gas connection Gas pressure regulator A pressure regulator that is convertible from natural to LP gas (Propane) or vice versa is any doubt concerning installation contact the Miele Technical Service Department: U 1-800-999-1360 techserv@mieleusa....
... water. This will not be necessary. 31 This item has been customized by Miele. Flame adjustment will allow the appliance to be used between the gas connection and the regulator. LP gas - 10" w.c. When installed properly, the flame will vary in the above.... After connecting the appliance check all applicable safety requirements. Gas connection Gas pressure regulator A pressure regulator that is convertible from natural to LP gas (Propane) or vice versa is any doubt concerning installation contact the Miele Technical Service Department: U 1-800-999-1360 techserv@mieleusa....

Operating and Installation manual
Page 32
Gas connection Nominal Rating Table Auxiliary burner Max. output Min. output All burners Max. output Min. output Wok burner left Max. output Min. output Fast burner Max. output BTU/hr 5000 700 KM 391 NG / LP-Gas 6000 1000 9500 1700 15300 650 41800 kW 1.47 0.21 1.76 0.29 2.78 0.50 4.48 0.19 12.25 32 output Min. output Normal burner Max.
Gas connection Nominal Rating Table Auxiliary burner Max. output Min. output All burners Max. output Min. output Wok burner left Max. output Min. output Fast burner Max. output BTU/hr 5000 700 KM 391 NG / LP-Gas 6000 1000 9500 1700 15300 650 41800 kW 1.47 0.21 1.76 0.29 2.78 0.50 4.48 0.19 12.25 32 output Min. output Normal burner Max.
Operating and Installation manual
Page 33
If the cooktop is not configured for the proper type of gas The cooktop should have been ordered for connection to either natural or LP gas. Converting to another type of gas connection please contact your Miele Dealer. 33
If the cooktop is not configured for the proper type of gas The cooktop should have been ordered for connection to either natural or LP gas. Converting to another type of gas connection please contact your Miele Dealer. 33

Operating and Installation manual
Page 34
Before discarding an old appliance, disconnect it from the gas and electrical supply and cut off the power cord to prevent it from becoming a hazard. 34 Help protect our environment Disposal of an old appliance Old appliances contain materials that can be recycled. Disposal of packing materials The cardboard box and packing materials are biodegradable and recyclable. Please contact your local recycling center about the possibility of recycling these materials. Please recycle.
Before discarding an old appliance, disconnect it from the gas and electrical supply and cut off the power cord to prevent it from becoming a hazard. 34 Help protect our environment Disposal of an old appliance Old appliances contain materials that can be recycled. Disposal of packing materials The cardboard box and packing materials are biodegradable and recyclable. Please contact your local recycling center about the possibility of recycling these materials. Please recycle.
KM391 Cooktop
Page 1
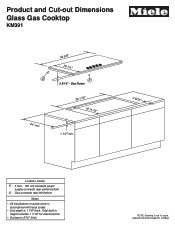
Gas connects rear left bottom Notes • All installations must be done in height includes 1 7/16" for electrical box • Surface is 5/16" thick. NOTE: Drawing is 1 7/8" thick. See Notes 36 1/16" 19 11/16" 1 1/2" min. 2 9/16" Location Codes E - 5 foot - 120 volt standard power supply connects rear center bottom G - Total built-in accordance with local codes. • Unit depth is not to scale. SPECIFICATION SHEETS 010904 Product and Cut-out Dimensions Glass Gas Cooktop KM391 G 24" min 36 5/8" 20 1/4" E 3 5/16" -
Gas connects rear left bottom Notes • All installations must be done in height includes 1 7/16" for electrical box • Surface is 5/16" thick. NOTE: Drawing is 1 7/8" thick. See Notes 36 1/16" 19 11/16" 1 1/2" min. 2 9/16" Location Codes E - 5 foot - 120 volt standard power supply connects rear center bottom G - Total built-in accordance with local codes. • Unit depth is not to scale. SPECIFICATION SHEETS 010904 Product and Cut-out Dimensions Glass Gas Cooktop KM391 G 24" min 36 5/8" 20 1/4" E 3 5/16" -