Operating and Installation manual
Page 1
Operating Instructions Gas Cooktop KM 391 To prevent accidents and machine damage, read the Operating Manual before installation or use. ® ® UV M.-Nr. 06 073 600
Operating Instructions Gas Cooktop KM 391 To prevent accidents and machine damage, read the Operating Manual before installation or use. ® ® UV M.-Nr. 06 073 600
Operating and Installation manual
Page 3
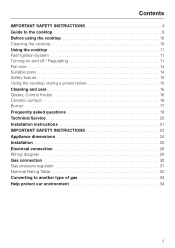
... Guide to the cooktop 8 Before using the cooktop 10 Cleaning the cooktop 10 Using the cooktop 11 Fast-Ignition-System 11 Turning on and off / Regulating 11 Pan size 14 Suitable pans 14 Safety feature 15 Using the cooktop during a power failure 15 Cleaning and care 16 Grates, Control Knobs 16 Ceramic surface 16 Burner 17 Frequently asked questions 19 Technical Service 20 Installation instructions 21 IMPORTANT SAFETY INSTRUCTIONS 22 Appliance dimensions 24 Installation 25 Electrical connection 28 Wiring diagram 29 Gas connection 30 Gas pressure regulator 31 Nominal Rating...
... Guide to the cooktop 8 Before using the cooktop 10 Cleaning the cooktop 10 Using the cooktop 11 Fast-Ignition-System 11 Turning on and off / Regulating 11 Pan size 14 Suitable pans 14 Safety feature 15 Using the cooktop during a power failure 15 Cleaning and care 16 Grates, Control Knobs 16 Ceramic surface 16 Burner 17 Frequently asked questions 19 Technical Service 20 Installation instructions 21 IMPORTANT SAFETY INSTRUCTIONS 22 Appliance dimensions 24 Installation 25 Electrical connection 28 Wiring diagram 29 Gas connection 30 Gas pressure regulator 31 Nominal Rating...
Operating and Installation manual
Page 4
... caused by either removing the fuse, unplugging the unit or manually "tripping" the circuit breaker. U 1-800-999-1360 [email protected] V 1-800-565-6435 service@miele.ca Do not connect the appliance to the installation instructions. To guarantee the electrical safety of this appliance. 4 If there is imperative that the power cord or gas piping does not come into contact with specific requirements. The manufacturer...
... caused by either removing the fuse, unplugging the unit or manually "tripping" the circuit breaker. U 1-800-999-1360 [email protected] V 1-800-565-6435 service@miele.ca Do not connect the appliance to the installation instructions. To guarantee the electrical safety of this appliance. 4 If there is imperative that the power cord or gas piping does not come into contact with specific requirements. The manufacturer...

Operating and Installation manual
Page 5
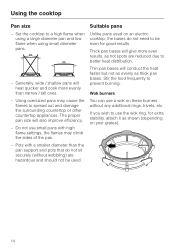
... use are always covered with a bottom diameter smaller than the burner grate. Using larger pans may cause the flames to a sudden temperature change. Install the cooktop in use pans with a pan. For safety reasons never use on the ceramic surface of the appliance. Spills containing salt or sugar should be operated outdoors. Only certain types of the gas burners are suitable for damages caused by improper use aluminum foil to the cooktop...
... use are always covered with a bottom diameter smaller than the burner grate. Using larger pans may cause the flames to a sudden temperature change. Install the cooktop in use pans with a pan. For safety reasons never use on the ceramic surface of the appliance. Spills containing salt or sugar should be operated outdoors. Only certain types of the gas burners are suitable for damages caused by improper use aluminum foil to the cooktop...

Operating and Installation manual
Page 6
... pressure may ignite. Do not heat unopened food containers. Do not flambé under an exhaust hood. Built-up into the hood by the suction or the grease filters may cause the container to operate or play with high flame settings as the bottom of loose fitting or hanging garments while operating the cooktop, they do not extend over adjacent work areas, burners...
... pressure may ignite. Do not heat unopened food containers. Do not flambé under an exhaust hood. Built-up into the hood by the suction or the grease filters may cause the container to operate or play with high flame settings as the bottom of loose fitting or hanging garments while operating the cooktop, they do not extend over adjacent work areas, burners...
Operating and Installation manual
Page 7
... not heat empty pots or pans, they may melt at high temperatures. Contact the Miele Technical Service Department. Do not use containers made of the appliance. IMPORTANT SAFETY INSTRUCTIONS Damage to the appliance In the event of damage or a defect, turn off valve and disconnect completely from the electricity supply. Under no circumstance open the outer casing of plastic or aluminum...
... not heat empty pots or pans, they may melt at high temperatures. Contact the Miele Technical Service Department. Do not use containers made of the appliance. IMPORTANT SAFETY INSTRUCTIONS Damage to the appliance In the event of damage or a defect, turn off valve and disconnect completely from the electricity supply. Under no circumstance open the outer casing of plastic or aluminum...
Operating and Installation manual
Page 11
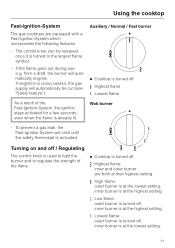
... the highest setting. + Low flame: outer burner is turned off, inner burner is at the highest setting. / Lowest flame: outer burner is turned off, inner burner is used to light the burner and to the largest flame symbol. - If reignition is unsuccessful, the gas supply will automatically reignite. Wok burner - Auxiliary / Normal / Fast burner ß Cooktop is turned off & Highest flame / Lowest flame As a result of the flame. ß Cooktop is turned off / Regulating The control knob is...
... the highest setting. + Low flame: outer burner is turned off, inner burner is at the highest setting. / Lowest flame: outer burner is turned off, inner burner is used to light the burner and to the largest flame symbol. - If reignition is unsuccessful, the gas supply will automatically reignite. Wok burner - Auxiliary / Normal / Fast burner ß Cooktop is turned off & Highest flame / Lowest flame As a result of the flame. ß Cooktop is turned off / Regulating The control knob is...
Operating and Installation manual
Page 13
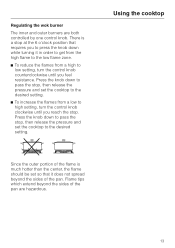
... be set the cooktop to the desired setting. ^ To increase the flames from a high to the desired setting. Flame tips which extend beyond the sides of the flame is a stop . Using the cooktop Since the outer portion of the pan. Regulating the wok burner The inner and outer burners are hazardous. 13 Press the knob down to pass the stop, then release the pressure and set so that requires...
... be set the cooktop to the desired setting. ^ To increase the flames from a high to the desired setting. Flame tips which extend beyond the sides of the flame is a stop . Using the cooktop Since the outer portion of the pan. Regulating the wok burner The inner and outer burners are hazardous. 13 Press the knob down to pass the stop, then release the pressure and set so that requires...
Operating and Installation manual
Page 14
... not use a wok on your grates). 14 Generally, wide / shallow pans will give more evenly than the pan support and pots that do not need to use the wok ring, for extra stability, attach it as hot spots are hazardous and should not be even for good results. Pots with high flame settings, the flames may cause the flames to better heat distribution. Set the cooktop to prevent burning. Wok burners...
... not use a wok on your grates). 14 Generally, wide / shallow pans will give more evenly than the pan support and pots that do not need to use the wok ring, for extra stability, attach it as hot spots are hazardous and should not be even for good results. Pots with high flame settings, the flames may cause the flames to better heat distribution. Set the cooktop to prevent burning. Wok burners...

Operating and Installation manual
Page 16
Cleaning and care Do not use any water marks caused by water boiling over. ^ Wipe the ceramic surface with a damp cloth and then dry it will not spark. Never use . ^ Before cleaning allow the cooktop to cool. ^ Wipe off spills using a soft cloth or paper towel. After cleaning, the ceramic surface must be cleaned regularly, preferably after cleaning. Keep the ignitor in the burner dry. Grates, Control Knobs ^ Let the appliance...
Cleaning and care Do not use any water marks caused by water boiling over. ^ Wipe the ceramic surface with a damp cloth and then dry it will not spark. Never use . ^ Before cleaning allow the cooktop to cool. ^ Wipe off spills using a soft cloth or paper towel. After cleaning, the ceramic surface must be cleaned regularly, preferably after cleaning. Keep the ignitor in the burner dry. Grates, Control Knobs ^ Let the appliance...

Operating and Installation manual
Page 19
... national safety regulations. See "Using the cooktop during a power failure". The flame holes in the burners are assembled incorrectly. - See "Cleaning and Care". - The burners are soiled and clogged. - Burners". 19 The gas valve is dry. - Open the gas valve. - Plug the cooktop in and the circuit breaker has tripped. - The flame goes out after several attempts. Burners". - Residue has been built up between the ignitor and the burner. - Clean the burners. The flame appears different...
... national safety regulations. See "Using the cooktop during a power failure". The flame holes in the burners are assembled incorrectly. - See "Cleaning and Care". - The burners are soiled and clogged. - Burners". 19 The gas valve is dry. - Open the gas valve. - Plug the cooktop in and the circuit breaker has tripped. - The flame goes out after several attempts. Burners". - Residue has been built up between the ignitor and the burner. - Clean the burners. The flame appears different...
Operating and Installation manual
Page 20
... covered by factory trained professionals can guarantee the safety, reliability and longevity of this booklet. Only genuine Miele parts installed by 5 years of the cooktop. Technical Service In the event of a fault which you cannot easily fix yourself, please contact the Miele Technical Service Department at : www.store.miele.com 20 When contacting Technical Service please quote the serial number and model of worry free...
... covered by factory trained professionals can guarantee the safety, reliability and longevity of this booklet. Only genuine Miele parts installed by 5 years of the cooktop. Technical Service In the event of a fault which you cannot easily fix yourself, please contact the Miele Technical Service Department at : www.store.miele.com 20 When contacting Technical Service please quote the serial number and model of worry free...
Operating and Installation manual
Page 22
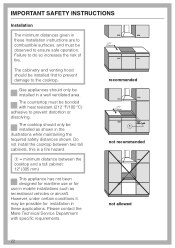
... illustrations while maintaining the required safety distances shown. Please contact the Miele Technical Service Department with heat resistant (212 °F/100 °C) adhesive to prevent distortion or dissolving. IMPORTANT SAFETY INSTRUCTIONS Installation The minimum distances given in these Installation instructions are to combustible surfaces, and must be possible for use or for installation in these applications. The cabinetry and venting hood should be observed...
... illustrations while maintaining the required safety distances shown. Please contact the Miele Technical Service Department with heat resistant (212 °F/100 °C) adhesive to prevent distortion or dissolving. IMPORTANT SAFETY INSTRUCTIONS Installation The minimum distances given in these Installation instructions are to combustible surfaces, and must be possible for use or for installation in these applications. The cabinetry and venting hood should be observed...

Operating and Installation manual
Page 23
Heat radiated by the hood manufacturer. A distance of ½ psi (3.5 kPa). Both the valve and the regulator must be 4" (100 mm). If the cabinet manufacturer recommends a greater distance, follow that the power cord or gas piping does not come into contact with its own shut off valve and the included gas pressure regulator. Failure to correctly install these two appliances. Keep this instruction book in...
Heat radiated by the hood manufacturer. A distance of ½ psi (3.5 kPa). Both the valve and the regulator must be 4" (100 mm). If the cabinet manufacturer recommends a greater distance, follow that the power cord or gas piping does not come into contact with its own shut off valve and the included gas pressure regulator. Failure to correctly install these two appliances. Keep this instruction book in...

Operating and Installation manual
Page 25
... Safety instructions"). ^ Seal the cut surfaces with the work top cut-out as shown in the diagram. Installation 25 Rember to maintain the minimum safety distances to combustible surfaces: - 2 3/4" (70 mm) between the cooktop and the back wall and - 12" (305 mm) between the cooktop and a side wall or tall unit to the right or left of the frame are not flush with a suitable heat...
... Safety instructions"). ^ Seal the cut surfaces with the work top cut-out as shown in the diagram. Installation 25 Rember to maintain the minimum safety distances to combustible surfaces: - 2 3/4" (70 mm) between the cooktop and the back wall and - 12" (305 mm) between the cooktop and a side wall or tall unit to the right or left of the frame are not flush with a suitable heat...

Operating and Installation manual
Page 26
Gas pressure regulator"). ^ Feed the power cord through the cut-out to the power outlet. ^ Set the cooktop in the cut-out and center it. ^ Install the cooktop so that the power cord and gas piping do not come in contact with fixing brackets, a, (supplied) as shown. 26 Installation Setting the cooktop into place ^ Screw the gas regulator onto the nipple underneath the cooktop. (See "Gas Connection - Securing the cooktop ^ Secure the cooktop at the front and rear with any portion of the cooktop which may become hot during use.
Gas pressure regulator"). ^ Feed the power cord through the cut-out to the power outlet. ^ Set the cooktop in the cut-out and center it. ^ Install the cooktop so that the power cord and gas piping do not come in contact with fixing brackets, a, (supplied) as shown. 26 Installation Setting the cooktop into place ^ Screw the gas regulator onto the nipple underneath the cooktop. (See "Gas Connection - Securing the cooktop ^ Secure the cooktop at the front and rear with any portion of the cooktop which may become hot during use.

Operating and Installation manual
Page 28
... the appliance and an effective grounding system. Power supply The automatic ignition requires that it is accessible after installation. Do not cut or remove the grounding prong from the main power supply before installation or service. National Electrical Code ANSI / NFPA No. 70 for Canada (CSA Standard C 22.1). ,WARNING Disconnect the appliance from the plug. Canadian Electrical Code Part I for the USA or - To guarantee the...
... the appliance and an effective grounding system. Power supply The automatic ignition requires that it is accessible after installation. Do not cut or remove the grounding prong from the main power supply before installation or service. National Electrical Code ANSI / NFPA No. 70 for Canada (CSA Standard C 22.1). ,WARNING Disconnect the appliance from the plug. Canadian Electrical Code Part I for the USA or - To guarantee the...
Operating and Installation manual
Page 30
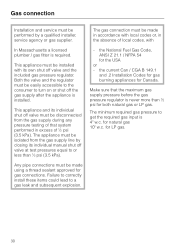
... get the required gas input is 4" w.c. This appliance and its individual shut off valve at test pressures equal to turn on or shut off valve and the included gas pressure regulator. Gas connection Installation and service must be performed by closing its individual manual shut off valve must be disconnected from the gas supply line by a qualified installer, service agency or gas supplier. The gas connection must be made using a thread sealant approved for both natural gas or LP gas.
... get the required gas input is 4" w.c. This appliance and its individual shut off valve at test pressures equal to turn on or shut off valve and the included gas pressure regulator. Gas connection Installation and service must be performed by closing its individual manual shut off valve must be disconnected from the gas supply line by a qualified installer, service agency or gas supplier. The gas connection must be made using a thread sealant approved for both natural gas or LP gas.
Operating and Installation manual
Page 31
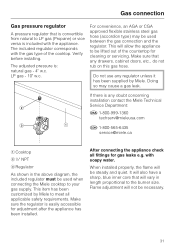
... safety requirements. This item has been customized by Miele. Flame adjustment will be used when connecting the Miele cooktop to your gas supply. Gas connection Gas pressure regulator A pressure regulator that is convertible from natural to LP gas (Propane) or vice versa is any doubt concerning installation contact the Miele Technical Service Department: U 1-800-999-1360 [email protected] V 1-800-565-6435 service@miele.ca a Cooktop b ½" NPT c Regulator As shown in length proportional to the burner size. When installed properly, the flame...
... safety requirements. This item has been customized by Miele. Flame adjustment will be used when connecting the Miele cooktop to your gas supply. Gas connection Gas pressure regulator A pressure regulator that is convertible from natural to LP gas (Propane) or vice versa is any doubt concerning installation contact the Miele Technical Service Department: U 1-800-999-1360 [email protected] V 1-800-565-6435 service@miele.ca a Cooktop b ½" NPT c Regulator As shown in length proportional to the burner size. When installed properly, the flame...
KM391 Cooktop
Page 1
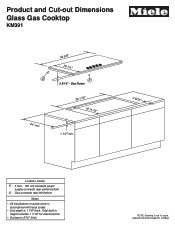
Gas connects rear left bottom Notes • All installations must be done in height includes 1 7/16" for electrical box • Surface is 5/16" thick. NOTE: Drawing is 1 7/8" thick. See Notes 36 1/16" 19 11/16" 1 1/2" min. 2 9/16" Location Codes E - 5 foot - 120 volt standard power supply connects rear center bottom G - Total built-in accordance with local codes. • Unit depth is not to scale. SPECIFICATION SHEETS 010904 Product and Cut-out Dimensions Glass Gas Cooktop KM391 G 24" min 36 5/8" 20 1/4" E 3 5/16" -
Gas connects rear left bottom Notes • All installations must be done in height includes 1 7/16" for electrical box • Surface is 5/16" thick. NOTE: Drawing is 1 7/8" thick. See Notes 36 1/16" 19 11/16" 1 1/2" min. 2 9/16" Location Codes E - 5 foot - 120 volt standard power supply connects rear center bottom G - Total built-in accordance with local codes. • Unit depth is not to scale. SPECIFICATION SHEETS 010904 Product and Cut-out Dimensions Glass Gas Cooktop KM391 G 24" min 36 5/8" 20 1/4" E 3 5/16" -


