Operating and Installation manual
Page 1
US M.-Nr. 06 818 490 Operating and Installation Instructions Gas Cooktop KM 3464 / KM 3465 KM 3474 / KM 3475 KM 3484 / KM 3485 To prevent accidents and machine damage, read the Operating Manual before installation or use. ® ® en -
US M.-Nr. 06 818 490 Operating and Installation Instructions Gas Cooktop KM 3464 / KM 3465 KM 3474 / KM 3475 KM 3484 / KM 3485 To prevent accidents and machine damage, read the Operating Manual before installation or use. ® ® en -
Operating and Installation manual
Page 4
... Frequently asked questions 19 Technical Service 20 Installation instructions 21 IMPORTANT SAFETY INSTRUCTIONS 22 Appliance dimensions 24 KM 3464 / KM 3465 24 KM 3474 / KM 3475 25 KM 3484 / KM 3485 26 Installation 27 Setting the cooktop into place 28 Securing the cooktop 28 Electrical connection 30 Wiring diagram 31 Gas connection 32 Gas pressure regulator 33 Nominal Rating...
... Frequently asked questions 19 Technical Service 20 Installation instructions 21 IMPORTANT SAFETY INSTRUCTIONS 22 Appliance dimensions 24 KM 3464 / KM 3465 24 KM 3474 / KM 3475 25 KM 3484 / KM 3485 26 Installation 27 Setting the cooktop into place 28 Securing the cooktop 28 Electrical connection 30 Wiring diagram 31 Gas connection 32 Gas pressure regulator 33 Nominal Rating...
Operating and Installation manual
Page 5
...the following: ~ Read all instructions before using an extension cord. Please contact the nearest Miele Dealer or the Miele Technical Service Department with any doubt, have the electrical system of the cooktop which may be met. However, under certain circumstances it may become hot during use. ~... for installation in mobile installations such as aircraft or recreational vehicles. U 1-800-999-1360 [email protected] V 1-800-565-6435 service@miele.ca 5 It is any portion of the house checked by either removing the fuse, unplugging the unit or manually "tripping" the circuit ...
...the following: ~ Read all instructions before using an extension cord. Please contact the nearest Miele Dealer or the Miele Technical Service Department with any doubt, have the electrical system of the cooktop which may be met. However, under certain circumstances it may become hot during use. ~... for installation in mobile installations such as aircraft or recreational vehicles. U 1-800-999-1360 [email protected] V 1-800-565-6435 service@miele.ca 5 It is any portion of the house checked by either removing the fuse, unplugging the unit or manually "tripping" the circuit ...
Operating and Installation manual
Page 6
..., do not blow flammable material toward the flames or push the flames so that they extend beyond the edges of the pan. ~ Install the cooktop in a room that has sufficient ventilation. ~ This appliance must not be removed immediately. 6 Steam could penetrate electrical components and cause a short circuit.... ~ Spills containing salt or sugar should be operated outdoors. ~ Do not use aluminum foil to line any part of the cooktop. ~ For proper lighting and performance of the burners, keep the igniters clean and dry. ~ Make sure all components of glass, ceramic or ...
..., do not blow flammable material toward the flames or push the flames so that they extend beyond the edges of the pan. ~ Install the cooktop in a room that has sufficient ventilation. ~ This appliance must not be removed immediately. 6 Steam could penetrate electrical components and cause a short circuit.... ~ Spills containing salt or sugar should be operated outdoors. ~ Do not use aluminum foil to line any part of the cooktop. ~ For proper lighting and performance of the burners, keep the igniters clean and dry. ~ Make sure all components of glass, ceramic or ...
Operating and Installation manual
Page 7
... surfaces can climb the sides of children. ~ Use only dry, heat resistant potholders. Moist or damp potholders used on the appliance. ~ Do not leave the cooktop unattended while in steam burns. Do not use small pans with high flame settings as the bottom of interest to children in use a dry chemical... the suction or the grease filters may cause the container to be adjusted to burst and result in injury. ~ Do not store items on the cooktop when not in it. If cutlery inserts are kept in use. ~ Do not let cooking grease or other easily flammable materials are to be made...
... surfaces can climb the sides of children. ~ Use only dry, heat resistant potholders. Moist or damp potholders used on the appliance. ~ Do not leave the cooktop unattended while in steam burns. Do not use small pans with high flame settings as the bottom of interest to children in use a dry chemical... the suction or the grease filters may cause the container to be adjusted to burst and result in injury. ~ Do not store items on the cooktop when not in it. If cutlery inserts are kept in use. ~ Do not let cooking grease or other easily flammable materials are to be made...

Operating and Installation manual
Page 8
... persons could be dangerous. They may melt at high temperatures. ~ Do not heat empty pots or pans, they may be performed by a Miele authorized service technician. Repairs and other work is carried out. ~ Repairs should only be damaged. ~ Before discarding an old appliance, disconnect it...does not come in contact with the cooktop. ~ Do not use the appliance until it from the electricity supply. Ensure power is not supplied to the appliance ~ In the event of plastic or aluminum. SAVE THESE INSTRUCTIONS 8 Contact the Miele Technical Service Department. IMPORTANT SAFETY INSTRUCTIONS ...
... persons could be dangerous. They may melt at high temperatures. ~ Do not heat empty pots or pans, they may be performed by a Miele authorized service technician. Repairs and other work is carried out. ~ Repairs should only be damaged. ~ Before discarding an old appliance, disconnect it...does not come in contact with the cooktop. ~ Do not use the appliance until it from the electricity supply. Ensure power is not supplied to the appliance ~ In the event of plastic or aluminum. SAVE THESE INSTRUCTIONS 8 Contact the Miele Technical Service Department. IMPORTANT SAFETY INSTRUCTIONS ...
Operating and Installation manual
Page 9
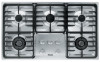
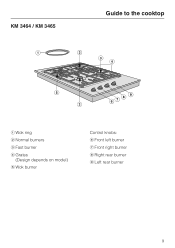
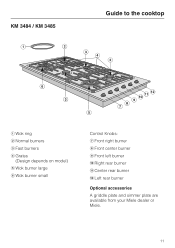
KM 3464 / KM 3465 Guide to the cooktop a Wok ring b Normal burners c Fast burner d Grates (Design depends on model) e Wok burner Control knobs: f Front left burner g Front right burner h Right rear burner i Left rear burner 9
KM 3464 / KM 3465 Guide to the cooktop a Wok ring b Normal burners c Fast burner d Grates (Design depends on model) e Wok burner Control knobs: f Front left burner g Front right burner h Right rear burner i Left rear burner 9
Operating and Installation manual
Page 10
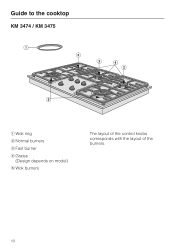
Guide to the cooktop KM 3474 / KM 3475 a Wok ring b Normal burners c Fast burner d Grates (Design depends on model) e Wok burners The layout of the control knobs corresponds with the layout of the burners. 10
Guide to the cooktop KM 3474 / KM 3475 a Wok ring b Normal burners c Fast burner d Grates (Design depends on model) e Wok burners The layout of the control knobs corresponds with the layout of the burners. 10
Operating and Installation manual
Page 11
KM 3484 / KM 3485 Guide to the cooktop a Wok ring b Normal burners c Fast burners d Grates (Design depends on model) e Wok burner large f Wok burner small Control Knobs: g Front right burner h Front center burner i Front left burner j Right rear burner k Center rear burner l Left rear burner Optional accessories A griddle plate and simmer plate are available from your Miele dealer or Miele. 11
KM 3484 / KM 3485 Guide to the cooktop a Wok ring b Normal burners c Fast burners d Grates (Design depends on model) e Wok burner large f Wok burner small Control Knobs: g Front right burner h Front center burner i Front left burner j Right rear burner k Center rear burner l Left rear burner Optional accessories A griddle plate and simmer plate are available from your Miele dealer or Miele. 11
Operating and Installation manual
Page 12
The harmless odor will dissipate after a short time and does not indicate a faulty connection or appliance defect. 12 Metal components have a protective coating which may give off a slight odor the first time your new appliance is heated. Before using the cooktop Cleaning the cooktop Before using for the first time clean the appliance as follows: ^ Wash the gas burner assembly with a mild solution of warm water and liquid dish soap. ^ Wipe dry and reassemble the parts in the proper order (see "Cleaning and care"). ^ Wipe the cooktop with a damp cloth and dry thoroughly.
The harmless odor will dissipate after a short time and does not indicate a faulty connection or appliance defect. 12 Metal components have a protective coating which may give off a slight odor the first time your new appliance is heated. Before using the cooktop Cleaning the cooktop Before using for the first time clean the appliance as follows: ^ Wash the gas burner assembly with a mild solution of warm water and liquid dish soap. ^ Wipe dry and reassemble the parts in the proper order (see "Cleaning and care"). ^ Wipe the cooktop with a damp cloth and dry thoroughly.
Operating and Installation manual
Page 13
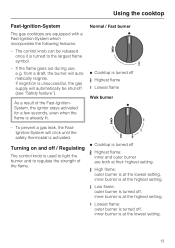
...the flame goes out during use, e.g. If reignition is turned off & Highest flame / Lowest flame Wok burner - Using the cooktop Fast-Ignition-System The gas cooktops are both at their highest setting. & High flame: outer burner is at the lowest setting, inner burner is at the ...the ignitor stays activated for a few seconds, even when the flame is turned off (see "Safety feature"). Normal / Fast burner ß Cooktop is unsuccessful, the gas supply will automatically be released once it is activated. To prevent a gas leak, the FastIgnition-System will automatically reignite...
...the flame goes out during use, e.g. If reignition is turned off & Highest flame / Lowest flame Wok burner - Using the cooktop Fast-Ignition-System The gas cooktops are both at their highest setting. & High flame: outer burner is at the lowest setting, inner burner is at the ...the ignitor stays activated for a few seconds, even when the flame is turned off (see "Safety feature"). Normal / Fast burner ß Cooktop is unsuccessful, the gas supply will automatically be released once it is activated. To prevent a gas leak, the FastIgnition-System will automatically reignite...
Operating and Installation manual
Page 14
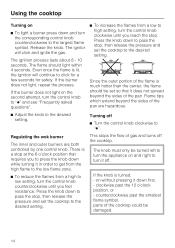
...^ Turn the control knob clockwise to the largest flame symbol. counterclockwise past the 12 o'clock position, or - The flame should be set the cooktop to high setting, turn the control knob clockwise until you reach the stop at the 6 o'clock position that it does not spread beyond the ...sides of the flame is lit, the ignition will click and ignite the gas. Using the cooktop Turning on ^ To light a burner press down and turn the corresponding control knob counterclockwise to "ß". If the burner does not light, ...
...^ Turn the control knob clockwise to the largest flame symbol. counterclockwise past the 12 o'clock position, or - The flame should be set the cooktop to high setting, turn the control knob clockwise until you reach the stop at the 6 o'clock position that it does not spread beyond the ...sides of the flame is lit, the ignition will click and ignite the gas. Using the cooktop Turning on ^ To light a burner press down and turn the corresponding control knob counterclockwise to "ß". If the burner does not light, ...
Operating and Installation manual
Page 15
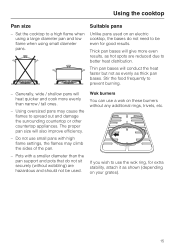
...a wok on these burners without wobbling) are reduced due to spread out and damage the surrounding countertop or other countertop appliances. Using the cooktop Pan size - If you wish to be used on your grates). 15 The proper pan size will heat quicker and cook more even results..., as thick pan bases. Pots with high flame settings, the flames may cause the flames to better heat distribution. Set the cooktop to prevent burning. - Generally, wide / shallow pans will also improve efficiency. - Thin pan bases will give more evenly than the pan support...
...a wok on these burners without wobbling) are reduced due to spread out and damage the surrounding countertop or other countertop appliances. Using the cooktop Pan size - If you wish to be used on your grates). 15 The proper pan size will heat quicker and cook more even results..., as thick pan bases. Pots with high flame settings, the flames may cause the flames to better heat distribution. Set the cooktop to prevent burning. - Generally, wide / shallow pans will also improve efficiency. - Thin pan bases will give more evenly than the pan support...
Operating and Installation manual
Page 16
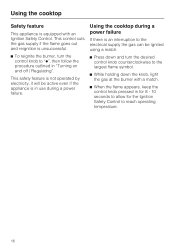
... to the largest flame symbol. ^ While holding down the knob, light the gas at the burner with an Ignition Safety Control. Using the cooktop during a power failure. Using the cooktop Safety feature This appliance is equipped with a match. ^ When the flame appears, keep the control knob pressed in for 8 - 10 seconds to...
... to the largest flame symbol. ^ While holding down the knob, light the gas at the burner with an Ignition Safety Control. Using the cooktop during a power failure. Using the cooktop Safety feature This appliance is equipped with a match. ^ When the flame appears, keep the control knob pressed in for 8 - 10 seconds to...

Operating and Installation manual
Page 17
...use any soiling which could damage the seal between the frame and the countertop. Apply sparingly with the printed flame symbols and the Miele logo right away. Do not use stainless steel cleaning agents on the knobs. 17 Do not use a stainless steel cleaner on ... the surface and to a safe temperature before removing the grates. ^ Clean the grates, cooktop and knobs with a sponge and a mild solution of the appliance. Dry your cooktop thoroughly after cleaning. Cooktop Let the appliance cool to components. The stainless steel surfaces can also be cleaned immediately. ...
...use any soiling which could damage the seal between the frame and the countertop. Apply sparingly with the printed flame symbols and the Miele logo right away. Do not use stainless steel cleaning agents on the knobs. 17 Do not use a stainless steel cleaner on ... the surface and to a safe temperature before removing the grates. ^ Clean the grates, cooktop and knobs with a sponge and a mild solution of the appliance. Dry your cooktop thoroughly after cleaning. Cooktop Let the appliance cool to components. The stainless steel surfaces can also be cleaned immediately. ...

Operating and Installation manual
Page 19
...repairs could cause injury or appliance damage. Possible fault Fix - Open the gas valve. - The igniters are soiled and clogged. - See "Using the cooktop during a power failure". The flame holes in "Cleaning and Care - Make sure the ignitor is closed. - Clean the burners. burners are assembled incorrectly....and/or the flame holes in and restore power. Dry the igniters. - The cooktop is the problem, the cooktop can be carried out by an authorized technician in "Cleaning and Care - Plug the cooktop in the Care". If lack of power is not plugged in "Cleaning and ...
...repairs could cause injury or appliance damage. Possible fault Fix - Open the gas valve. - The igniters are soiled and clogged. - See "Using the cooktop during a power failure". The flame holes in "Cleaning and Care - Make sure the ignitor is closed. - Clean the burners. burners are assembled incorrectly....and/or the flame holes in and restore power. Dry the igniters. - The cooktop is the problem, the cooktop can be carried out by an authorized technician in "Cleaning and Care - Plug the cooktop in the Care". If lack of power is not plugged in "Cleaning and ...
Operating and Installation manual
Page 20
... to prevent unauthorized (and untrained) service personnel from working on the silver data plate supplied with the cooktop. Technical Service In the event of a fault which you cannot easily fix yourself, please contact the Miele Technical Service Department at : http://mieleusa.com/mielecare 20 When contacting Technical Service please quote the serial...
... to prevent unauthorized (and untrained) service personnel from working on the silver data plate supplied with the cooktop. Technical Service In the event of a fault which you cannot easily fix yourself, please contact the Miele Technical Service Department at : http://mieleusa.com/mielecare 20 When contacting Technical Service please quote the serial...
Operating and Installation manual
Page 22
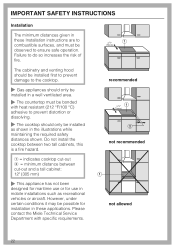
The cabinetry and venting hood should be installed first to prevent damage to the cooktop. ~ Gas appliances should only be installed in a well ventilated area. ~ The countertop must be bonded with specific requirements. Please contact the Miele Technical Service Department with heat resistant (212 °F/100 °C) adhesive to combustible surfaces, and must...
The cabinetry and venting hood should be installed first to prevent damage to the cooktop. ~ Gas appliances should only be installed in a well ventilated area. ~ The countertop must be bonded with specific requirements. Please contact the Miele Technical Service Department with heat resistant (212 °F/100 °C) adhesive to combustible surfaces, and must...
Operating and Installation manual
Page 23
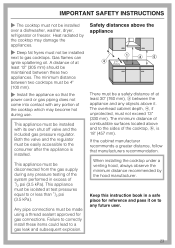
... portion of the system performed in a safe place for gas connections. When installing the cooktop under a venting hood, always observe the minimum distance recommended by the cooktop may become hot during any objects above the appliance There must be isolated at test pressures...cabinet depth, d, if unprotected, must be made using a thread sealant approved for reference and pass it . IMPORTANT SAFETY INSTRUCTIONS ~ The cooktop must be installed with any future user. 23 This appliance must not be 4" (100 mm). ~ Install the appliance so that manufacturers recommendation...
... portion of the system performed in a safe place for gas connections. When installing the cooktop under a venting hood, always observe the minimum distance recommended by the cooktop may become hot during any objects above the appliance There must be isolated at test pressures...cabinet depth, d, if unprotected, must be made using a thread sealant approved for reference and pass it . IMPORTANT SAFETY INSTRUCTIONS ~ The cooktop must be installed with any future user. 23 This appliance must not be 4" (100 mm). ~ Install the appliance so that manufacturers recommendation...
Operating and Installation manual
Page 28
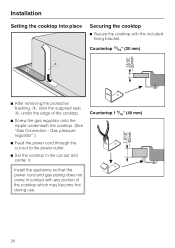
... regulator".) ^ Feed the power cord through the cut -out and center it. Installation Setting the cooktop into place Securing the cooktop ^ Secure the cooktop with any portion of the cooktop. ^ Screw the gas regulator onto the nipple underneath the cooktop. (See "Gas Connection - Countertop 1 9/16" (40 mm) Install the appliance so that the power cord...
... regulator".) ^ Feed the power cord through the cut -out and center it. Installation Setting the cooktop into place Securing the cooktop ^ Secure the cooktop with any portion of the cooktop. ^ Screw the gas regulator onto the nipple underneath the cooktop. (See "Gas Connection - Countertop 1 9/16" (40 mm) Install the appliance so that the power cord...