Operating and Installation manual
Page 1
Operating and Installation Instructions Gas Cooktop KM 3464 / KM 3465 KM 3474 / KM 3475 KM 3484 / KM 3485 To prevent accidents and machine damage, read the Operating Manual before installation or use. ® ® en - US M.-Nr. 06 818 490
Operating and Installation Instructions Gas Cooktop KM 3464 / KM 3465 KM 3474 / KM 3475 KM 3484 / KM 3485 To prevent accidents and machine damage, read the Operating Manual before installation or use. ® ® en - US M.-Nr. 06 818 490
Operating and Installation manual
Page 4
... / Regulating 13 Pan size 15 Suitable pans 15 Safety feature 16 Using the cooktop during a power failure 16 Cleaning and care 17 Frequently asked questions 19 Technical Service 20 Installation instructions 21 IMPORTANT SAFETY INSTRUCTIONS 22 Appliance dimensions 24 KM 3464 / KM 3465 24 KM 3474 / KM 3475 25 KM 3484 / KM 3485 26 Installation 27 Setting the cooktop into place 28 Securing the cooktop 28 Electrical connection 30 Wiring diagram 31 Gas connection 32 Gas pressure regulator 33 Nominal Rating Table 34 Converting to another type...
... / Regulating 13 Pan size 15 Suitable pans 15 Safety feature 16 Using the cooktop during a power failure 16 Cleaning and care 17 Frequently asked questions 19 Technical Service 20 Installation instructions 21 IMPORTANT SAFETY INSTRUCTIONS 22 Appliance dimensions 24 KM 3464 / KM 3465 24 KM 3474 / KM 3475 25 KM 3484 / KM 3485 26 Installation 27 Setting the cooktop into place 28 Securing the cooktop 28 Electrical connection 30 Wiring diagram 31 Gas connection 32 Gas pressure regulator 33 Nominal Rating Table 34 Converting to another type...
Operating and Installation manual
Page 5
... removing the fuse, unplugging the unit or manually "tripping" the circuit breaker. ~ This equipment has not been designed for maritime use or for the first time. ~ Be certain your gas appliance follow basic safety precautions including the following: ~ Read all instructions before using an extension cord. Extension cords do not come into contact with specific requirements. ~ After connecting the appliance test for installation...
... removing the fuse, unplugging the unit or manually "tripping" the circuit breaker. ~ This equipment has not been designed for maritime use or for the first time. ~ Be certain your gas appliance follow basic safety precautions including the following: ~ Read all instructions before using an extension cord. Extension cords do not come into contact with specific requirements. ~ After connecting the appliance test for installation...
Operating and Installation manual
Page 6
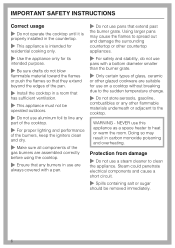
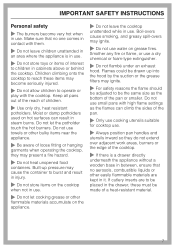
... removed immediately. 6 NEVER use this appliance as a space heater to line any part of the cooktop. ~ For proper lighting and performance of the burners, keep the igniters clean and dry. ~ Make sure all components of the gas burners are always covered with a pan. ~ Do not use pans that extend past the burner grate. IMPORTANT SAFETY INSTRUCTIONS Correct usage ~ Do not operate the cooktop until it is properly installed in the countertop...
... removed immediately. 6 NEVER use this appliance as a space heater to line any part of the cooktop. ~ For proper lighting and performance of the burners, keep the igniters clean and dry. ~ Make sure all components of the gas burners are always covered with a pan. ~ Do not use pans that extend past the burner grate. IMPORTANT SAFETY INSTRUCTIONS Correct usage ~ Do not operate the cooktop until it is properly installed in the countertop...
Operating and Installation manual
Page 7
... the cooktop. Keep all pans out of the reach of loose fitting or hanging garments when operating the cooktop, they do not extend over adjacent work areas, burners or the edge of interest to be adjusted to children in use a dry chemical or foam-type extinguisher. ~ Do not flambé under an exhaust hood. Flames could be drawn up pressure may ignite. ~ For...
... the cooktop. Keep all pans out of the reach of loose fitting or hanging garments when operating the cooktop, they do not extend over adjacent work areas, burners or the edge of interest to be adjusted to children in use a dry chemical or foam-type extinguisher. ~ Do not flambé under an exhaust hood. Flames could be drawn up pressure may ignite. ~ For...

Operating and Installation manual
Page 8
... from the gas and electrical supply and cut off valve and disconnect completely from becoming a hazard. Ensure power is carried out. ~ Repairs should only be dangerous. Otherwise the warranty is under warranty repairs should only be performed by unqualified persons could be performed by a Miele authorized service technician. SAVE THESE INSTRUCTIONS 8 Repairs and other work is not supplied to the appliance while repair work by qualified...
... from the gas and electrical supply and cut off valve and disconnect completely from becoming a hazard. Ensure power is carried out. ~ Repairs should only be dangerous. Otherwise the warranty is under warranty repairs should only be performed by unqualified persons could be performed by a Miele authorized service technician. SAVE THESE INSTRUCTIONS 8 Repairs and other work is not supplied to the appliance while repair work by qualified...
Operating and Installation manual
Page 13
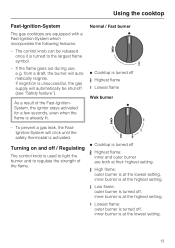
... flame / Lowest flame Wok burner - The control knob can be shut-off * Highest flame: inner and outer burner are equipped with a Fast-Ignition-System which incorporates the following features: - If the flame goes out during use, e.g. To prevent a gas leak, the FastIgnition-System will click until the safety thermostat is used to light the burner and to the largest flame symbol. - Normal / Fast burner ß Cooktop is turned off / Regulating The control knob is...
... flame / Lowest flame Wok burner - The control knob can be shut-off * Highest flame: inner and outer burner are equipped with a Fast-Ignition-System which incorporates the following features: - If the flame goes out during use, e.g. To prevent a gas leak, the FastIgnition-System will click until the safety thermostat is used to light the burner and to the largest flame symbol. - Normal / Fast burner ß Cooktop is turned off / Regulating The control knob is...
Operating and Installation manual
Page 14
... control knob counterclockwise until you feel resistance. Regulating the wok burner The inner and outer burners are hazardous. ^ Adjust the knob to click for a few seconds for safety. The ignitor will continue to the desired setting. The flame should be turned left to turn the appliance on the second attempt, turn the control knob to "ß" and see "Frequently asked questions". ^ To increase the flames from a high to "ß". Flame...
... control knob counterclockwise until you feel resistance. Regulating the wok burner The inner and outer burners are hazardous. ^ Adjust the knob to click for a few seconds for safety. The ignitor will continue to the desired setting. The flame should be turned left to turn the appliance on the second attempt, turn the control knob to "ß" and see "Frequently asked questions". ^ To increase the flames from a high to "ß". Flame...
Operating and Installation manual
Page 15
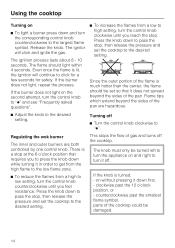
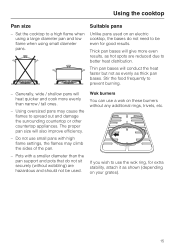
... a high flame when using a large diameter pan and low flame when using small diameter pans. Thin pan bases will give more evenly than the pan support and pots that do not need to better heat distribution. Set the cooktop to use a wok on these burners without wobbling) are reduced due to be used on your grates). 15 Stir the food frequently to spread out and damage the surrounding countertop or other countertop...
... a high flame when using a large diameter pan and low flame when using small diameter pans. Thin pan bases will give more evenly than the pan support and pots that do not need to better heat distribution. Set the cooktop to use a wok on these burners without wobbling) are reduced due to be used on your grates). 15 Stir the food frequently to spread out and damage the surrounding countertop or other countertop...
Operating and Installation manual
Page 16
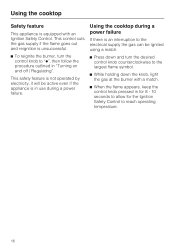
.... ^ When the flame appears, keep the control knob pressed in "Turning on and off / Regulating". This safety feature is not operated by electricity, it will be ignited using a match. ^ Press down the knob, light the gas at the burner with an Ignition Safety Control. This control cuts the gas supply if the flame goes out and reignition is an interruption to reach operating temperature. 16 Using the cooktop during a power failure.
.... ^ When the flame appears, keep the control knob pressed in "Turning on and off / Regulating". This safety feature is not operated by electricity, it will be ignited using a match. ^ Press down the knob, light the gas at the burner with an Ignition Safety Control. This control cuts the gas supply if the flame goes out and reignition is an interruption to reach operating temperature. 16 Using the cooktop during a power failure.

Operating and Installation manual
Page 17
... be cleaned using a non-abrasive stainless steel cleaner. oven sprays, stain or rust removers, these could damage the seal between the frame and the countertop. Do not use a stainless steel cleaner on the printed surfaces. Cleaning and care Never use a steam cleaner to prevent lime deposits. Dry your cooktop thoroughly after cleaning. Cooktop Let the appliance cool to components. Dry the cooktop and grates thoroughly after cleaning it will not spark. Apply...
... be cleaned using a non-abrasive stainless steel cleaner. oven sprays, stain or rust removers, these could damage the seal between the frame and the countertop. Do not use a stainless steel cleaner on the printed surfaces. Cleaning and care Never use a steam cleaner to prevent lime deposits. Dry your cooktop thoroughly after cleaning. Cooktop Let the appliance cool to components. Dry the cooktop and grates thoroughly after cleaning it will not spark. Apply...

Operating and Installation manual
Page 19
.... Open the gas valve. - Plug the cooktop in "Cleaning and Care - The burners are soiled and clogged. - If lack of power is dry. - The igniters no longer work. - Reassemble the burners as shown in and restore power. Burners". - The burners are wet. - Clean the burners. Residue has been built up between the ignitor and the burner. - Burners". - The flame appears different than usual. - Burners". 19 Dry the igniters. - See "Cleaning and Care". The igniters are assembled...
.... Open the gas valve. - Plug the cooktop in "Cleaning and Care - The burners are soiled and clogged. - If lack of power is dry. - The igniters no longer work. - Reassemble the burners as shown in and restore power. Burners". - The burners are wet. - Clean the burners. Residue has been built up between the ignitor and the burner. - Burners". - The flame appears different than usual. - Burners". 19 Dry the igniters. - See "Cleaning and Care". The igniters are assembled...
Operating and Installation manual
Page 20
... sticker to prevent unauthorized (and untrained) service personnel from working on the silver data plate supplied with the cooktop. Technical Service In the event of a fault which you the assurance of knowing that guarantees repairs by a Miele Authorized Service Provider using genuine Miele parts. When contacting Technical Service please quote the serial number and model of the cooktop. Please note that unless expressly approved in...
... sticker to prevent unauthorized (and untrained) service personnel from working on the silver data plate supplied with the cooktop. Technical Service In the event of a fault which you the assurance of knowing that guarantees repairs by a Miele Authorized Service Provider using genuine Miele parts. When contacting Technical Service please quote the serial number and model of the cooktop. Please note that unless expressly approved in...
Operating and Installation manual
Page 22
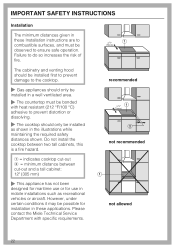
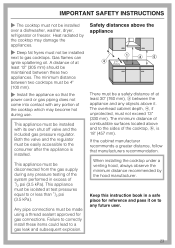
... may be possible for use or for installation in these Installation instructions are to combustible surfaces, and must be observed to the cooktop. ~ Gas appliances should only be installed as recreational vehicles or aircraft. Failure to prevent distortion or dissolving. ~ The cooktop should only be installed in a well ventilated area. ~ The countertop must be bonded with specific requirements. a = indicates cooktop cut-out b = minimum distance between two tall...
... may be possible for use or for installation in these Installation instructions are to combustible surfaces, and must be observed to the cooktop. ~ Gas appliances should only be installed as recreational vehicles or aircraft. Failure to prevent distortion or dissolving. ~ The cooktop should only be installed in a well ventilated area. ~ The countertop must be bonded with specific requirements. a = indicates cooktop cut-out b = minimum distance between two tall...
Operating and Installation manual
Page 23
... 18" (457 mm). Failure to correctly install these two appliances. When installing the cooktop under a venting hood, always observe the minimum distance recommended by the cooktop may become hot during any pressure testing of the system performed in a safe place for gas connections. Both the valve and the regulator must be disconnected from the gas supply during use. This appliance must be easily accessible to...
... 18" (457 mm). Failure to correctly install these two appliances. When installing the cooktop under a venting hood, always observe the minimum distance recommended by the cooktop may become hot during any pressure testing of the system performed in a safe place for gas connections. Both the valve and the regulator must be disconnected from the gas supply during use. This appliance must be easily accessible to...
Operating and Installation manual
Page 28
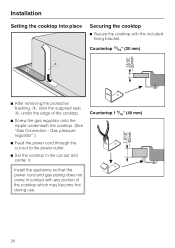
... bracket. Countertop 13/16" (20 mm) d c ^ After removing the protective backing, d, stick the supplied seal, c, under the edge of the cooktop which may become hot during use. 28 Gas pressure regulator".) ^ Feed the power cord through the cut -out and center it. Installation Setting the cooktop into place Securing the cooktop ^ Secure the cooktop with any portion of the cooktop. ^ Screw the gas regulator onto the nipple underneath the cooktop. (See "Gas Connection...
... bracket. Countertop 13/16" (20 mm) d c ^ After removing the protective backing, d, stick the supplied seal, c, under the edge of the cooktop which may become hot during use. 28 Gas pressure regulator".) ^ Feed the power cord through the cut -out and center it. Installation Setting the cooktop into place Securing the cooktop ^ Secure the cooktop with any portion of the cooktop. ^ Screw the gas regulator onto the nipple underneath the cooktop. (See "Gas Connection...
Operating and Installation manual
Page 30
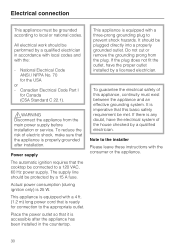
...-prong grounding plug to the installer Please leave these instructions with a 4 ft. (1.2 m) long power cord that the cooktop be performed by a 15 A fuse. This appliance is accessible after installation. All electrical work should be grounded according to a 120 VAC, 60 Hz power supply. Canadian Electrical Code Part I for Canada (CSA Standard C 22.1). ,WARNING Disconnect the appliance from the plug. Power supply The automatic ignition requires that is equipped...
...-prong grounding plug to the installer Please leave these instructions with a 4 ft. (1.2 m) long power cord that the cooktop be performed by a 15 A fuse. This appliance is accessible after installation. All electrical work should be grounded according to a 120 VAC, 60 Hz power supply. Canadian Electrical Code Part I for Canada (CSA Standard C 22.1). ,WARNING Disconnect the appliance from the plug. Power supply The automatic ignition requires that is equipped...
Operating and Installation manual
Page 32
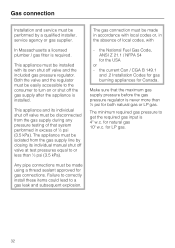
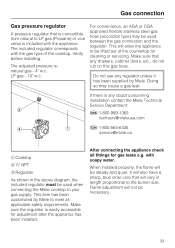
The gas connection must be made using a thread sealant approved for both natural gas or LP gas. This appliance must be easily accessible to the consumer to turn on or shut off valve at test pressures equal to or less than ½ psi for gas connections. Any pipe connections must be performed by closing its own shut off valve and the included gas pressure regulator. The minimum required gas pressure to a gas leak and subsequent...
The gas connection must be made using a thread sealant approved for both natural gas or LP gas. This appliance must be easily accessible to the consumer to turn on or shut off valve at test pressures equal to or less than ½ psi for gas connections. Any pipe connections must be performed by closing its own shut off valve and the included gas pressure regulator. The minimum required gas pressure to a gas leak and subsequent...
Operating and Installation manual
Page 33
... been installed. For convenience, an AGA or CGA approved flexible stainless steel gas hose (accordion type) may cause a gas leak. This will not be used when connecting the Miele cooktop to the burner size. Do not use any regulator unless it has been supplied by Miele to LP gas (Propane) or vice versa is included with soapy water. If there is convertible from natural to meet all fittings for cleaning or servicing. Gas connection Gas pressure regulator A pressure regulator...
... been installed. For convenience, an AGA or CGA approved flexible stainless steel gas hose (accordion type) may cause a gas leak. This will not be used when connecting the Miele cooktop to the burner size. Do not use any regulator unless it has been supplied by Miele to LP gas (Propane) or vice versa is included with soapy water. If there is convertible from natural to meet all fittings for cleaning or servicing. Gas connection Gas pressure regulator A pressure regulator...
KM347x Cooktop
Page 1
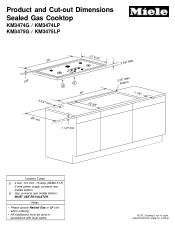
MUST USE REGULATOR. NOTE: Drawing is not to scale. SPECIFICATION SHEETS 010405 G - Notes • Please specify Natural Gas or LP unit when ordering. • All installations must be done in accordance with local codes. Product and Cut-out Dimensions Sealed Gas Cooktop KM3474G / KM3474LP KM3475G / KM3475LP 36" 21 5/16" 3/8" 2 3/4" min 25" min E G 35" 20 3/8" 1 1/2" min. 3 3/8" Max 3/1R6a" dMiuasx 1 7/8" Location Codes E - 6 foot -110 Volt - 15 Amp (NEMA 5-15) 3-wire power supply connects rear middle bottom. Gas connects rear middle bottom.
MUST USE REGULATOR. NOTE: Drawing is not to scale. SPECIFICATION SHEETS 010405 G - Notes • Please specify Natural Gas or LP unit when ordering. • All installations must be done in accordance with local codes. Product and Cut-out Dimensions Sealed Gas Cooktop KM3474G / KM3474LP KM3475G / KM3475LP 36" 21 5/16" 3/8" 2 3/4" min 25" min E G 35" 20 3/8" 1 1/2" min. 3 3/8" Max 3/1R6a" dMiuasx 1 7/8" Location Codes E - 6 foot -110 Volt - 15 Amp (NEMA 5-15) 3-wire power supply connects rear middle bottom. Gas connects rear middle bottom.


