
Operating and Installation manual
Page 3
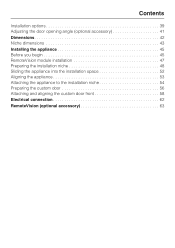
Contents Installation options 39 Adjusting the door opening angle (optional accessory 41 Dimensions 42 Niche dimensions 43 Installing the appliance 45 Before you begin 45 RemoteVision module installation 47 Preparing the installation niche 48 Sliding the appliance into the installation space 52 Aligning the appliance 53 Attaching the appliance to the installation niche 54 Preparing the custom door 56 Attaching and aligning the custom door front 58 Electrical connection 62 RemoteVision (optional accessory 63
Contents Installation options 39 Adjusting the door opening angle (optional accessory 41 Dimensions 42 Niche dimensions 43 Installing the appliance 45 Before you begin 45 RemoteVision module installation 47 Preparing the installation niche 48 Sliding the appliance into the installation space 52 Aligning the appliance 53 Attaching the appliance to the installation niche 54 Preparing the custom door 56 Attaching and aligning the custom door front 58 Electrical connection 62 RemoteVision (optional accessory 63
Operating and Installation manual
Page 38
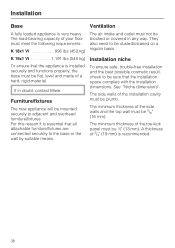
...540 kg) To ensure that the appliance is essential that the installation space complies with the installation dimensions. If in any way. The minimum thickness of your floor must meet the following requirements: K 18x1 Vi 996 lbs (452 kg) The air intake and outlet must be blocked or covered in doubt..., contact Miele. The load-bearing capacity of the toe-kick panel must be sure that all attachable furniture...
...540 kg) To ensure that the appliance is essential that the installation space complies with the installation dimensions. If in any way. The minimum thickness of your floor must meet the following requirements: K 18x1 Vi 996 lbs (452 kg) The air intake and outlet must be blocked or covered in doubt..., contact Miele. The load-bearing capacity of the toe-kick panel must be sure that all attachable furniture...
Operating and Installation manual
Page 40
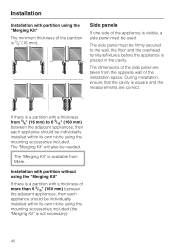
...installed within its own niche using the "Merging Kit" If there is 5/8" (16 mm). The "Merging Kit" is not necessary). 40 The dimensions of more than 6 5/16" (160 mm) between the adjacent appliances, then each appliance should be individually installed within its own niche using the... 5/8" (16 mm) to the wall, the floor and the overhead furniture/fixtures before the appliance is square and the measurements are taken from Miele. If there is a partition with partition without using the mounting accessories included (the "Merging Kit" is available from the opposite wall of the...
...installed within its own niche using the "Merging Kit" If there is 5/8" (16 mm). The "Merging Kit" is not necessary). 40 The dimensions of more than 6 5/16" (160 mm) between the adjacent appliances, then each appliance should be individually installed within its own niche using the... 5/8" (16 mm) to the wall, the floor and the overhead furniture/fixtures before the appliance is square and the measurements are taken from Miele. If there is a partition with partition without using the mounting accessories included (the "Merging Kit" is available from the opposite wall of the...
Operating and Installation manual
Page 42
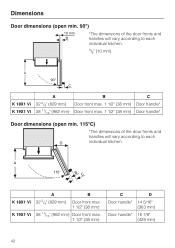
...D Door handle* 14 5/16" (363 mm) Door handle* 16 7/8" (428 mm) 42 Dimensions Door dimensions (open min. 90°) *The dimensions of the door fronts and handles will vary according to each individual kitchen. 3/8" (10 mm) K 18X1 Vi K 19X1 Vi A 32 5/8" (829 mm) 38 11/16" (982 mm) B Door front max. 1 ...1/2" (38 mm) Door front max. 1 1/2" (38 mm) C Door handle* Door handle* Door dimensions (open min. 115°C) *The dimensions of the door fronts and handles will vary according...
...D Door handle* 14 5/16" (363 mm) Door handle* 16 7/8" (428 mm) 42 Dimensions Door dimensions (open min. 90°) *The dimensions of the door fronts and handles will vary according to each individual kitchen. 3/8" (10 mm) K 18X1 Vi K 19X1 Vi A 32 5/8" (829 mm) 38 11/16" (982 mm) B Door front max. 1 ...1/2" (38 mm) Door front max. 1 1/2" (38 mm) C Door handle* Door handle* Door dimensions (open min. 115°C) *The dimensions of the door fronts and handles will vary according...

Operating and Installation manual
Page 46
... the cavity is very heavy. The housing unit must be at least 1/2" (13 mm) thick, preferably 3/4" 19 mm). ^ Check the base (see "Installation"). ^ Check the dimensions of the protective packaging. 46 The plinth facing must be sure that all furniture parts in front of the intended installation location. ^ Remove any cable...
... the cavity is very heavy. The housing unit must be at least 1/2" (13 mm) thick, preferably 3/4" 19 mm). ^ Check the base (see "Installation"). ^ Check the dimensions of the protective packaging. 46 The plinth facing must be sure that all furniture parts in front of the intended installation location. ^ Remove any cable...

Operating and Installation manual
Page 53
Important! The installation aids e on the base has reached the indicated guide dimension 1 1/4" (32 mm). The height-adjustable feet at the front and rear can all the way toward the wooden beam. 53 Installing the appliance Aligning the ... mm) and 1 1/2" (38 mm). If using a wooden beam as an alternative anti-tip device, rotate the appliance all be adjusted from the front: - The guide dimension of 1 1/4" (32 mm) is related to align the installation aids e on the door. ^ Align the custom door with the custom front. Rear feet: Adjust with...
Important! The installation aids e on the base has reached the indicated guide dimension 1 1/4" (32 mm). The height-adjustable feet at the front and rear can all the way toward the wooden beam. 53 Installing the appliance Aligning the ... mm) and 1 1/2" (38 mm). If using a wooden beam as an alternative anti-tip device, rotate the appliance all be adjusted from the front: - The guide dimension of 1 1/4" (32 mm) is related to align the installation aids e on the door. ^ Align the custom door with the custom front. Rear feet: Adjust with...
Side by Side Merging Kit Installation Manual
Page 4
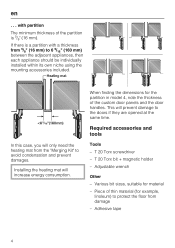
... avoid condensation and prevent damages. Piece of the custom door panels and the door handles. T 20 Torx bit + magnetic holder - Adhesive tape 4 When finding the dimensions for the partition in model 4, note the thickness of thin material (for material - Adjustable wrench Other - Required accessories and tools Tools - Various bit sizes, suitable...
... avoid condensation and prevent damages. Piece of the custom door panels and the door handles. T 20 Torx bit + magnetic holder - Adhesive tape 4 When finding the dimensions for the partition in model 4, note the thickness of thin material (for material - Adjustable wrench Other - Required accessories and tools Tools - Various bit sizes, suitable...
Vi Refrigerators (30 inch)
Page 1
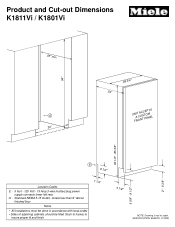
Product and Cut-out Dimensions K1811Vi / K1801Vi 25" min. SPECIFICATION SHEETS 011208 2" - 8 3/8" O - locate less than 9" above finished floor Notes • All Installations must be done in accordance with local codes &#...
Product and Cut-out Dimensions K1811Vi / K1801Vi 25" min. SPECIFICATION SHEETS 011208 2" - 8 3/8" O - locate less than 9" above finished floor Notes • All Installations must be done in accordance with local codes &#...
48-Inch Side by Side Vi Installations
Page 1
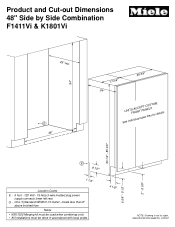
... 3/8" E 9 1/2" 1 1/4" Location Codes E - 5 foot - 120 Volt - 15 Amp 3-wire molded plug power supply connects lower left rear. One (1)Standard NEMA 5-15 Outlet - Product and Cut-out Dimensions 48" Side by Side Combination F1411Vi & K1801Vi 25" min. SPECIFICATION SHEETS 010707
... 3/8" E 9 1/2" 1 1/4" Location Codes E - 5 foot - 120 Volt - 15 Amp 3-wire molded plug power supply connects lower left rear. One (1)Standard NEMA 5-15 Outlet - Product and Cut-out Dimensions 48" Side by Side Combination F1411Vi & K1801Vi 25" min. SPECIFICATION SHEETS 010707