Operating and Installation manual
Page 2
... Temperature alarm 13 Door alarm 13 Setting the temperature 14 Setting the temperature in the refrigerator 14 SmartFresh drawers 16 Storage temperatures 16 Humidity 16 Using the SmartFresh drawers 16 Using the refrigerator efficiently 18 SuperCool 19 Automatic defrost 20 Adjusting the interior fittings 21 Moving the shelves 21 Removing the storage shelf from above the deli drawer 23 To remove the shelf above the SmartFresh drawers 23 Cleaning and care 24 Cleaning the interior and accessories 25 Humidity filters...
... Temperature alarm 13 Door alarm 13 Setting the temperature 14 Setting the temperature in the refrigerator 14 SmartFresh drawers 16 Storage temperatures 16 Humidity 16 Using the SmartFresh drawers 16 Using the refrigerator efficiently 18 SuperCool 19 Automatic defrost 20 Adjusting the interior fittings 21 Moving the shelves 21 Removing the storage shelf from above the deli drawer 23 To remove the shelf above the SmartFresh drawers 23 Cleaning and care 24 Cleaning the interior and accessories 25 Humidity filters...
Operating and Installation manual
Page 4
... (e.g., danger of the house checked by a qualified electrician. ~ Only connect power to the appliance when all instructions before installation and use to prevent accidents and machine damage. If there is any future user. Improper use of this appliance to electricity. Electrical Safety ~ Before installation, make sure that this Operating manual. To guarantee the electrical safety of the appliance can lead to personal injury and...
... (e.g., danger of the house checked by a qualified electrician. ~ Only connect power to the appliance when all instructions before installation and use to prevent accidents and machine damage. If there is any future user. Improper use of this appliance to electricity. Electrical Safety ~ Before installation, make sure that this Operating manual. To guarantee the electrical safety of the appliance can lead to personal injury and...

Operating and Installation manual
Page 5
... a room with too low an ambient temperature, e.g., a garage, as : - IMPORTANT SAFETY INSTRUCTIONS Installation This appliance is completely installed and secured per the installation instructions. ~ This appliance must be installed and connected in compliance with the installation instructions. ~ Installation and repair work environments - Work by a responsible person. ~ To reduce the risk of injury, do not touch the cold surfaces in the refrigerator compartment, particularly when hands are...
... a room with too low an ambient temperature, e.g., a garage, as : - IMPORTANT SAFETY INSTRUCTIONS Installation This appliance is completely installed and secured per the installation instructions. ~ This appliance must be installed and connected in compliance with the installation instructions. ~ Installation and repair work environments - Work by a responsible person. ~ To reduce the risk of injury, do not touch the cold surfaces in the refrigerator compartment, particularly when hands are...
Operating and Installation manual
Page 6
... not easily climb inside. ~ Consult with your old appliance ~ Before disposing of by : - Make sure the CFC refrigerant is removed and disposed of an old appliance, first make the door latch or lock unusable. ~ Take off the door. ~ Leave the shelves in place so that children may have a cooling system that used CFCs (chlorofluorocarbons). puncturing the refrigerant channels in the plinth...
... not easily climb inside. ~ Consult with your old appliance ~ Before disposing of by : - Make sure the CFC refrigerant is removed and disposed of an old appliance, first make the door latch or lock unusable. ~ Take off the door. ~ Leave the shelves in place so that children may have a cooling system that used CFCs (chlorofluorocarbons). puncturing the refrigerant channels in the plinth...
Operating and Installation manual
Page 7
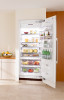
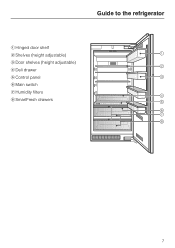
Guide to the refrigerator a Hinged door shelf b Shelves (height adjustable) c Door shelves (height adjustable) d Deli drawer e Control panel f Main switch g Humidity filters h SmartFresh drawers 7
Guide to the refrigerator a Hinged door shelf b Shelves (height adjustable) c Door shelves (height adjustable) d Deli drawer e Control panel f Main switch g Humidity filters h SmartFresh drawers 7
Operating and Installation manual
Page 9
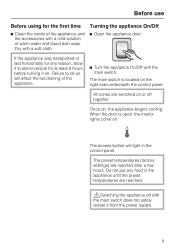
... begins cooling. The preset temperatures (factory settings) are reached. ,Switching the appliance off together. Before use Before using for the first time ^ Clean the inside of the appliance and the accessories with a soft cloth. Dry with a mild solution of warm water and liquid dish soap. When the door is located on . The main switch is open, the interior lights come on the right-side underneath the control panel. Turning...
... begins cooling. The preset temperatures (factory settings) are reached. ,Switching the appliance off together. Before use Before using for the first time ^ Clean the inside of the appliance and the accessories with a soft cloth. Dry with a mild solution of warm water and liquid dish soap. When the door is located on . The main switch is open, the interior lights come on the right-side underneath the control panel. Turning...

Operating and Installation manual
Page 14
...: - Temperature display The temperature display on the operating panel always shows the required temperature. Setting the temperature Setting the temperature in the refrigerator The loss of 37°F (4°C) in the appliance has risen by several degrees, indicating that the appliance is being left open for a while, e.g. Tap the X and Y sensor buttons to raise/lower the temperature 1°, or hold it turns yellow. ^ Use the X and Y buttons next to the temperature display...
...: - Temperature display The temperature display on the operating panel always shows the required temperature. Setting the temperature Setting the temperature in the refrigerator The loss of 37°F (4°C) in the appliance has risen by several degrees, indicating that the appliance is being left open for a while, e.g. Tap the X and Y sensor buttons to raise/lower the temperature 1°, or hold it turns yellow. ^ Use the X and Y buttons next to the temperature display...
Operating and Installation manual
Page 21
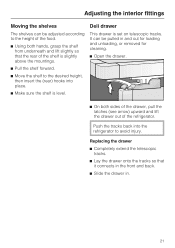
... removed for cleaning. ^ Open the drawer. ^ On both hands, grasp the shelf from underneath and lift slightly so that the rear of the refrigerator. It can be pulled in . 21 Push the tracks back into place. ^ Make sure the shelf is set on telescopic tracks. Deli drawer This drawer is level. Adjusting the interior fittings Moving the shelves The shelves can be adjusted according to the height of...
... removed for cleaning. ^ Open the drawer. ^ On both hands, grasp the shelf from underneath and lift slightly so that the rear of the refrigerator. It can be pulled in . 21 Push the tracks back into place. ^ Make sure the shelf is set on telescopic tracks. Deli drawer This drawer is level. Adjusting the interior fittings Moving the shelves The shelves can be adjusted according to the height of...
Operating and Installation manual
Page 22
... avoid injury. 22 Replacing the drawer ^ Completely extend the telescopic tracks. ^ Lay the drawer onto the tracks so that it connects in and out for loading and unloading, or removed for cleaning. On the hinged side of the door is a safety lock, which must be turned to a horizontal position before the drawer can be removed. ^ Using a suitable object, e.g., coin, turn the safety lock...
... avoid injury. 22 Replacing the drawer ^ Completely extend the telescopic tracks. ^ Lay the drawer onto the tracks so that it connects in and out for loading and unloading, or removed for cleaning. On the hinged side of the door is a safety lock, which must be turned to a horizontal position before the drawer can be removed. ^ Using a suitable object, e.g., coin, turn the safety lock...
Operating and Installation manual
Page 23
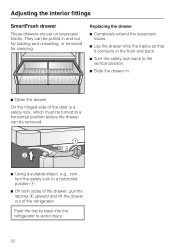
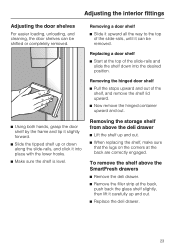
... glass shelf slightly, then lift it carefully up and out. ^ Replace the deli drawer. 23 Removing the storage shelf from above the SmartFresh drawers ^ Remove the deli drawer. ^ Remove the filler strip at the top of the shelf, and remove the shelf lid upward. ^ Now remove the hinged container upward and out. Adjusting the interior fittings Adjusting the door shelves For easier loading, unloading, and cleaning, the door shelves can be shifted or completely removed. ^ Using...
... glass shelf slightly, then lift it carefully up and out. ^ Replace the deli drawer. 23 Removing the storage shelf from above the SmartFresh drawers ^ Remove the deli drawer. ^ Remove the filler strip at the top of the shelf, and remove the shelf lid upward. ^ Now remove the hinged container upward and out. Adjusting the interior fittings Adjusting the door shelves For easier loading, unloading, and cleaning, the door shelves can be shifted or completely removed. ^ Using...
Operating and Installation manual
Page 25
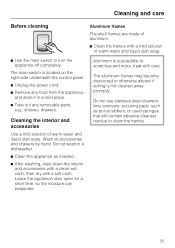
Cleaning the interior and accessories Use a mild solution of warm water and liquid dish soap. ^ Use the main switch to turn the appliance off completely. Leave the appliance door open for a short time, so the moisture can evaporate. Aluminum is not cleaned away promptly. lime removers; The main switch is located on the right-side underneath the control panel. ^ Unplug the power cord. ^ Remove any removable parts, e.g., shelves, drawers. Do not wash in a cool place...
Cleaning the interior and accessories Use a mild solution of warm water and liquid dish soap. ^ Use the main switch to turn the appliance off completely. Leave the appliance door open for a short time, so the moisture can evaporate. Aluminum is not cleaned away promptly. lime removers; The main switch is located on the right-side underneath the control panel. ^ Unplug the power cord. ^ Remove any removable parts, e.g., shelves, drawers. Do not wash in a cool place...

Operating and Installation manual
Page 26
... the drawer and remove them along with the filters downwards starting from b. ^ Remove the filter mat. ^ Clean the filters by rinsing them with lukewarm water. Cleaning and care Humidity filters The two humidity filters, located above the SmartFresh drawers, must be removed for cleaning. ^ Remove the SmartFresh drawer. ^ Unhook the filter cover a in a dishwasher or washing machine. This will damage the filter. ^ Air-dry the filters. ^ Place the filters back in the filter cover. ^ Put the filter cover...
... the drawer and remove them along with the filters downwards starting from b. ^ Remove the filter mat. ^ Clean the filters by rinsing them with lukewarm water. Cleaning and care Humidity filters The two humidity filters, located above the SmartFresh drawers, must be removed for cleaning. ^ Remove the SmartFresh drawer. ^ Unhook the filter cover a in a dishwasher or washing machine. This will damage the filter. ^ Air-dry the filters. ^ Place the filters back in the filter cover. ^ Put the filter cover...
Operating and Installation manual
Page 28
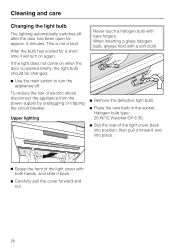
.... 5 minutes. This is opened briefly, the light bulb should be changed. ^ Use the main switch to turn on when the door is not a fault. Cleaning and care Changing the light bulb The lighting automatically switches off . After the bulb has cooled for a short time it back. ^ Carefully pull the cover forward and out. 28 When inserting a glass halogen bulb, always hold with a soft cloth. ^ Remove the defective light bulb. ^ Place the new bulb in the socket...
.... 5 minutes. This is opened briefly, the light bulb should be changed. ^ Use the main switch to turn on when the door is not a fault. Cleaning and care Changing the light bulb The lighting automatically switches off . After the bulb has cooled for a short time it back. ^ Carefully pull the cover forward and out. 28 When inserting a glass halogen bulb, always hold with a soft cloth. ^ Remove the defective light bulb. ^ Place the new bulb in the socket...
Operating and Installation manual
Page 30
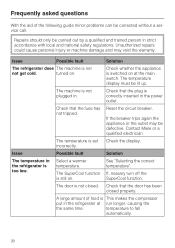
... set Check the display. Reset the circuit breaker. If the breaker trips again the appliance or the outlet may void the warranty. Contact Miele or a qualified electrician. The temperature is correctly inserted in the power outlet. If, nessary turn off the SuperCool function. The door is too low. Frequently asked questions With the aid of food is not plugged in the refrigerator...
... set Check the display. Reset the circuit breaker. If the breaker trips again the appliance or the outlet may void the warranty. Contact Miele or a qualified electrician. The temperature is correctly inserted in the power outlet. If, nessary turn off the SuperCool function. The door is too low. Frequently asked questions With the aid of food is not plugged in the refrigerator...
Operating and Installation manual
Page 39
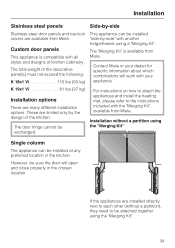
... the instructions included with another fridge/freezer using the "Merging Kit" Single column The appliance can be installed "side-by-side" with the "Merging Kit", available from Miele. These are many different installation options. If the appliances are available from Miele. The total weight of kitchen cabinetry. Custom door panels This appliance is available from Miele. Installation Stainless steel panels Side-by-side Stainless steel door panels and toe-kick covers are installed...
... the instructions included with another fridge/freezer using the "Merging Kit" Single column The appliance can be installed "side-by-side" with the "Merging Kit", available from Miele. These are many different installation options. If the appliances are available from Miele. The total weight of kitchen cabinetry. Custom door panels This appliance is available from Miele. Installation Stainless steel panels Side-by-side Stainless steel door panels and toe-kick covers are installed...

Operating and Installation manual
Page 46
... the location of the power outlet. ^ Check that all furniture parts in front of the intended installation location. ^ Remove any cable clips from the back of the appliance. ^ Take the supplied accessories out of the housing must be at right angles, as otherwise the furniture door will not align correctly with the 4 corners of the appliance are securely connected...
... the location of the power outlet. ^ Check that all furniture parts in front of the intended installation location. ^ Remove any cable clips from the back of the appliance. ^ Take the supplied accessories out of the housing must be at right angles, as otherwise the furniture door will not align correctly with the 4 corners of the appliance are securely connected...
Operating and Installation manual
Page 47
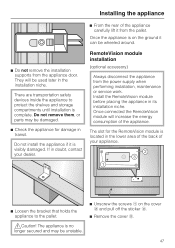
... sticker c. ^ Remove the cover b. 47 If in its installation niche. Install the RemoteVision module before placing the appliance in doubt, contact your appliance. ^ Loosen the bracket that holds the appliance to protect the shelves and storage compartments until installation is complete. Do not install the appliance if it from the power supply when performing installation, maintenance or service work. RemoteVision module installation (optional...
... sticker c. ^ Remove the cover b. 47 If in its installation niche. Install the RemoteVision module before placing the appliance in doubt, contact your appliance. ^ Loosen the bracket that holds the appliance to protect the shelves and storage compartments until installation is complete. Do not install the appliance if it from the power supply when performing installation, maintenance or service work. RemoteVision module installation (optional...
Operating and Installation manual
Page 48
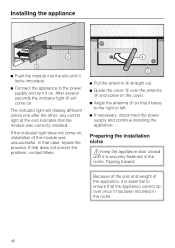
... niche. 48 any control light at the end indicates that case, repeat the process. Tipping hazard. Installing the appliance ^ Push the module into the slot until it on. In that the module was unsuccessful. Preparing the installation niche ,Keep the appliance door closed until it locks into place. ^ Connect the appliance to the power supply and turn it is essential...
... niche. 48 any control light at the end indicates that case, repeat the process. Tipping hazard. Installing the appliance ^ Push the module into the slot until it on. In that the module was unsuccessful. Preparing the installation niche ,Keep the appliance door closed until it locks into place. ^ Connect the appliance to the power supply and turn it is essential...
Operating and Installation manual
Page 62
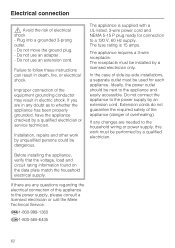
Do not move the ground plug. - Do not use an adapter. - Installation, repairs and other work must be dangerous. The appliance requires a 3-wire receptacle. Failure to the power supply, please consult a licensed electrician or call the Miele Technical Service. If any changes are needed to the household wiring or power supply, this appliance to follow these instructions can result in electric shock. Before installing the appliance, verify that the voltage...
Do not move the ground plug. - Do not use an adapter. - Installation, repairs and other work must be dangerous. The appliance requires a 3-wire receptacle. Failure to the power supply, please consult a licensed electrician or call the Miele Technical Service. If any changes are needed to the household wiring or power supply, this appliance to follow these instructions can result in electric shock. Before installing the appliance, verify that the voltage...
Side by Side Merging Kit Installation Manual
Page 4
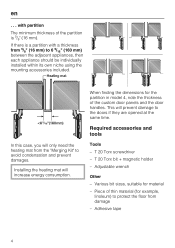
... tape 4 When finding the dimensions for material - Various bit sizes, suitable for the partition in model 4, note the thickness of the partition is a partition with a thickness from 5/8" (16 mm) to protect the floor from the "Merging Kit" to the doors if they are opened at the same time. en . . . This will increase energy consumption. Adjustable wrench Other - In...
... tape 4 When finding the dimensions for material - Various bit sizes, suitable for the partition in model 4, note the thickness of the partition is a partition with a thickness from 5/8" (16 mm) to protect the floor from the "Merging Kit" to the doors if they are opened at the same time. en . . . This will increase energy consumption. Adjustable wrench Other - In...


