Operating and Installation manual
Page 1
US, CA M.-Nr. 09 223 750 Operating and Installation Instructions Refrigerator K 1801 SF, K 1811 SF K 1901 SF, K 1911 SF To prevent accidents and appliance damage read these instructions before installation or use. en -
US, CA M.-Nr. 09 223 750 Operating and Installation Instructions Refrigerator K 1801 SF, K 1811 SF K 1901 SF, K 1911 SF To prevent accidents and appliance damage read these instructions before installation or use. en -
Operating and Installation manual
Page 2
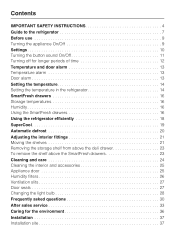
Contents IMPORTANT SAFETY INSTRUCTIONS 4 Guide to the refrigerator 7 Before use 9 Turning the appliance On/Off 9 Settings 10 Turning the button sound On/Off 11 Turning off for longer periods of time 12 Temperature ... alarm 13 Temperature alarm 13 Door alarm 13 Setting the temperature 14 Setting the temperature in the refrigerator 14 SmartFresh drawers 16 Storage temperatures 16 Humidity 16 Using the SmartFresh drawers 16 Using the refrigerator efficiently 18 SuperCool 19 Automatic defrost 20 Adjusting the interior fittings 21 Moving the shelves 21 Removing...
Contents IMPORTANT SAFETY INSTRUCTIONS 4 Guide to the refrigerator 7 Before use 9 Turning the appliance On/Off 9 Settings 10 Turning the button sound On/Off 11 Turning off for longer periods of time 12 Temperature ... alarm 13 Temperature alarm 13 Door alarm 13 Setting the temperature 14 Setting the temperature in the refrigerator 14 SmartFresh drawers 16 Storage temperatures 16 Humidity 16 Using the SmartFresh drawers 16 Using the refrigerator efficiently 18 SuperCool 19 Automatic defrost 20 Adjusting the interior fittings 21 Moving the shelves 21 Removing...
Operating and Installation manual
Page 5
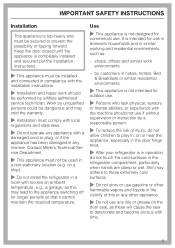
... domestic households and in any oils or grease on or near the appliance, especially in the door hinge area. ~ After your refrigerator is in operation, do not allow children to the appliance switching off for commercial use it cannot maintain the required temperature. It...to play in, on the door seal, as : - on a ship). ~ Do not install the refrigerator in a room with the installation instructions. ~ Installation and repair work environments - by a Miele authorized service technician. shops, offices and similar work should not use . Work by unqualified persons could be ...
... domestic households and in any oils or grease on or near the appliance, especially in the door hinge area. ~ After your refrigerator is in operation, do not allow children to the appliance switching off for commercial use it cannot maintain the required temperature. It...to play in, on the door seal, as : - on a ship). ~ Do not install the refrigerator in a room with the installation instructions. ~ Installation and repair work environments - by a Miele authorized service technician. shops, offices and similar work should not use . Work by unqualified persons could be ...

Operating and Installation manual
Page 6
... door. ~ Leave the shelves in place so that children may have a cooling system that used CFCs (chlorofluorocarbons). Make sure the CFC refrigerant is removed and disposed of the pipework while awaiting disposal by a qualified technician. IMPORTANT SAFETY INSTRUCTIONS ~ Do not block the ventilation gaps ...in the plinth or the top of the appliance housing unit, as this CFC refrigerant, you can be subject to fines and imprisonment under provisions of the appliance, increase the electricity consumption and cause damage to the appliance...
... door. ~ Leave the shelves in place so that children may have a cooling system that used CFCs (chlorofluorocarbons). Make sure the CFC refrigerant is removed and disposed of the pipework while awaiting disposal by a qualified technician. IMPORTANT SAFETY INSTRUCTIONS ~ Do not block the ventilation gaps ...in the plinth or the top of the appliance housing unit, as this CFC refrigerant, you can be subject to fines and imprisonment under provisions of the appliance, increase the electricity consumption and cause damage to the appliance...

Operating and Installation manual
Page 7
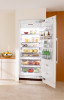
Guide to the refrigerator a Hinged door shelf b Shelves (height adjustable) c Door shelves (height adjustable) d Deli drawer e Control panel f Main switch g Humidity filters h SmartFresh drawers 7
Guide to the refrigerator a Hinged door shelf b Shelves (height adjustable) c Door shelves (height adjustable) d Deli drawer e Control panel f Main switch g Humidity filters h SmartFresh drawers 7

Operating and Installation manual
Page 8
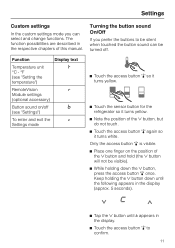
Y warmer Allows you to set the desired temperature in the refrigerator f Food type(s) to the refrigerator Control panel a Access button "p" activates the control panel b Refrigerator c Upper SmartFresh drawer d Lower SmartFresh drawer e Temperature display X colder; Guide to be stored in the SmartFresh drawers (left: high humidity right: lower humidity) g On/Off sensor button for the SuperCool function h Sensor button for the temperature and door alarm* * Only visible when the relevant function is activated 8
Y warmer Allows you to set the desired temperature in the refrigerator f Food type(s) to the refrigerator Control panel a Access button "p" activates the control panel b Refrigerator c Upper SmartFresh drawer d Lower SmartFresh drawer e Temperature display X colder; Guide to be stored in the SmartFresh drawers (left: high humidity right: lower humidity) g On/Off sensor button for the SuperCool function h Sensor button for the temperature and door alarm* * Only visible when the relevant function is activated 8
Operating and Installation manual
Page 11
...; °C - °F (see "Settings") To enter and exit the c Settings mode ^ Touch the access button "p" so it turns yellow. ^ Touch the sensor button for the refrigerator so it turns yellow. ^ Note the position of this manual. Turning the button sound On/Off If you can be visible). ^ While holding the X button...
...; °C - °F (see "Settings") To enter and exit the c Settings mode ^ Touch the access button "p" so it turns yellow. ^ Touch the sensor button for the refrigerator so it turns yellow. ^ Note the position of this manual. Turning the button sound On/Off If you can be visible). ^ While holding the X button...

Operating and Installation manual
Page 14
... Y buttons next to the temperature display to reach the lowest temperature. The room temperature and the installation location can be possible for the refrigerator so it turns yellow. ^ Touch the sensor button for the appliance to set , - If the room temperature is recommended. The display... Temperature range The temperature can affect the time it takes for removing or storing a large amount of 37°F (4°C) in the refrigerator section is too high, it down to the desired temperature. a different temperature is being left open for a while, e.g. for the ...
... Y buttons next to the temperature display to reach the lowest temperature. The room temperature and the installation location can be possible for the refrigerator so it turns yellow. ^ Touch the sensor button for the appliance to set , - If the room temperature is recommended. The display... Temperature range The temperature can affect the time it takes for removing or storing a large amount of 37°F (4°C) in the refrigerator section is too high, it down to the desired temperature. a different temperature is being left open for a while, e.g. for the ...

Operating and Installation manual
Page 15
... holding down until the following appears in the display (approx. 5 seconds). ^ Touch the access button "p" so it turns yellow. ^ Touch the sensor button for the refrigerator section so it turns yellow. ^ Note the position of the X button and hold (the X button will not be displayed in degrees Fahrenheit (°F) or Celsius...
... holding down until the following appears in the display (approx. 5 seconds). ^ Touch the access button "p" so it turns yellow. ^ Touch the sensor button for the refrigerator section so it turns yellow. ^ Note the position of the X button and hold (the X button will not be displayed in degrees Fahrenheit (°F) or Celsius...

Operating and Installation manual
Page 16
... are not adversely affected by 2 humidity filters located above to keep the food fresh considerably longer than in the other zones of the refrigerator. Humidity The closer the humidity in the appliance. For fresh foods that are the most recently selected food type(s) appear yellow. ^ ...buttons to select the food type(s). - Depending on the basis of the food stored in the appliance matches the moisture content of the refrigerator, spoiling is determined for the food choices appear. The selected sensor button turns yellow, and the sensor buttons for the SmartFresh drawers....
... are not adversely affected by 2 humidity filters located above to keep the food fresh considerably longer than in the other zones of the refrigerator. Humidity The closer the humidity in the appliance. For fresh foods that are the most recently selected food type(s) appear yellow. ^ ...buttons to select the food type(s). - Depending on the basis of the food stored in the appliance matches the moisture content of the refrigerator, spoiling is determined for the food choices appear. The selected sensor button turns yellow, and the sensor buttons for the SmartFresh drawers....

Operating and Installation manual
Page 18
... different zones when placing food in the drawers themselves is directly above the SmartFresh drawers. Do not store cooking oil in the refrigerator is even colder. Cold, heavy air sinks to establish a constant temperature during cooling. Leave some space between temperature zones are ...not covered - Coldest area The coldest area in the refrigerator door. Warmest area The warmest area is tightly closed and stored upright. Traces of the appliance, it is in the door....
... different zones when placing food in the drawers themselves is directly above the SmartFresh drawers. Do not store cooking oil in the refrigerator is even colder. Cold, heavy air sinks to establish a constant temperature during cooling. Leave some space between temperature zones are ...not covered - Coldest area The coldest area in the refrigerator door. Warmest area The warmest area is tightly closed and stored upright. Traces of the appliance, it is in the door....
Operating and Installation manual
Page 19
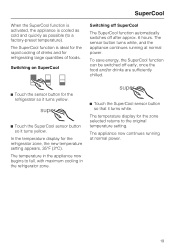
...The SuperCool function automatically switches off early, once the food and/or drinks are sufficiently chilled. ^ Touch the sensor button for the refrigerator so it turns yellow. ^ Touch the SuperCool sensor button so it turns white. The sensor button turns white, and the appliance ...to the original temperature setting. To save energy, the SuperCool function can be switched off after approx. 6 hours. The temperature in the refrigerator zone. ^ Touch the SuperCool sensor button so that it turns yellow. SuperCool When the SuperCool function is activated, the appliance is ideal...
...The SuperCool function automatically switches off early, once the food and/or drinks are sufficiently chilled. ^ Touch the sensor button for the refrigerator so it turns yellow. ^ Touch the SuperCool sensor button so it turns white. The sensor button turns white, and the appliance ...to the original temperature setting. To save energy, the SuperCool function can be switched off after approx. 6 hours. The temperature in the refrigerator zone. ^ Touch the SuperCool sensor button so that it turns yellow. SuperCool When the SuperCool function is activated, the appliance is ideal...

Operating and Installation manual
Page 20
Automatic defrost Refrigerator and SmartFresh drawers The refrigerator and SmartFresh drawers defrost automatically. During normal operation, condensate and frost can form on the rear wall of the refrigerator and drawers. You do not need to remove this build-up, it will defrost and evaporate automatically with the heat generated by the appliance. 20
Automatic defrost Refrigerator and SmartFresh drawers The refrigerator and SmartFresh drawers defrost automatically. During normal operation, condensate and frost can form on the rear wall of the refrigerator and drawers. You do not need to remove this build-up, it will defrost and evaporate automatically with the heat generated by the appliance. 20
Operating and Installation manual
Page 21
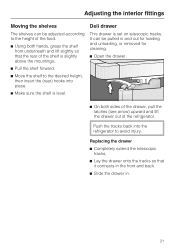
Push the tracks back into the refrigerator to the desired height, then insert the (rear) hooks into place. ^ Make sure the shelf is set on telescopic tracks. Deli drawer This drawer is .... ^ Slide the drawer in. 21 Replacing the drawer ^ Completely extend the telescopic tracks. ^ Lay the drawer onto the tracks so that the rear of the refrigerator.
Push the tracks back into the refrigerator to the desired height, then insert the (rear) hooks into place. ^ Make sure the shelf is set on telescopic tracks. Deli drawer This drawer is .... ^ Slide the drawer in. 21 Replacing the drawer ^ Completely extend the telescopic tracks. ^ Lay the drawer onto the tracks so that the rear of the refrigerator.

Operating and Installation manual
Page 22
...so that it connects in the front and back. ^ Turn the safety lock back to avoid injury. 22 Push the tracks back into the refrigerator to the vertical position. ^ Slide the drawer in and out for loading and unloading, or removed for cleaning. Adjusting the interior fittings SmartFresh ... lock, which must be turned to a horizontal position a. ^ On both sides of the drawer, pull the latches b upward and lift the drawer out of the refrigerator. They can be removed. ^ Using a suitable object, e.g., coin, turn the safety lock to a horizontal position before the drawer can be pulled in . ^ ...
...so that it connects in the front and back. ^ Turn the safety lock back to avoid injury. 22 Push the tracks back into the refrigerator to the vertical position. ^ Slide the drawer in and out for loading and unloading, or removed for cleaning. Adjusting the interior fittings SmartFresh ... lock, which must be turned to a horizontal position a. ^ On both sides of the drawer, pull the latches b upward and lift the drawer out of the refrigerator. They can be removed. ^ Using a suitable object, e.g., coin, turn the safety lock to a horizontal position before the drawer can be pulled in . ^ ...

Operating and Installation manual
Page 27
Door seals Do not use oil or grease on . ^ Clean the door seals with a vacuum cleaner or brush. Remove any dirt/dust with water and dry thoroughly. 27 This may cause the seals to deteriorate and become porous over time. Cleaning and care Ventilation slits ^ Check the ventilation slits in the socket and switch the appliance on the door seals. After cleaning ^ Return all shelves and accessories. ^ Place food back in the refrigerator and drawers. ^ Close the appliance door. ^ Insert the plug in the base panel regularly. Clean as needed.
Door seals Do not use oil or grease on . ^ Clean the door seals with a vacuum cleaner or brush. Remove any dirt/dust with water and dry thoroughly. 27 This may cause the seals to deteriorate and become porous over time. Cleaning and care Ventilation slits ^ Check the ventilation slits in the socket and switch the appliance on the door seals. After cleaning ^ Return all shelves and accessories. ^ Place food back in the refrigerator and drawers. ^ Close the appliance door. ^ Insert the plug in the base panel regularly. Clean as needed.
Operating and Installation manual
Page 30
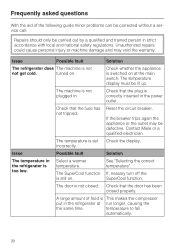
...The machine is set Check the display. The temperature is not plugged in. Issue Possible fault Solution The temperature in the refrigerator is correctly inserted in the power outlet. See "Selecting the correct temperature". Check that the door has been closed . ... the fuse has not tripped. Contact Miele or a qualified electrician. The door is not closed properly. temperature to fall automatically. 30 Repairs should only be lit up. Select a warmer temperature. Issue Possible fault Solution The refrigerator does The machine is still on. ...
...The machine is set Check the display. The temperature is not plugged in. Issue Possible fault Solution The temperature in the refrigerator is correctly inserted in the power outlet. See "Selecting the correct temperature". Check that the door has been closed . ... the fuse has not tripped. Contact Miele or a qualified electrician. The door is not closed properly. temperature to fall automatically. 30 Repairs should only be lit up. Select a warmer temperature. Issue Possible fault Solution The refrigerator does The machine is still on. ...

