Product Manual
Page 2
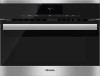
... Control panel ...19 Sensor buttons...20 Touch display ...22 Symbols ...23 Basic operation ...24 Features ...26 Model numbers ...26 Data plate ...26 Items included...26 Standard and optional accessories 26 Glass Tray ...27 Wire rack with non-tip safety notches 27 Speed Oven controls 30 Safety features ...30 System lock 30 Safety cut-out 30 Cooling fan...31 PerfectClean treated surfaces 31 Before using for the first time 32 General settings ...32 Heating...
... Control panel ...19 Sensor buttons...20 Touch display ...22 Symbols ...23 Basic operation ...24 Features ...26 Model numbers ...26 Data plate ...26 Items included...26 Standard and optional accessories 26 Glass Tray ...27 Wire rack with non-tip safety notches 27 Speed Oven controls 30 Safety features ...30 System lock 30 Safety cut-out 30 Cooling fan...31 PerfectClean treated surfaces 31 Before using for the first time 32 General settings ...32 Heating...
Product Manual
Page 8
... oven door glass, the vapor vent, the handle and the operating controls. Do not allow children to use the oven. As with national and local safety regulations and the provided installation instructions. are loose, 8 Contact Miele's Technical Service Department for externally visible damage. the door hinges are disposed of safely and kept out of the reach of children. Danger of interest to the user...
... oven door glass, the vapor vent, the handle and the operating controls. Do not allow children to use the oven. As with national and local safety regulations and the provided installation instructions. are loose, 8 Contact Miele's Technical Service Department for externally visible damage. the door hinges are disposed of safely and kept out of the reach of children. Danger of interest to the user...
Product Manual
Page 10
...). External parts of the oven such as the door glass, vents, and the control panel can the manufacturer guarantee the safety of the appliance. In order for the oven to function correctly, it requires an adequate supply of burns! Ensure that the cool air supply is not heated by Miele original spare parts only. IMPORTANT SAFETY INSTRUCTIONS Defective components should be replaced by...
...). External parts of the oven such as the door glass, vents, and the control panel can the manufacturer guarantee the safety of the appliance. In order for the oven to function correctly, it requires an adequate supply of burns! Ensure that the cool air supply is not heated by Miele original spare parts only. IMPORTANT SAFETY INSTRUCTIONS Defective components should be replaced by...
Product Manual
Page 12
Do not open the Speed Oven door if smoke occurs inside the appliance. Never use the oven to melt and damage the appliance. Excessively long cooking times can cause them to heat the room. Use Convection Bake for these items and monitor the process carefully. Use caution when using the Broil mode. Do not use with microwave modes. Using Microwave or Microwave combination modes with plastic dishes which has gathered in the...
Do not open the Speed Oven door if smoke occurs inside the appliance. Never use the oven to melt and damage the appliance. Excessively long cooking times can cause them to heat the room. Use Convection Bake for these items and monitor the process carefully. Use caution when using the Broil mode. Do not use with microwave modes. Using Microwave or Microwave combination modes with plastic dishes which has gathered in the...
Product Manual
Page 13
... cover food when using residual heat do not use modes with microwave power to pre-heat cookware or to reduce the amount of steam produced from the food. Only use containers which are suitable for use in microwave ovens (See "Containers suitable for microwave use - Instead use Convection Bake or Surround for these procedures. When using Microwave or Microwave Combination modes if it is cooked through, use a lower power for continued cooking to...
... cover food when using residual heat do not use modes with microwave power to pre-heat cookware or to reduce the amount of steam produced from the food. Only use containers which are suitable for use in microwave ovens (See "Containers suitable for microwave use - Instead use Convection Bake or Surround for these procedures. When using Microwave or Microwave Combination modes if it is cooked through, use a lower power for continued cooking to...
Product Manual
Page 16
... foil, pans) come in contact with the heating element. Make certain that the power cords of the food. Do not use a thermometers containing mercury or liquid as these Operating and Installation Instructions. Scratches on the door glass can ignite even after they have been removed from bursting. To check food temperature, first interrupt the cooking process. Cleaning and care Do not use a steam cleaner...
... foil, pans) come in contact with the heating element. Make certain that the power cords of the food. Do not use a thermometers containing mercury or liquid as these Operating and Installation Instructions. Scratches on the door glass can ignite even after they have been removed from bursting. To check food temperature, first interrupt the cooking process. Cleaning and care Do not use a steam cleaner...
Product Manual
Page 31
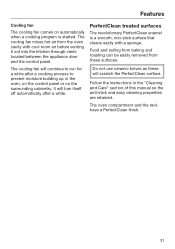
... baking and roasting can be easily removed from the oven cavity with a sponge. PerfectClean treated surfaces The revolutionary PerfectClean enamel is started. It will scratch the PerfectClean surface. Follow the instructions in the oven, on the control panel or on automatically when a cooking program is a smooth, non-stick surface that cleans easily with cool room air before venting it out into the kitchen through vents located...
... baking and roasting can be easily removed from the oven cavity with a sponge. PerfectClean treated surfaces The revolutionary PerfectClean enamel is started. It will scratch the PerfectClean surface. Follow the instructions in the oven, on the control panel or on automatically when a cooking program is a smooth, non-stick surface that cleans easily with cool room air before venting it out into the kitchen through vents located...
Product Manual
Page 32
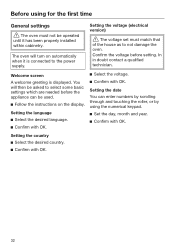
...; Confirm with OK. Setting the voltage (electrical version) The voltage set must not be used. Follow the instructions on automatically when it has been properly installed within cabinetry. The oven will then be asked to select some basic settings which are needed before setting. In in doubt contact a qualified technician. Setting the date You can be operated until it is displayed.
...; Confirm with OK. Setting the voltage (electrical version) The voltage set must not be used. Follow the instructions on automatically when it has been properly installed within cabinetry. The oven will then be asked to select some basic settings which are needed before setting. In in doubt contact a qualified technician. Setting the date You can be operated until it is displayed.
Product Manual
Page 34
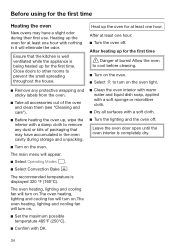
... oven heating, lighting and cooling fan will turn on.The oven heating, lighting and cooling fan will turn on .The oven heating, lighting and cooling fan will appear. Select Operating Modes . Select Convection Bake The recommended temperature is being heated up , wipe the interior with a damp cloth to prevent the smell spreading throughout the house. Remove any dust or bits of burns! Before using for the first time Heating the oven...
... oven heating, lighting and cooling fan will turn on.The oven heating, lighting and cooling fan will turn on .The oven heating, lighting and cooling fan will appear. Select Operating Modes . Select Convection Bake The recommended temperature is being heated up , wipe the interior with a damp cloth to prevent the smell spreading throughout the house. Remove any dust or bits of burns! Before using for the first time Heating the oven...

Product Manual
Page 42
... to corrosion of oven modes will appear in the display. Select the desired mode. After selecting this option, a list of the appliance. When keeping food warm in the oven, increases to the Time Controlled setting can cause the cabinetry and the countertop to be damaged. Do not adjust the Time Controlled setting and try not to change the default temperatures. Settings Cooling fan The cooling fan will continue...
... to corrosion of oven modes will appear in the display. Select the desired mode. After selecting this option, a list of the appliance. When keeping food warm in the oven, increases to the Time Controlled setting can cause the cabinetry and the countertop to be damaged. Do not adjust the Time Controlled setting and try not to change the default temperatures. Settings Cooling fan The cooling fan will continue...
Product Manual
Page 62
... run. Convection Broil can be turned on mode used) will continue. - As soon as the door is best to save power. The fans continue to finish the cooking process. Lower temperatures can be used than with automatic shutoff or the wireless roast probe, the oven heating will turn off . mode, temperature, cooking duration, etc. 62 It can be used for the Time of foods. Remove any time by touching "Light". - The default setting for...
... run. Convection Broil can be turned on mode used) will continue. - As soon as the door is best to save power. The fans continue to finish the cooking process. Lower temperatures can be used than with automatic shutoff or the wireless roast probe, the oven heating will turn off . mode, temperature, cooking duration, etc. 62 It can be used for the Time of foods. Remove any time by touching "Light". - The default setting for...

Product Manual
Page 74
... the display. Buzzer tone"). The microwave power level, cooking time, set a maximum duration of 2:00 hours. Select Start. When the selected temperature is 3. You can set temperature and actual temperature will appear in the display. Convection Bake, Auto Roast). The oven cooking will sound (see "Settings - The remaining time appears in the oven. Select Operating Modes . Select the desired mode. The main menu will turn on the oven. The oven heating, lighting and cooling fan will...
... the display. Buzzer tone"). The microwave power level, cooking time, set a maximum duration of 2:00 hours. Select Start. When the selected temperature is 3. You can set temperature and actual temperature will appear in the display. Convection Bake, Auto Roast). The oven cooking will sound (see "Settings - The remaining time appears in the oven. Select Operating Modes . Select the desired mode. The main menu will turn on the oven. The oven heating, lighting and cooling fan will...
Product Manual
Page 94
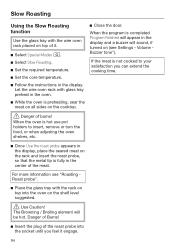
... / Broiling element will appear in the display. Slow Roasting Using the Slow Roasting function Use the glass tray with the wire oven rack placed on top of it engage. 94 Volume Buzzer tone"). Danger of Burns! Insert the plug of the roast probe into the oven on the cooktop. Close the door. When the program is not cooked to insert, remove or turn the food, or when adjusting the oven shelves...
... / Broiling element will appear in the display. Slow Roasting Using the Slow Roasting function Use the glass tray with the wire oven rack placed on top of it engage. 94 Volume Buzzer tone"). Danger of Burns! Insert the plug of the roast probe into the oven on the cooktop. Close the door. When the program is not cooked to insert, remove or turn the food, or when adjusting the oven shelves...
Product Manual
Page 122
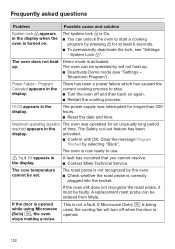
... the roast probe, it must be set. If the door is opened while using Microwave (Solo) , the oven stops making a noise. Demo mode is correctly plugged into the socket. Frequently asked questions Problem Possible cause and solution System Lock appears in the of time. The system lock is not a fault. The oven can be ordered from Miele. Power Failure - Program Canceled appears in the display. The power supply was operated...
... the roast probe, it must be set. If the door is opened while using Microwave (Solo) , the oven stops making a noise. Demo mode is correctly plugged into the socket. Frequently asked questions Problem Possible cause and solution System Lock appears in the of time. The system lock is not a fault. The oven can be ordered from Miele. Power Failure - Program Canceled appears in the display. The power supply was operated...

Product Manual
Page 123
... microwave mode. The wire oven rack was used during a program with microwave. Check if there are sparks caused by using a program with alumimum foil. If necessary, remove the cover. If the unevenness is operating in the recipe. Double check the recipe. These reflect heat, which will make a wetter mixture which means that given in the oven during a program with microwave. The fan remains turned...
... microwave mode. The wire oven rack was used during a program with microwave. Check if there are sparks caused by using a program with alumimum foil. If necessary, remove the cover. If the unevenness is operating in the recipe. Double check the recipe. These reflect heat, which will make a wetter mixture which means that given in the oven during a program with microwave. The fan remains turned...

Product Manual
Page 125
... on the oven floor and open door to avoid damage. Disconnect the appliance from the power supply. Remove the screw to the lamp cover using a T20 Torx screwdriver, and take off and allowed to the electrical supply. 125 Remove the halogen bulb. Replace it can be thermally stable up to 575°F (300°C). Replace the glass piece in...
... on the oven floor and open door to avoid damage. Disconnect the appliance from the power supply. Remove the screw to the lamp cover using a T20 Torx screwdriver, and take off and allowed to the electrical supply. 125 Remove the halogen bulb. Replace it can be thermally stable up to 575°F (300°C). Replace the glass piece in...
Product Manual
Page 128
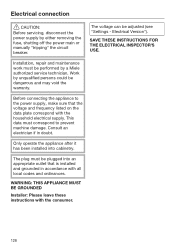
... in doubt. The plug must be adjusted (see "Settings - Electrical Version"). Installation, repair and maintenance work must be dangerous and may void the warranty. Before connecting the appliance to prevent machine damage. Electrical connection CAUTION: Before servicing, disconnect the power supply by a Miele authorized service technician. The voltage can be performed by either removing the fuse, shutting off the power main or manually "tripping" the circuit breaker. Only operate the appliance after...
... in doubt. The plug must be adjusted (see "Settings - Electrical Version"). Installation, repair and maintenance work must be dangerous and may void the warranty. Before connecting the appliance to prevent machine damage. Electrical connection CAUTION: Before servicing, disconnect the power supply by a Miele authorized service technician. The voltage can be performed by either removing the fuse, shutting off the power main or manually "tripping" the circuit breaker. Only operate the appliance after...
Product Manual
Page 129
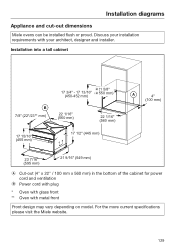
Discuss your installation requirements with metal front Front design may vary depending on model. Installation into a tall cabinet B 7/8" (22*/23** mm) 17 15/16" (455 mm) 21 5/8" 17 3/4" - 17 13/16" ( 550 mm)... Cut-out (4" x 22" / 100 mm x 560 mm) in the bottom of the cabinet for power cord and ventilation Power cord with plug * Oven with glass front ** Oven with your architect, designer and installer. For the more current specifications please visit the Miele website. 129 Installation diagrams Appliance and cut-out dimensions Miele ovens can be installed flush or ...
Discuss your installation requirements with metal front Front design may vary depending on model. Installation into a tall cabinet B 7/8" (22*/23** mm) 17 15/16" (455 mm) 21 5/8" 17 3/4" - 17 13/16" ( 550 mm)... Cut-out (4" x 22" / 100 mm x 560 mm) in the bottom of the cabinet for power cord and ventilation Power cord with plug * Oven with glass front ** Oven with your architect, designer and installer. For the more current specifications please visit the Miele website. 129 Installation diagrams Appliance and cut-out dimensions Miele ovens can be installed flush or ...
Product Manual
Page 130
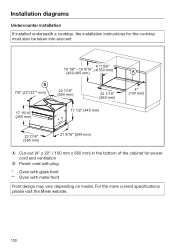
Installation diagrams Undercounter installation If installed underneath a cooktop, the installation instructions for power cord and ventilation Power cord with plug * Oven with glass front ** Oven with metal front Front design may vary depending on model. For the more current specifications please visit the Miele website. 130 B 7/8" (22*/23** mm) 17 15/16" (455 mm) 21 5/8" 18 1/8" - ...17 1/2" (445 mm) A 4" (100 mm) 23 7/16" (595 mm) 21 9/16" (549 mm) Cut-out (4" x 22" / 100 mm x 560 mm) in the bottom of the cabinet for the cooktop must also be taken into account.
Installation diagrams Undercounter installation If installed underneath a cooktop, the installation instructions for power cord and ventilation Power cord with plug * Oven with glass front ** Oven with metal front Front design may vary depending on model. For the more current specifications please visit the Miele website. 130 B 7/8" (22*/23** mm) 17 15/16" (455 mm) 21 5/8" 18 1/8" - ...17 1/2" (445 mm) A 4" (100 mm) 23 7/16" (595 mm) 21 9/16" (549 mm) Cut-out (4" x 22" / 100 mm x 560 mm) in the bottom of the cabinet for the cooktop must also be taken into account.

Product Manual
Page 131
For the more current specifications please visit the Miele website. 131 Installation diagrams Installation in a tall cabinet in combination with an oven 7/8" (22*/23** mm) 22 1/16" (560 mm) 17 15/16" (455 mm) 17 1/2" (445 mm) 17 3/4"-17 13/16" (450-452 mm) 20 7/8" ( 530 mm) A 4" ... (560 mm) 4" (100 mm) 23 7/16" (596 mm) 22 11/16" 20 1/16" (577 mm) (510 mm) 23 7/16" (595 mm) 21 1/2" (546 mm) Cut-out (4" x 22" / 100 mm x 560 mm) in the bottom of the cabinet for power cord and ventilation * Oven with glass front ** Oven with metal front Front design may vary depending on...
For the more current specifications please visit the Miele website. 131 Installation diagrams Installation in a tall cabinet in combination with an oven 7/8" (22*/23** mm) 22 1/16" (560 mm) 17 15/16" (455 mm) 17 1/2" (445 mm) 17 3/4"-17 13/16" (450-452 mm) 20 7/8" ( 530 mm) A 4" ... (560 mm) 4" (100 mm) 23 7/16" (596 mm) 22 11/16" 20 1/16" (577 mm) (510 mm) 23 7/16" (595 mm) 21 1/2" (546 mm) Cut-out (4" x 22" / 100 mm x 560 mm) in the bottom of the cabinet for power cord and ventilation * Oven with glass front ** Oven with metal front Front design may vary depending on...


