
Specs
Page 2
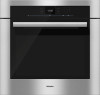
ContourLine 30" Convection Oven H 6580 BP FOREVER BETTER H 6580 BP Features: • SensorTronic controls: 5-line TFT display with laterally positioned sensor controls that clearly present menu content. • Self Clean Oven • 19 Operating Modes &#... Probe for easier handling • ComfortSwivel Handle moves with the motion of your wrist, creating a more ergonomic feel when opening and closing the oven door H 6580 BP Page 2 of hot air • Soft Open and Soft Close for perfect roasting results • Favorites -
ContourLine 30" Convection Oven H 6580 BP FOREVER BETTER H 6580 BP Features: • SensorTronic controls: 5-line TFT display with laterally positioned sensor controls that clearly present menu content. • Self Clean Oven • 19 Operating Modes &#... Probe for easier handling • ComfortSwivel Handle moves with the motion of your wrist, creating a more ergonomic feel when opening and closing the oven door H 6580 BP Page 2 of hot air • Soft Open and Soft Close for perfect roasting results • Favorites -
Specs
Page 3
ContourLine 30" Convection Oven H 6580 BP FOREVER BETTER H 6580 BP Page 3 of 8
ContourLine 30" Convection Oven H 6580 BP FOREVER BETTER H 6580 BP Page 3 of 8
Specs
Page 4
...Additional Cut-outs Required Venting cut-out required at base of cabinet (4" x 28" / 100 mm x 720 mm) in the bottom of 8 NEMA 14-30 plug 120/208V, 30A, 60Hz 5800w / 120/240V, 30A, 60Hz 4400w 240V / 24.166A / 208V / 21.15A Shipping Weight Shipping Dimensions Support 216 ...lbs 3211/16" W x 351/16" H x 305/16" L Call 20/20 800.843.7231 82020technologies.com FOREVER BETTER H 6580 BP Page 4 of the cabinet for power cord and ventilation Electrical Electrical Requirements Power Cord Electrical Rating Total Amps Shipping 208/240V 30A 60Hz circuit Yes...
...Additional Cut-outs Required Venting cut-out required at base of cabinet (4" x 28" / 100 mm x 720 mm) in the bottom of 8 NEMA 14-30 plug 120/208V, 30A, 60Hz 5800w / 120/240V, 30A, 60Hz 4400w 240V / 24.166A / 208V / 21.15A Shipping Weight Shipping Dimensions Support 216 ...lbs 3211/16" W x 351/16" H x 305/16" L Call 20/20 800.843.7231 82020technologies.com FOREVER BETTER H 6580 BP Page 4 of the cabinet for power cord and ventilation Electrical Electrical Requirements Power Cord Electrical Rating Total Amps Shipping 208/240V 30A 60Hz circuit Yes...

Specs
Page 5
ContourLine 30" Convection Oven H 6580 BP PRODUCT VIEWS Isometric FOREVER BETTER Front H 6580 BP Page 5 of 8
ContourLine 30" Convection Oven H 6580 BP PRODUCT VIEWS Isometric FOREVER BETTER Front H 6580 BP Page 5 of 8

Specs
Page 6
ContourLine 30" Convection Oven H 6580 BP PRODUCT VIEWS Top View FOREVER BETTER Rear View Electrical Connection RemoteVision Module H 6580 BP Page 6 of 8
ContourLine 30" Convection Oven H 6580 BP PRODUCT VIEWS Top View FOREVER BETTER Rear View Electrical Connection RemoteVision Module H 6580 BP Page 6 of 8

Specs
Page 7
ContourLine 30" Convection Oven H 6580 BP PRODUCT VIEWS Side View FOREVER BETTER INSTALLATION SPECIFICATIONS Install in Tall Cabinet H 6580 BP Page 7 of 8
ContourLine 30" Convection Oven H 6580 BP PRODUCT VIEWS Side View FOREVER BETTER INSTALLATION SPECIFICATIONS Install in Tall Cabinet H 6580 BP Page 7 of 8

Specs
Page 8
ContourLine 30" Convection Oven H 6580 BP INSTALLATION SPECIFICATIONS Undercounter Installation FOREVER BETTER H 6580 BP Page 8 of 8
ContourLine 30" Convection Oven H 6580 BP INSTALLATION SPECIFICATIONS Undercounter Installation FOREVER BETTER H 6580 BP Page 8 of 8

Product Manual
Page 2
... the first time 26 General settings ...26 Heating the oven...28 Settings ...29 Accessing the "Settings" menu 29 Changing and saving settings 29 Settings overview 30 Language ...32 Time of day ...32 Display ...32 Clock format ...32 Setting the time 32 Date...32 Lighting ...33 Display brightness 33 Buzzer tones...
... the first time 26 General settings ...26 Heating the oven...28 Settings ...29 Accessing the "Settings" menu 29 Changing and saving settings 29 Settings overview 30 Language ...32 Time of day ...32 Display ...32 Clock format ...32 Setting the time 32 Date...32 Lighting ...33 Display brightness 33 Buzzer tones...

Product Manual
Page 30
Country Show On / Off * / Night Dimming Clock Format 24 h / 12 h * Set On / On for 15 Seconds * Melody Solo Tone Weight g / lb:oz * Temperature °C / °F * * Factory default 30 Settings Settings overview Option Language Time Date Lighting Display Brightness Buzzer Tones Keypad Tone Units of Measurement Available settings ... / deutsch / english / ...
Country Show On / Off * / Night Dimming Clock Format 24 h / 12 h * Set On / On for 15 Seconds * Melody Solo Tone Weight g / lb:oz * Temperature °C / °F * * Factory default 30 Settings Settings overview Option Language Time Date Lighting Display Brightness Buzzer Tones Keypad Tone Units of Measurement Available settings ... / deutsch / english / ...

Product Manual
Page 41
... convection fan to the modes The oven has a wide range of modes for preparing a variety of meat, fish and crispy poultry. 320°F (160°C) 30-475°F (250°C) 41 Guide to circulate heated air throughout the oven.
... convection fan to the modes The oven has a wide range of modes for preparing a variety of meat, fish and crispy poultry. 320°F (160°C) 30-475°F (250°C) 41 Guide to circulate heated air throughout the oven.

Product Manual
Page 42
...; The entire upper heating element is used then when using the fan. pot roast, and braising or cooking at low temperatures. 355°F (180°C) 30-525°F (280°C) 42
...; The entire upper heating element is used then when using the fan. pot roast, and braising or cooking at low temperatures. 355°F (180°C) 30-525°F (280°C) 42

Product Manual
Page 48
... . The oven will turn on or off automatically at you would like cooking to set core temperature is 12 hours. The food takes 30 minutes to set has elapsed, the heating will turn off automatically. By entering Duration, Duration or Start at the time set . Duration ...are using the roast probe. Duration Enter the cooking duration desired. The oven will switch off automatically It is reached. - Select Duration and set 0:30 h or select Ready at . Use the numeric keypad to start at time cannot be ready (1-2-1-5). Confirm with OK. Once the...
... . The oven will turn on or off automatically at you would like cooking to set core temperature is 12 hours. The food takes 30 minutes to set has elapsed, the heating will turn off automatically. By entering Duration, Duration or Start at the time set . Duration ...are using the roast probe. Duration Enter the cooking duration desired. The oven will switch off automatically It is reached. - Select Duration and set 0:30 h or select Ready at . Use the numeric keypad to start at time cannot be ready (1-2-1-5). Confirm with OK. Once the...

Product Manual
Page 49
...cooking process a buzzer will continue to enter the time parameters: - Start at time will be ready at 12:30. Select Change. Select Duration and set the time to 12:30 h. After the program has started you have the option to save the program as a Favorite (see "Settings -..."). During the cooling down in the display. To turn on automatically when this temperature is reached, a buzzer will lose their effectiveness. Sequence of 0:30 h. Select Ready at and the start of how to run. 49 Select "Back" to go back to use the automatic On/Off feature...
...cooking process a buzzer will continue to enter the time parameters: - Start at time will be ready at 12:30. Select Change. Select Duration and set the time to 12:30 h. After the program has started you have the option to save the program as a Favorite (see "Settings -..."). During the cooling down in the display. To turn on automatically when this temperature is reached, a buzzer will lose their effectiveness. Sequence of 0:30 h. Select Ready at and the start of how to run. 49 Select "Back" to go back to use the automatic On/Off feature...
Product Manual
Page 75
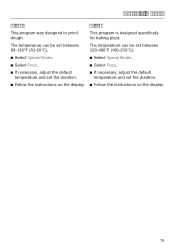
... is designed specifically for baking pizza. Special Modes Proof This program was designed to proof dough. The temperature can be set between 85-120°F (30-50°C). Select Special Modes. Select Proof. If necessary, adjust the default temperature and set the duration. Follow the instructions on...
... is designed specifically for baking pizza. Special Modes Proof This program was designed to proof dough. The temperature can be set between 85-120°F (30-50°C). Select Special Modes. Select Proof. If necessary, adjust the default temperature and set the duration. Follow the instructions on...

Product Manual
Page 78
Pressure will build up or can explode causing damage to use jars designed for an additional 25-30 minutes. Then reduce the temperature to heat up inside them . 78 Fruit / Cucumbers As soon as bubbles are visible in the jars. After ... sealed jars or containers. Vegetables Reduce the temperature to set for approx. 24 hours. Make sure all jars are for an additional 25-30 minutes. Canning jars, - Then leave the jars in the jars select the lowest temperature. Canning containers Danger of burns! After canning Danger of...
Pressure will build up or can explode causing damage to use jars designed for an additional 25-30 minutes. Then reduce the temperature to heat up inside them . 78 Fruit / Cucumbers As soon as bubbles are visible in the jars. After ... sealed jars or containers. Vegetables Reduce the temperature to set for approx. 24 hours. Make sure all jars are for an additional 25-30 minutes. Canning jars, - Then leave the jars in the jars select the lowest temperature. Canning containers Danger of burns! After canning Danger of...
Product Manual
Page 96
... on the data plate correspond with the consumer. 96 Electrical connection CAUTION: Before servicing, disconnect the power supply by a Miele authorized service technician. Work by unqualified persons could be performed by either removing the fuse, shutting off the power main or manually "... leave these instructions with the household electrical supply. Electrical connection The oven is installed and grounded in accordance with a NEMA 14-30 P plug ready for connection to prevent machine damage. This data must be dangerous and may void the warranty. Before connecting the...
... on the data plate correspond with the consumer. 96 Electrical connection CAUTION: Before servicing, disconnect the power supply by a Miele authorized service technician. Work by unqualified persons could be performed by either removing the fuse, shutting off the power main or manually "... leave these instructions with the household electrical supply. Electrical connection The oven is installed and grounded in accordance with a NEMA 14-30 P plug ready for connection to prevent machine damage. This data must be dangerous and may void the warranty. Before connecting the...