
Product Manual
Page 2
... Model numbers ...19 Data plate ...19 Items included...19 Standard and optional accessories 19 Shelf runners...20 Universal tray and Wire oven rack 20 FlexiClips with wire rack 21 Oven controls ...24 Safety features ...24 System lock 24 Safety cut-out 24 Cooling fan...24 Vented oven door 24 Safety Door Lock for Self Clean 24 PerfectClean treated surfaces 25 Self Clean ready accessories 25 Before using for the first time 26 General settings ...26 Heating the oven...28 Settings...
... Model numbers ...19 Data plate ...19 Items included...19 Standard and optional accessories 19 Shelf runners...20 Universal tray and Wire oven rack 20 FlexiClips with wire rack 21 Oven controls ...24 Safety features ...24 System lock 24 Safety cut-out 24 Cooling fan...24 Vented oven door 24 Safety Door Lock for Self Clean 24 PerfectClean treated surfaces 25 Self Clean ready accessories 25 Before using for the first time 26 General settings ...26 Heating the oven...28 Settings...
Product Manual
Page 7
... the installation instructions. Installation, repair and maintenance work by children. Danger of suffocation! IMPORTANT SAFETY INSTRUCTIONS Children Children should be performed by a Miele authorized service technician in accordance with any appliance, close supervision is necessary when used by unauthorized persons could be injured. Burn Hazard - The oven gets hot at the oven door glass, the vapor vent, the handle and the operating controls.
... the installation instructions. Installation, repair and maintenance work by children. Danger of suffocation! IMPORTANT SAFETY INSTRUCTIONS Children Children should be performed by a Miele authorized service technician in accordance with any appliance, close supervision is necessary when used by unauthorized persons could be injured. Burn Hazard - The oven gets hot at the oven door glass, the vapor vent, the handle and the operating controls.

Product Manual
Page 9
... sufficient time to cool. Do not let food sit in a hot oven. Caution: Heating elements may be hot even though they are not burned on the heating elements or interior surfaces of the oven. During and after use . Use caution to function correctly, it requires an adequate supply of the oven such as the door glass, vents, and the control panel can build up behind a cabinet door...
... sufficient time to cool. Do not let food sit in a hot oven. Caution: Heating elements may be hot even though they are not burned on the heating elements or interior surfaces of the oven. During and after use . Use caution to function correctly, it requires an adequate supply of the oven such as the door glass, vents, and the control panel can build up behind a cabinet door...

Product Manual
Page 13
... a Miele genuine roast probe. The high temperatures used in the Self Clean program. Please remove these accessories from other manufacturers are not designed for cleaning in or around the oven interior which seals the inside of the oven. Debris should not be used during self-cleaning will damage accessories that are used, the warranty may become void. Only use oven cleaners. Commercial oven cleaners or oven liners of any part...
... a Miele genuine roast probe. The high temperatures used in the Self Clean program. Please remove these accessories from other manufacturers are not designed for cleaning in or around the oven interior which seals the inside of the oven. Debris should not be used during self-cleaning will damage accessories that are used, the warranty may become void. Only use oven cleaners. Commercial oven cleaners or oven liners of any part...

Product Manual
Page 14
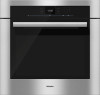
Guide to the oven a Control panel b Door with contact switch* and lock for Self Clean program c Browning / Broiling element d Oven interior lighting e Connection socket for the roast probe f Twin power convection fans with heating element g Runners with 6 shelf levels h Data plate i Clean Glass door * This switch ensures that the heating elements and the convection fans turn off when the door is opened during use. 14
Guide to the oven a Control panel b Door with contact switch* and lock for Self Clean program c Browning / Broiling element d Oven interior lighting e Connection socket for the roast probe f Twin power convection fans with heating element g Runners with 6 shelf levels h Data plate i Clean Glass door * This switch ensures that the heating elements and the convection fans turn off when the door is opened during use. 14

Product Manual
Page 24
... Self-Clean program is used . The door can be removed and disassembled for an exceedingly long period. It also allows you to use the various cooking modes to bake, roast and broil. the MasterChef programs, - settings that have a heat-reflective coating on part of time depends on and off, - Safety cut-out The oven automatically turns itself off automatically. The length of their surface. The cooling fan mixes hot air...
... Self-Clean program is used . The door can be removed and disassembled for an exceedingly long period. It also allows you to use the various cooking modes to bake, roast and broil. the MasterChef programs, - settings that have a heat-reflective coating on part of time depends on and off, - Safety cut-out The oven automatically turns itself off automatically. The length of their surface. The cooling fan mixes hot air...

Product Manual
Page 26
... minutes (e.g. 1-2-1-5 for the first time General settings The oven must match that of day can be used. Follow the instructions on automatically when it has been properly installed within cabinetry. Select the country Scroll through the list until it is displayed. You will turn on the display. Setting the voltage (electrical version) The voltage set the year, month and day...
... minutes (e.g. 1-2-1-5 for the first time General settings The oven must match that of day can be used. Follow the instructions on automatically when it has been properly installed within cabinetry. Select the country Scroll through the list until it is displayed. You will turn on the display. Setting the voltage (electrical version) The voltage set the year, month and day...

Product Manual
Page 28
.... Leave the oven door open until the oven interior is being heated up the oven for at least one hour with nothing in the oven cavity during their first use. Heat up for the first time. The oven heating, lighting and cooling fan will appear. Select Operating Modes. Select Convection Bake The default temperature is displayed 320°F (160°C). Close doors to other rooms to remove any protective wrapping...
.... Leave the oven door open until the oven interior is being heated up the oven for at least one hour with nothing in the oven cavity during their first use. Heat up for the first time. The oven heating, lighting and cooling fan will appear. Select Operating Modes. Select Convection Bake The default temperature is displayed 320°F (160°C). Close doors to other rooms to remove any protective wrapping...

Product Manual
Page 35
... temperatures. The default temperature is displayed along with the available temperature range. Change the default temperature. Confirm with temperatures that differ from building up in the oven, on the cabinetry. When keeping food warm in the surrounding cabinetry. - After selecting this option, a list of oven modes will appear in the display. - Time Controlled The cooling fan will turn off to run the self cleaning program. Do not adjust the Time Controlled setting...
... temperatures. The default temperature is displayed along with the available temperature range. Change the default temperature. Confirm with temperatures that differ from building up in the oven, on the cabinetry. When keeping food warm in the surrounding cabinetry. - After selecting this option, a list of oven modes will appear in the display. - Time Controlled The cooling fan will turn off to run the self cleaning program. Do not adjust the Time Controlled setting...

Product Manual
Page 43
... the roast probe, the oven heating will consume the least amount of cooking. Energy Save Phase will remain on again at any accessories from the oven that you do not require for 15 Seconds the oven interior lighting turns off depends on mode used) will appear in the display. Operation 43 Remove any time by touching "Light". - If a temperature range is given, it is best to open the door when cooking. - The oven turns off...
... the roast probe, the oven heating will consume the least amount of cooking. Energy Save Phase will remain on again at any accessories from the oven that you do not require for 15 Seconds the oven interior lighting turns off depends on mode used) will appear in the display. Operation 43 Remove any time by touching "Light". - If a temperature range is given, it is best to open the door when cooking. - The oven turns off...

Product Manual
Page 58
... bright, shiny metal tins as heat-resistant glass, ceramic and coated dishes can be greased or covered with parchment paper. anything with PerfectClean enamel. frozen food cooked on the wire rack. Surround : Dark metal, enamel or aluminum baking tins with PerfectClean enamel generally do not need to stick, - Always place baking pans on the wire rack. 58 This will allow for good...
... bright, shiny metal tins as heat-resistant glass, ceramic and coated dishes can be greased or covered with parchment paper. anything with PerfectClean enamel. frozen food cooked on the wire rack. Surround : Dark metal, enamel or aluminum baking tins with PerfectClean enamel generally do not need to stick, - Always place baking pans on the wire rack. 58 This will allow for good...

Product Manual
Page 66
... the door. 66 The Browning / Broiling element will sound, if turned on the shelf level indicated. Use Caution! Buzzer tone"). When the program is not cooked to insert, remove or turn the food, or when adjusting the oven shelves, etc. Once Use the roast probe appears in the center of the roast probe into the oven on (see "Roasting Roast probe". Place the universal tray on the rack...
... the door. 66 The Browning / Broiling element will sound, if turned on the shelf level indicated. Use Caution! Buzzer tone"). When the program is not cooked to insert, remove or turn the food, or when adjusting the oven shelves, etc. Once Use the roast probe appears in the center of the roast probe into the oven on (see "Roasting Roast probe". Place the universal tray on the rack...
Product Manual
Page 73
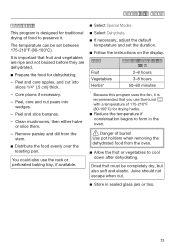
... set the duration. Follow the instructions on the display. Food Fruit Vegetables Herbs* Approx. Use pot holders when removing the dehydrated food from the stem. Distribute the food evenly over the roasting pan. It is important that you use the rack or perforated baking tray, if available. Select Special Modes. Select Dehydrate. If necessary, adjust the default temperature and set...
... set the duration. Follow the instructions on the display. Food Fruit Vegetables Herbs* Approx. Use pot holders when removing the dehydrated food from the stem. Distribute the food evenly over the roasting pan. It is important that you use the rack or perforated baking tray, if available. Select Special Modes. Select Dehydrate. If necessary, adjust the default temperature and set...
Product Manual
Page 74
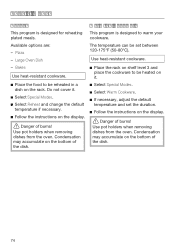
... plated meals. Condensation may accumulate on the rack. Bakes Use heat-resistant cookware. Place the food to be reheated in a dish on the bottom of burns! Condensation may accumulate on the display. Danger of the dish. 74 Large Oven Dish - Do not cover it . Select Special Modes. Select Warm Cookware. If necessary, adjust the default temperature and set...
... plated meals. Condensation may accumulate on the rack. Bakes Use heat-resistant cookware. Place the food to be reheated in a dish on the bottom of burns! Condensation may accumulate on the display. Danger of the dish. 74 Large Oven Dish - Do not cover it . Select Special Modes. Select Warm Cookware. If necessary, adjust the default temperature and set...
Product Manual
Page 75
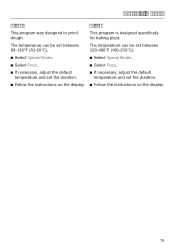
.... If necessary, adjust the default temperature and set the duration. Follow the instructions on the display. The temperature can be set between 320-480°F (160-250°C). Select Special Modes. Select Pizza. If necessary, adjust the default temperature and set the duration. Follow the instructions on the display. 75 Pizza This program is designed specifically for baking pizza.
.... If necessary, adjust the default temperature and set the duration. Follow the instructions on the display. The temperature can be set between 320-480°F (160-250°C). Select Special Modes. Select Pizza. If necessary, adjust the default temperature and set the duration. Follow the instructions on the display. 75 Pizza This program is designed specifically for baking pizza.

Product Manual
Page 87
Removing the door Cleaning and care Do not attempt to pull the door off the brackets when it rests partially open. Do not use the handle to take the door off the brackets, the handle could break. Close the door until it is connected with brackets on each door hinge. The door is in the horizontal position, the brackets will go. Holding the door securely at both sides, lift...
Removing the door Cleaning and care Do not attempt to pull the door off the brackets when it rests partially open. Do not use the handle to take the door off the brackets, the handle could break. Close the door until it is connected with brackets on each door hinge. The door is in the horizontal position, the brackets will go. Holding the door securely at both sides, lift...

Product Manual
Page 93
... oven over after the Self Clean and leaves it with a longer duration. 93 Observe the manufacturers instructions. Frequently asked questions Problem The oven lighting does not turn on the oven floor and open door to avoid damage. Disconnect the appliance from the power supply. Loosen the bulb cover with the tool supplied at the back of burns! If coarse soiling remains, start the Self Clean...
... oven over after the Self Clean and leaves it with a longer duration. 93 Observe the manufacturers instructions. Frequently asked questions Problem The oven lighting does not turn on the oven floor and open door to avoid damage. Disconnect the appliance from the power supply. Loosen the bulb cover with the tool supplied at the back of burns! If coarse soiling remains, start the Self Clean...
Product Manual
Page 96
... oven is installed and grounded in doubt. This data must be adjusted (see "Settings - SAVE THESE INSTRUCTIONS FOR THE ELECTRICAL INSPECTOR'S USE. Installation, repair and maintenance work must correspond to the power supply: - 120/208 V, 30 A, 60 Hz or - 120/240 V, 30 A, 60 Hz The voltage can be performed by a Miele authorized service technician. Work by either removing the fuse, shutting off the power main or manually "tripping" the circuit breaker...
... oven is installed and grounded in doubt. This data must be adjusted (see "Settings - SAVE THESE INSTRUCTIONS FOR THE ELECTRICAL INSPECTOR'S USE. Installation, repair and maintenance work must correspond to the power supply: - 120/208 V, 30 A, 60 Hz or - 120/240 V, 30 A, 60 Hz The voltage can be performed by a Miele authorized service technician. Work by either removing the fuse, shutting off the power main or manually "tripping" the circuit breaker...
Product Manual
Page 97
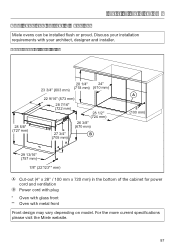
... (4" x 28" / 100 mm x 720 mm) in the bottom of the cabinet for power cord and ventilation Power cord with plug * Oven with glass front ** Oven with your installation requirements with metal front Front design may vary depending on model. Installation diagrams Appliance and cut-out dimensions Miele ovens can be installed flush or proud. For the more current specifications please visit the Miele website. 97 Discuss your architect, designer and...
... (4" x 28" / 100 mm x 720 mm) in the bottom of the cabinet for power cord and ventilation Power cord with plug * Oven with glass front ** Oven with your installation requirements with metal front Front design may vary depending on model. Installation diagrams Appliance and cut-out dimensions Miele ovens can be installed flush or proud. For the more current specifications please visit the Miele website. 97 Discuss your architect, designer and...
Product Manual
Page 98
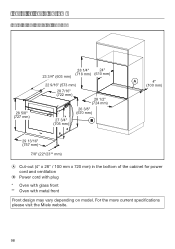
For the more current specifications please visit the Miele website. 98 Installation diagrams Installation into a tall cabinet 28 5/8" (727 mm) 28 1/4" 24" 23 3/4" (603 mm) (718 mm) (610 mm) 22 9/16" (573 mm) 28 7/16" (722 mm) 28 1/2" (724 mm) 26 3/8" (670 mm) 27 3/4" B (705 mm) A 4" (100 mm) 29 13/16" (757 mm) 7/8" (22*/23** mm) Cut-out (4" x 28" / 100 mm x 720 mm) in the bottom of the cabinet for power cord and ventilation Power cord with plug * Oven with glass front ** Oven with metal front Front design may vary depending on model.
For the more current specifications please visit the Miele website. 98 Installation diagrams Installation into a tall cabinet 28 5/8" (727 mm) 28 1/4" 24" 23 3/4" (603 mm) (718 mm) (610 mm) 22 9/16" (573 mm) 28 7/16" (722 mm) 28 1/2" (724 mm) 26 3/8" (670 mm) 27 3/4" B (705 mm) A 4" (100 mm) 29 13/16" (757 mm) 7/8" (22*/23** mm) Cut-out (4" x 28" / 100 mm x 720 mm) in the bottom of the cabinet for power cord and ventilation Power cord with plug * Oven with glass front ** Oven with metal front Front design may vary depending on model.


