Specs
Page 1
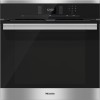
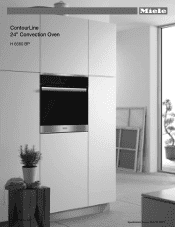
ContourLine 24" Convection Oven H 6560 BP 8mieleusa.com Specification Sheets TRS 07212015
ContourLine 24" Convection Oven H 6560 BP 8mieleusa.com Specification Sheets TRS 07212015
Specs
Page 2
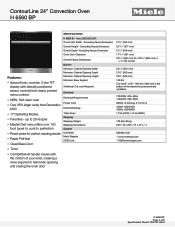
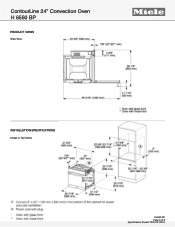
... Minimum Base Support Additional Cut-outs Required Electrical Electrical Requirements Power Cord Electrical Rating Total Amps Shipping Shipping Weight Shipping Dimensions Support Call Miele Miele Website 20/20 Link 213/4" (553 mm) 2211/16" (577 mm) 211/2" (546 mm) 1713/16" (451 mm...- Item 22656052USA Overal Unit Width - Excluding Fascia Dimension Overall Depth- Excluding Fascia Dimension Overall Height - ContourLine 24" Convection Oven H 6560 BP FOREVER BETTER Features: • SensorTronic controls: 5-line TFT display with the motion of 8 Specification Sheets TRS 07212015 up to 20 ...
... Minimum Base Support Additional Cut-outs Required Electrical Electrical Requirements Power Cord Electrical Rating Total Amps Shipping Shipping Weight Shipping Dimensions Support Call Miele Miele Website 20/20 Link 213/4" (553 mm) 2211/16" (577 mm) 211/2" (546 mm) 1713/16" (451 mm...- Item 22656052USA Overal Unit Width - Excluding Fascia Dimension Overall Depth- Excluding Fascia Dimension Overall Height - ContourLine 24" Convection Oven H 6560 BP FOREVER BETTER Features: • SensorTronic controls: 5-line TFT display with the motion of 8 Specification Sheets TRS 07212015 up to 20 ...
Specs
Page 3
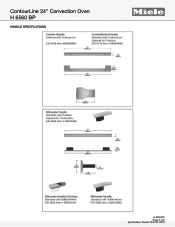
ContourLine 24" Convection Oven H 6560 BP HANDLE SPECIFICATIONS FOREVER BETTER H 6560 BP Page 3 of 8 Specification Sheets TRS 07212015
ContourLine 24" Convection Oven H 6560 BP HANDLE SPECIFICATIONS FOREVER BETTER H 6560 BP Page 3 of 8 Specification Sheets TRS 07212015
Specs
Page 4
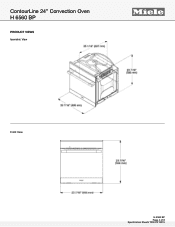
ContourLine 24" Convection Oven H 6560 BP PRODUCT VIEWS Isometric View FOREVER BETTER Front View H 6560 BP Page 4 of 8 Specification Sheets TRS 07212015
ContourLine 24" Convection Oven H 6560 BP PRODUCT VIEWS Isometric View FOREVER BETTER Front View H 6560 BP Page 4 of 8 Specification Sheets TRS 07212015
Specs
Page 5
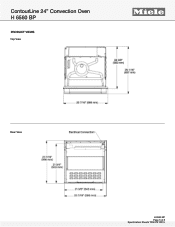
ContourLine 24" Convection Oven H 6560 BP PRODUCT VIEWS Top View FOREVER BETTER Rear View H 6560 BP Page 5 of 8 Specification Sheets TRS 07212015
ContourLine 24" Convection Oven H 6560 BP PRODUCT VIEWS Top View FOREVER BETTER Rear View H 6560 BP Page 5 of 8 Specification Sheets TRS 07212015
Specs
Page 6
ContourLine 24" Convection Oven H 6560 BP PRODUCT VIEWS Side View FOREVER BETTER INSTALLATION SPECIFICATIONS Install in Tall Niche H 6560 BP Page 6 of 8 Specification Sheets TRS 07212015
ContourLine 24" Convection Oven H 6560 BP PRODUCT VIEWS Side View FOREVER BETTER INSTALLATION SPECIFICATIONS Install in Tall Niche H 6560 BP Page 6 of 8 Specification Sheets TRS 07212015
Specs
Page 7
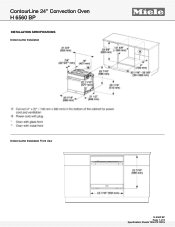
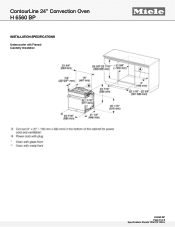
ContourLine 24" Convection Oven H 6560 BP INSTALLATION SPECIFICATIONS Undercounter Installation FOREVER BETTER Undercounter Installation Front view H 6560 BP Page 7 of 8 Specification Sheets TRS 07212015
ContourLine 24" Convection Oven H 6560 BP INSTALLATION SPECIFICATIONS Undercounter Installation FOREVER BETTER Undercounter Installation Front view H 6560 BP Page 7 of 8 Specification Sheets TRS 07212015
Specs
Page 8
ContourLine 24" Convection Oven H 6560 BP INSTALLATION SPECIFICATIONS Undercounter with Framed Cabinetry Installation FOREVER BETTER H 6560 BP Page 8 of 8 Specification Sheets TRS 07212015
ContourLine 24" Convection Oven H 6560 BP INSTALLATION SPECIFICATIONS Undercounter with Framed Cabinetry Installation FOREVER BETTER H 6560 BP Page 8 of 8 Specification Sheets TRS 07212015

Trim Kit
Page 2
70cm Trim Kit EBA 6767 INSTALLATION SPECIFICATIONS Installation In Tall Niche FOREVER BETTER 7/8" (22mm) Page 2 of 3
70cm Trim Kit EBA 6767 INSTALLATION SPECIFICATIONS Installation In Tall Niche FOREVER BETTER 7/8" (22mm) Page 2 of 3

Trim Kit
Page 3
70cm Trim Kit EBA 6767 INSTALLATION SPECIFICATIONS Installation above 70cm Oven FOREVER BETTER Page 3 of 3 Specification Sheet TRS 03032015
70cm Trim Kit EBA 6767 INSTALLATION SPECIFICATIONS Installation above 70cm Oven FOREVER BETTER Page 3 of 3 Specification Sheet TRS 03032015
Product Manual
Page 1
Operating and Installation Instructions Convection Oven To prevent accidents and machine damage, read these instructions before installation or use. en-US M.-Nr. 09 786 800
Operating and Installation Instructions Convection Oven To prevent accidents and machine damage, read these instructions before installation or use. en-US M.-Nr. 09 786 800
Product Manual
Page 2
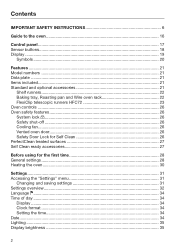
Contents IMPORTANT SAFETY INSTRUCTIONS 6 Guide to the oven 16 Control panel ...17 Sensor buttons...18 Display ...19 Symbols ...20 Features ...21 Model numbers ...21 Data plate ...21 Items included...21 Standard and optional accessories 21 Shelf runners...22 Baking tray, Roasting pan and Wire oven rack 22 FlexiClip telescopic runners HFC72 23 Oven controls ...26 Oven safety features 26 System lock 26 Safety shut-off 26 Cooling fan...26 Vented oven door 26 Safety Door Lock for Self Clean 26 PerfectClean treated surfaces 27 Self Clean ready accessories 27 Before using for the first ...
Contents IMPORTANT SAFETY INSTRUCTIONS 6 Guide to the oven 16 Control panel ...17 Sensor buttons...18 Display ...19 Symbols ...20 Features ...21 Model numbers ...21 Data plate ...21 Items included...21 Standard and optional accessories 21 Shelf runners...22 Baking tray, Roasting pan and Wire oven rack 22 FlexiClip telescopic runners HFC72 23 Oven controls ...26 Oven safety features 26 System lock 26 Safety shut-off 26 Cooling fan...26 Vented oven door 26 Safety Door Lock for Self Clean 26 PerfectClean treated surfaces 27 Self Clean ready accessories 27 Before using for the first ...
Product Manual
Page 3
Contents Acoustic information 35 Melody ...35 Solo tone...35 Keypad tone...36 Units of measurement 36 Weight...36 Temperature ...36 Cooling fan...37 Self Clean...37 Default temperatures 37 Safety ...38 System lock 38 Sensor lock ...38 Calibrate temperature 39 Voltage ...39 Showroom program 39 Demo Mode ...39 Factory default ...39 Timer ...40 Setting the timer...40 Resetting the timer 41 Canceling the timer 41 Guide to the modes 42 Operating the oven 44 Energy saving tips 44 Quick Guide ...45 Cooling fan ...45 Additional functions 46 Changing the oven mode 46 Changing the ...
Contents Acoustic information 35 Melody ...35 Solo tone...35 Keypad tone...36 Units of measurement 36 Weight...36 Temperature ...36 Cooling fan...37 Self Clean...37 Default temperatures 37 Safety ...38 System lock 38 Sensor lock ...38 Calibrate temperature 39 Voltage ...39 Showroom program 39 Demo Mode ...39 Factory default ...39 Timer ...40 Setting the timer...40 Resetting the timer 41 Canceling the timer 41 Guide to the modes 42 Operating the oven 44 Energy saving tips 44 Quick Guide ...45 Cooling fan ...45 Additional functions 46 Changing the oven mode 46 Changing the ...

Product Manual
Page 4
Contents Using the MasterChef programs 52 Notes on using these programs 53 Favorites ...54 Creating a Favorite 54 Starting a Favorite 56 Changing Favorites 57 Changing cooking stages 57 Changing the name 57 Deleting a Favorite 58 Bake ...59 Roast ...61 Roast Probe ...62 How the roast probe works 62 When to use the roast probe 62 Important notes regarding the roast probe 63 Using the roast probe 63 Time left display 64 Using residual heat 65 Slow Roasting ...66 Using the Slow Roasting function 67 Adjusting the Slow Roasting temperature 68 Broil ...69 Special Modes ...72 Defrost ...
Contents Using the MasterChef programs 52 Notes on using these programs 53 Favorites ...54 Creating a Favorite 54 Starting a Favorite 56 Changing Favorites 57 Changing cooking stages 57 Changing the name 57 Deleting a Favorite 58 Bake ...59 Roast ...61 Roast Probe ...62 How the roast probe works 62 When to use the roast probe 62 Important notes regarding the roast probe 63 Using the roast probe 63 Time left display 64 Using residual heat 65 Slow Roasting ...66 Using the Slow Roasting function 67 Adjusting the Slow Roasting temperature 68 Broil ...69 Special Modes ...72 Defrost ...
Product Manual
Page 5
Contents Stubborn soiling (excluding the FlexiClip runners 83 Self Cleaning the oven interior 83 Preparing for the Self Clean program 84 Starting the Self Clean program 84 Starting the Self Clean program 84 Delaying the start of the Self Clean program 85 At the end of the Self Clean program 85 The Self Clean program is canceled 86 Removing the door 88 Reinstalling the door 89 Removing the shelf runners with FlexiClip telescopic runners 90 Lowering the Browning/Broiling element 90 Frequently asked questions 91 Technical Service 96 Caring for the environment 97 Electrical...
Contents Stubborn soiling (excluding the FlexiClip runners 83 Self Cleaning the oven interior 83 Preparing for the Self Clean program 84 Starting the Self Clean program 84 Starting the Self Clean program 84 Delaying the start of the Self Clean program 85 At the end of the Self Clean program 85 The Self Clean program is canceled 86 Removing the door 88 Reinstalling the door 89 Removing the shelf runners with FlexiClip telescopic runners 90 Lowering the Browning/Broiling element 90 Frequently asked questions 91 Technical Service 96 Caring for the environment 97 Electrical...
Product Manual
Page 6
Use only as described in these operating instructions in this manual. Other uses are not permitted and can lead to prevent accidents and machine damage. Only use the appliance for residential use this oven to any future user. Use This appliance is not intended for outdoor use. Only use only. Do not use of the appliance can be dangerous. Risk of the oven to personal injury and material damage. Improper use this oven for residential cooking, and the purposes described in a safe place and pass them on to store or dry flammable materials...
Use only as described in these operating instructions in this manual. Other uses are not permitted and can lead to prevent accidents and machine damage. Only use the appliance for residential use this oven to any future user. Use This appliance is not intended for outdoor use. Only use only. Do not use of the appliance can be dangerous. Risk of the oven to personal injury and material damage. Improper use this oven for residential cooking, and the purposes described in a safe place and pass them on to store or dry flammable materials...

Product Manual
Page 7
IMPORTANT SAFETY INSTRUCTIONS Children Children should not be left alone or unattended in an area where an oven is in cabinets above an oven. Failure to hang or lean on or near the oven. Danger of the oven. Do not let children touch the oven while the Self Clean program is running. Danger of suffocation! Never allow children to reach these items could be installed and connected in normal use. The oven gets hot at the oven door glass, the vapor vent, the handle and the operating controls. Ensure that of the appliance. Children's skin is ...
IMPORTANT SAFETY INSTRUCTIONS Children Children should not be left alone or unattended in an area where an oven is in cabinets above an oven. Failure to hang or lean on or near the oven. Danger of the oven. Do not let children touch the oven while the Self Clean program is running. Danger of suffocation! Never allow children to reach these items could be installed and connected in normal use. The oven gets hot at the oven door glass, the vapor vent, the handle and the operating controls. Ensure that of the appliance. Children's skin is ...
Product Manual
Page 8
...a qualified technician. Before installation, make sure that this appliance, continuity must be met. GROUNDING INSTRUCTIONS". Contact Miele's Technical Service Department for externally visible damage. Consult a qualified electrician if in accordance with the household electrical supply. This...system. removing the fuse, 8 IMPORTANT SAFETY INSTRUCTIONS Installation, repair and maintenance work should be performed by a Miele authorized service technician in doubt. Before installation or service, disconnect the power supply to prevent injury and machine ...
...a qualified technician. Before installation, make sure that this appliance, continuity must be met. GROUNDING INSTRUCTIONS". Contact Miele's Technical Service Department for externally visible damage. Consult a qualified electrician if in accordance with the household electrical supply. This...system. removing the fuse, 8 IMPORTANT SAFETY INSTRUCTIONS Installation, repair and maintenance work should be performed by a Miele authorized service technician in doubt. Before installation or service, disconnect the power supply to prevent injury and machine ...
Product Manual
Page 9
Ensure that the cool air supply is not heated by Miele original parts only. Do not close the door while the oven is not impaired (e.g. danger of cool air. All other sources nearby. If the ...
Ensure that the cool air supply is not heated by Miele original parts only. Do not close the door while the oven is not impaired (e.g. danger of cool air. All other sources nearby. If the ...

Product Manual
Page 10
in a hot oven. Caution: Heating elements may be achieved by stirring and/or turning the food. Use only dry, heat-resistant potholders. Doing so can become hot enough to cool. Do not let food sit in the oven for potholders. Do not let potholders touch hot heating elements. Loose fitting or hanging garments present a fire hazard. The steam created could cause serious burns or scalding and the sudden change in temperature can be hot even though they have had sufficient time to cause burns. Use pot holders when placing food in the oven, adjusting ...
in a hot oven. Caution: Heating elements may be achieved by stirring and/or turning the food. Use only dry, heat-resistant potholders. Doing so can become hot enough to cool. Do not let food sit in the oven for potholders. Do not let potholders touch hot heating elements. Loose fitting or hanging garments present a fire hazard. The steam created could cause serious burns or scalding and the sudden change in temperature can be hot even though they have had sufficient time to cause burns. Use pot holders when placing food in the oven, adjusting ...