
Product Manual
Page 2
... the time of day for the first time 26 Heating the oven...28 Settings ...29 Changing the time of day 29 Changing factory default settings 30 System lock ...33 Timer ...35 Setting the timer...35 At the end of the timer 36 Guide to the modes 37 2
... the time of day for the first time 26 Heating the oven...28 Settings ...29 Changing the time of day 29 Changing factory default settings 30 System lock ...33 Timer ...35 Setting the timer...35 At the end of the timer 36 Guide to the modes 37 2

Product Manual
Page 30
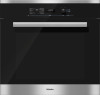
...; If necessary, use the rotary selector to move the symbol until it appears under Settings. Confirm with OK. 30 The status is saved and the setting appears again. If you would like to change additional settings, repeat the process. If you would...
...; If necessary, use the rotary selector to move the symbol until it appears under Settings. Confirm with OK. 30 The status is saved and the setting appears again. If you would like to change additional settings, repeat the process. If you would...

Product Manual
Page 31
... is turned on before it can be used. The oven also switches off automatically if no settings are selected within a certain period of time (approx. 30 minutes). The time of day display is turned on and is visible in the display. The buzzer is Off. ...
... is turned on before it can be used. The oven also switches off automatically if no settings are selected within a certain period of time (approx. 30 minutes). The time of day display is turned on and is visible in the display. The buzzer is Off. ...

Product Manual
Page 39
... oven that you do not require for the time of energy. - When cooking with temperatures above 285°F (140°C) and cooking durations longer than 30 minutes, turn off automatically if a button is best to open the door when cooking. - Operation Energy saving tips - Remove any time by touching ...
... oven that you do not require for the time of energy. - When cooking with temperatures above 285°F (140°C) and cooking durations longer than 30 minutes, turn off automatically if a button is best to open the door when cooking. - Operation Energy saving tips - Remove any time by touching ...
Product Manual
Page 43
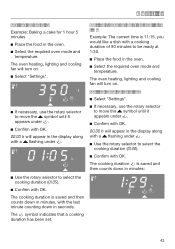
... a cooking duration of 90 minutes to select the cooking duration Confirm with a flashing under . Use the rotary selector to be ready at 1:30. Place the food in minutes, with a flashing under .
... a cooking duration of 90 minutes to select the cooking duration Confirm with a flashing under . Use the rotary selector to be ready at 1:30. Place the food in minutes, with a flashing under .
Product Manual
Page 44
...liking, you can extend the cooking duration by entering a new duration. 44 a buzzer will sound if turned on . As soon as the start time (1:30 pm 1:30 = 12:00) has been reached, the oven heating, lighting and cooling fan will turn on (see "Settings Turn the mode selector to enter the ...finish time (1:30). Confirm with OK. Operation Set the finish time: Use the rotary selector to move the until it appears under appears: ...
...liking, you can extend the cooking duration by entering a new duration. 44 a buzzer will sound if turned on . As soon as the start time (1:30 pm 1:30 = 12:00) has been reached, the oven heating, lighting and cooling fan will turn on (see "Settings Turn the mode selector to enter the ...finish time (1:30). Confirm with OK. Operation Set the finish time: Use the rotary selector to move the until it appears under appears: ...

Product Manual
Page 46
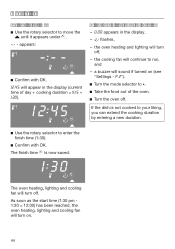
The finish time is now deleted. 46 The symbol will flash under . Use the rotary selector to move the symbol until it appears under . Confirm with OK. Operation Deleting a finish time Select "Settings". If necessary, use the rotary selector to enter the finish time (1:30). Confirm with OK.
The finish time is now deleted. 46 The symbol will flash under . Use the rotary selector to move the symbol until it appears under . Confirm with OK. Operation Deleting a finish time Select "Settings". If necessary, use the rotary selector to enter the finish time (1:30). Confirm with OK.

Product Manual
Page 56
Canning jars, - Jars with a towel and leave to use jars designed for an additional 25-30 minutes. Then reduce the temperature to the appliance, as well as bubbles are closed properly when storing them and they can food in the warm ... Always follow the USDA canning guidelines. Canning containers Danger of burns! Canning fruit and vegetables It is recommended to set for an additional 25-30 minutes. The instructions are visible in the jars. After the canning duration has completed, select the lowest temperature and leave the jars in the...
Canning jars, - Jars with a towel and leave to use jars designed for an additional 25-30 minutes. Then reduce the temperature to the appliance, as well as bubbles are closed properly when storing them and they can food in the warm ... Always follow the USDA canning guidelines. Canning containers Danger of burns! Canning fruit and vegetables It is recommended to set for an additional 25-30 minutes. The instructions are visible in the jars. After the canning duration has completed, select the lowest temperature and leave the jars in the...
Product Manual
Page 76
...or manually "tripping" the circuit breaker. WARNING: THIS APPLIANCE MUST BE GROUNDED Installer: Please leave these instructions with a NEMA 14-30 P plug ready for connection to prevent machine damage. The plug must be dangerous and may void the warranty. Electrical connection &#...57379; CAUTION: Before servicing, disconnect the power supply by a Miele authorized service technician. Installation, repair and maintenance work must be adjusted (see "Settings SAVE THESE INSTRUCTIONS FOR THE ELECTRICAL INSPECTOR'S...
...or manually "tripping" the circuit breaker. WARNING: THIS APPLIANCE MUST BE GROUNDED Installer: Please leave these instructions with a NEMA 14-30 P plug ready for connection to prevent machine damage. The plug must be dangerous and may void the warranty. Electrical connection &#...57379; CAUTION: Before servicing, disconnect the power supply by a Miele authorized service technician. Installation, repair and maintenance work must be adjusted (see "Settings SAVE THESE INSTRUCTIONS FOR THE ELECTRICAL INSPECTOR'S...
Specs
Page 1
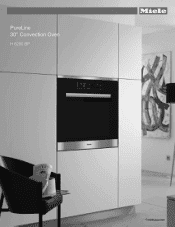
PureLine 30" Convection Oven H 6280 BP 8mieleusa.com
PureLine 30" Convection Oven H 6280 BP 8mieleusa.com

Specs
Page 2
H 6280 BP Page 2 of hot air • Soft Open and Soft Close for an easier handling • The simple yet sleek Silhouette handle seems to float enhancing its modern design lines. PureLine 30" Convection Oven H 6280 BP FOREVER BETTER H 6280 BP Features: • DirectSelect controls offer turn dial operation with a 7-segment liquid crystal display • Self Clean oven • 8 Operating Modes • Rapid PreHeat • CleanGlass Door • Timer • TwinPower Fans provide optimum and even distribution of 8
H 6280 BP Page 2 of hot air • Soft Open and Soft Close for an easier handling • The simple yet sleek Silhouette handle seems to float enhancing its modern design lines. PureLine 30" Convection Oven H 6280 BP FOREVER BETTER H 6280 BP Features: • DirectSelect controls offer turn dial operation with a 7-segment liquid crystal display • Self Clean oven • 8 Operating Modes • Rapid PreHeat • CleanGlass Door • Timer • TwinPower Fans provide optimum and even distribution of 8

Specs
Page 3
PureLine 30" Convection Oven H 6280 BP FOREVER BETTER H 6280 BP Page 3 of 8
PureLine 30" Convection Oven H 6280 BP FOREVER BETTER H 6280 BP Page 3 of 8

Specs
Page 4
...) 193 lbs Additional Cut-outs Required Venting cut-out required at base of cabinet (4" x 28" / 100mm x 720mm) in the bottom of 8 PureLine 30" Convection Oven H 6280 BP SPECIFICATIONS H 6280 BP - NEMA 14-30 plug 120/208V, 30A, 60Hz 5800w / 120/240V, 30A, 60Hz 4400w 240V / 24.166A / 208V / 21.15A Shipping Weight Shipping Dimensions Support 216...
...) 193 lbs Additional Cut-outs Required Venting cut-out required at base of cabinet (4" x 28" / 100mm x 720mm) in the bottom of 8 PureLine 30" Convection Oven H 6280 BP SPECIFICATIONS H 6280 BP - NEMA 14-30 plug 120/208V, 30A, 60Hz 5800w / 120/240V, 30A, 60Hz 4400w 240V / 24.166A / 208V / 21.15A Shipping Weight Shipping Dimensions Support 216...

Specs
Page 5
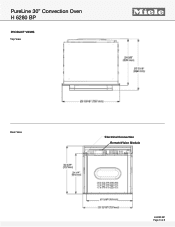
PureLine 30" Convection Oven H 6280 BP PRODUCT VIEWS Isometric FOREVER BETTER Front H 6280 BP Page 5 of 8
PureLine 30" Convection Oven H 6280 BP PRODUCT VIEWS Isometric FOREVER BETTER Front H 6280 BP Page 5 of 8
Specs
Page 6
PureLine 30" Convection Oven H 6280 BP PRODUCT VIEWS Top View FOREVER BETTER Rear View Electrical Connection RemoteVision Module H 6280 BP Page 6 of 8
PureLine 30" Convection Oven H 6280 BP PRODUCT VIEWS Top View FOREVER BETTER Rear View Electrical Connection RemoteVision Module H 6280 BP Page 6 of 8

Specs
Page 7
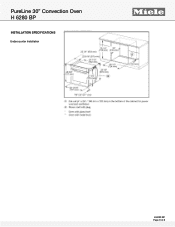
PureLine 30" Convection Oven H 6280 BP PRODUCT VIEWS Side View FOREVER BETTER INSTALLATION SPECIFICATIONS Install in Tall Cabinet H 6280 BP Page 7 of 8
PureLine 30" Convection Oven H 6280 BP PRODUCT VIEWS Side View FOREVER BETTER INSTALLATION SPECIFICATIONS Install in Tall Cabinet H 6280 BP Page 7 of 8
Specs
Page 8
PureLine 30" Convection Oven H 6280 BP INSTALLATION SPECIFICATIONS Undercounter Installation FOREVER BETTER H 6280 BP Page 8 of 8
PureLine 30" Convection Oven H 6280 BP INSTALLATION SPECIFICATIONS Undercounter Installation FOREVER BETTER H 6280 BP Page 8 of 8