Product Manual
Page 1
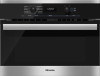
en - Operating and Installation Instructions Speed Oven To prevent accidents and machine damage, read these instructions before installation or use. US, CA M.-Nr. 09 786 880
en - Operating and Installation Instructions Speed Oven To prevent accidents and machine damage, read these instructions before installation or use. US, CA M.-Nr. 09 786 880
Product Manual
Page 4
... Stubborn soiling...85 Lowering the Browning / Broiling element 86 Frequently asked questions 87 Technical Service 92 Caring for the environment 93 Electrical connection 94 Installation diagrams 95 Appliance and cut-out dimensions 95 Installation into a tall cabinet 95 Undercounter installation 96 Installation in a tall cabinet in combination with an oven 97 Front dimensions 98...
... Stubborn soiling...85 Lowering the Browning / Broiling element 86 Frequently asked questions 87 Technical Service 92 Caring for the environment 93 Electrical connection 94 Installation diagrams 95 Appliance and cut-out dimensions 95 Installation into a tall cabinet 95 Undercounter installation 96 Installation in a tall cabinet in combination with an oven 97 Front dimensions 98...
Product Manual
Page 5
... moisture in a safe place and pass them on to prevent accidents and machine damage. Read all instructions before installing or using the appliance, follow basic safety precautions, including the following: Read all instructions before installation and use only: cooking, baking, roasting, broiling, canning, defrosting and reheating of the oven to any future...
... moisture in a safe place and pass them on to prevent accidents and machine damage. Read all instructions before installing or using the appliance, follow basic safety precautions, including the following: Read all instructions before installation and use only: cooking, baking, roasting, broiling, canning, defrosting and reheating of the oven to any future...
Product Manual
Page 6
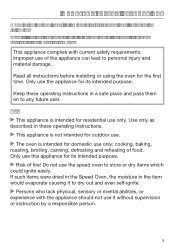
...Technical safety This appliance must be installed and connected in compliance with the installation instructions. Installation, repair and maintenance work by unauthorized persons could be injured. Burn Hazard - Contact Miele's Technical Service Department for externally visible damage...IMPORTANT SAFETY INSTRUCTIONS Children Children should be performed by a Miele authorized service technician in accordance with national and local safety regulations and the provided installation instructions. Never allow children to the user. Ensure that any appliance...
...Technical safety This appliance must be installed and connected in compliance with the installation instructions. Installation, repair and maintenance work by unauthorized persons could be injured. Burn Hazard - Contact Miele's Technical Service Department for externally visible damage...IMPORTANT SAFETY INSTRUCTIONS Children Children should be performed by a Miele authorized service technician in accordance with national and local safety regulations and the provided installation instructions. Never allow children to the user. Ensure that any appliance...

Product Manual
Page 7
...the household electrical supply. holes or cracks are visible in doubt. Before installation or service, disconnect the power supply to the work area by a qualified electrician. Before installation, make sure that this appliance to electricity. The oven is any ... This appliance must be referred to be met. Connect only to connect this basic safety requirement be operated until it has been properly installed within cabinetry. Danger of electric shock! GROUNDING INSTRUCTIONS". If there is not to a qualified technician. 7 Consult a qualified ...
...the household electrical supply. holes or cracks are visible in doubt. Before installation or service, disconnect the power supply to the work area by a qualified electrician. Before installation, make sure that this appliance to electricity. The oven is any ... This appliance must be referred to be met. Connect only to connect this basic safety requirement be operated until it has been properly installed within cabinetry. Danger of electric shock! GROUNDING INSTRUCTIONS". If there is not to a qualified technician. 7 Consult a qualified ...
Product Manual
Page 8
... door until they are not glowing. Doing so can become hot enough to cause burns. Ensure that the cool air supply is not heated by Miele original spare parts only. Wear pot holders when placing food in or removing food, or when making adjustments in food poisoning or sickness. 8 Proper... or interior surfaces of cool air. insulation in use , do not touch, or let clothing or other sources nearby. If the oven is installed behind the closed door and cause damage to the oven, cabinetry and flooring. Depending on the mode selected, you could burn yourself on the heating...
... door until they are not glowing. Doing so can become hot enough to cause burns. Ensure that the cool air supply is not heated by Miele original spare parts only. Wear pot holders when placing food in or removing food, or when making adjustments in food poisoning or sickness. 8 Proper... or interior surfaces of cool air. insulation in use , do not touch, or let clothing or other sources nearby. If the oven is installed behind the closed door and cause damage to the oven, cabinetry and flooring. Depending on the mode selected, you could burn yourself on the heating...
Product Manual
Page 14
... heating element. Make certain that the power cords of the food. Only use a thermometer specifically approved for food use it as these Operating and Installation Instructions. Scratches on the door glass can ignite even after they have been removed from bursting. To check food temperature, first interrupt the...
... heating element. Make certain that the power cords of the food. Only use a thermometer specifically approved for food use it as these Operating and Installation Instructions. Scratches on the door glass can ignite even after they have been removed from bursting. To check food temperature, first interrupt the...
Product Manual
Page 22
Printed on the back page. Have this information available when contacting Miele Technical Service. various accessories. When ordering, please have ready the model number of... and optional accessories This Speed Oven is supplied with Miele ovens. Features Model numbers A list of the ovens described in these operating instructions can be used with : - the operating and installation instructions for securing your oven and of the desired ... plate are designed to be ordered from the Mieleusa.com website or Miele. Data plate The data plate located on the front frame of the oven.
Printed on the back page. Have this information available when contacting Miele Technical Service. various accessories. When ordering, please have ready the model number of... and optional accessories This Speed Oven is supplied with Miele ovens. Features Model numbers A list of the ovens described in these operating instructions can be used with : - the operating and installation instructions for securing your oven and of the desired ... plate are designed to be ordered from the Mieleusa.com website or Miele. Data plate The data plate located on the front frame of the oven.

Product Manual
Page 27
... of time the time of day will flash under : Use the rotary selector to be operated until it has been properly installed within this period of time the current time of day is displayed again. Setting the time of day for the first time The oven...
... of time the time of day will flash under : Use the rotary selector to be operated until it has been properly installed within this period of time the current time of day is displayed again. Setting the time of day for the first time The oven...

Product Manual
Page 94
...Miele authorized service technician. Only operate the appliance after it has been installed into an appropriate outlet that the voltage and frequency listed on the data plate correspond with the household electrical supply. The voltage can be plugged into cabinetry. This data must correspond to the power supply, make sure that is installed... and grounded in doubt. Installation, repair and maintenance work must be adjusted (see "Settings SAVE THESE INSTRUCTIONS FOR THE ELECTRICAL ...
...Miele authorized service technician. Only operate the appliance after it has been installed into an appropriate outlet that the voltage and frequency listed on the data plate correspond with the household electrical supply. The voltage can be plugged into cabinetry. This data must correspond to the power supply, make sure that is installed... and grounded in doubt. Installation, repair and maintenance work must be adjusted (see "Settings SAVE THESE INSTRUCTIONS FOR THE ELECTRICAL ...
Product Manual
Page 95
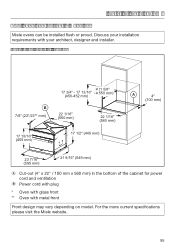
... the more current specifications please visit the Miele website. 95 Installation into a tall cabinet B 7/8" (22*/23** mm) 17 15/16" (455 mm) 21 5/8" 17 3/4" - 17 13/16" ( 550 mm) (450-452 mm) 22 1/16" (560 mm) ... x 560 mm) in the bottom of the cabinet for power cord and ventilation Power cord with plug * Oven with glass front ** Oven with your installation requirements with metal front Front design may vary depending on model. Installation diagrams Appliance and cut-out dimensions Miele ovens can be installed flush or proud.
... the more current specifications please visit the Miele website. 95 Installation into a tall cabinet B 7/8" (22*/23** mm) 17 15/16" (455 mm) 21 5/8" 17 3/4" - 17 13/16" ( 550 mm) (450-452 mm) 22 1/16" (560 mm) ... x 560 mm) in the bottom of the cabinet for power cord and ventilation Power cord with plug * Oven with glass front ** Oven with your installation requirements with metal front Front design may vary depending on model. Installation diagrams Appliance and cut-out dimensions Miele ovens can be installed flush or proud.
Product Manual
Page 96
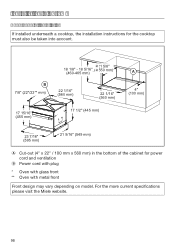
...; Cut-out (4" x 22" / 100 mm x 560 mm) in the bottom of the cabinet for the cooktop must also be taken into account. Installation diagrams Undercounter installation If installed underneath a cooktop, the installation instructions for power cord and ventilation Power cord with plug * Oven with glass front ** Oven with metal front Front design may...
...; Cut-out (4" x 22" / 100 mm x 560 mm) in the bottom of the cabinet for the cooktop must also be taken into account. Installation diagrams Undercounter installation If installed underneath a cooktop, the installation instructions for power cord and ventilation Power cord with plug * Oven with glass front ** Oven with metal front Front design may...
Product Manual
Page 97
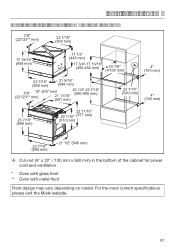
Installation diagrams Installation in a tall cabinet in combination with an oven 7/8" (22*/23** mm) 22 1/16" (560 mm) 17 15/16" (455 mm) 17 1/2" (445 mm) 17 3/4"-17 ... and ventilation * Oven with glass front ** Oven with metal front Front design may vary depending on model. For the more current specifications please visit the Miele website. 97
Installation diagrams Installation in a tall cabinet in combination with an oven 7/8" (22*/23** mm) 22 1/16" (560 mm) 17 15/16" (455 mm) 17 1/2" (445 mm) 17 3/4"-17 ... and ventilation * Oven with glass front ** Oven with metal front Front design may vary depending on model. For the more current specifications please visit the Miele website. 97

Product Manual
Page 98
Installation diagrams Front dimensions 4 3/8" (111 mm) 17 1/2" (445 mm) 17 15/16" A (455 mm) 17 3/4" (451 mm) 13 1/8" 3/16" (333 mm) (4 mm) A H61xx: 2 5/16" (59 mm) H62xx: 1 5/8" (42 mm) B Speed Oven with glass front: 1/16" (2.2 mm) Speed Oven with metal front: 1/16 (1.2 mm) B - 1/16" (-2 mm) 98
Installation diagrams Front dimensions 4 3/8" (111 mm) 17 1/2" (445 mm) 17 15/16" A (455 mm) 17 3/4" (451 mm) 13 1/8" 3/16" (333 mm) (4 mm) A H61xx: 2 5/16" (59 mm) H62xx: 1 5/8" (42 mm) B Speed Oven with glass front: 1/16" (2.2 mm) Speed Oven with metal front: 1/16 (1.2 mm) B - 1/16" (-2 mm) 98

Product Manual
Page 99
Installation Open the door and use the screws supplied to secure the oven to the oven trim and align it. The oven must not be operated until it has been properly installed within cabinetry. If there are side handles, please remove them. Connect the power cord to the electrical supply. Push the oven into the cabinetry up to the side walls of the cabinetry through the holes in the oven trim. 99
Installation Open the door and use the screws supplied to secure the oven to the oven trim and align it. The oven must not be operated until it has been properly installed within cabinetry. If there are side handles, please remove them. Connect the power cord to the electrical supply. Push the oven into the cabinetry up to the side walls of the cabinetry through the holes in the oven trim. 99

Specs
Page 7
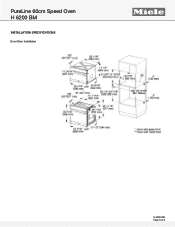
PureLine 60cm Speed Oven H 6200 BM INSTALLATION SPECIFICATIONS Install in Tall Cabinet FOREVER BETTER Undercounter Installation H 6200 BM Page 7 of 9
PureLine 60cm Speed Oven H 6200 BM INSTALLATION SPECIFICATIONS Install in Tall Cabinet FOREVER BETTER Undercounter Installation H 6200 BM Page 7 of 9
Specs
Page 8
PureLine 60cm Speed Oven H 6200 BM INSTALLATION SPECIFICATIONS Over 60cm Installation FOREVER BETTER H 6200 BM Page 8 of 9
PureLine 60cm Speed Oven H 6200 BM INSTALLATION SPECIFICATIONS Over 60cm Installation FOREVER BETTER H 6200 BM Page 8 of 9

Specs
Page 9
PureLine 60cm Speed Oven H 6200 BM INSTALLATION SPECIFICATIONS Door Swing FOREVER BETTER H 6200 BM Page 9 of 9
PureLine 60cm Speed Oven H 6200 BM INSTALLATION SPECIFICATIONS Door Swing FOREVER BETTER H 6200 BM Page 9 of 9
