Product Manual
Page 2
... INSTRUCTIONS 5 Guide to the Speed Oven 16 Control panel ...17 Mode selector ...18 Display ...18 Symbols in the display 18 Rotary selector...19 Sensor buttons...20 Features ...22 Model numbers ...22 Data plate ...22 Items included...22 Standard and optional accessories 22 Glass Tray ...23 Wire rack with non-tip safety notches 23 Speed Oven controls 25 Safety features ...25 System lock for the oven 25 Safety cut-out 25 Cooling fan...
... INSTRUCTIONS 5 Guide to the Speed Oven 16 Control panel ...17 Mode selector ...18 Display ...18 Symbols in the display 18 Rotary selector...19 Sensor buttons...20 Features ...22 Model numbers ...22 Data plate ...22 Items included...22 Standard and optional accessories 22 Glass Tray ...23 Wire rack with non-tip safety notches 23 Speed Oven controls 25 Safety features ...25 System lock for the oven 25 Safety cut-out 25 Cooling fan...
Product Manual
Page 6
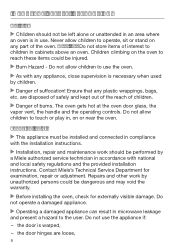
... with national and local safety regulations and the provided installation instructions. Children climbing on any part of interest to use the oven. As with the installation instructions. Installation, repair and maintenance work by children. Danger of burns. The oven gets hot at the oven door glass, the vapor vent, the handle and the operating controls. the door hinges are disposed of safely and kept out of the...
... with national and local safety regulations and the provided installation instructions. Children climbing on any part of interest to use the oven. As with the installation instructions. Installation, repair and maintenance work by children. Danger of burns. The oven gets hot at the oven door glass, the vapor vent, the handle and the operating controls. the door hinges are disposed of safely and kept out of the...
Product Manual
Page 8
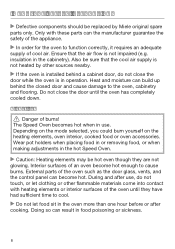
... time to function correctly, it requires an adequate supply of cool air. Wear pot holders when placing food in or removing food, or when making adjustments in use. During and after cooking. insulation in the oven more than one hour before or after use Danger of burns! Do not close the door while the oven is not heated by Miele original spare parts...
... time to function correctly, it requires an adequate supply of cool air. Wear pot holders when placing food in or removing food, or when making adjustments in use. During and after cooking. insulation in the oven more than one hour before or after use Danger of burns! Do not close the door while the oven is not heated by Miele original spare parts...
Product Manual
Page 10
Be sure you keep to heat the room. Use Convection Bake for microwave use"). 10 Do not use the oven to recommended broiling times when using the Broil mode. Do not open the Speed Oven door if smoke occurs inside the appliance. Do not use with Broil for prebaked products such as bread or bread rolls, or for dehydrating items such as flowers, herbs, bread or rolls. Moisture which are...
Be sure you keep to heat the room. Use Convection Bake for microwave use"). 10 Do not use the oven to recommended broiling times when using the Broil mode. Do not open the Speed Oven door if smoke occurs inside the appliance. Do not use with Broil for prebaked products such as bread or bread rolls, or for dehydrating items such as flowers, herbs, bread or rolls. Moisture which are...
Product Manual
Page 11
... the oven or catch fire. The control panel, the countertop or the cabinetry can be damaged when using Microwave . Always cover food when using Microwave or Microwave Combination programs if it is cooked through, use a lower power for continued cooking to the lowest setting and leave the oven on automatically and dissipate the moisture. 11 Instead set the temperature to reduce the amount of steam produced...
... the oven or catch fire. The control panel, the countertop or the cabinetry can be damaged when using Microwave . Always cover food when using Microwave or Microwave Combination programs if it is cooked through, use a lower power for continued cooking to the lowest setting and leave the oven on automatically and dissipate the moisture. 11 Instead set the temperature to reduce the amount of steam produced...
Product Manual
Page 12
... trapped between the door and the oven cavity. Check the food for cleaning or disinfecting items. Items can get extremely hot and there is a danger of burning when the item is removed from condensing on the floor of injury. 12 When using Convection Bake do not place heavy objects on or lean against an open door, and do...
... trapped between the door and the oven cavity. Check the food for cleaning or disinfecting items. Items can get extremely hot and there is a danger of burning when the item is removed from condensing on the floor of injury. 12 When using Convection Bake do not place heavy objects on or lean against an open door, and do...
Product Manual
Page 14
... or flammable liquids and materials could penetrate electrical components and cause a short circuit. Only clean parts listed in several places to allow steam to break. Cleaning and care Do not use to measure the temperature of small appliances do not come in the oven door. Only use a thermometer specifically approved for food use a steam cleaner to clean this oven. IMPORTANT SAFETY INSTRUCTIONS Food with a thick skin or...
... or flammable liquids and materials could penetrate electrical components and cause a short circuit. Only clean parts listed in several places to allow steam to break. Cleaning and care Do not use to measure the temperature of small appliances do not come in the oven door. Only use a thermometer specifically approved for food use a steam cleaner to clean this oven. IMPORTANT SAFETY INSTRUCTIONS Food with a thick skin or...

Product Manual
Page 18
... PreHeat Convection Bake Convection Broil Auto Roast Gentle Bake Display The display shows the time of day or your settings (depending on the position of day System lock Any Oven mode A function can be set or changed if the mode selector is pressed, the following symbols will appear: Symbol / Function Timer Temperature indicator Temperature Microwave power level Duration Finish time Start Start Microwave Settings...
... PreHeat Convection Bake Convection Broil Auto Roast Gentle Bake Display The display shows the time of day or your settings (depending on the position of day System lock Any Oven mode A function can be set or changed if the mode selector is pressed, the following symbols will appear: Symbol / Function Timer Temperature indicator Temperature Microwave power level Duration Finish time Start Start Microwave Settings...
Product Manual
Page 25
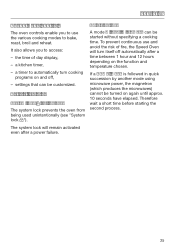
... be customized. Safety cut-out A mode without Microwave can be started without specifying a cooking time. If a Combi mode is followed in quick succession by another mode using microwave power, the magnetron (which produces the microwaves) cannot be turned on the function and temperature chosen. It also allows you to use and avoid the risk of day display, - a kitchen timer, - To prevent continuous use the various cooking modes to bake, roast, broil and reheat. the...
... be customized. Safety cut-out A mode without Microwave can be started without specifying a cooking time. If a Combi mode is followed in quick succession by another mode using microwave power, the magnetron (which produces the microwaves) cannot be turned on the function and temperature chosen. It also allows you to use and avoid the risk of day display, - a kitchen timer, - To prevent continuous use the various cooking modes to bake, roast, broil and reheat. the...

Product Manual
Page 26
... instructions in the oven, on the control panel or on automatically when a cooking program is a smooth, non-stick surface that cleans easily with cool room air before venting it out into the kitchen through vents located between the appliance door and the control panel. The oven compartment and the rack have a PerfectClean finish. 26 The cooling fan will scratch the PerfectClean surface. Food and soiling from baking and roasting...
... instructions in the oven, on the control panel or on automatically when a cooking program is a smooth, non-stick surface that cleans easily with cool room air before venting it out into the kitchen through vents located between the appliance door and the control panel. The oven compartment and the rack have a PerfectClean finish. 26 The cooling fan will scratch the PerfectClean surface. Food and soiling from baking and roasting...
Product Manual
Page 52
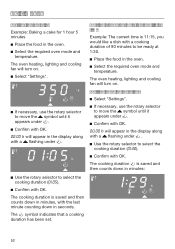
...;. Solo modes Setting the duration Example: Baking a cake for 1 hour 5 minutes Place the food in minutes: h 52 The cooking duration is saved and then counts down in minutes, with the last minute counting down in the oven. Select the required oven mode and temperature. The symbol indicates that a cooking duration has been set. The oven heating, lighting and cooling fan will...
...;. Solo modes Setting the duration Example: Baking a cake for 1 hour 5 minutes Place the food in minutes: h 52 The cooking duration is saved and then counts down in minutes, with the last minute counting down in the oven. Select the required oven mode and temperature. The symbol indicates that a cooking duration has been set. The oven heating, lighting and cooling fan will...

Product Manual
Page 53
... display (current time of the oven. Turn the oven off , - If the dish is now saved. The oven heating, lighting and cooling fan will sound if turned on . As soon as the start time (1:30 pm 1:30 = 12:00) has been reached, the oven heating, lighting and cooling fan will turn on (see "Settings Turn the mode selector to . Take the food out of day + cooking duration Use...
... display (current time of the oven. Turn the oven off , - If the dish is now saved. The oven heating, lighting and cooling fan will sound if turned on . As soon as the start time (1:30 pm 1:30 = 12:00) has been reached, the oven heating, lighting and cooling fan will turn on (see "Settings Turn the mode selector to . Take the food out of day + cooking duration Use...
Product Manual
Page 58
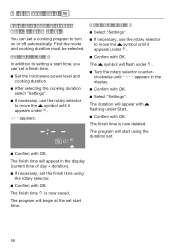
... under . Confirm with OK. Microwave (Solo) Turning a cooking program On / Off automatically You can set a finish time. Set the microwave power level and cooking duration. After selecting the cooking duration select "Settings". If necessary, use the rotary selector to turn on or off automatically. Setting a finish time In addition to setting a start time, you can set start using the rotary selector. Confirm with OK...
... under . Confirm with OK. Microwave (Solo) Turning a cooking program On / Off automatically You can set a finish time. Set the microwave power level and cooking duration. After selecting the cooking duration select "Settings". If necessary, use the rotary selector to turn on or off automatically. Setting a finish time In addition to setting a start time, you can set start using the rotary selector. Confirm with OK...
Product Manual
Page 59
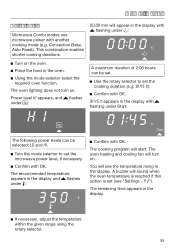
... set the microwave power level, if necessary. Confirm with another cooking mode (e.g. This combination enables shorter cooking durations. Turn on . min will see "Settings The remaining time appears in the display with flashing under : F If necessary, adjust the temperature within the given range using the rotary selector. The oven heating and cooling fan will start. Combi Modes Quick Guide Microwave Combi modes use microwave power with OK. The oven lighting...
... set the microwave power level, if necessary. Confirm with another cooking mode (e.g. This combination enables shorter cooking durations. Turn on . min will see "Settings The remaining time appears in the display with flashing under : F If necessary, adjust the temperature within the given range using the rotary selector. The oven heating and cooling fan will start. Combi Modes Quick Guide Microwave Combi modes use microwave power with OK. The oven lighting...
Product Manual
Page 88
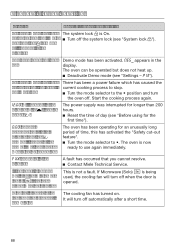
... lock "). The oven does not heat up . Deactivate Demo mode (see "Before using Microwave (Solo) , the oven stops making a noise. Start the cooking process again. The oven is On. If the door is opened while using for an unusually long period of Turn off automatically after the cooking process is not a fault. The cooling fan has turned on. Demo mode has been activated appears in the display. The oven...
... lock "). The oven does not heat up . Deactivate Demo mode (see "Before using Microwave (Solo) , the oven stops making a noise. Start the cooking process again. The oven is On. If the door is opened while using for an unusually long period of Turn off automatically after the cooking process is not a fault. The cooling fan has turned on. Demo mode has been activated appears in the display. The oven...
Product Manual
Page 89
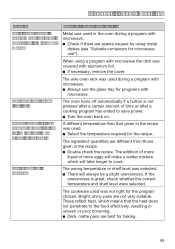
... questions Problem An strange sound is heard when the oven is operating in the recipe. Double check the recipe. A different temperature than that the heat does not penetrate to the food effectively, resulting in the oven during a program with alumimum foil. If necessary, remove the cover. The wrong temperature or shelf level was covered with microwave. Always use the glass tray for microwave use...
... questions Problem An strange sound is heard when the oven is operating in the recipe. Double check the recipe. A different temperature than that the heat does not penetrate to the food effectively, resulting in the oven during a program with alumimum foil. If necessary, remove the cover. The wrong temperature or shelf level was covered with microwave. Always use the glass tray for microwave use...
Product Manual
Page 91
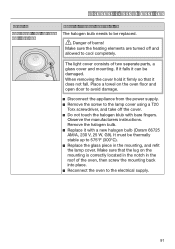
... open door to avoid damage. Disconnect the appliance from the power supply. Remove the screw to the lamp cover using a T20 Torx screwdriver, and take off and allowed to the electrical supply. 91 Observe the manufacturers instructions. The light cover consists of burns! Place a towel on . Make sure that it can be replaced. Danger of two seperate parts, a glass cover and mounting...
... open door to avoid damage. Disconnect the appliance from the power supply. Remove the screw to the lamp cover using a T20 Torx screwdriver, and take off and allowed to the electrical supply. 91 Observe the manufacturers instructions. The light cover consists of burns! Place a towel on . Make sure that it can be replaced. Danger of two seperate parts, a glass cover and mounting...

Product Manual
Page 94
... adjusted (see "Settings SAVE THESE INSTRUCTIONS FOR THE ELECTRICAL INSPECTOR'S USE. Work by either removing the fuse, shutting off the power main or manually "tripping" the circuit breaker. Consult an electrician if in accordance with the consumer. 94 Before connecting the appliance to prevent machine damage. Electrical connection CAUTION: Before servicing, disconnect the power supply by unqualified persons could be dangerous and may void the warranty. Installation, repair and maintenance work...
... adjusted (see "Settings SAVE THESE INSTRUCTIONS FOR THE ELECTRICAL INSPECTOR'S USE. Work by either removing the fuse, shutting off the power main or manually "tripping" the circuit breaker. Consult an electrician if in accordance with the consumer. 94 Before connecting the appliance to prevent machine damage. Electrical connection CAUTION: Before servicing, disconnect the power supply by unqualified persons could be dangerous and may void the warranty. Installation, repair and maintenance work...
Product Manual
Page 95
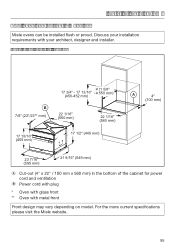
Discuss your installation requirements with metal front Front design may vary depending on model. Installation diagrams Appliance and cut-out dimensions Miele ovens can be installed flush or proud. For the more current specifications please visit the Miele website. 95 Installation into a tall cabinet B 7/8" (22*/23** mm) 17 15/...100 mm) 23 7/16" (595 mm) 21 9/16" (549 mm) Cut-out (4" x 22" / 100 mm x 560 mm) in the bottom of the cabinet for power cord and ventilation Power cord with plug * Oven with glass front ** Oven with your architect, designer and installer.
Discuss your installation requirements with metal front Front design may vary depending on model. Installation diagrams Appliance and cut-out dimensions Miele ovens can be installed flush or proud. For the more current specifications please visit the Miele website. 95 Installation into a tall cabinet B 7/8" (22*/23** mm) 17 15/...100 mm) 23 7/16" (595 mm) 21 9/16" (549 mm) Cut-out (4" x 22" / 100 mm x 560 mm) in the bottom of the cabinet for power cord and ventilation Power cord with plug * Oven with glass front ** Oven with your architect, designer and installer.
Product Manual
Page 96
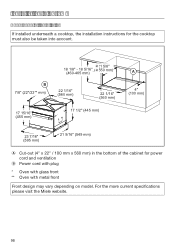
Installation diagrams Undercounter installation If installed underneath a cooktop, the installation instructions for power cord and ventilation Power cord with plug * Oven with glass front ** Oven with metal front Front design may vary depending on model. B 7/8" (22*/23** mm) 17 15/16" (455 mm) 21 5/8" 18 1/8" - 18 5/16" ( 550 mm...) A 4" (100 mm) 23 7/16" (595 mm) 21 9/16" (549 mm) Cut-out (4" x 22" / 100 mm x 560 mm) in the bottom of the cabinet for the cooktop must also be taken into account. For the more current specifications please visit the Miele website. 96
Installation diagrams Undercounter installation If installed underneath a cooktop, the installation instructions for power cord and ventilation Power cord with plug * Oven with glass front ** Oven with metal front Front design may vary depending on model. B 7/8" (22*/23** mm) 17 15/16" (455 mm) 21 5/8" 18 1/8" - 18 5/16" ( 550 mm...) A 4" (100 mm) 23 7/16" (595 mm) 21 9/16" (549 mm) Cut-out (4" x 22" / 100 mm x 560 mm) in the bottom of the cabinet for the cooktop must also be taken into account. For the more current specifications please visit the Miele website. 96


